
With amazing lenses, intelligent AF systems and shake-defeating technology at our disposal, your photographs should be as sharp as those from the four pros in this article.
So, if you’re striving for pictures that exhibit outstanding clarity and crispness but are falling a little short right now, this is where your photography takes a turn for the better. We talked with four leading pro photographers of different disciplines to give you an insight into how they set up and work, but first, let’s chat about the fundamentals of getting sharp photographs.
Start sharp to get sharp photographs
Taking pictures is a linear process and the ideal is to get everything right at each stage. So, if your pictures are consistently not up to expectations it makes sense to start at the beginning, and that’s you.
Take an honest look at your technique. Are your elbows tucked in and is your left hand supporting the lens? Are you stabbing the shutter button and jerking the camera or giving it a smooth press? It’s basic stuff but revisiting your technique won’t do any harm.
Next, look at your kit. It could be that the camera or lens has had a knock and needs a service, or the problem might be as simple as dusty lenses or poor-quality filters.
Avoiding the shakes
When it comes to ruined shots the biggest culprit is camera shake, but there’s help here in the form of image stabilisers, in-body and in-lens. They enable sharp stills at remarkably slow shutter speeds and they give smooth video footage when a tripod or other support is not available. But reliance on tech can lead to complacency.
If you haven’t tested your handholding skills, get your kit and venture outside for a real-life test. With the IS active, take shots from 1/60sec down to 1sec and at the extremes of your zooms. A close check of the results will indicate your handholding limits for general photography with different lenses.
Stop any movement with a fast shutter speed. Fujifilm GFX 50R, 120mm, 1/1000sec at f/8, ISO 400
While IS might mean sharp shots with slower shutter speeds, don’t forget a tripod or monopod. Supports might not suit everyone or every subject, but they are invaluable tools and allow shots that would otherwise be impossible.
With rapidly moving subjects, the choice of shutter speed is critical for sharp shots but it’s not all about fast speeds and you have to think about the effect you want. For racing cars 1/1000sec or 1/2000sec are good starting points. However, while your shots might ‘freeze’ a racing car, the result might look static. If you find this, use 1/500sec and panning to give a sharp shot with a sense of action.
Control the light for sharp photographs
While shutter speed is the priority for action shooters, the aperture comes first with landscape, macro and portrait photographers. People photographers like to shoot at wide-ish apertures so that the subject stands out from the background and this has the benefit of enabling fairly fast shutter speeds. Landscapers and macro workers prefer f/11 or f/16 to give plenty of depth of field and this means slower shutter speeds that require steady hands, effective IS or a tripod.
So far, we have talked about aperture and shutter speeds and balancing the two for sharp pictures and the pictorial effect you’re after, but we haven’t mentioned ISO, a very powerful feature.
In a low-light scenario, if the lens is at its widest aperture and the shutter speed close to or below your handholding limit, the next option is to set a higher ISO value.
In low light, set a higher ISO to allow smaller apertures or faster shutter speeds. The raw file was put through DxO PureRaw 2 to reduce digital noise Nikon D800, 15mm, 1/125sec at f/3.5, ISO 3200
This can be done manually but digital cameras have auto ISO so the speed is automatically changed when needed. The feature works with the camera’s native range, typically 100-12,800, and that is a potential issue. Quality at the higher speeds is less good, with poor colours, weaker blacks and digital noise breaking up detail.
To avoid disappointment, dig into the ISO menu and set an upper limit of ISO 1600 or 3200 to keep quality high and still give a reasonably fast, handholdable shutter speed.
Lens matters
High shutter speeds, impeccable technique and stabilisers count for nothing if you’re not making the most of your optics. Which aperture you use is often a creative decision, but the value used also has a fundamental impact on sharpness. See our guide to common lens problems and how to fix them.
Generally, lenses are not delivering their best at either extreme of the aperture range. At their maximum aperture, lenses give good crispness in the centre, but the image often gets softer towards the corners.
This improves with stopping down – even stopping down by one f-stop can produce an improvement, while many lenses are at their best at two or three f-stops from the maximum. As the lens approaches the minimum aperture (f/16, f/22) diffraction kicks in and this results in softer images; the smallest lens aperture always suffers the most.
Lens performance is crucial but irrelevant if the focus is off. Most of us rely on autofocus so it is important that the camera is correctly set up to suit the subject and how you like to shoot. Many shooters use single point or small zone AF and the focus joystick or touch AF. However, with very capable face/eye detect and subject modes, more and more people are happy to leave it up to the camera.
Finally, just a brief word on sharpening in editing. If you’ve brushed up on your capture technique you should be getting sharp shots that don’t need much help in software. If your shots aren’t quite sharp due to poor focusing, subject movement or weak lens performance, there are tools and softwares that can help with the problem, but the moral is get it right in-camera. Shooting crisp pictures is a habit and a good one to get into. Follow our advice and that of our four pros and get sharp.
Wildlife: Emma Healey

Emma Healey is passionate about wildlife, especially observing animal behaviour and capturing it with her camera. She loves creatures great and small and enjoys photographing insects too.
Her outfit comprises two Canon EOS R5 bodies, and her favourite lens is the EF 300mm f/2.8 used with an EOS R adapter. Emma works for specialist tour operator Wildlife Worldwide and over the past year has led client workshops to Brazil, Zambia, Botswana and most recently to northern Greece to photograph pelicans.
Emma’s advice for getting sharp photographs
Whenever I am leading a workshop, one of the first things I encourage clients to do is to get to know their camera and make it work for them. I think adjusting settings should be instinctive and you need to be able to alter them quickly by touch when the camera is up to the eye. It’s even worth practising camera handling in the dark. This will help you to get sharp pictures, as fiddling with settings wastes valuable time and risks missing the shot. In a hide, it means you can change settings quickly without having to turn on a torch to see what you’re doing.
I’m a control freak so I am always in manual exposure mode. I like to manually change ISO too but sometimes when there is a lot going on I will use auto ISO. In sunlight I use ISO 100-200 and change speed to suit the lighting, and my top limit is generally ISO 3200 at dusk or if the light is low. I am always checking the exposure readout in the viewfinder, and I would rather get a sharp and slightly dark image that I can adjust and fine-tune in editing.
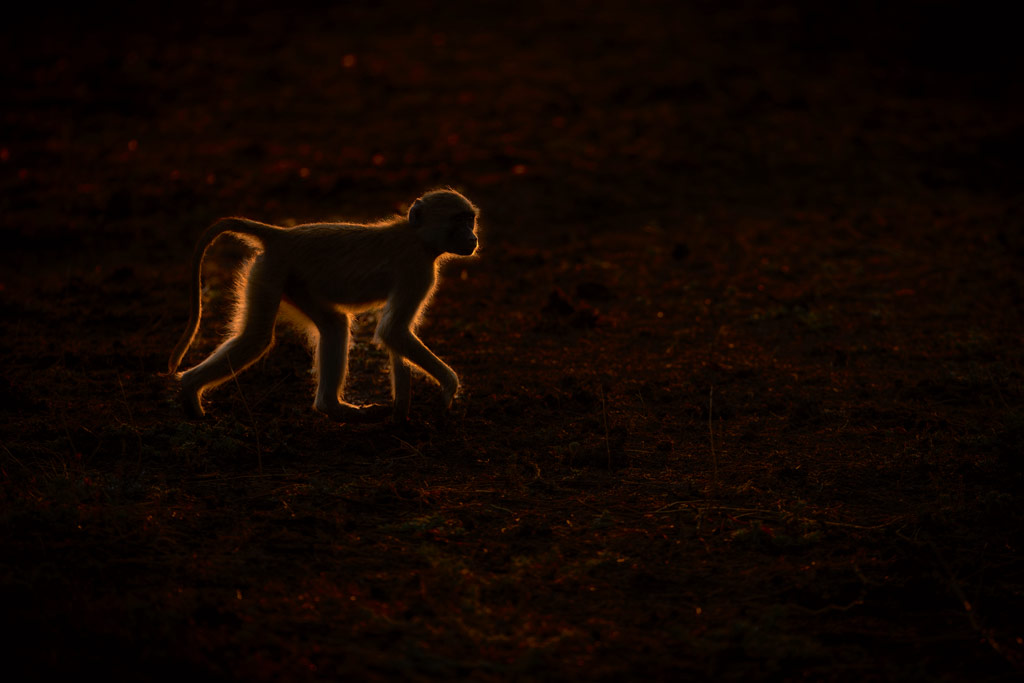
Advanced AF systems with subject detect can make accurate focus tracking a piece of cake. Canon EOS R5, 300mm, 1/800sec at f/3.2, ISO 1250
On location, I invariably have the EF 300mm f/2.8 on my EOS R5 with an adapter and generally have an aperture of f/2.8-3.2 set. F/3.2 is my safe space and that’s fine so long as I get the subject’s eye in focus. However, I have been shooting a lot at f/2.8 for the effect it gives where the eye is sharp and the even more shallow depth of field makes the rest of the scene look quite dreamy.
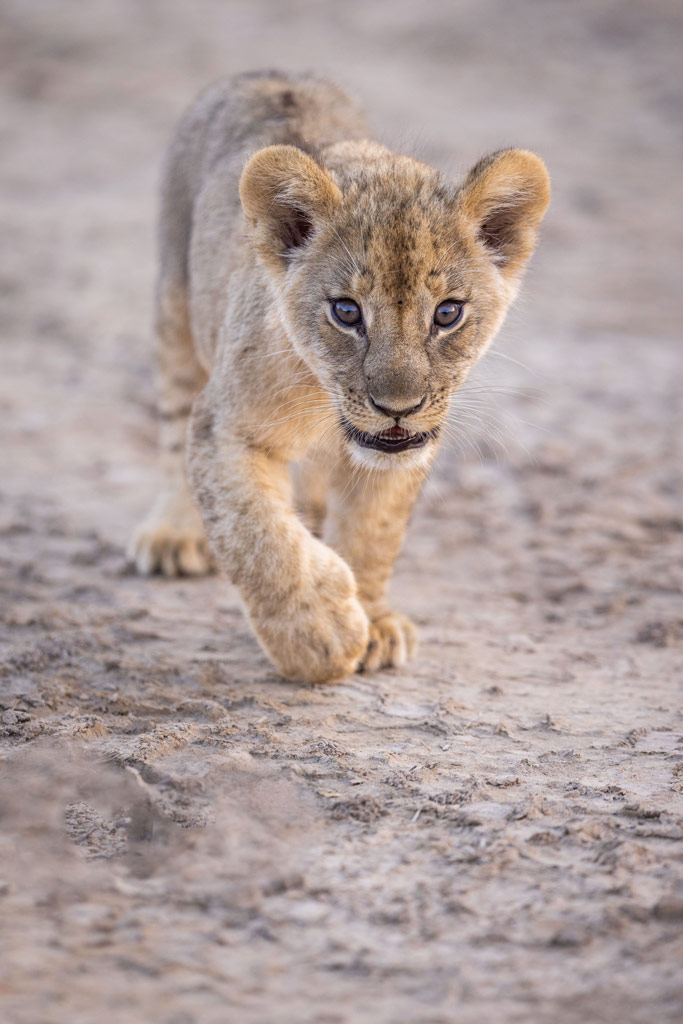
That is my normal approach but if I had a lion in front of me and I wanted its whole face to be sharp I would set to f/8. If I have the time, I would probably shoot at both apertures and pick the one I prefer later.
I’m lucky because I have steady hands so I can shoot at slower shutter speeds with no problem. I don’t tend to use tripods/monopods and find them restrictive because animals can move quickly and I don’t want to miss the shot.
Poor focusing here would mean this shot wouldn’t be worth keeping
Canon EOS R5, 300mm, 1/1250sec at f/2.8, ISO 320
The exception is when I’m shooting macro focus stacks, which I would rather do with a tripod when possible. However, I also do stacks handheld too.
I’ll sometimes use a slightly higher shutter speed than normal even in good light. So I’ll do some ‘safety’ shots at, say, 1/1250sec to make sure I’ve got some sharp ones before dropping down to around 1/500sec – this is even with the in-body image stabiliser working. Provided that it is reasonably still I can handhold the Canon EOS R5 and 300mm f/2.8 at 1/100sec. I’m not happy at that sort of shutter speed but I will if there’s no choice.
My focusing set-up is for back button AF so I have the AF-ON set to activate spot AF and the AE-L button for wide zone AF with eye detect/tracking. I use servo AF and on the EOS R5 either Case 2 or 3: for birds in flight it’s Case 2, and Case 3 for animals running around.
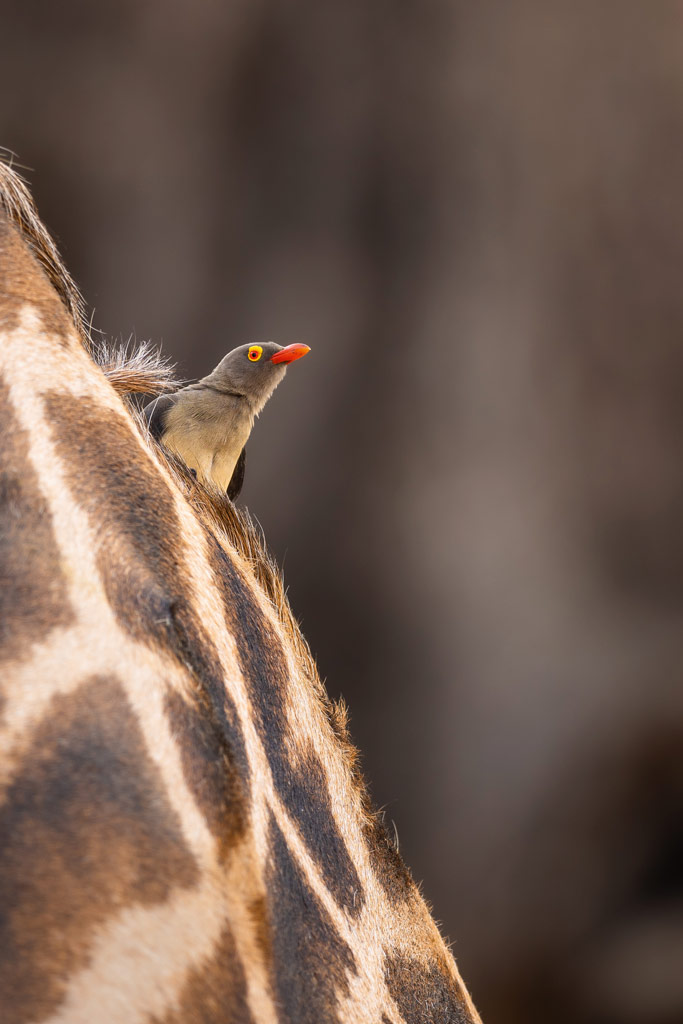
Shooting at wide apertures makes the subject stand out proudly from the background. Canon EOS R5, 300mm, 1/400sec at f/2.8, ISO 100
I will usually use eye detect/tracking unless I have a wild dog, cheetah or leopard in shot – these mammals have too many spots and confuse the eye-detect system so it’s best to stick with spot AF.
Canon’s animal eye detect was designed and developed for bird photography. It can often find a bird in a tree of sticks; it’s incredible. But you can have a leopard with big eyes in front of you and the eye detect will go to its ear or the tip of its tail. With a leopard, I will try eye detect first but if it doesn’t immediately pick up the subject’s eye I use AF-ON for spot AF and with the focus lever move the AF point to the part of the scene I want sharp. There was a firmware update that was meant to improve this but it still needs work.
Macro: Geraint Radford

‘I class myself as a nature photographer with a macro lens,’ wildlife pro Geraint Radford says. ‘While I love insects, I know not everyone does and I want everybody to get into nature photography, whether it is flowers, fungi or bugs.’
Geraint is an OM System ambassador and uses the OM-1, mostly partnered with the 60mm macro lens and FL-1900R flash.
Geraint’s advice for sharper photographs
For getting sharp macro shots, stability is probably the most important thing and that is easier if your gear doesn’t weigh a lot. I use the OM System OM-1 with 30mm f/3.5 and 60mm f/2.8 macro lenses.
I always shoot handheld. I am blessed with steady hands, and can handhold the 60mm macro lens very close to the subject at 1/10sec – and that comes from familiarity with the kit and constant practice. Also, I shoot handheld because I have developed my shooting style to get in, get the shot and move on and that disturbs the subject less. It keeps you moving and exploring too.
I’ve tried tripods but they don’t suit my working style. I like the adventure of taking my camera out and spontaneously shooting what’s happening without having to set things up. Besides, the OM-1 with its 8EV benefit IBIS system is so stable that it’s almost like shooting on a tripod.
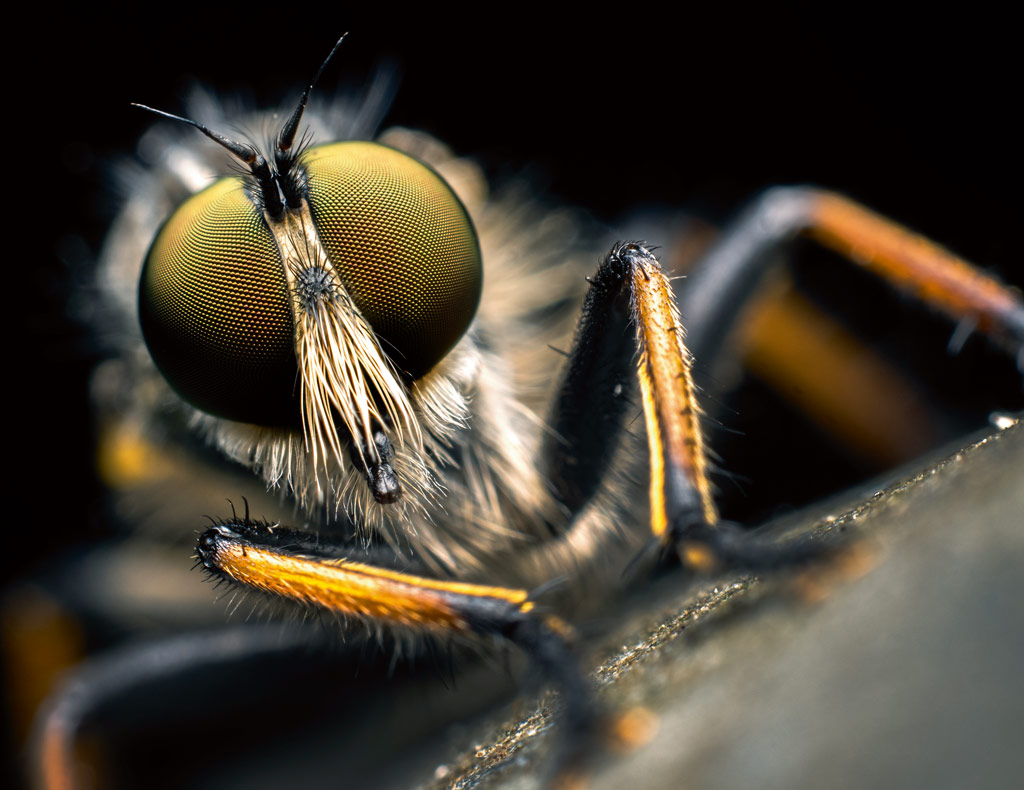
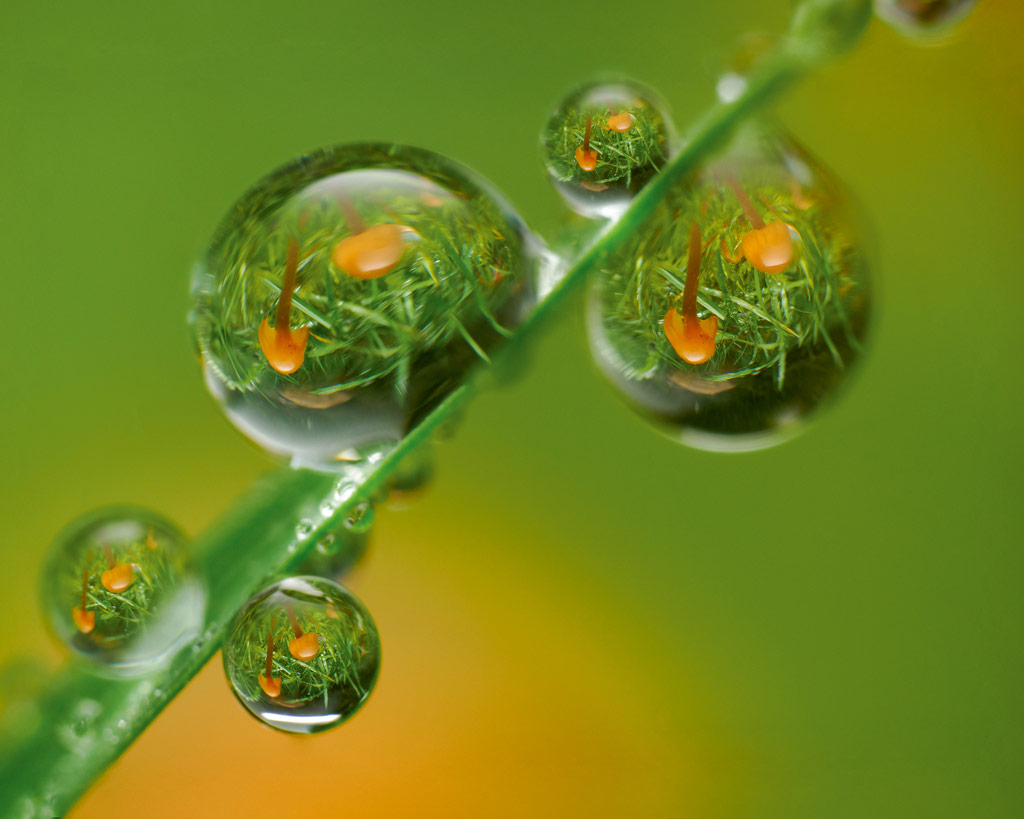
Depth of field decreases as you get closer to a subject which makes focusing really critical for close-ups like this of a robber fly. Olympus OM-D E-M1X, 60mm, 1/250sec at f/6.3, ISO 200
I tend to get the story and composition first and then find focus and worry about detail. You can have a very sharp picture but if it is badly composed and not nice to look at, all it has is sharpness. One of my favourite images that kickstarted this journey is of a springtail shown here. It is tiny, literally 1.5mm, and I shot it from underneath a leaf and behind that leaf is a fungi that is 0.5mm.
To get those two subjects sharp in one shot is impossible. So I did a focus stack of the fungi first, pulled the camera back, and waited for the springtail to come into shot and then photographed it. Blending those elements was a challenge but I got the story.
In terms of set-up, I have the AF-ON button set to continuous AF and the shutter button to release only. For single shot AF, one touch of the AF-ON button brings the shot into focus.
The mix of sharpness and blur combines brilliantly for this close-up
Olympus OM-1, 60mm, 1/50sec at f/6.3, ISO 500
I use the smallest single focus point so I can be really clinical with focus. I can shoot an insect through blades of grass for soft out-of-focus framing and the OM-1 is so stable the AF doesn’t hunt. I use autofocus unless I’m at very high magnifications. With extension tubes or the Raynox DCR-250 close-up lens, everything is manual, even focus stacking.
I prioritise focus stacking over focus bracketing because it eliminates any doubt. The camera shoots up to 15 raw files, which are retained, and quickly blends them together to give a JPEG. I check the stacked preview carefully and if the camera has blended it successfully, I know when I process the raw files in Photoshop later that it’s definitely going to work; and knowing that in the field is a massive advantage. It saves me shooting hundreds of shots hoping for the best.
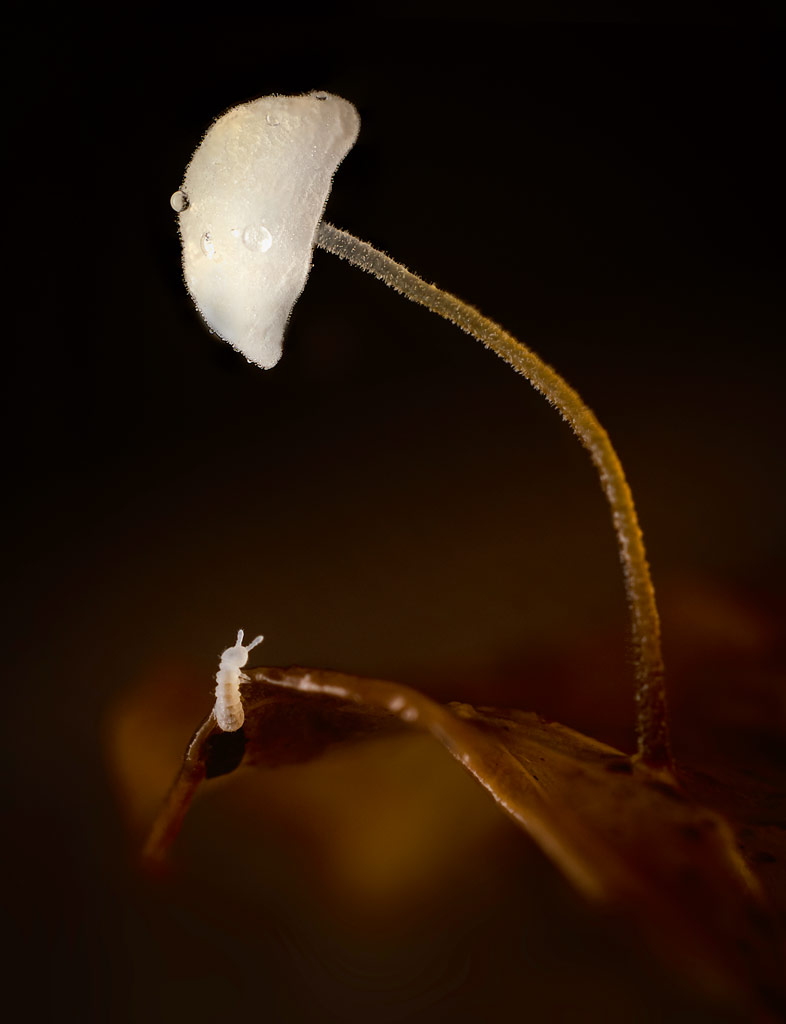
Focus stacking makes this springtail and fungi shot possible. Olympus OM-1, 60mm, 1/125sec at f/6.3, ISO 400
For me, focus stacking is a creative feature as well as a technical one. It can be used to gain depth of field, but also to limit it. Say you’re shooting a flower. To get the flower sharp you’d use f/11, but that means the background is quite distinct. With stacking you can limit where the depth of field ends so you can use f/2.8 with up to 15 frames to get the flower sharp against a blurred background.
In a typical scenario with an insect on a flower I go for 15 frames with a differential setting of five which is a nice happy medium provided I can set an f/stop for enough focus to cover that differential. I usually stack at around f/5.6.
Finally, shooting handheld macro, flash is your best friend. I use the OM System FL-900R speedlight. It recycles fast enough for focus stacking, but I use it responsibly because subject welfare is important.
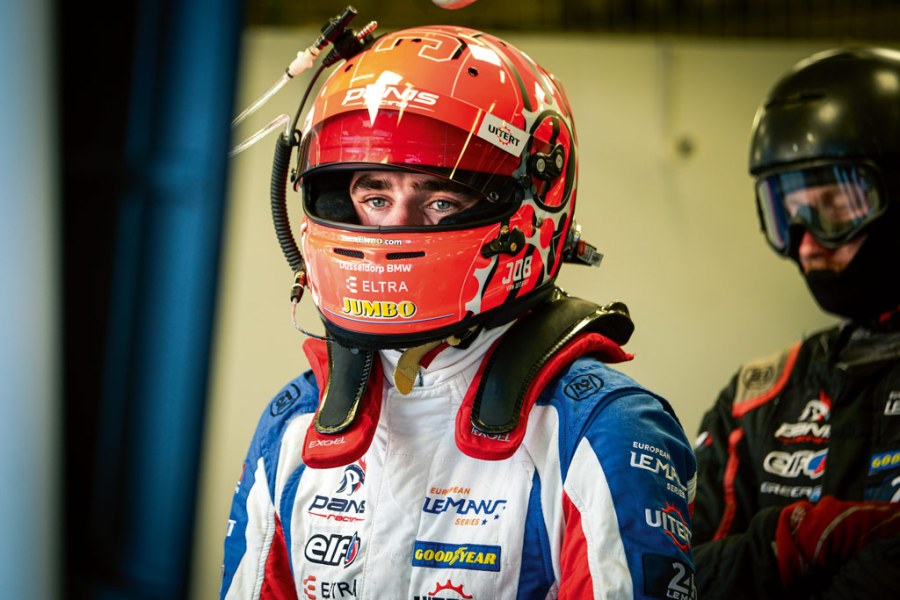
Action: Jeff Carter

Jeff Carter has over 25 years’ experience as a pro photographer specialising in motorsports although he is known for his commercial and fine art work too. Since 2009 he has worked for the FIA (Federation Internationale de l’Automobile) providing stills and video for its website and social media feeds.
He was a Fujifilm X-photographer from 2015 until 2022 and helped the brand with the development of its X Series system and continues to work with the company. His current outfit includes the Fujifilm X-H2 and X-H2S.
Jeff’s advice for sharper photographs
The first thing with any genre of photography – and especially action – is get to know your camera system inside out. If you’re there looking through menus thinking what to do, you’re not concentrating on what’s going on in front of you. Using your camera should be instinctive and everything should be set up for the genre you’re shooting. It’s the biggest step to getting sharp images.
I’m not averse to bumping up the ISO to get the required shutter speed and the noise performance of the Fujifilm X-H2 and X-H2S is remarkably good. It’s a very different situation from a few years ago when I was shooting rugby at Murrayfield using the X-T2 with the 100-400mm lens. I was at ISO 12,800 and the results were grainy, but I needed the high ISO to get 1/1000sec. When I bought the Fujifilm 200mm f/2 I could shoot at ISO 1600 which was so much better.

It is essential the eyes are pin-sharp in people shots. Fujifilm X-H2S, 50-140mm, 1/60sec at f/2.8, ISO 160
Which shutter speed I use depends on the shot I am going for. Panning is something I do a lot. I start with a shutter speed of 1/125sec and go slower from there. But this is the arty stuff I do after I have the sharp shots the clients want and at races such as Le Mans I have plenty of time.
For sharp head-on car shots, I use a minimum of 1/1000sec, maybe 1/2000sec or 1/4000sec. Being able to do this without increasing ISO is the beauty of having a fast-aperture lens.
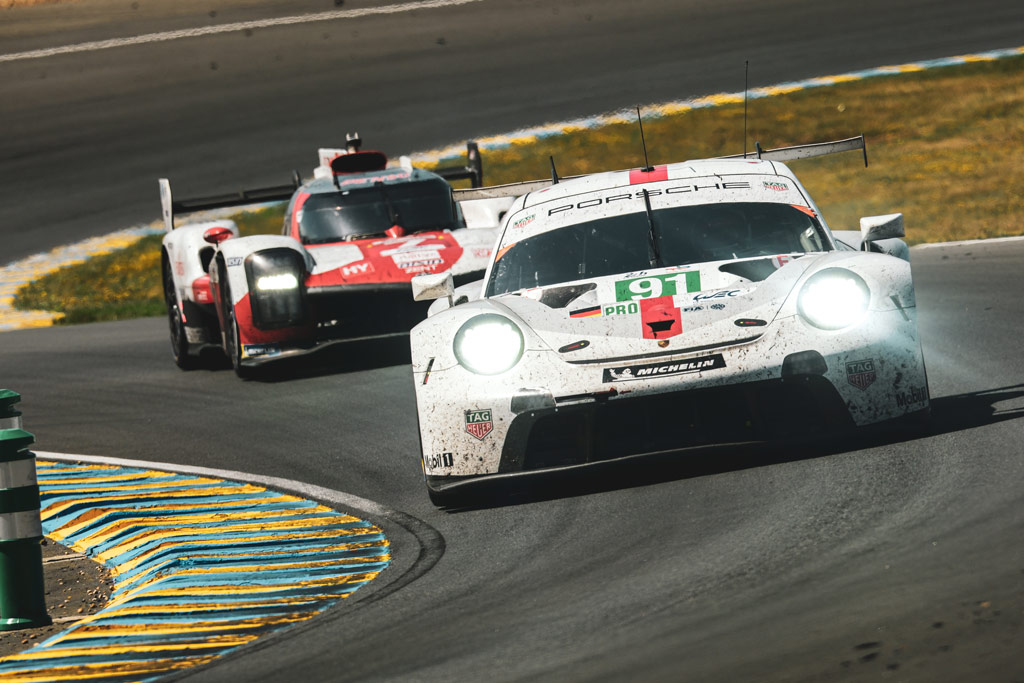
With cars hurtling towards the camera at over 130mph, accurate focus, fast continuous shooting and a 1/2000sec shutter speed all help to get sharp shots
Fujifilm X-H2S, 200mm and 1.4x teleconverter, 1/2000sec at f/2.8, ISO 800
The autofocus on the Fujifilm X-H2 and, in particular, the Fujifilm X-H2S is lightning-fast. In all honesty, I thought Fujifilm AF was slightly behind the game compared with Canon and Sony, but I feel Fujifilm has caught up and the X-H2S is now Sony-good. I did a test at 40fps using the camera’s electronic shutter – normally I use the mechanical shutter – and shot a car coming towards me doing over 130mph and the 200-odd shots in the sequence were all sharp. I was impressed with that.
As a car approaches, I aim the AF point on the windscreen sun strip that the cars I shoot have. I’m mostly on single point, sometimes the 3×3 zone, and move the point around as needed. I’m always aware that the AF system can misbehave at critical moments, so I tend to be old school and put the focus point where I want it.
The AF can struggle with cars coming towards you with their headlights on or with reflections off the windscreen. Such occasions can throw the AF off, but it’s only for the odd shot and if the camera does lose focus it’s reacquired quickly.
At night, with cars coming straight towards me the AF will be all over the place so it’s over to manual focusing. I just focus on a bollard or something at the side of the track and shoot just before the car gets there.
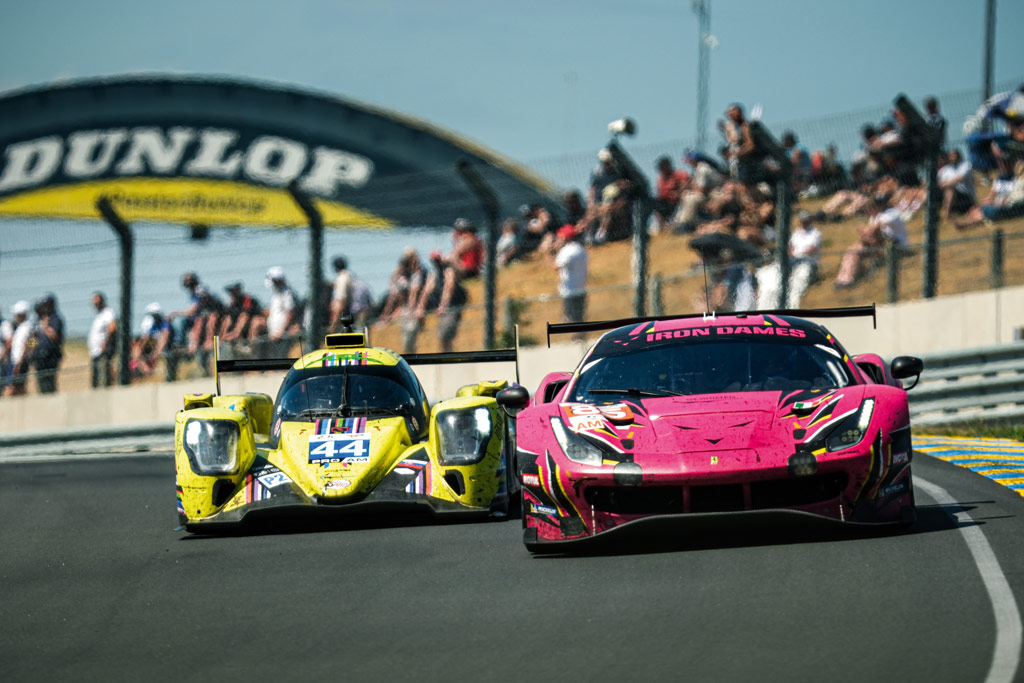
I try not to show any wheels because shooting at fast shutter speeds the wheels are frozen and the cars look like they are parked even though they are doing 130mph. So, to show speed when shooting head-on I have cars side by side or one just slightly behind the other; a single car on its own won’t look good unless there is something going on.
Landscapes: Nigel Danson
Pro landscape photographer Nigel Danson is a long-term Nikon user and currently uses a Nikon Z 7II for stills and a Z 6II for video. The duo is supported by three lenses, the 14-30mm, 24-120mm and 70-200mm. On location he also takes a drone and a Benro Mach 3 tripod.
Nigel started his YouTube channel six years ago after a near-fatal car accident in Yosemite National Park; he now has 436k subscribers and new videos are posted every Sunday.
Nigel’s advice for sharper photographs
There’s so much more to picture sharpness than using lenses at their best apertures, so I’ll start by saying that people get carried away with sharpness and don’t concentrate enough on composition, telling a story, the light and all the other things that make a great image.
The equipment and how many megapixels you have is obviously key. If you define sharpness by how large you can print an image then megapixels are important. It’s less critical if you define sharpness by how good it looks onscreen. I took the sunrise shot shown here 16 years ago on the Nikon D200 and it is sharp and just 10.2MP.
What is important is lens quality. If you want the sharpest image, a prime lens will give better quality compared with a zoom. I have a 50mm f/1.8 and if I took a shot at f/5.6 and did the same at 50mm on my Nikon Z 24-120mm, the 50mm prime will definitely be sharper. But the 24-120mm is versatile, and the ability to get the shot and tell the story matters.
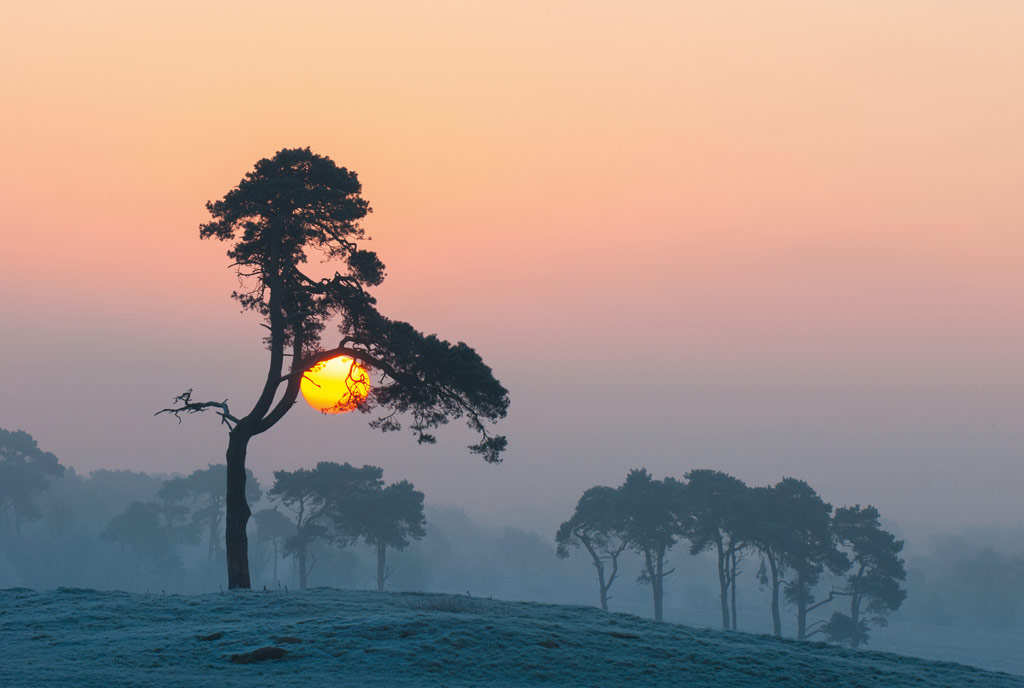
Taken on a 10.2MP Nikon D200, a low-resolution camera compared with the latest models but it’s still pin-sharp. Nikon D200, 70-200mm, 1/60sec at f/8, ISO 100
You should also understand the characteristics of your lenses. For instance, if you are shooting a lone tree across a valley with a 100mm lens, you’re better off on most current lenses shooting at f/4 rather than f/8 or f/11 because modern lenses are best at wider settings and get less sharp as they are stopped down.
Then it comes down to how you use your equipment. In an early morning shoot the shutter may be 1/2sec or slower, so you need to have the camera on a tripod, and then there are techniques around that.
Nikon cameras have an exposure delay mode which takes the picture a set time after the shutter release has been pressed. I use it to avoid camera shake; on other brands you can use the self-timer.
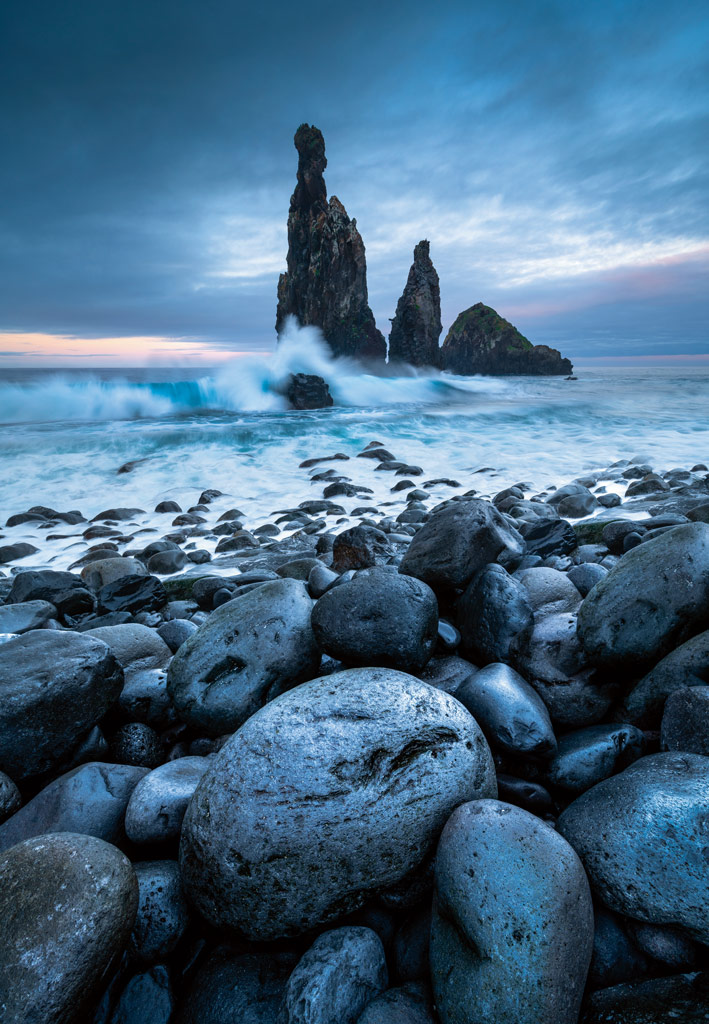
Learn to control depth of field for supreme front-to-back sharpness. Nikon Z7, 14-30mm, 1.6sec at f/14, ISO 64
A big mistake many tripod users make is pressing the shutter button for a one-second exposure, but by doing that they are shaking the camera. It is easily avoided by using a timer or wireless remote. One technique I employ when I am shooting around 1/15sec is using the touchscreen monitor to take the shot.
With seascapes accurate timing is essential and this method means you can time the shot and be precise with focusing, which brings me on to one element of photography that I see a lot of people struggling with, depth of field. Most of the time in scenics you want everything sharp, so depth of field control is key.
I understand depth of field and the characteristics of my lenses. I know if I shoot at 24mm at f/10 everything is sharp if I focus at a certain point. A good tip is to use an app like PhotoPills that tells you the depth of field for your camera and focal length at a given aperture when focused at a certain point.
A really useful technique that I use a lot is focus stacking. Often, I’m using a wide lens so that means there’s more in focus in the first place but if I stack, I will take two shots to merge in Photoshop. If I am unsure then I will take shots focused on the foreground, midground and background so I have all the essential data.
Advanced focus modes are important with subjects such as wildlife. With landscapes I use single spot AF and manually pick where I am going to focus.
In editing, I think people get carried away and apply too much sharpening and that creates an artificially sharp image. Use a little sharpening in post but don’t overdo it.
Further reading
Get started with wildlife photography
Best-value macro lenses for mirrorless and DSLR
How to capture fast-moving birds and animals
Follow AP on Facebook, Twitter, Instagram, and YouTube.


