
There are no perfect lenses. Even top-quality lenses have little issues and imperfections that become obvious once you know what to look out for. Angela Nicholson explains the common lens problems, how they happen and what you can do about them.
We tend to get very excited about cameras and all the features they offer, but the lenses that you use on them are at least as important. And while we might upgrade from one generation of camera to another, our lenses often stay with us for longer because we use them on each successive camera. That means that it’s well worth looking after your optics and learning how to get the very best from them with our top tips.
How to fix common lens problems
1. Keep it clean
Lenses constantly pick up dust on their front (and rear) elements. A little bit of dust on the front or rear element of a lens isn’t a major issue, but if it’s allowed to build up or if you get water droplets, fingerprint smears or more significant deposits of dirt on them, you won’t get the best results – flare can become more of an issue and the autofocus system may even start to struggle. Fortunately it’s easily dealt with, but as with most cleaning jobs, it’s best done on a regular basis so it’s a small job rather than a major undertaking.
If you’re not quite sure what camera cleaning products are best, why not take a look at our Camera cleaning products guide.
Get into the right habit
It’s not difficult to clean a lens but it is very easy to forget to do it, so my first tip is to try to get into the habit of having a quick look at the front and rear elements of a lens at the start of every shoot and giving them a wipe. If you’re out for the day with your camera, it’s a good idea to aim to check your lens occasionally because there’s been many occasions when I’ve discovered that my initially clean lens has received a smattering of pollen or a splash of mud from a shaking dog.
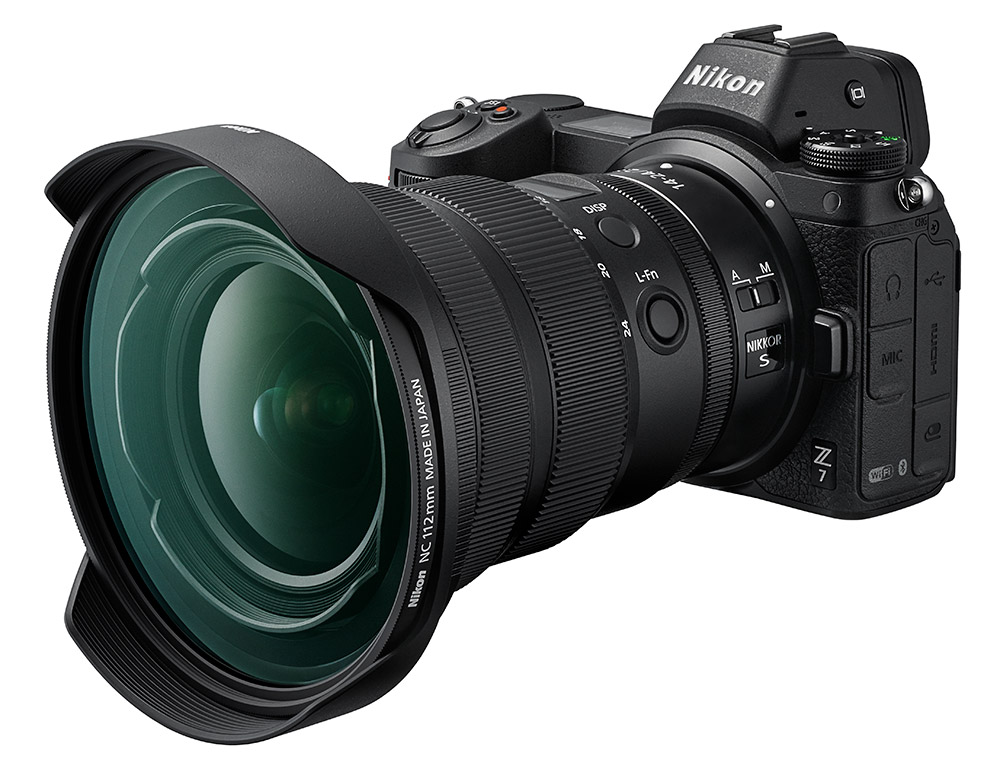
A lens hood is a sensible addition to any lens but it’s vital for an ultra-wideangle
You should also check the rear element of a lens before you mount it and if necessary give it a quick blast with a bulb blower, run a brush over it and give it a wipe with a clean lens cloth.
Don’t use your t-shirt
These days, just about every coat or jacket that I wear, and every camera bag, has a lens cloth in a pocket. That way, I’m never without a decent cleaning cloth, so I don’t have to remember to take cloths with me and I can clean my lenses wherever I am without resorting to a tissue or the edge of my T-shirt. After every shoot, or at the end of a day out with your camera, it’s a good idea to take a careful look at your camera and lenses and give them a clean. This is particularly important if you’ve been in a dusty environment, at the coast or out in poor weather.
Microfibre cloths are the best at picking up grease and dust, but you can also get ‘lens pens’ with a brush on one end an a dust-collecting pad on the other.
2. Cut out flare
Flare shows up as streaks of light across your image or a general loss of contrast if you’re shooting into the light. Moderns lenses have sophisticated coatings to reduce ghosting and internal reflections, but flare can be an issue when light passes across the surface of the front element of a lens and starts bouncing around all the elements inside. It’s a particular issue with wideangle optics as their field of view means there’s greater chance of the light source being in the frame. If you’re lucky, it can look quite attractive in an image, adding a touch of sparkle and creating a suggestion of sunshine.

Flare can introduce unusual colours and hotspots to images; the best solution for this lens problem here would be to shoot from another angle so the leaves obscure the sun
However, flare can also lower the contrast of your images, cause problems for the autofocus system and even introduce strange colours and hotspots across your photographs. The easiest way to avoid flare is to fit a lens hood on the end of your lens. It works in the same way as the peak of your cap or your hand when you hold it up to shield your eyes. In other words, it prevents side or top lighting from passing over the front element.
Reposition yourself
However, if the sun or other light source is in the frame, a lens hood can’t cut it out and the only solution is to change the shooting angle or move the light. Sometimes it only takes a slight shift in your position to put the sun behind a branch and eliminate the problem.

Sometimes a little flare can inject extra interest to your image. In this case it also shows where the sunlight is coming from
Even if it’s not sunny, it pays to keep a lens hood on when shooting as it can protect the front element from knocks and keep raindrops, mist and water-spray away. It will help your lens stay in good condition for longer.
3. Avoid diffraction
Diffraction is an optical effect that starts to reduce sharpness at progressively smaller les apertures. As a broad rule of thumb, it can start to become visible at around f/11-f16 on full frame cameras, f/8-f/11 on APS-C cameras and f/5.6-f/8 on Micro Four Thirds. It depends a lot on the lens, but these are the apertures where you might want to take it into account.
Avoid the smallest aperture settings
Even the best lenses are better at some apertures than others and it’s useful to spend some time finding out which setting is sharpest. Try to avoid the very smallest aperture settings as, although the depth of field is the most extensive, diffraction can become a significant issue. Diffraction is the softening of the images caused by the light waves bending as they pass over the aperture blades. The smaller the aperture, the greater the proportion of light being bent, so the more significant the bending and softening. It means that even the point of focus doesn’t look as sharp as it does at the optimum aperture.

Using a mid-range aperture such as f/8, is usually a safe bet for good detail levels
To find a lens’s optimum aperture, shoot a series of images at every aperture setting and then check the results to find which setting gives the sharpest images. To do this, mount it on your camera on a tripod and set the sensitivity to ISO 100 or 200 to ensure the best image quality. Then focus on a flat subject with plenty of detail and, in aperture priority mode, take a shot at every aperture setting using a remote release or the self-timer to avoid any shake.
Testing a zoom lens
If you’re testing a zoom lens you should shoot at each aperture setting at every marked focal length. Start with the shortest focal length and shoot at every aperture before zooming to the next marked focal length and shooting at every aperture again. Keep doing this until you’ve shot at all the marked focal lengths. In an ideal world, you would shoot with your lens at a range of distances from your subject, starting with the closest focus point, then moving to a more standard range and then from somewhere further away.

Macro lenses are usually designed to give the best results at close focusing distances and comparatively small apertures
Alternatively, just shoot from the distance that you most commonly use the lens. With a macro lens, for example, this is likely to be near to the closest focusing point while with an 85mm portrait lens, you should be around 3m or 4m away if you use it for head-and-shoulder shots. If you’re testing a long telephoto lens, you’ll want to be even further away.
4. Fix distortion

Without correction, shooting close with a wide-angle lens can cause straight lines to bend like a banana
Almost all lenses exhibit some degree of distortion, especially zoom lenses. Often it’s corrected in-camera or automatically by your software, but you can still expect to see it quite often.
Barrel distortion makes a scene look like it’s been printed on a balloon that has then been blown up so that lines that should be straight are curved outwards at the middle. It’s most commonly seen with wideangle lenses used close to a subject, so a simple solution is to step further away from the subject and use a longer lens. Conversely, pincushion distortion makes straight lines bend inwards around the middle – imagine pressing the centre of a cushion.
It’s more commonly seen with telephoto lenses, but it doesn’t tend to be quite so dramatic as barrel distortion. These days, thanks to in-camera and software correction profiles, barrel and pincushion distortion aren’t as problematic as they once were. However, when images still need a little help, software such as DxO Viewpoint 4 is very handy and easy to use, or the Perspective Efex plug-in in the DxO Nik Collection.

Corrected
5. Correct converging verticals
If you’ve ever photographed a tall building with a wideangle lens and tipped the camera up to include the roof, you’ll have noticed that the top of the building looks a lot narrower than the bottom. This phenomenon is known as converging verticals and it happens because of perspective distortion. Used creatively and deliberately, it can be a useful way of adding drama to an image, but when the camera is tipped up a little, it can make the building look like it’s toppling backwards.
How to avoid converging verticals
There are two ways to avoid converging verticals at the shooting stage; the first is to move further away from the the building (and use a longer lens) so you can get it all in the frame without tipping the camera upwards. The aim here is to get the sensor or film in the camera parallel with the front of the building so there’s no perspective distortion. The problem with moving further away for a subject is that you may find more objects such as lamp-posts, people and traffic get in your way.
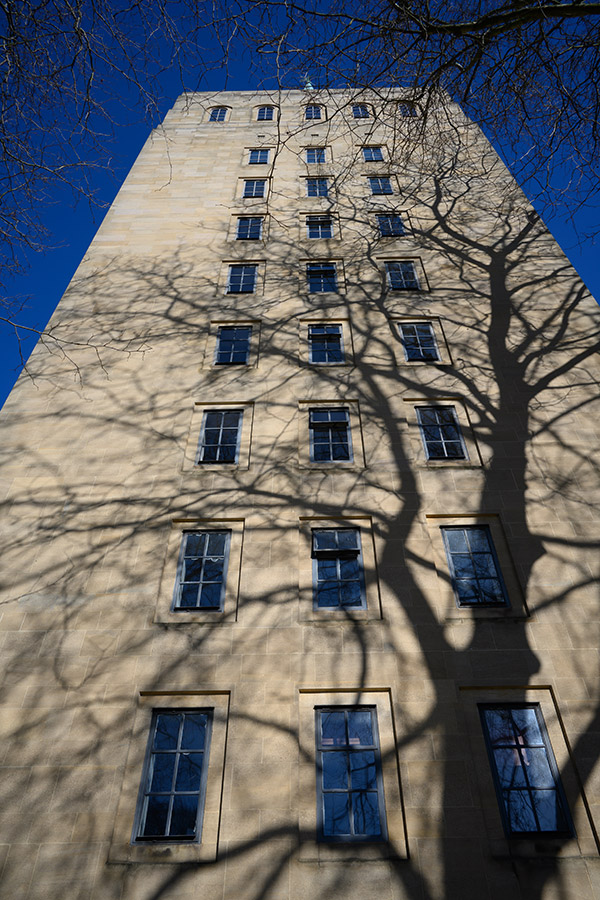
Using a 28mm lens on a full-frame camera and tipping the camera up to capture the shadow of the tree has resulted in converging verticals in this image, but it adds a dramatic sense of scale
Professional architecture photographers often use a tilt-and-shift lens because these allow them to stand close to a building and use the shift adjustment to move the lens upwards relative to the sensor to get the top of the building in the frame without tilting the camera. However, these lenses are expensive, making them less popular amongst enthusiast photographers.
Converging verticals can also be corrected relatively quickly and easily in post-capture processing software such as Adobe Camera Raw, Photoshop or Lightroom, or DxO Viewpoint 4. However you decide to make the correction, it’s important to keep in mind that the image will be cropped to remove blank areas resulting from the correction.
6. Reduce vignetting
Vignetting is that darkening of corners that you sometimes see in images shot at wide apertures, especial with wideangle lenses. This can sometimes be reduced by turning on a camera’s in-built vignetting correction; however, another option or to reduce it even further, is to close down the aperture by a stop or two. Naturally, reducing the aperture size comes at the expense of a reduction in the shutter speed (unless you increase the sensitivity setting) and an increase in the depth of field.

Vignetting doesn’t usually get more dramatic than this from the Funleader 18mm F/8 Cap Lens. In this case you have to learn to live with it
Most editing packages offer a vignetting correction control but they usually have to be used sparingly because the corner brightening also reduces the colour saturation which means you end up with pale corners rather than dark ones. DxO’s PhotoLab 6 uses data gathered from detailed image analysis for specific camera and lens combinations, so it’s a good choice.
7. Avoid focus distractions
While modern AF systems are reliable, they may not work well if there are objects in front of or behind the intended target. That’s where the focus limiter switches found on some telephoto and macro lenses come in handy because they restrict the distance range that the lens will focus within. The Olympus M. Zuiko Digital 300mm f/2.8 IS Pro, for example, has a focus limiter switch that can restrict the focusing to between 1.4m and 4m, 1.4m and infinity, or 4m and infinity.

It’s helpful to limit the focusing distance in situations like this when the camera and lens may attempt to jump to the foliage in the foreground
The latter setting prevents the lens from focusing closer than 4m, handy if shooting through grass or bushes. Similarly, the Sigma 105mm F2.8 Macro EX DG OS HSM has a focus limiter switch with settings marked Full, 0.45m-infinity and 0.312-0.45m. The last option is useful for close-up and macro as it stops the lens from focusing on the background by mistake.
Another way of helping to keep the focus where you want it is to use the AF stop button that appears on some lenses. This is especially useful in continuous AF mode when you can see that something is going to come between the camera and the subject so the subject is about to briefly disappear from view. Pressing the AF stop button disengages the focus system for a moment so that the lens doesn’t focus on the wrong object. Then, when you’ve got a clear view of the subject again, you can release the button to enable the lens and camera to keep it sharp.
8. Check your DSLR’s focus calibration
Because DSLRs use a dedicated autofocus sensor when the viewfinder is used to compose images, there can sometimes be focusing errors caused by mismatches in the manufacturing tolerances. If the alignment of the imaging sensor and the focus sensor in the camera is towards the edge of its tolerance, and the lens’s calibration is toward its limit in the same direction, it can add up to the lens focusing a little behind or in front of the subject. It’s not an issue for mirrorless cameras (or DSLRs in live view mode) because the imaging sensor is used to inform the camera’s autofocus system.
Fortunately, this mismatching can often be corrected using the calibration system that is found in most enthusiast and high-end DSLRs. What’s more, it doesn’t produce a global shift in the focus response, it’s actually done for individual lenses. It can be done at home or at a service centre, but it means you’ll be without your camera and lens for a few days.

There are AF calibration targets like this one from Andrew R Lawn. It’s available for free from www.squit.co.uk/photo/files/FocusChart.pdf
First things first
The first step in calibrating your DSLR’s autofocus system is to mount the lens that you have the problem with and find a subject with plenty of detail that you can shoot at around 45° on. Alternatively, you can buy a dedicated calibration target like the Datacolor SpyderLensCal for around £53, or search the internet for a downloadable pattern. Andrew R Lawn makes a good one that’s available for free at www.squit.co.uk/photo/files/FocusChart.pdf.
Then, with your camera mounted on a tripod and the widest aperture selected to minimise depth of field, use the central focus point to focus at the mid-point of your subject or calibration target and take a photograph.
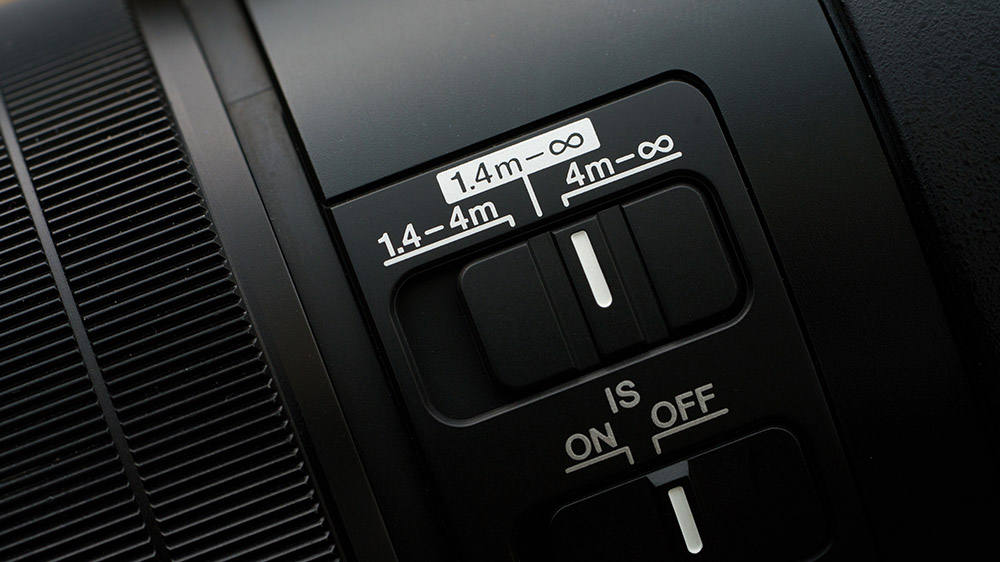
The focus limiter usually allows you to set the focus range to the complete range and one or two more restricted ranges
Next, open the image on your computer and with the image at 100% on screen, check if the focus is in front of or behind the intended focus point. Now find the calibration option in the camera’s menu – Canon calls it AF Microadjustment while Nikon calls it Auto Focus Fine Tune – and follow the on-screen steps, dialling in some focus adjustment. Once that’s done, shoot the calibration target again and check the image to see if the focus is at the correct point. If not, adjust focus again until spot-on.
9. Use modern manual focus aids
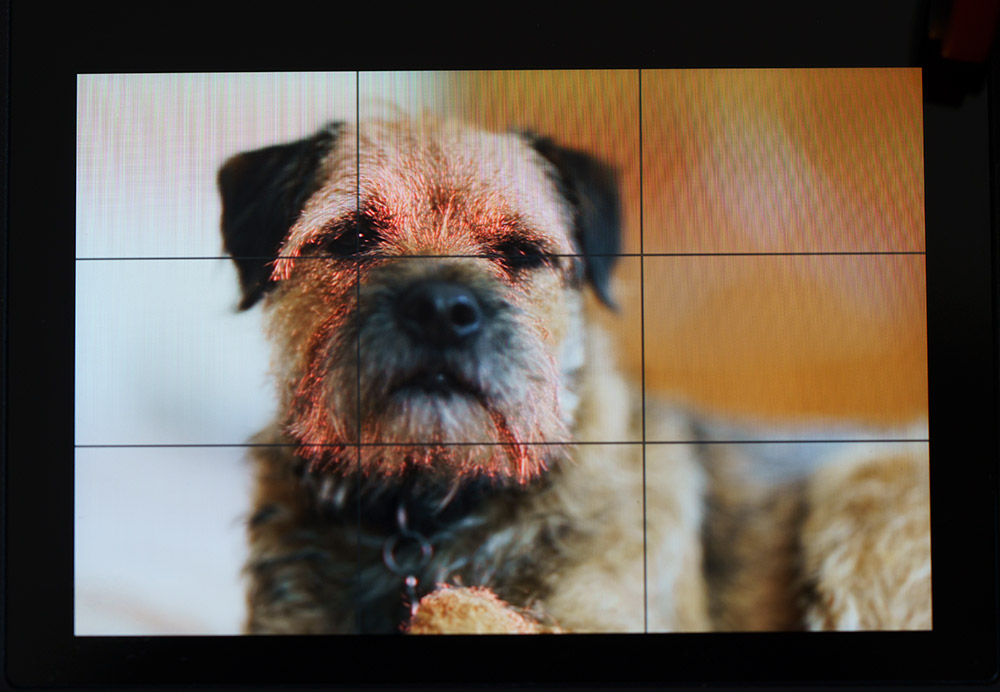
Focus peaking, shown here in red, is a useful tool for focusing manually in live view mode or on a mirrorless camera
If you use a DSLR in live view mode, or you’re shooting with a mirrorless camera, it’s usually possible to magnify part of the scene so you can see more detail.
Focus peaking is another useful tool that can help you get the focus just where you want it. It highlights the areas of strongest contrast (usually the areas in sharpest focus) and as you rotate the focus ring, you see the highlights move through the scene. You can usually select a small selection of colours for the focus peaking highlight. Red stands out from most scenes, but if I was photographing a red rose, I’d probably switch to yellow or white.
10. Remove chromatic aberration
Chromatic aberration is the colour fringing you sometimes see around object outlines, especially near the edges of the picture. It’s a very common lens problem. It is caused by a lens’s inability to focus different wavelengths of light at the same point. Fortunately, modern optical designs means this is less of an issue than it used to be, but you may still see the odd purple or cyan fringe in high contrast images.
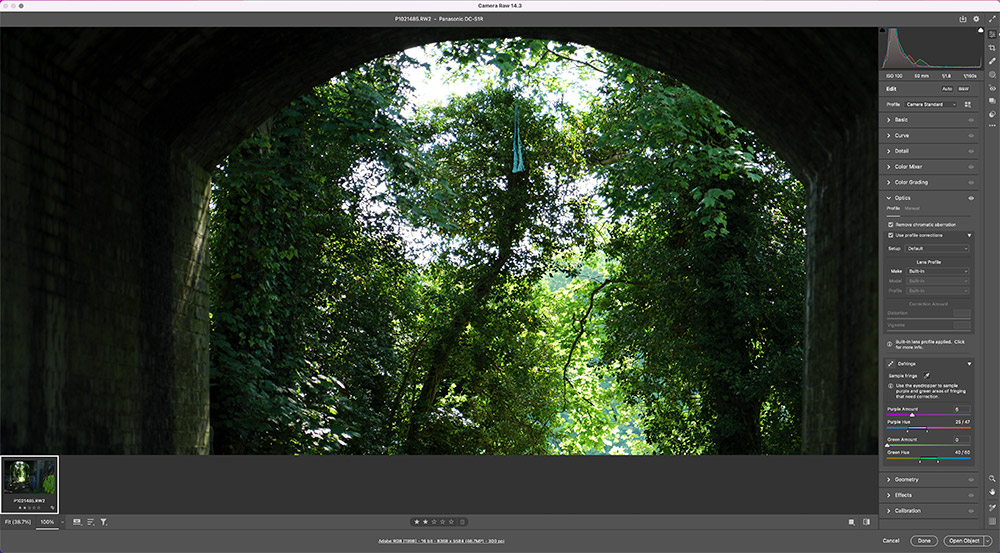
Even quite dramatic fringing can be removed with just one click of the Defringe tool in Adobe Camera Raw
In most cases, this can be dealt with very easily using image-editing software. In Adobe Camera Raw and Lightroom, for example, there is a simple chromatic aberration removal checkbox which often does the job in in an instant, but also a more powerful Defringe tool where you just click on the offending coloured fringe (it’s usually best done at at least 100% magnification) to make it magically vanish.
All images: Angela Nicholson
Further reading:
- 30 common photography problems solved
- How to fix wide-angle lens distortions for good
- 20 ways to get more from your wide-angle lenses
- Camera maintenance: how to clean your camera and equipment
- Beginners guide to lens types and choices
Follow AP on Facebook, Twitter, Instagram, and YouTube.