
Amateur Photographer verdict
A slick, feature rich and cutting edge image editing software. If you want the best and think you need the wealth of features, and you can commit to learning them Photoshop is the way to go.- Powerful new AI tools
- Industry-standard photo editing
- Entire ecosystem for sharing and collaborating
- Subscription only
- Steep learning curve
Photoshop has been at the forefront of digital imaging for 33 years, and remains one of the best image editors available. The breadth of features, cutting-edge AI tricks and industry standard tools put it at the top of the image-editing pile. But it’s a pile that gets better every year.
Adobe Photoshop 25.4 at a glance
- The industry standard photo editing program used by professionals and amateurs
- Incredible depth of image editing and graphic design tools
- Includes Camera Raw as a raw editor (as well as Lightroom)
- Subscription model at $9.99/£9.98 per month for the Creative Cloud Photography Plan
- Regular updates and cutting edge AI tools
- Mac or Windows
Photoshop has stiff competition from other excellent tools like Affinity Photo, DxO PhotoLab and Capture One, which all – unlike Adobe – offer a one-off purchase rather than a subscription-only model.
The subscription model may divide opinion but it does mean updates are included, and Adobe regularly comes up with the goods in this department. The most recent updates include Generative Fill and Expand, two tools that harness the power of generative AI to create objects, images and extra details. New Lens Blur and Point Color features have also been added to Camera Raw (and Lightroom).
Recently we’ve also been treated to Denoise, a vast improvement over previous noise tools, and the excellent Remove tool, which allows you to retouch with the power of generative AI. Then there’s the regularly expanded Neural Filters, constant updates to Photoshop on iPad, improvements to AI-powered masking and selection tools, plus continuing support for the newest cameras. It’s a genuinely exciting time for image-editing, and whenever Adobe releases a Photoshop update there’s usually something to get excited about.
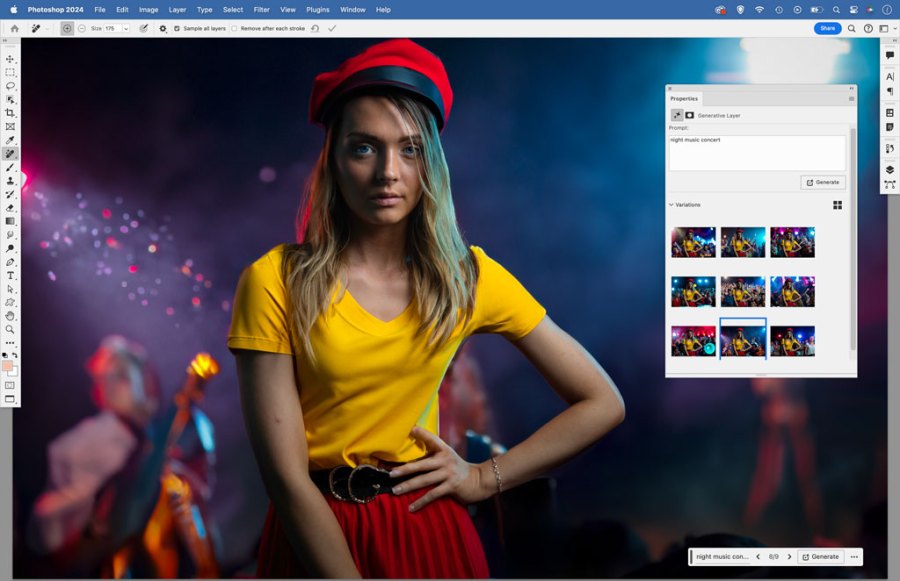
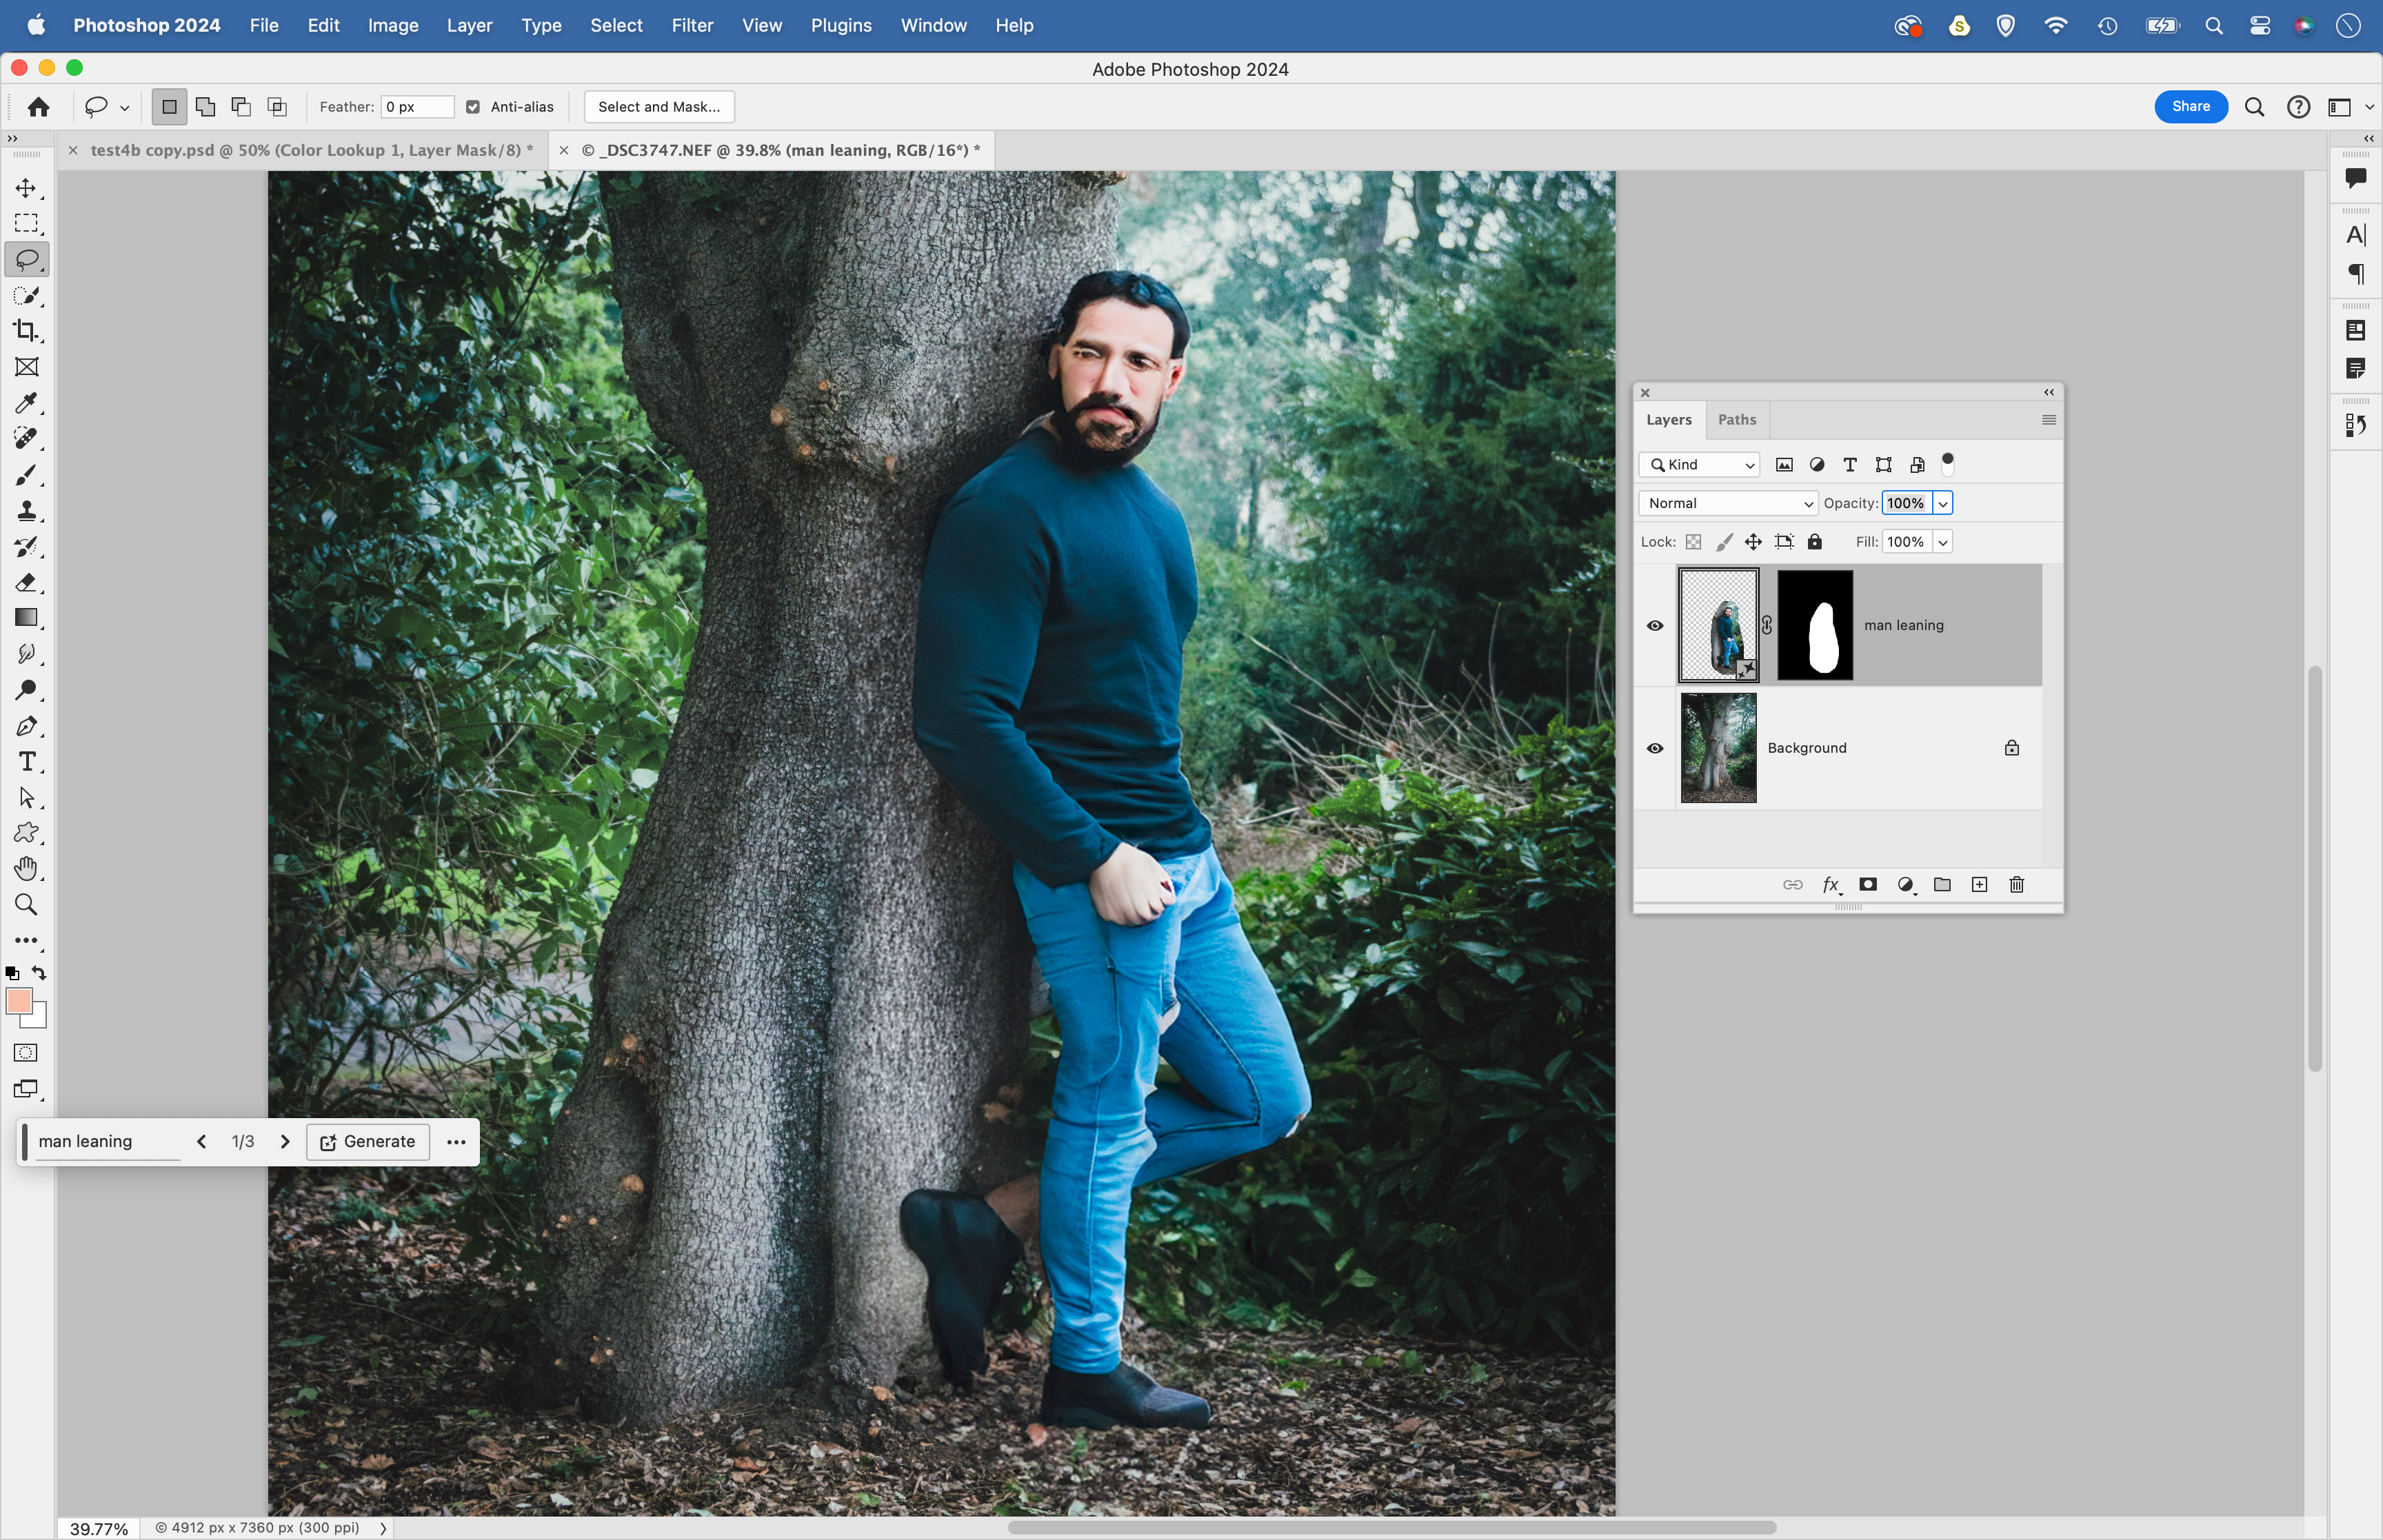
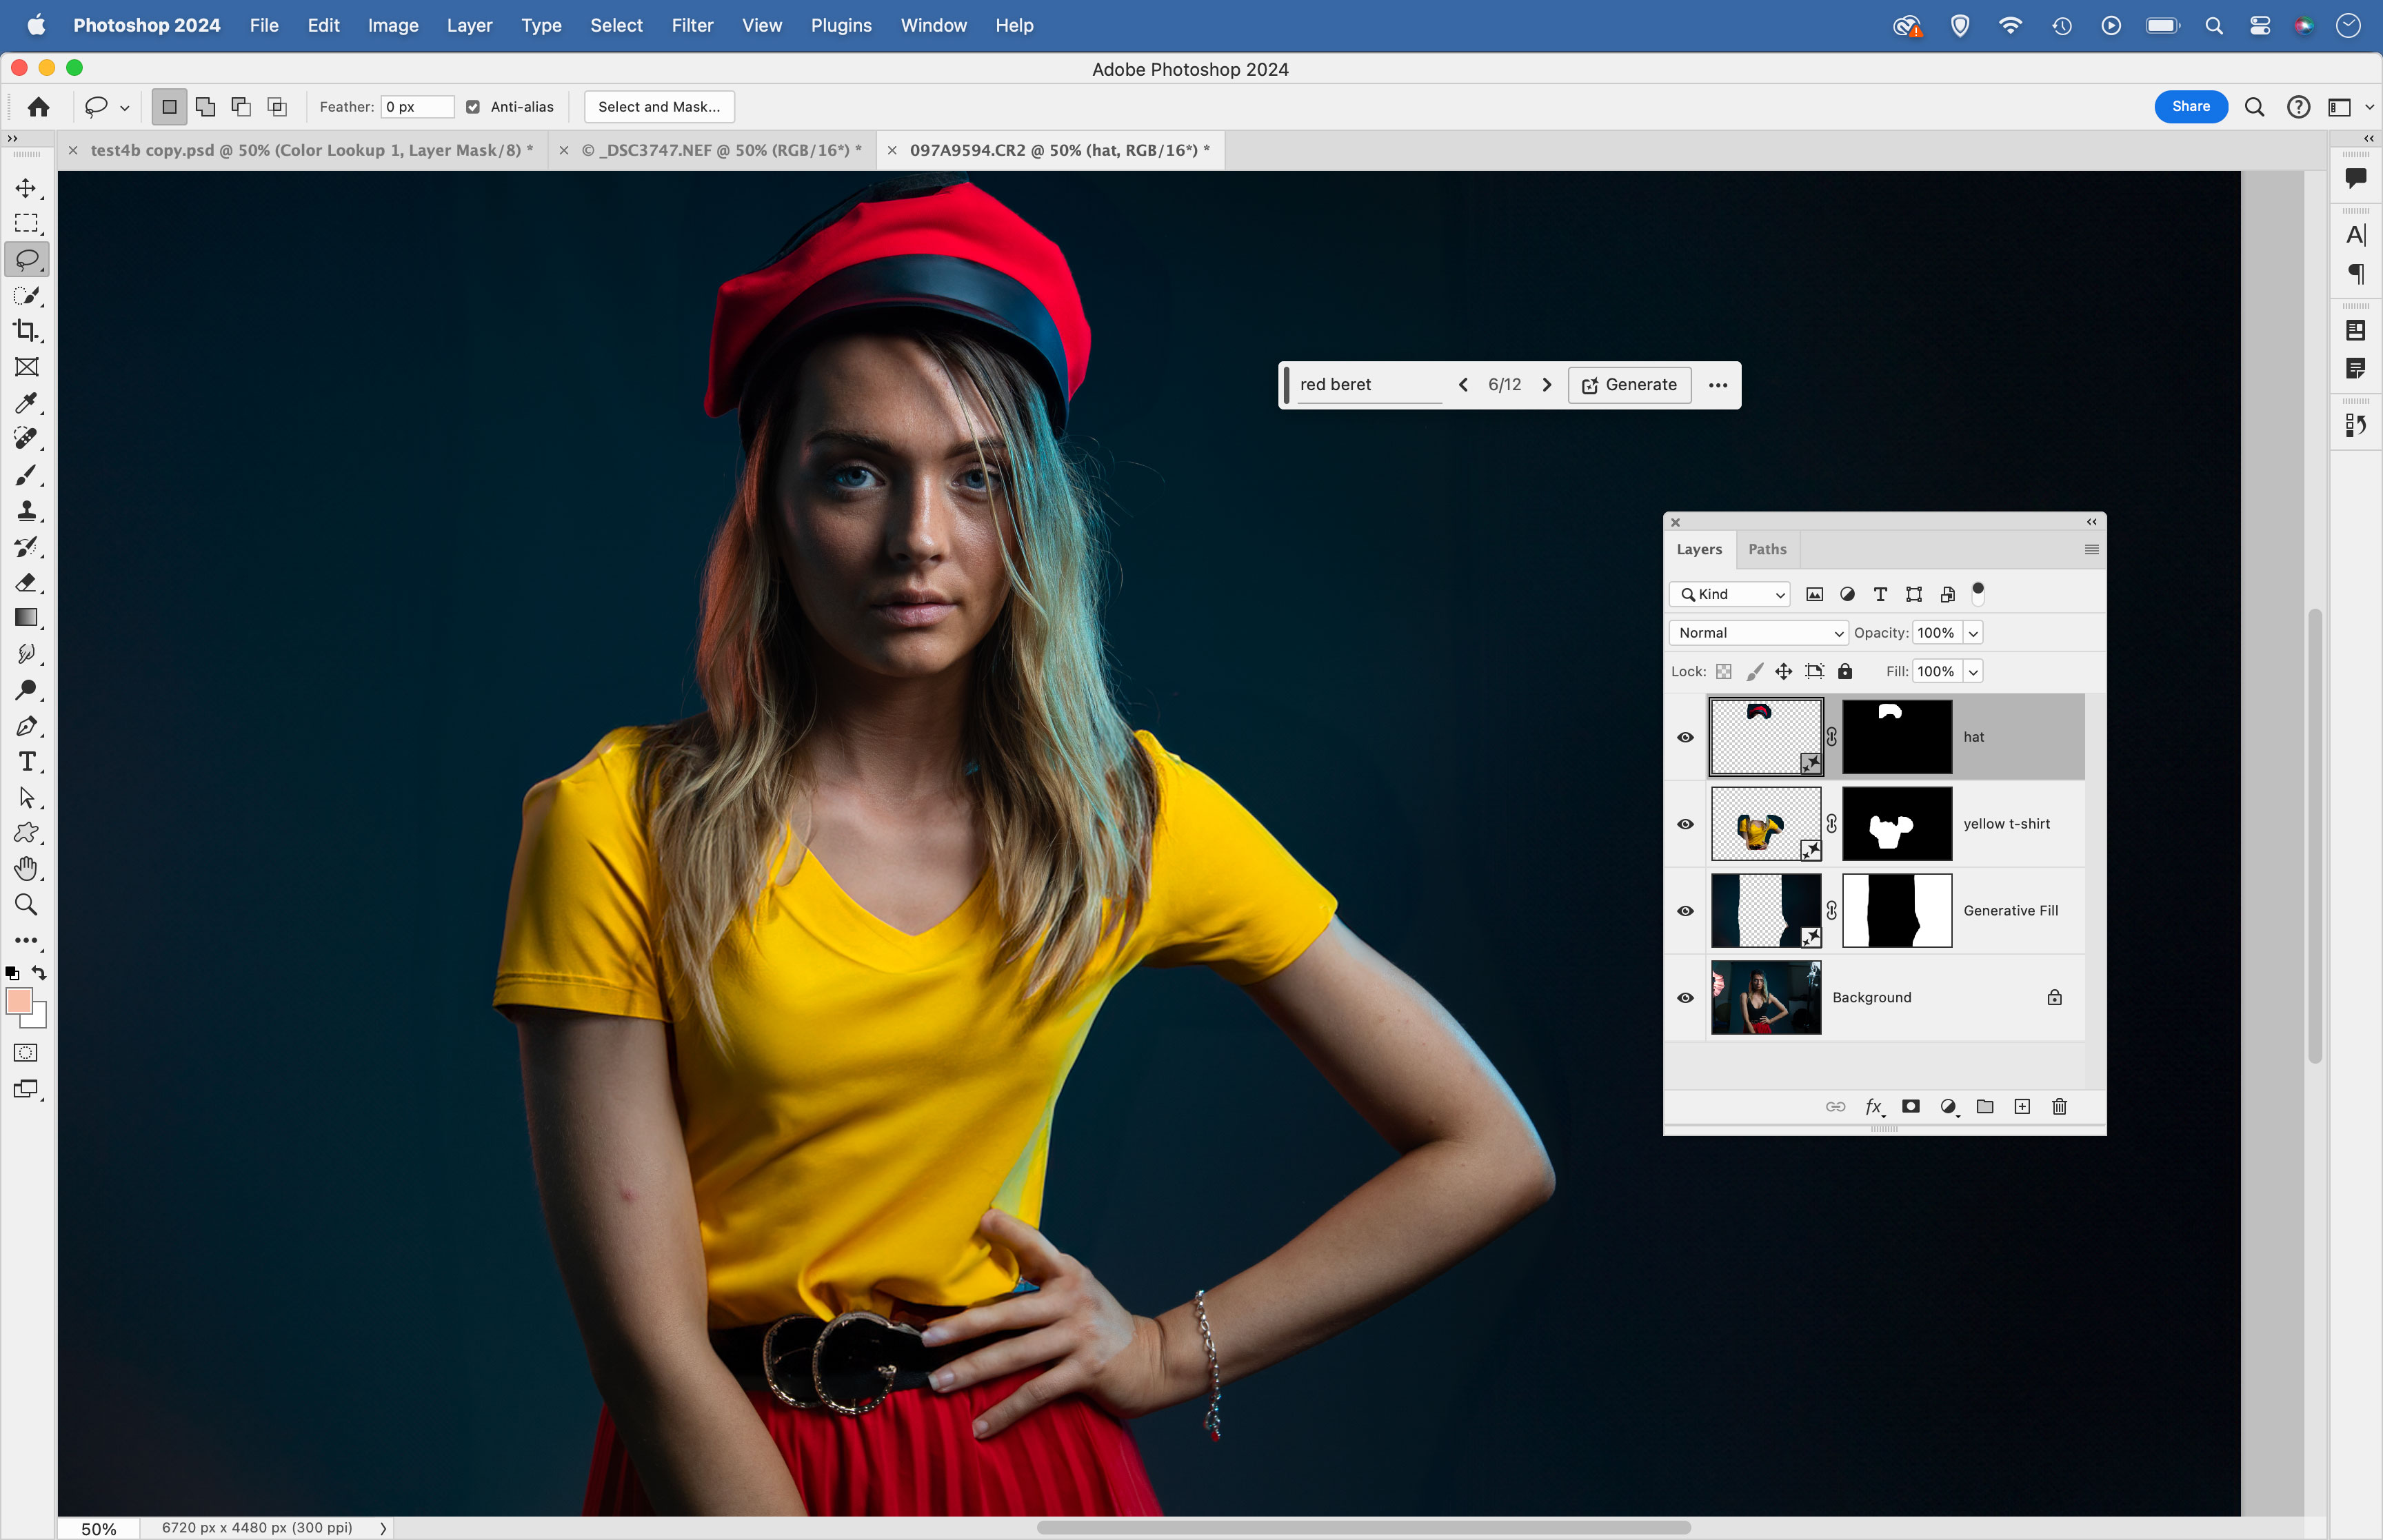
Photoshop CC – Generative Fill
The marquee new feature in Photoshop v25 is Generative Fill. Powered by Adobe Firefly, this is Photoshop’s answer to generative AI tools like MidJourney and Dall-E. With it, we can generate content from within Photoshop by typing text prompts. It’s a text-to-image tool that lets your imagination run wild. But the really interesting part is how Photoshop lets us integrate generative AI with our photos. Adobe’s approach to AI is such that, rather than generating images from scratch, the emphasis is instead on augmenting our own images with AI-generated content.
To do so, we make a selection with the Lasso tool over part of an image then type a prompt into the handy new Contextual Taskbar to generate AI content. The shape of the selection has an impact on the fill, so you can be precise about which areas are included. Once done, you can choose from three variations, generate again or refine your text prompt for more variations.


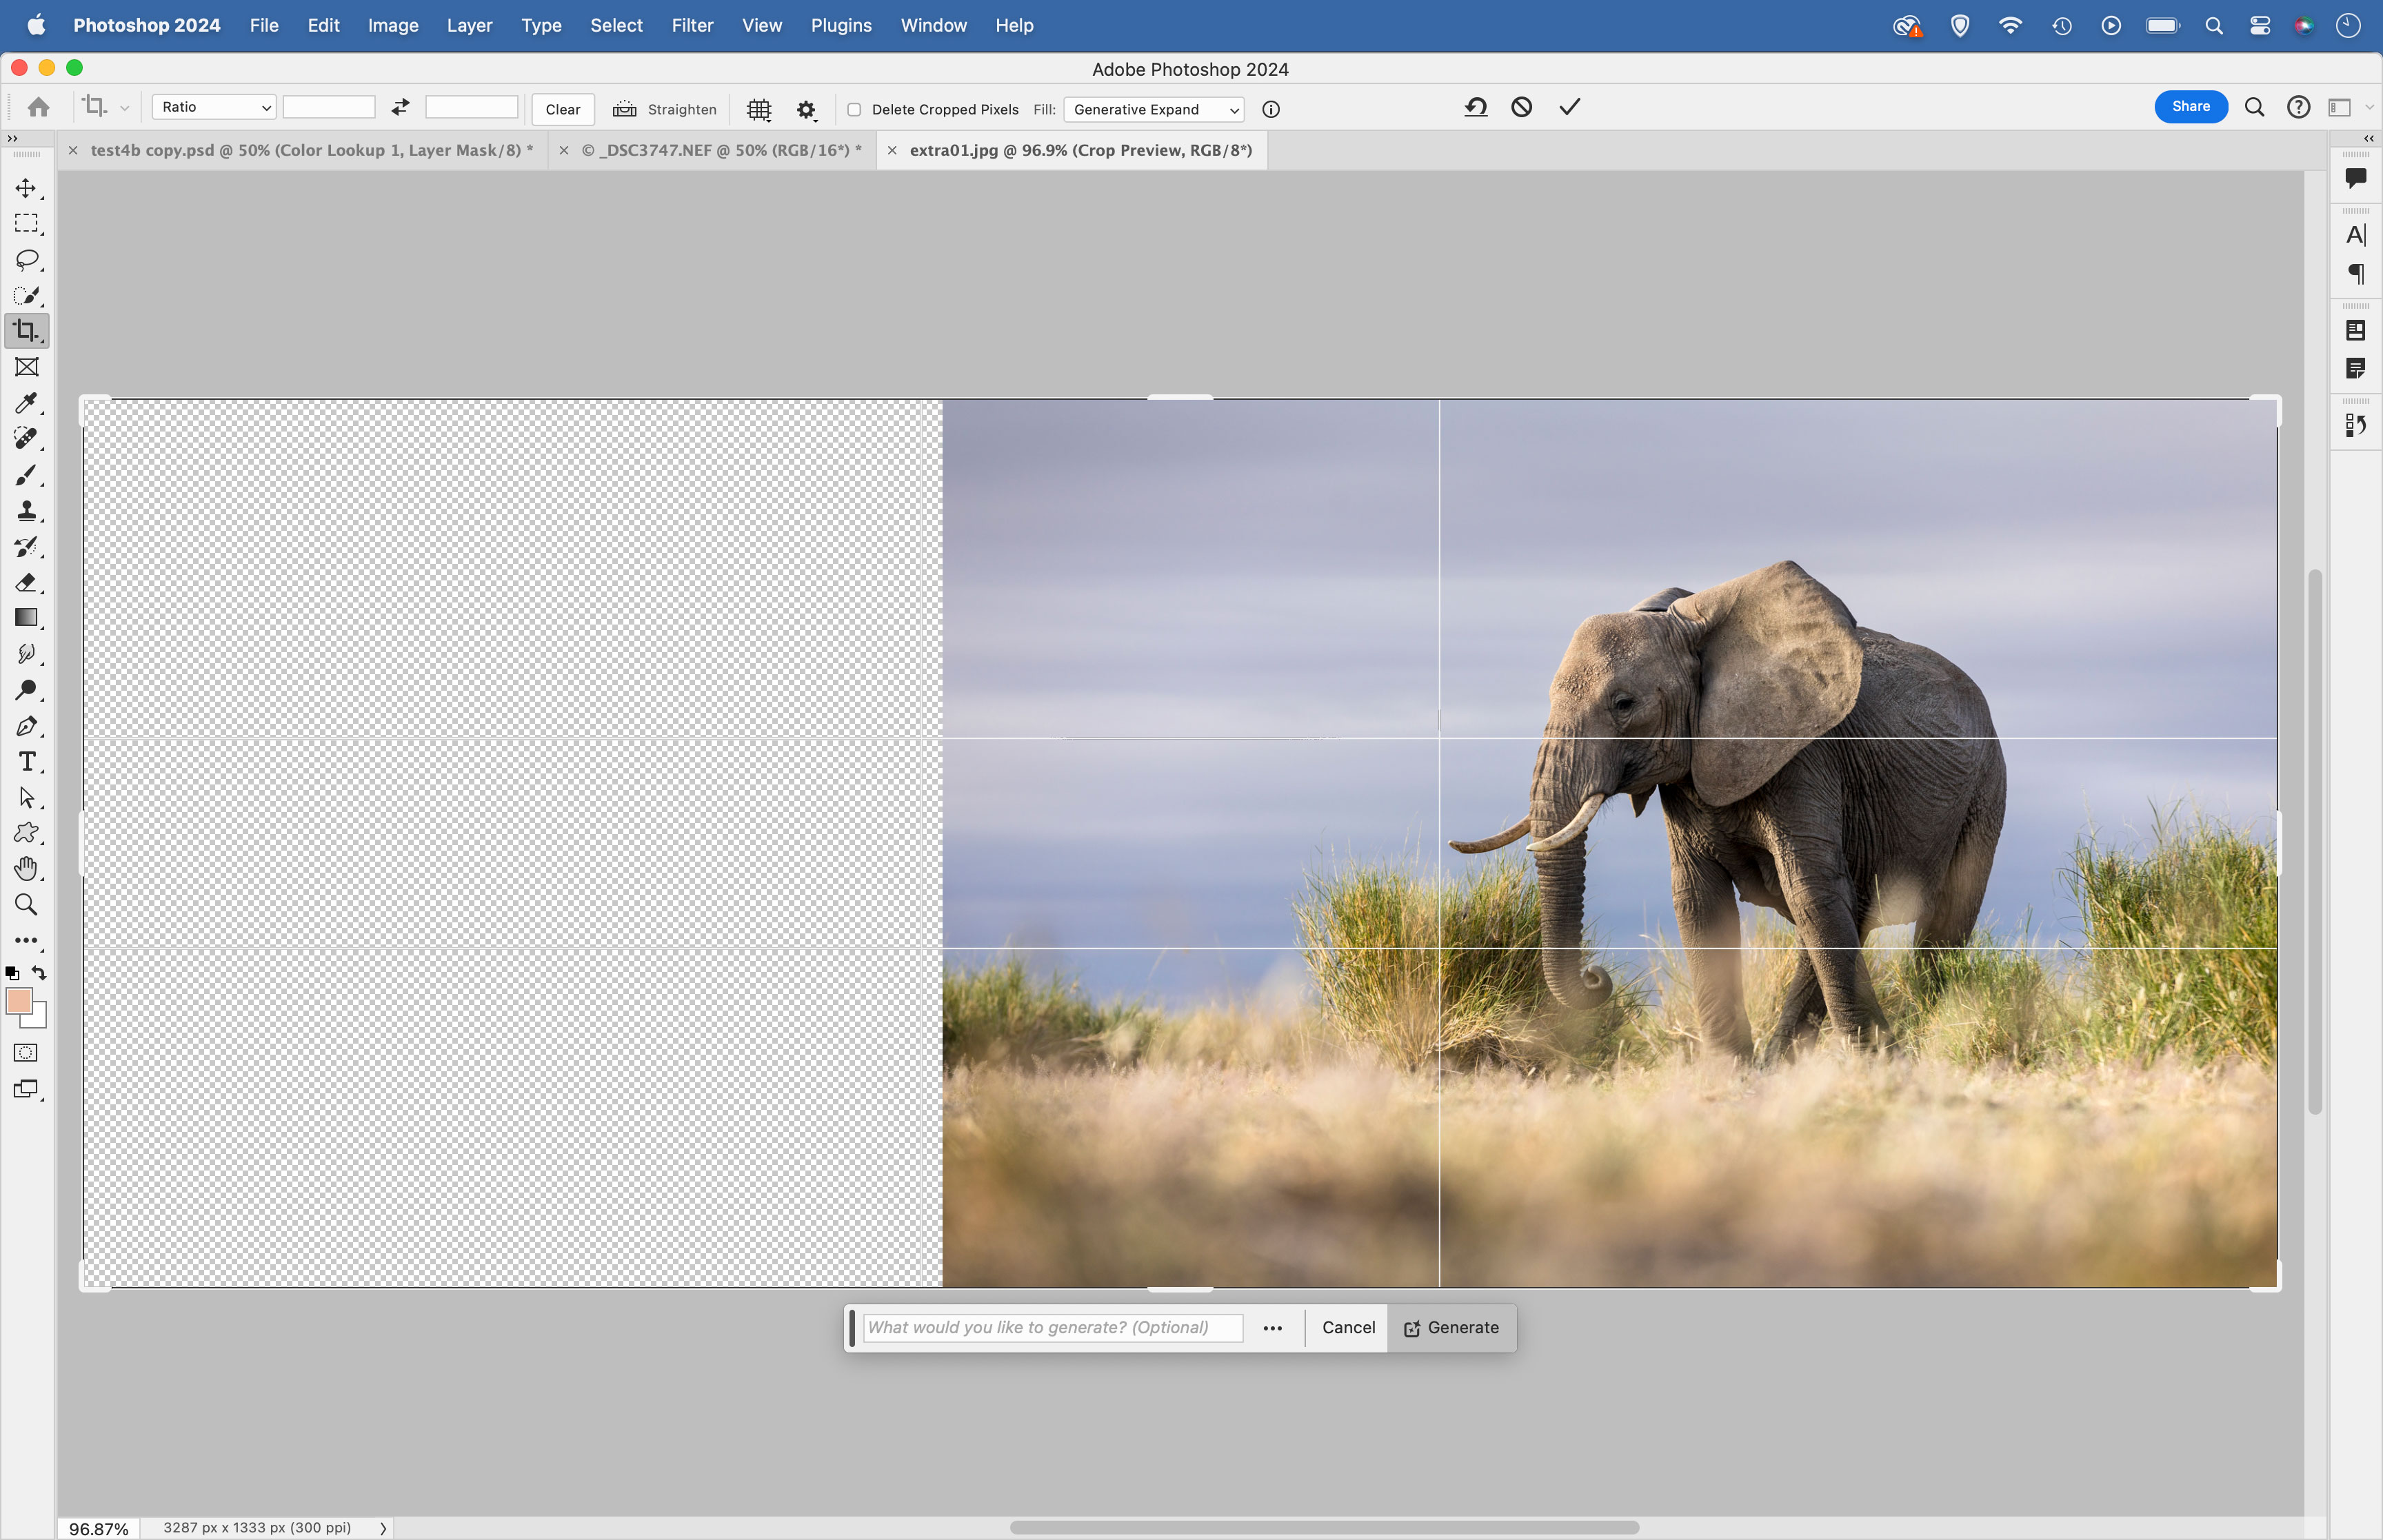
Photoshop CC – Generative Expand
Generative Expand could be one of the few generative AI tools that photographers truly embrace. It lets us expand outside the bounds of our original frame, generating new pixels based on the original content of the photo. If you’ve ever wanted to tweak a crop, allow extra room to correct a wonky frame or create negative space for text then Generative Expand can be very useful. In my tests it does an excellent job at recognising the content of the image and adding similar content around the edges.
Photoshop CC – Content Credentials
Whether we like it or not, generative AI is here to stay. In an era of deep fakes, Adobe is spearheading a system of use that builds trust into the AI process through its Content Credentials initiative. Any AI content created in Photoshop is automatically tagged in the image metadata (you can check whether an image has Photoshop-generated AI content by uploading it to contentcredentials.org).
What’s more, Photoshop’s AI tools are trained on the Adobe Stock library so, unlike many other AI tools, it doesn’t harvest intellectual property without the creator’s consent. Photoshop also imposes restrictions on copyrighted material, and any prompts for offensive content are denied. Contrast all this with the questionable data-scraping of internet images by MidJourney, or the repugnant NSFW deep-fakes of the open source Stable Diffusion, and it amounts to an approach that respects artists and photographers while responsibly pushing the boundaries of digital imaging.
Photoshop CC – Retouching and the Remove tool
To ‘Photoshop’ has long been common parlance for retouching and airbrushing. In this regard, Photoshop’s array of retouching tools are the best there is. With tools like Content-Aware Fill and Spot Removal you can remove objects and clean up photos with ease. The newest retouching tool is the AI-powered Remove tool. It’s simple to use and does a fantastic job at removing unwanted objects from scenes, although it’s not a panacea for all retouching needs, and you’ll often need to finish off with manual tools like the Clone or Patch tool.
Photoshop CC – Adobe Camera Raw
Adobe Camera Raw is Photoshop’s raw processing companion. When you open a raw photo in Photoshop it automatically opens in Camera Raw, where you can make initial raw edits before opening into Photoshop (if you need to). Camera Raw is, in its own way, as powerful and useful as Photoshop. With each update it gets better, and many of us now find we spend more time editing in Camera Raw or Lightroom (which has near-identical tools in its Develop Module) than we do in the main Photoshop interface.
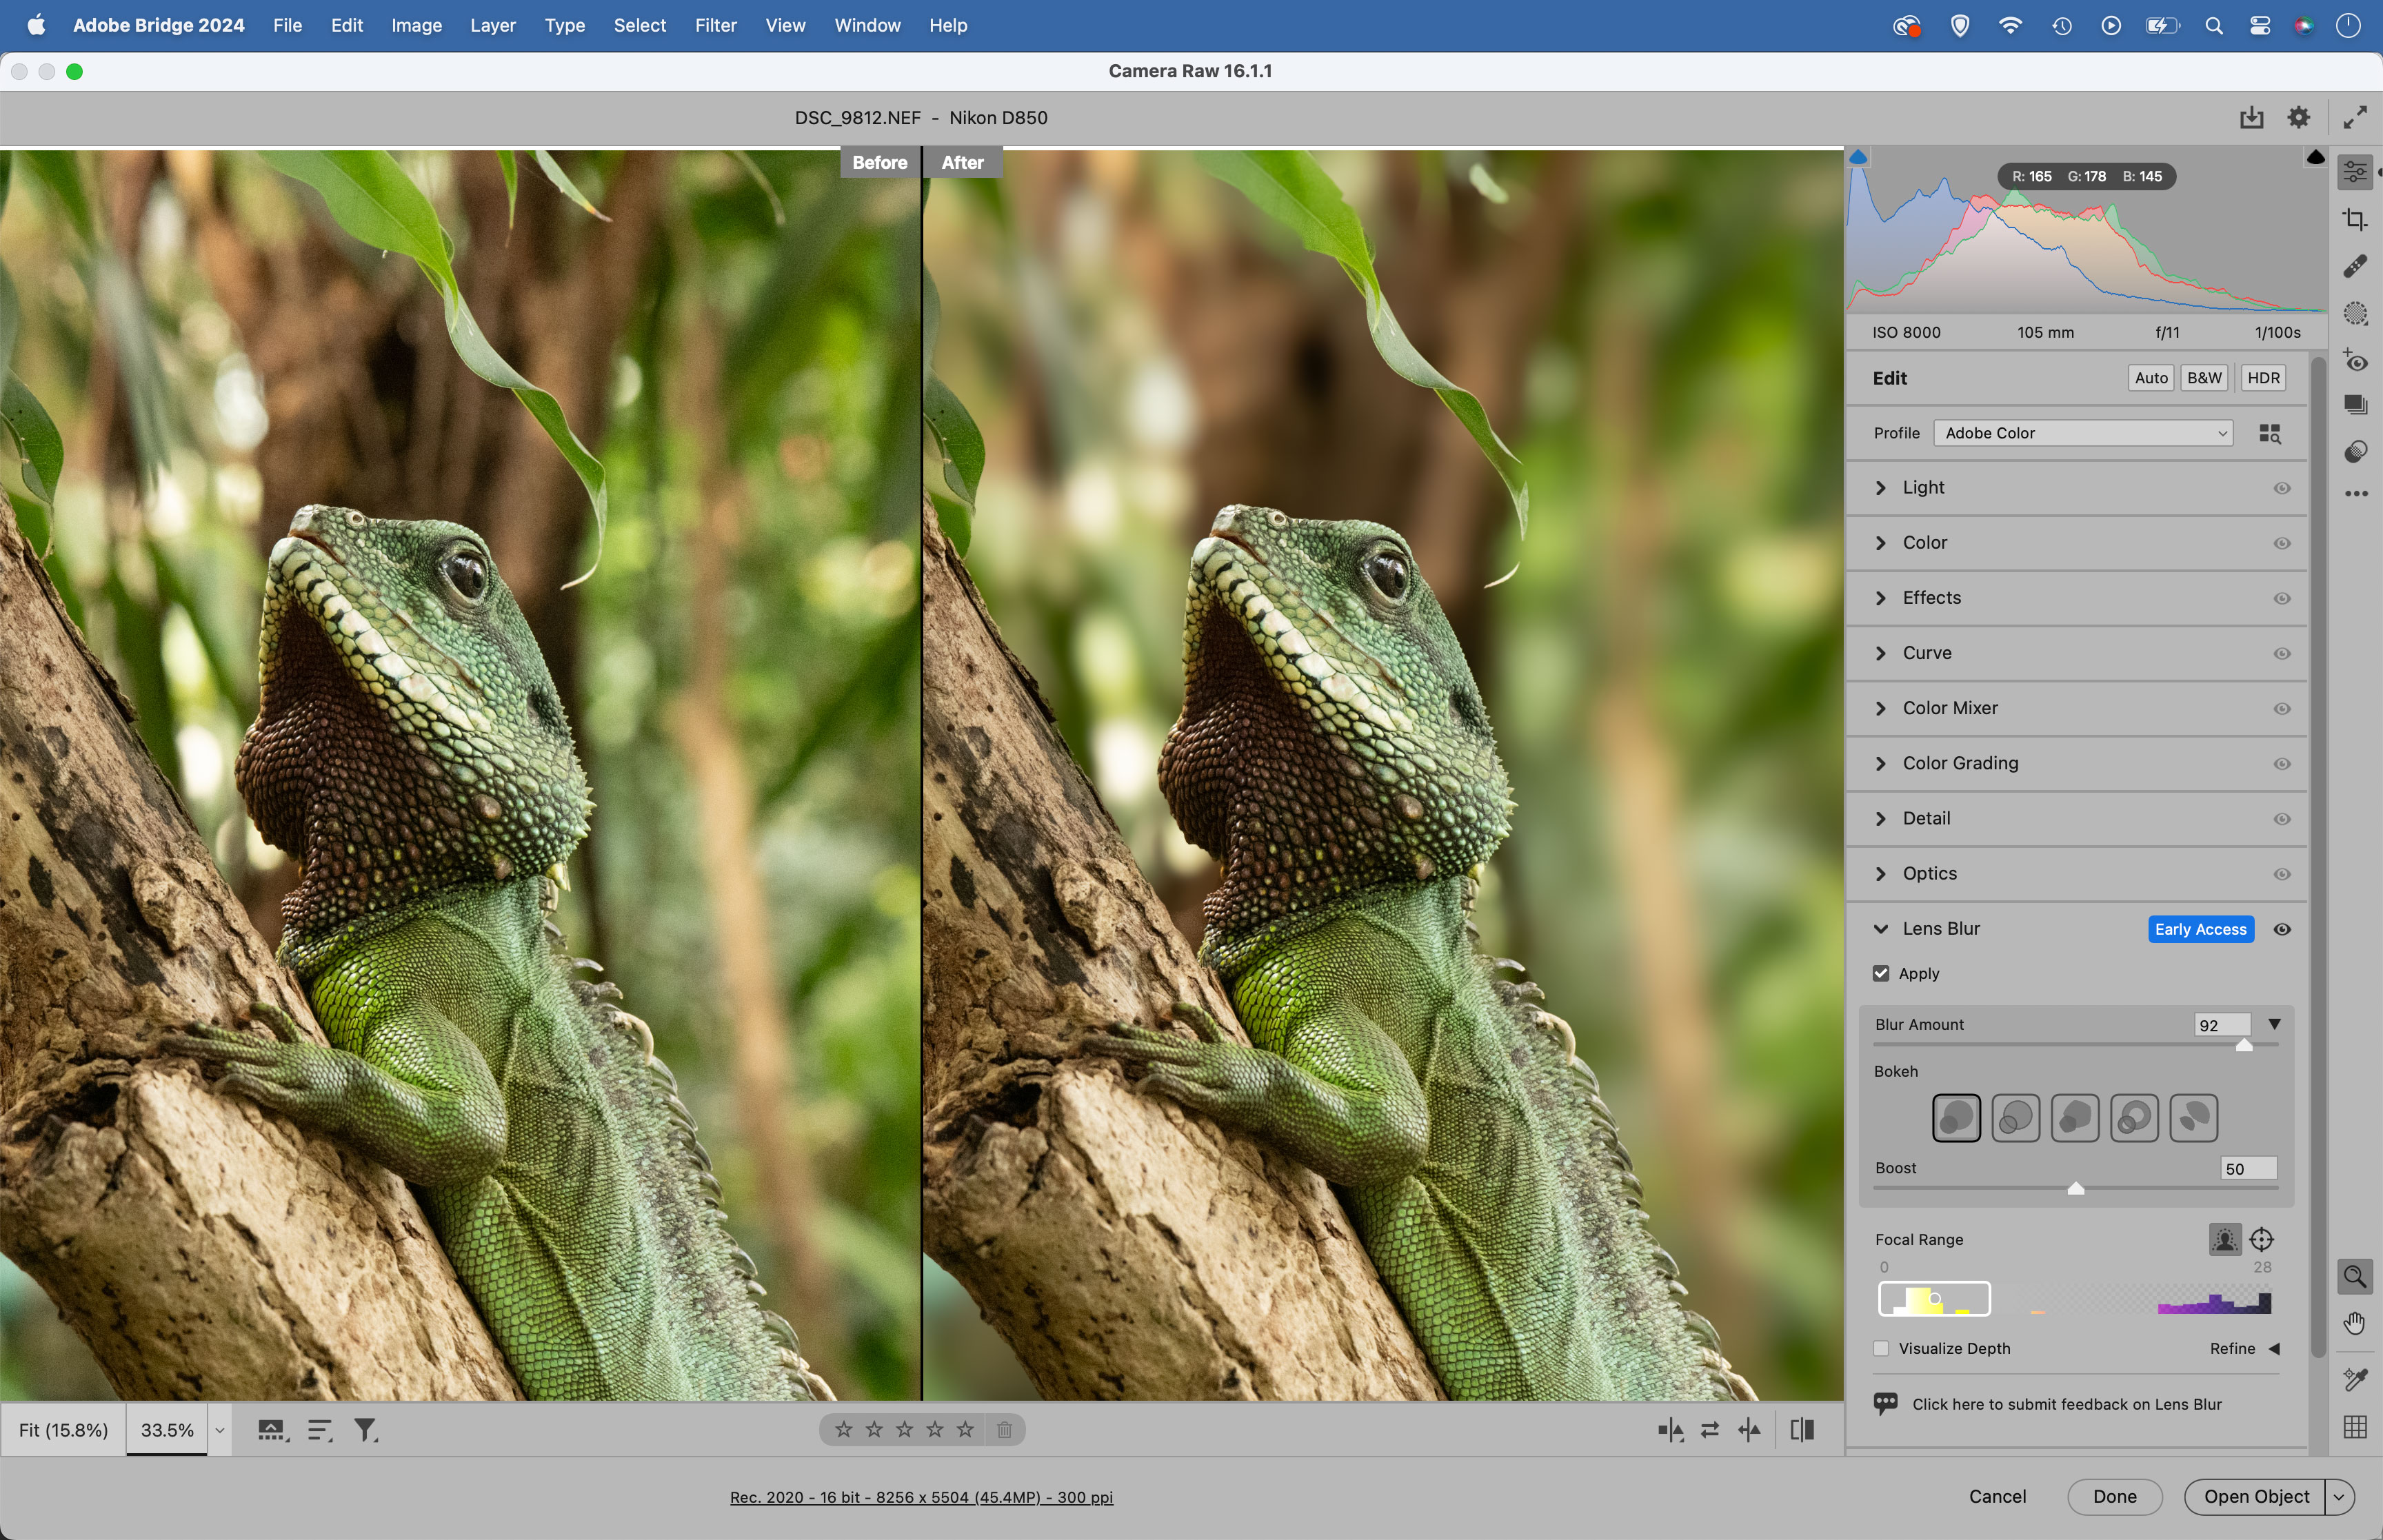
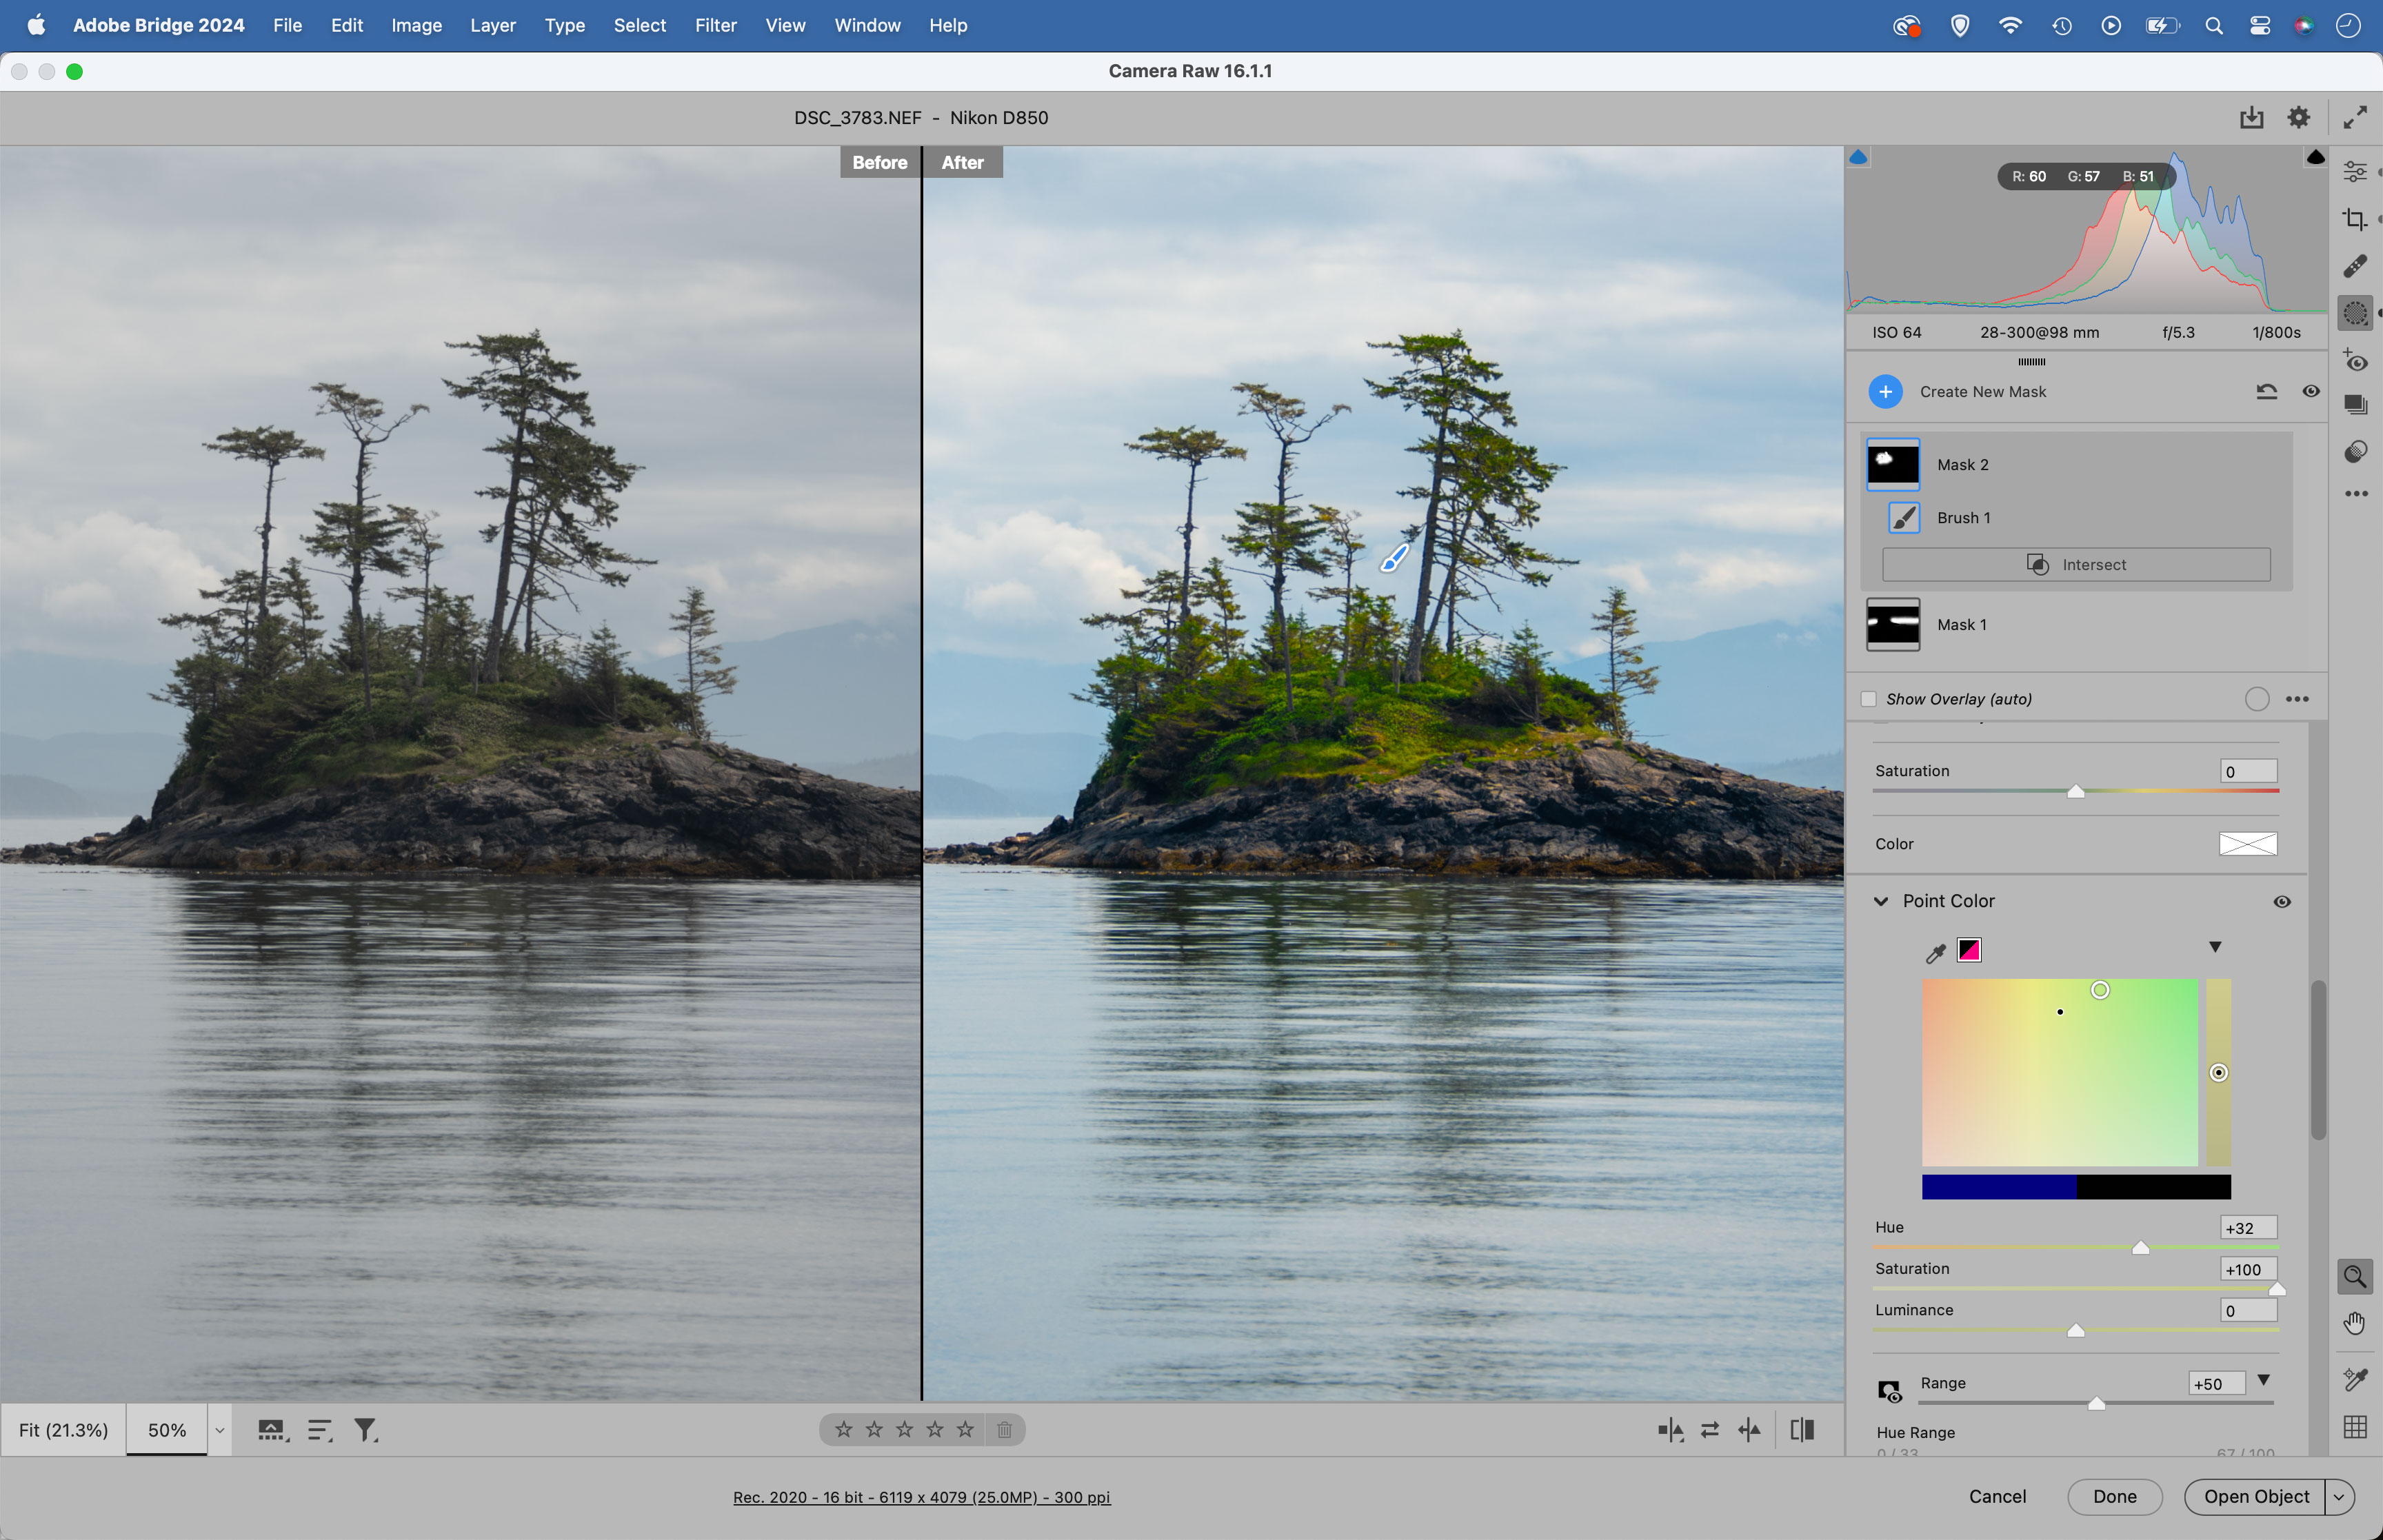
This is because Camera Raw offers precisely the kind of tools that photographers regularly need, and – unlike Photoshop – very little else. We can crop, boost colours, make local adjustments, sharpen and more, all within a non-destructive workflow that means every setting can be changed at any time. Newer tools like the AI-powered sky, subject and people masking make local adjustments quick and easy, and the Denoise tool works wonders on noisy, high ISO images. The latest updates have brought us Lens Blur for depth of field effects, and Point Color for fine colour adjustments. There’s also a brilliant new HDR mode for viewing and editing images, which is a gamechanger for those with HDR displays.
The Lens Blur feature in Camera Raw creates a depth map and adds realistic-looking blur, with fall-off in front and behind the ‘point of focus’. It’s ‘early access’ so not yet finished, but it can be very effective for creating a shallow depth of field effect.
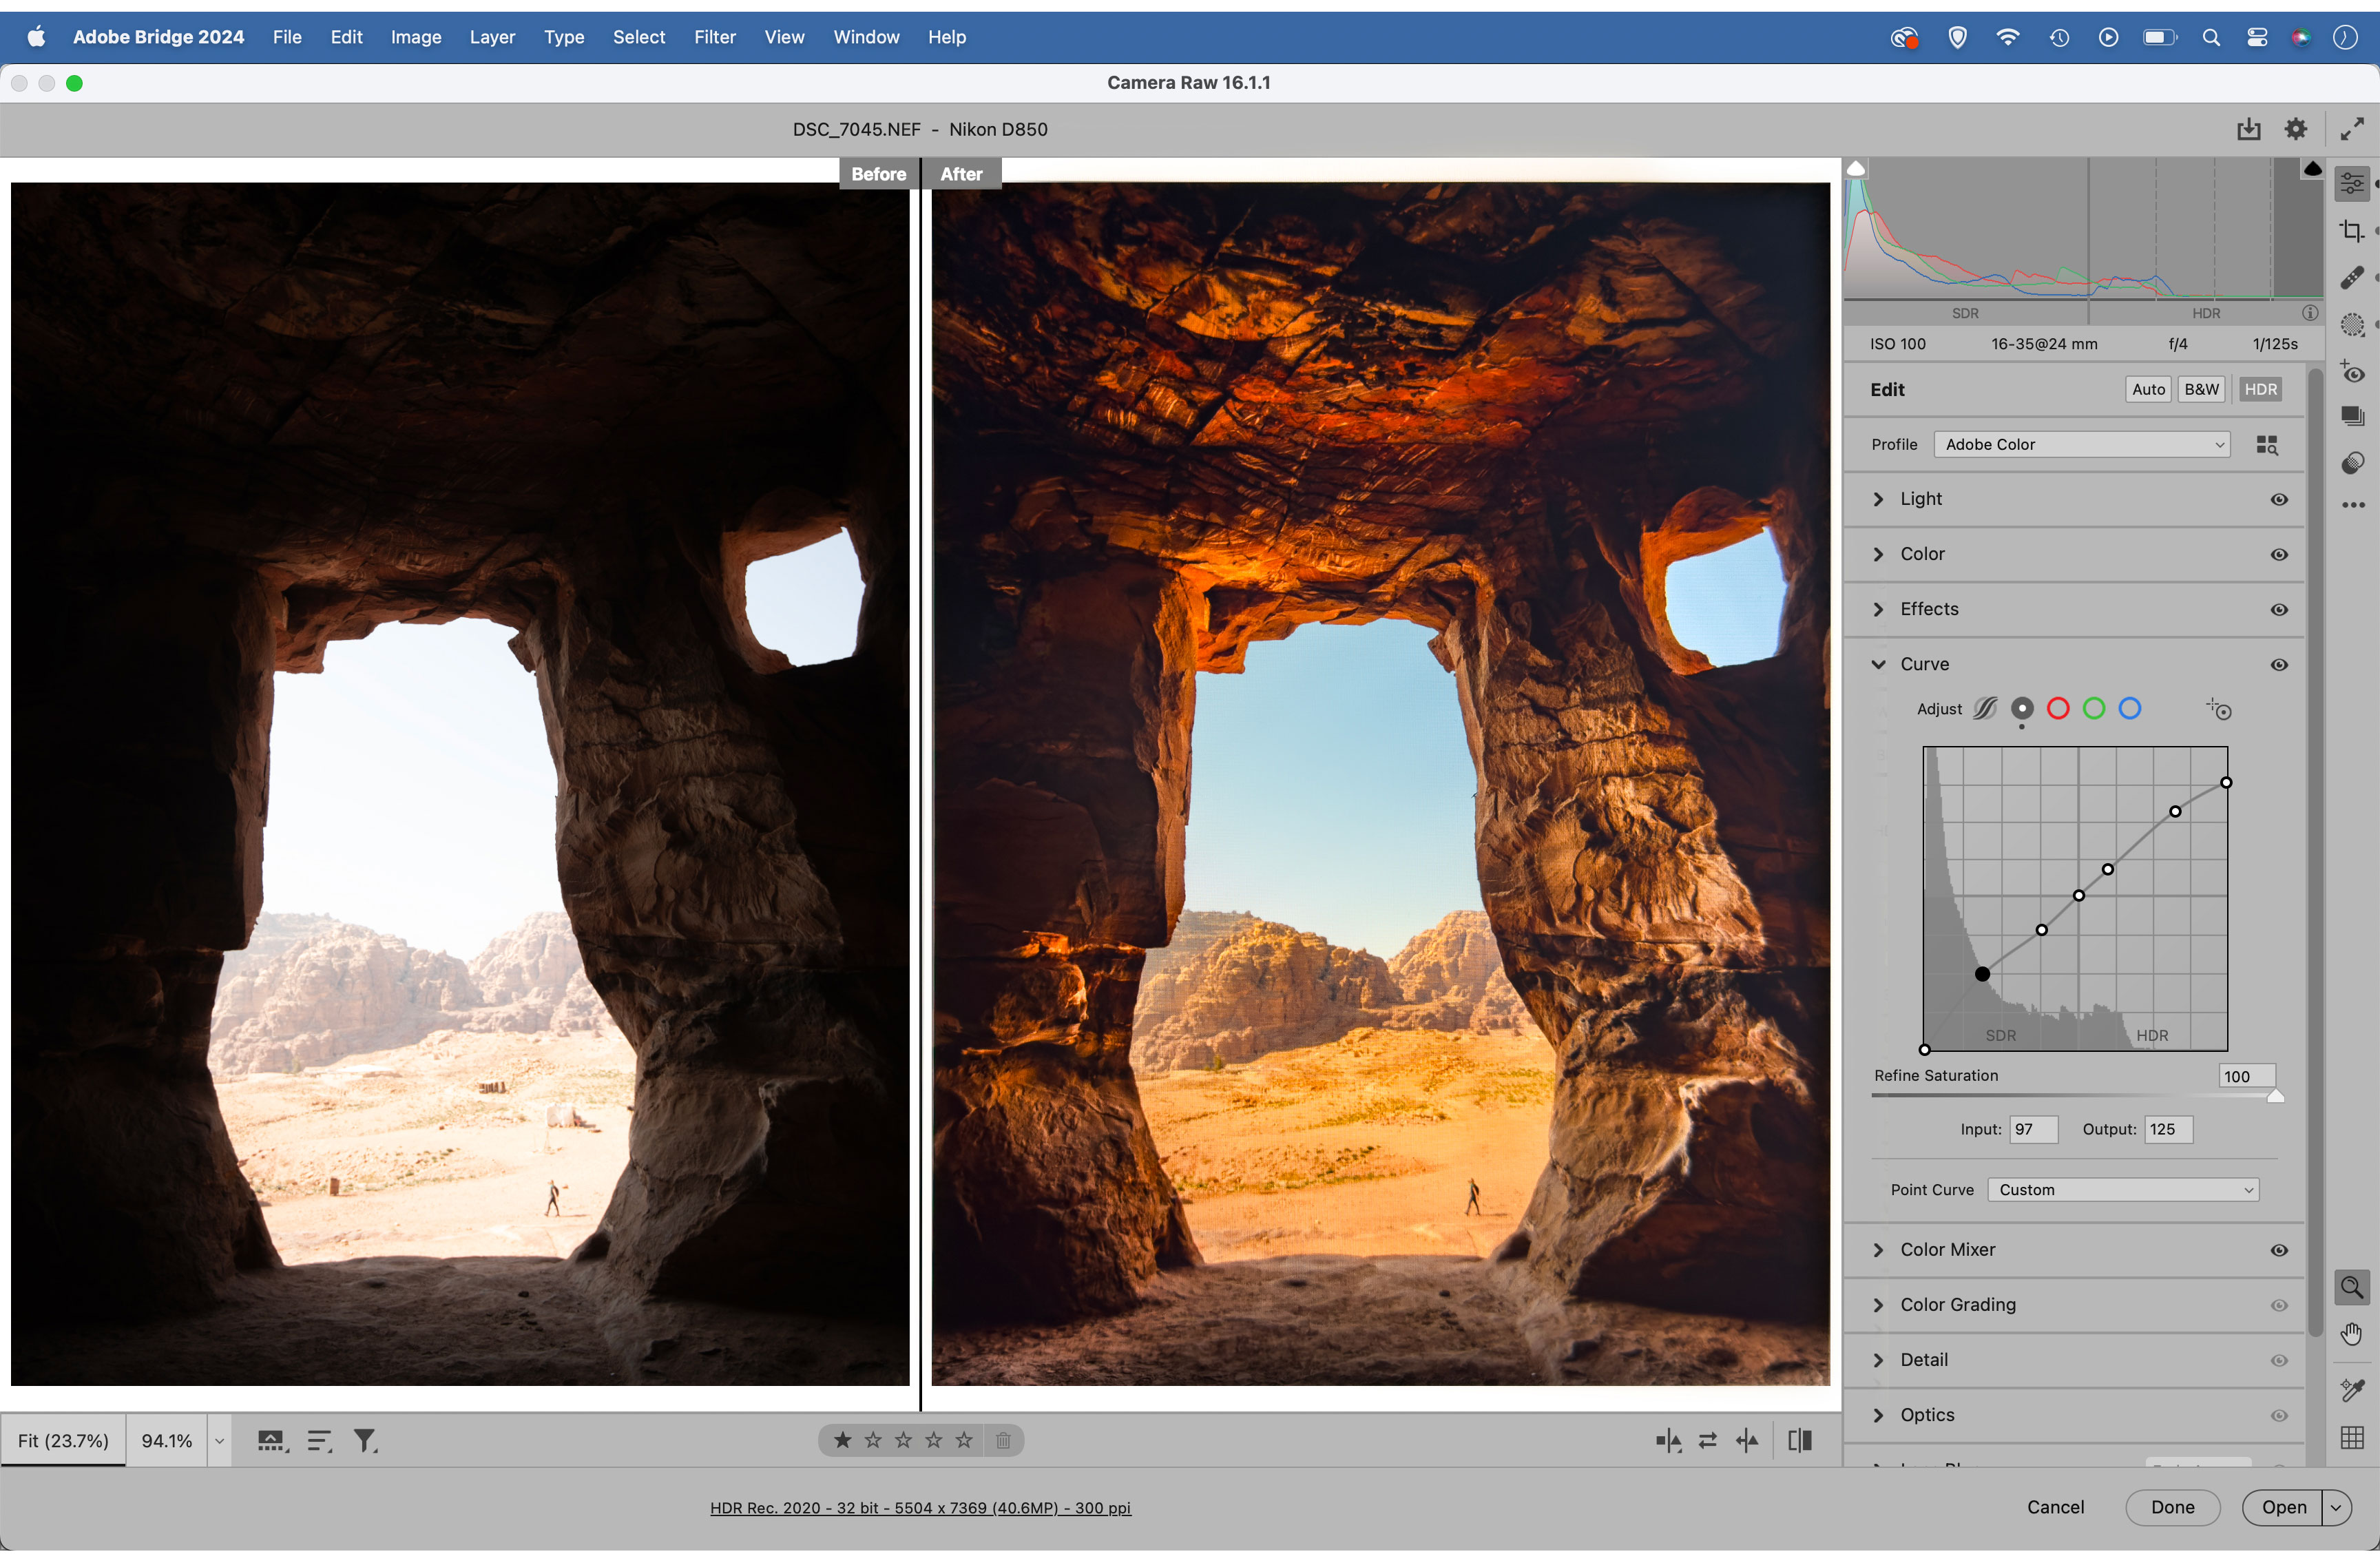
Those with HDR displays can now view and edit their images in HDR in Camera Raw and Lightroom. This offers up to four stops of extra brightness, which can reveal incredible highlight detail. Raws and HDR images pop out of the screen in a way that has to be seen to be believed. Viewing and editing images in HDR really is a transformative experience, and the standard view suddenly seems rather flat and dull by comparison.
Photoshop CC – Denoise
Noise reducing tools have come a long way in the last few years. Tools like DxO’s superb DeepPrime XD and Topaz DeNoise AI have previously bettered anything Photoshop and Lightroom could offer. But now they have Denoise.

Denoise is one of those game-changing tools that could impact not just how you edit your photos, but also how you take them. It employs AI to clean up image noise, and it does so to an astonishing degree. As such, it’s brilliant for clearing up high ISO photos. If you’re ever worried about your ISO creeping upwards while out shooting, it’s reassuring to know that Denoise can help clean things up later. Try it out on a photo taken at 12,800 ISO and you’re likely to be amazed at the clean, detailed image that it produces. It perhaps can’t top the brilliant DeepPrime XD from DxO PhotoLab 7. But in most instances it’s only pixel-peepers who will notice.


Photoshop CC – Powerful selection tools
Adobe is streets ahead of the competition in terms of intelligent selection and masking tools. These kinds of tools let us isolate parts of an image to make a cutout or perform a local tonal adjustment. In Photoshop you have the brilliant Object Selection tool, an AI-powered tool that lets you select objects with a single click. Similarly, there’s the Select Subject and Select Sky command, as well as the Refine tools and Hair Refinement that let you further improve your selections. Even if these tools don’t yield perfect results every time they often get you 90% of the way there, which saves you bags of time.
Perhaps even more useful for photographers interested in subtle enhancements are the masking tools found in Camera Raw and Lightroom. Similar to Photoshop’s AI selection tools, these let you instantly make a mask to isolate a subject, sky or background, or parts of a person like the skin, hair or clothes. Once done, you can make a series of non-destructive tonal edits to enhance the area, like boosting the colours in the subject or darkening a backdrop. You can also create Adaptive Presets that automatically work over different parts of photos like skies or faces.
Photoshop CC – Neural Filters
Photoshop is such a large program that some areas of it have remained untouched for decades, while others see constant improvements and upgrades. For instance, Photoshop’s Filter Gallery (Filter > Filter Gallery) looks pretty much the same as it did in 2010. By contrast, the recently introduced Neural Filters are regularly added to and enhanced.
Neural Filters employ AI to alter or enhance images in a variety of ways. Most of these filters use AI-powered subject or object selection in order to recognise and enhance parts of an image, like a face or a sky. Perhaps the most impressive is the Photo Restoration and Colorise filters. The former automatically cleans up old photos and damaged prints, while the latter applies a nahd-coloured effect to black and white images. Alongside these are the Super Zoom and JPEG Artifacts Removal tools, which can be useful for upsizing and clearing up low quality photos.


Adobe Photoshop CC – Verdict
Adobe Photoshop keeps getting better and better. The implementation of generative AI feels well thought out, working in harmony with the photography process rather than attempting to replace it with prompt-ography. The new tools can speed up the editing workflow and enable you to take your images wherever your imagination desires. However, it’s not all perfect. Generative Fill would have seemed astonishing a couple of years ago, but in the fast-paced area of generative AI the results aren’t always as good as what can be achieved in other image generators.
The main criticism – if it is a criticism at all – aimed at Photoshop is that for many users it is overkill. Photographers may find that they can do everything they need to in other non-subscription programs like DxO Photolab, CaptureOne, Affinity Photo or even the free GIMP. There’s also Photoshop Elements, the pared-down, beginner-friendly and cheaper cousin to Photoshop. But none of these are as slick, feature-rich and cutting-edge as Photoshop.
Affinity Photo – with its layers-based workflow, Personas and feature set – is the most similar offering to Photoshop and great value at £67.99, but its raw editing tools are basic compared to Camera Raw. DxO Photolab and CaptureOne both offer exceptional raw processing, but can’t match Photoshop for its depth of features, AI tools and layers-based workflow. Luminar AI has innovative AI features, but results can look overcooked.
Yes, Photoshop will be overkill for some users and the learning curve can be steep, but at $9.98/£9.99 a month for the Photography Plan – which includes Photoshop CC, Lightroom Classic, Lightroom CC, Adobe Bridge, Photoshop iPad, Lightroom Mobile, 20 GB of cloud storage, Adobe Portfolio and regular updates to all – you have very good value for money and an entire ecosystem of image editing tools.
Whether it’s the right choice for you depends on how much you’re willing to spend, if you think you need the wealth of features, and if you can commit to learning them. The gap between other image-editing programs and Photoshop is closer than ever, but if you want the best, Photoshop is the only choice.

Article by James Paterson, patersonphotos.com
Related reading:
- Are Adobe Camera Raw and Bridge dead?
- Is Photoshop Generative Fill good or bad for photographers?
- Lightroom vs Photoshop – which is best for photo editing?
- How to use Photoshop Actions for a faster workflow
Follow AP on Facebook, Twitter, Instagram, YouTube and TikTok.


