Advertising feature
Affinity Photo 2 is one of the best image-editing packages, and a great alternative to paying to monthly subscription for Adobe software. Here’s how its Depth of Field filter in Tilt Shift mode can add a convincing ‘miniature’ look to overhead shots
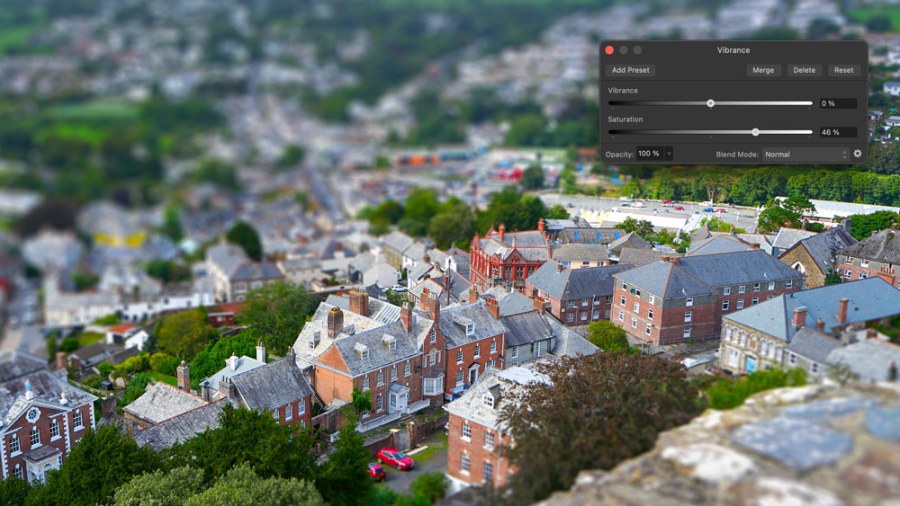
Using digital depth of field tools, you can create pretty convincing simulations of the real thing. Affinity Photo’s Depth of Field Live Filter does just that. What’s more, it can be used to create elliptical blur around a single subject or a tilt-shift blur to simulate a ‘miniature’ effect as if you’re looking down on a model rather than a real subject.
For all sorts of reasons, digital depth of field effects are not exact replicas of the optical depth of field effects from using wide-aperture lenses or photographing actual models. Nevertheless, they are close enough that you still get the broad effect and feel of shallow depth of field.
Recreating shallow of depth of field with Affinity Photo 2
The tilt-shift effect shown here is especially interesting because it uses a kind of optical illusion where we associate shallow depth of field and this kind of foreground/background blur with close-up photography – which reinforces the idea that we’re looking at a miniature model and not a real-world scene.

A fairly typical shot of a country town, but Affinity Photo 2 can do something much more special with it…
Get high with Affinity Photo 2’s Depth of Field filter
This works even better with subjects we’re used to seeing in model form, such as this street scenes viewed from above. A high viewpoint is actually an important part of the illusion because our brains are then more willing to accept a plane of sharp focus around the main subject and progressively increasing blur in the ‘foreground’ at the bottom of the picture and the ‘background’ at the top.

…thanks to the Depth of Field filter and other editing tools
Affinity Photo’s implementation is especially interesting because it allows for a sharp ‘strip’ in the centre of the image that allows for a bit more control over what appears sharp and what is starting to blur.
What’s also clever is that Affinity Photo can apply this as a Live Filter. This means that the blur effect is not baked into the image pixels, but exists on its own separate and re-editable Live Filter layer, so that you can go back at any point in the future to re-edit the effect.
Learn how to use Affinity Photo’s Live Depth of Field filter here
Further reading
Create stunning art – layer images with blend modes in Affinity Photo 2
Combine and mask image layers in Affinity Photo 2
Master adjustments and masks in Serif Affinity Photo 2
Master RAW editing with Affinity Photo 2
How to master Affinity Photo 2 for iPad
Create perfect panoramas with Serif Affinity Photo 2
Use Serif Affinity Photo 2 to remove distractions
Why Serif Affinity Photo’s 2 HDR Merge is a winner
How to master Serif Affinity Photo 2