Advertising feature
Whether you shoot landscapes, portraits, macro, street or wildlife, Serif Affinity Photo 2 is one of the best alternatives to paying for an Adobe Creative Cloud subscription, while still packing in a lot of the powerful features you get with Photoshop and Lightroom.
Even if you are used to Photoshop Elements or other photo editors, however, Affinity Photo’s way of working may leave you confused – so see below for our video guide to making everyday adjustments in Affinity Photo, using the full power of its non-destructive editing workflow (and explaining how layer masks work along the way).

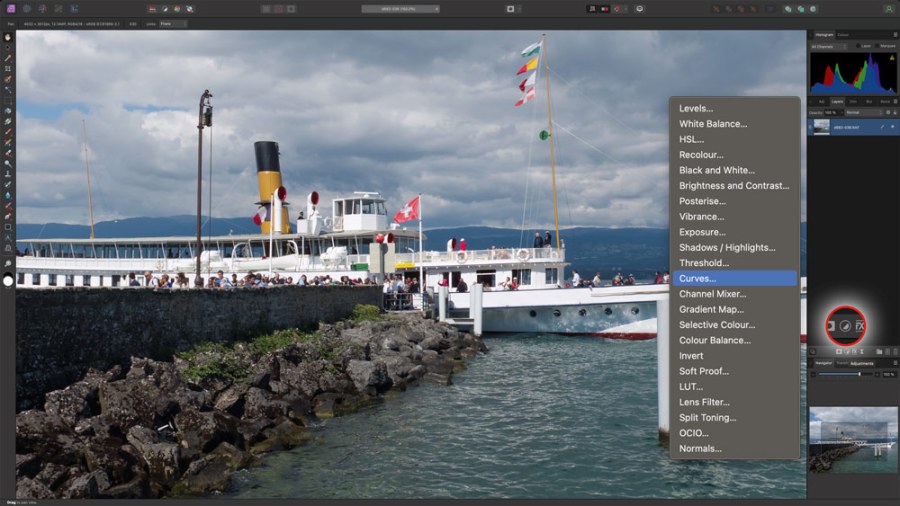
Our starting image of a beautiful lakeside scene just looks a little flat and bland, but this is easy enough to fix with Affinity Photo Adjustment layers
All this work is done in Affinity Photo’s Photo Persona, which is where you find the bulk of its image-editing tools. If you open a raw file, it will pass through the Develop module first and then arrive here in the Photo Persona for any further editing. There are four buttons on the top toolbar: Auto Levels, Auto Contrast, Auto Colours and Auto White Balance.

As you can see the finished images looks a lot punchier and more impactful
These act directly on the image layer, so it’s much harder to backtrack and change what you’ve done. We won’t use these. Instead, we’ll use Affinity Photo’s Adjustment layers, which are created using the pop-up menu at the bottom of the Layers panel on the right. It’s very useful to have all these non-destructive, re-editable adjustments.
but this does rely on saving your photo using the bespoke Affinity Photo file format. This happens automatically when you use the Save or Save As options – Affinity Photo will create a new image file alongside your original in its own file format.
Get to grips with Serif Affinity Photo 2’s powerful tools with our video
Further reading
Master RAW editing with Affinity Photo 2
How to master Affinity Photo 2 for iPad
Create perfect panoramas with Affinity Photo 2
Use Affinity Photo 2 to remove distractions
Why Affinity Photo 2’s HDR Merge is a winner
Master Affinity Photo 2


