Elevate your drone photography and video to new heights with 15 surefire tips that will help you to take a more professional approach to aerial image-making. James Abbott guides you through many of the techniques and processes he uses to capture aerial photography and video.
Top Tips for Aerial Photography
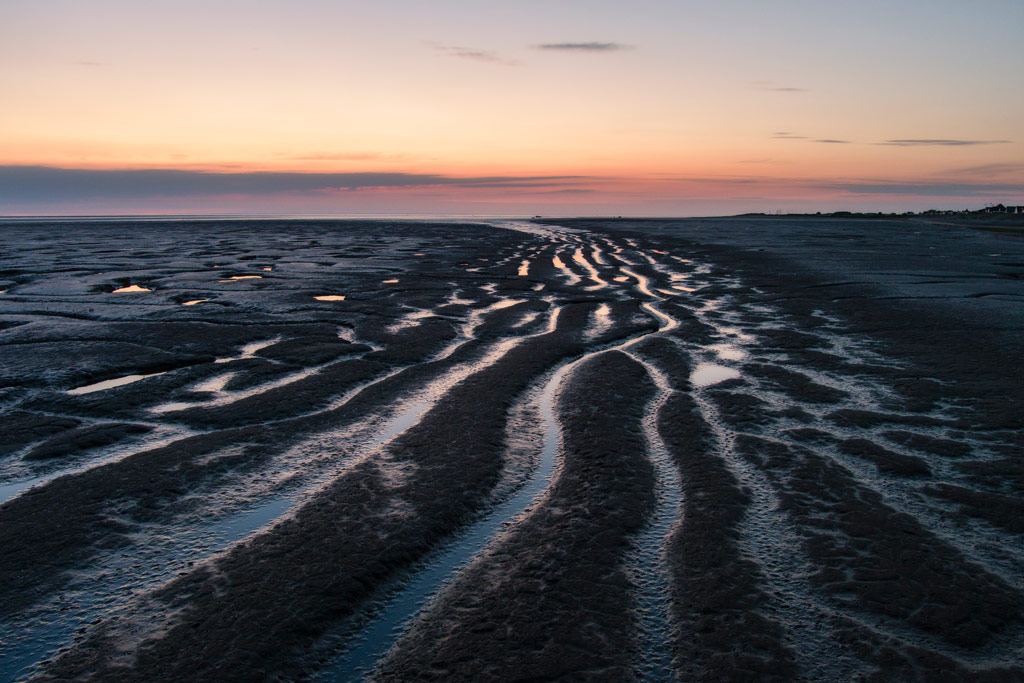
1. Shoot at the best time of day
Shooting aerial photos and videos around sunrise and sunset produces the best results thanks to softer, more colourful and much more dramatic light. So, just like with ground-based photography, these times of the day are equally suitable for shooting with a drone. This certainly doesn’t mean that you shouldn’t shoot at other times of the day because depending on the conditions, you can still capture fantastic light throughout the day.
Plus, when shooting ‘top-down’ images where the camera is pointing straight down at the ground, shooting in the middle of the day results in fewer shadows.
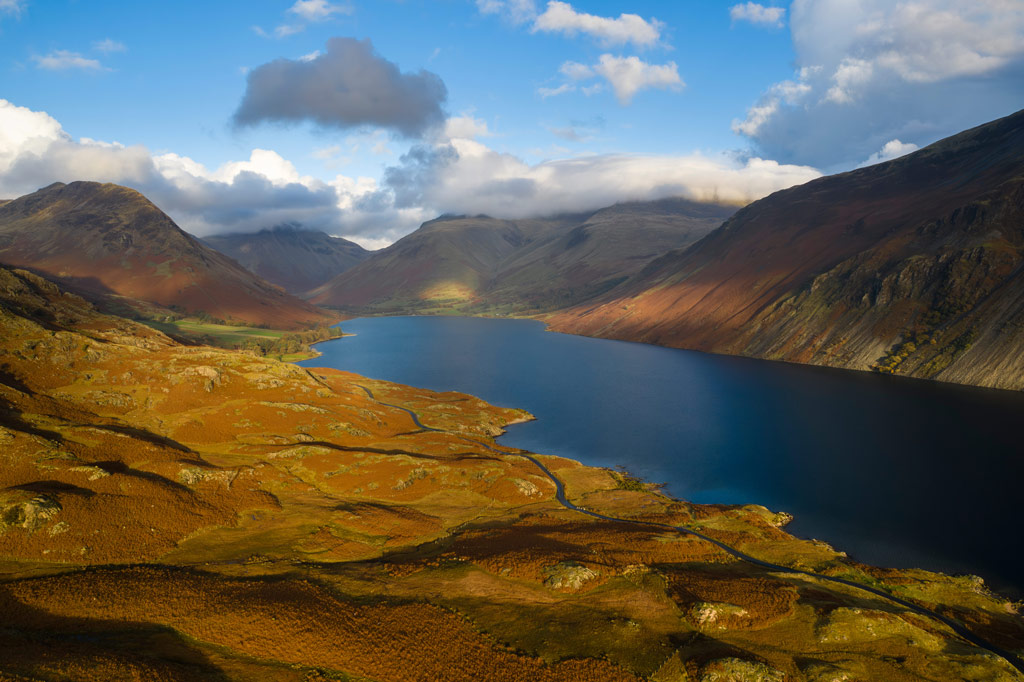
Image credit: James Abbott
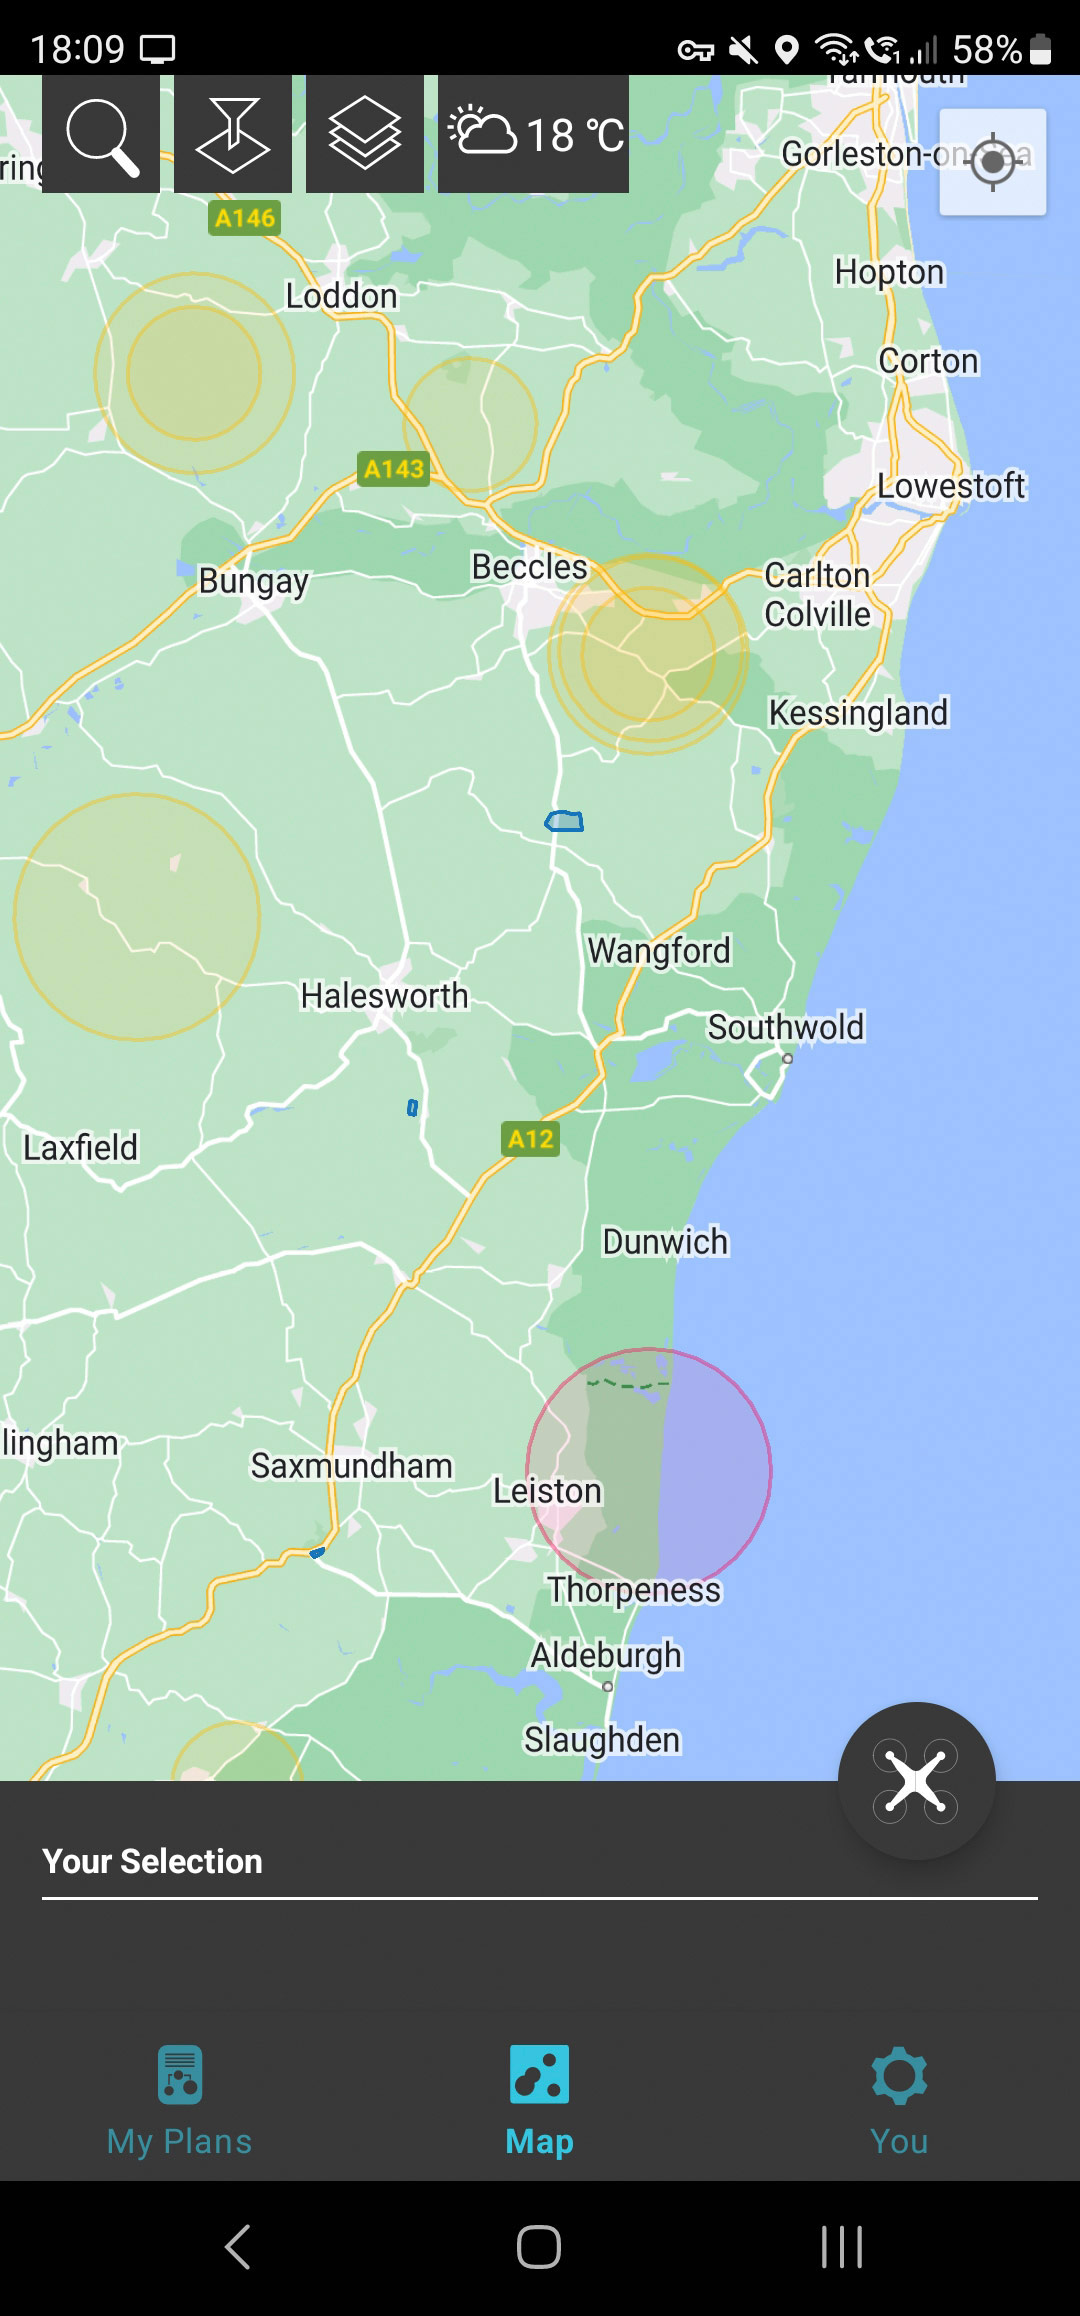
2. Plan your shoots
Just like any other type of photography and video, planning your shoots is a great way to increase your chances of success; with apps such as Clear Outside, The Photographer’s Ephemeris and PhotoPills all being invaluable tools. Google Maps is also another useful app, simply for scouting potential locations, but one app that every drone pilot should have is Drone Assist; this app shows you where restricted airspace is located, if there are any NOTAMs in place (warnings and temporary airspace closures), shows potential ground hazards and most importantly helps you to remain safe and legal.
Take a look at the best UK landscape photography locations here
3. Shoot Raw in a 4:3 Ratio
We all know that shooting in Raw provides more scope for making adjustments during processing, which in many cases means greater flexibility and improved image quality. This also goes for drones, which in many cases can capture images in both JPEG and DNG formats.
Some drones also allow you to shoot in both a 16:9 and a 4:3 ratio, and since the 4:3 ratio is a traditional photo format that we’re used to seeing and fits traditional photo paper sizes more effectively, it makes sense to shoot in this ratio for what you might call a more natural result.
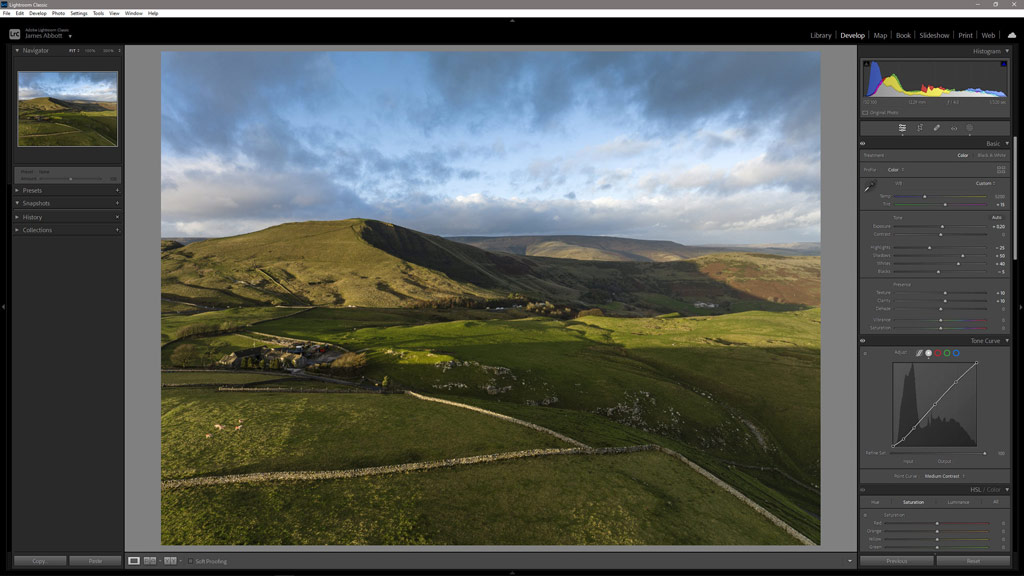
Image credit: James Abbott
4. Use your drone like it’s a flying tripod
One of the most common mistakes with drone photography is thinking that you have to fly as high as legally possible (120m) to capture the most awe-inspiring images. This can indeed be true in some situations, but for many subjects and scenes, a much lower altitude provides the most effective viewpoint.
The beauty of drones is that they can access locations otherwise inaccessible on foot, such as marshland, and you can capture great images from as low as 2m. Shooting at lower altitudes between 2-10m produces images that look different, but viewers often won’t immediately realise they’re drone shots which can add to their visual intrigue.
Aerial landscape taken after sunset at Snettisham in Norfolk on the Autel EVO Lite+. Image credit: James Abbott
5. Increase image size with Adobe Super Resolution
Many drones have a limited resolution of typically 12MP or around 20MP, which means that printing sizes are limited. Of course, some drones, including the DJI Mini 3, Mini 3 Pro and Air 3 have a 48MP photo function, but when using this you can’t use other useful modes such as Automatic Exposure Bracketing. The quickest and easiest way to increase the size of drone Raw files for making larger prints is to use Adobe Super Resolution in Lightroom and Adobe Camera Raw. The results are excellent, and the image size is doubled.

Image credit: James Abbott
6. Switch on visual guides when available
Higher-spec drones, such as those made by DJI and Autel, allow you to switch on several visual guides that aid with composition and exposure, so taking advantage of them can help speed up shooting both photos and videos. The histogram is a great tool for assessing exposure that you’ll no doubt be familiar with, while zebras are an overexposure warning most commonly used when shooting video.
The latter is where overexposed parts of the scene are overlaid with zebra lines. In addition to these, the rule-of-thirds grid and diagonal lines are great for speeding up framing and aiding composition, while focus peaking is invaluable when using manual focus.
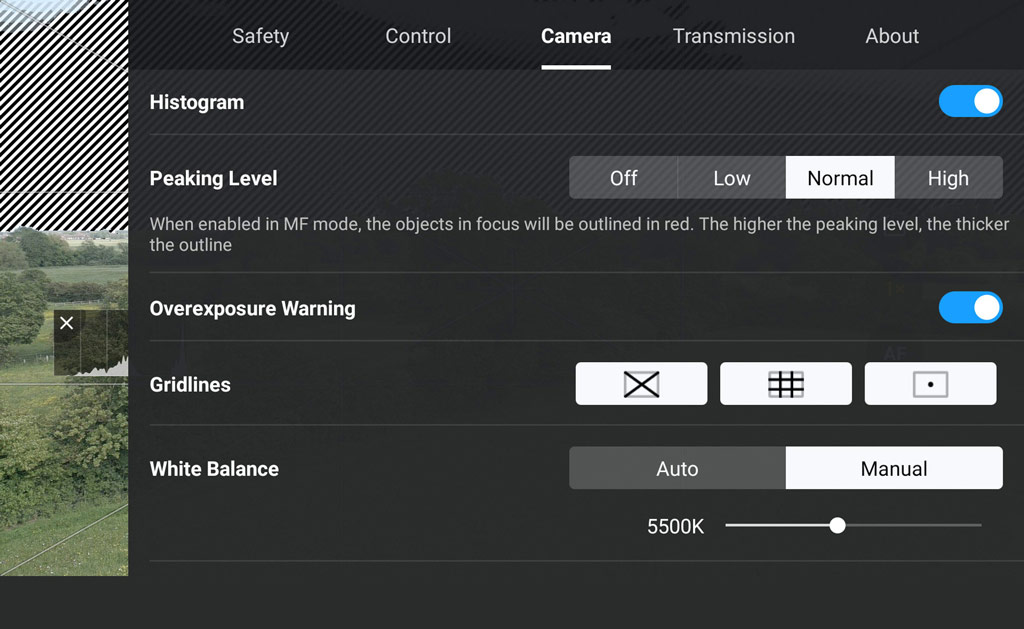
Image credit: James Abbott
7. Use compositional devices
When you get a drone into the air and frame up a shot, it’s all too easy to become overwhelmed by the new and interesting view of the world that’s presented by the drone, and as a result the application of compositional devices can be overlooked.
The rule-of-thirds, foreground interest and lead-in lines, at the most basic level, remain as important as ever and should be used whenever possible to provide visual balance and interest. In the example here, the rule-of-thirds ties the composition of this simple scene together, with the farm sitting on the bottom left intersecting lines, while the track on the left and wall on the right create lead-in lines to the farm.
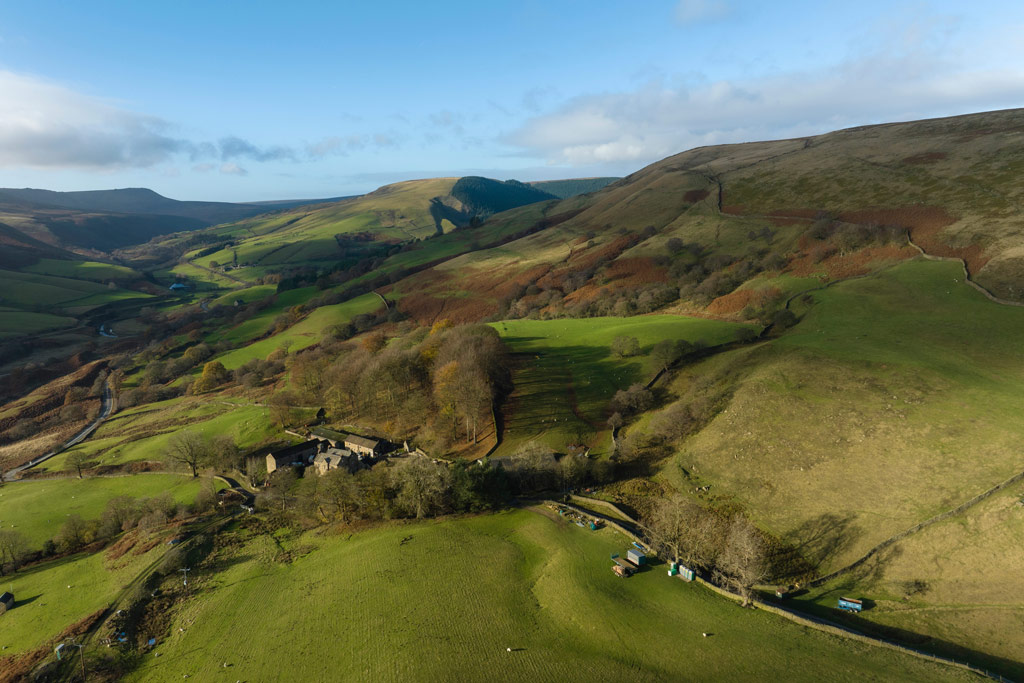
Image credit: James Abbott
8. Shoot in portrait format or create vertical panos
A handful of drones, well, the old DJI Mavic Pro and the DJI Mini 3 Pro/Mini 3 can rotate their cameras 90° to shoot in portrait format, which is incredibly useful for scenes that are best suited to an upright image.
If you don’t have one of these drone models you can still shoot portrait format images, but you have to shoot vertical panos and merge them in editing software. Simply fly the drone into position and leave it in a hover before adjusting the gimbal tilt to capture four landscape format images. Make sure each image overlaps the next for a successful blend, and if it’s a high-contrast scene you can even incorporate Automatic Exposure Bracketing for HDR capture.
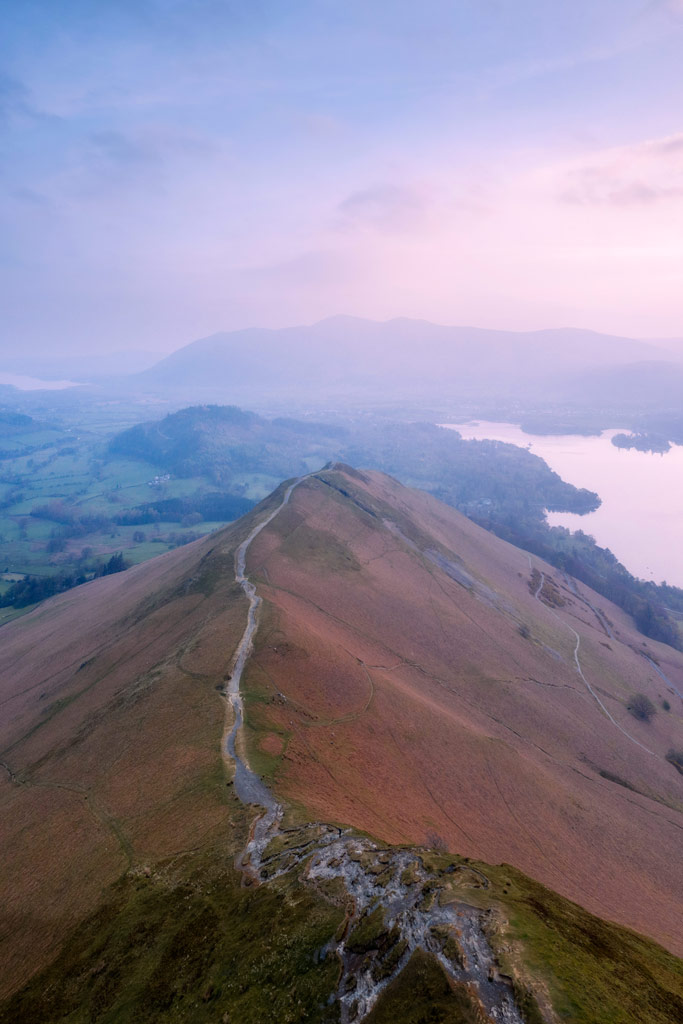
Cat Bells shot with a DJI Mavic 2 Pro during a hazy sunrise. Image credit: James Abbott
9. Don’t forget to look straight down
One of the great things about drones is their ability to point the camera straight down to capture the world from directly above, which is colloquially known as a ‘top-down’ shot. These types of images allow you to capture subjects in a completely different way from when you’re shooting on the ground, providing an opportunity to focus on shape, pattern and texture.
These types of shots also work well for video, both when the drone is held in a hover allowing a ground-based subject to move into and through the frame, or for tracking a moving subject moving through the scene.

Boatyard jetty shot from above with a DJI Mavic 2 Pro. Image credit: James Abbott
10. Use HDR to maintain detail
When shooting landscapes with a traditional camera on the ground, we can take advantage of a wide range of filters to control exposure and apply effects. ND grads are one of the most useful types of filters for maintaining sky detail in high-contrast scenes, but these aren’t available for drones and if they are, they’re essentially pointless because you can’t adjust the level of the graduation to match the horizon.
Drone filters are centred around ND filters and polarising filters, which are incredibly useful, but to maintain sky detail you can take advantage of Automatic Exposure Bracketing for HDR capture and then process them together in software such as Lightroom.
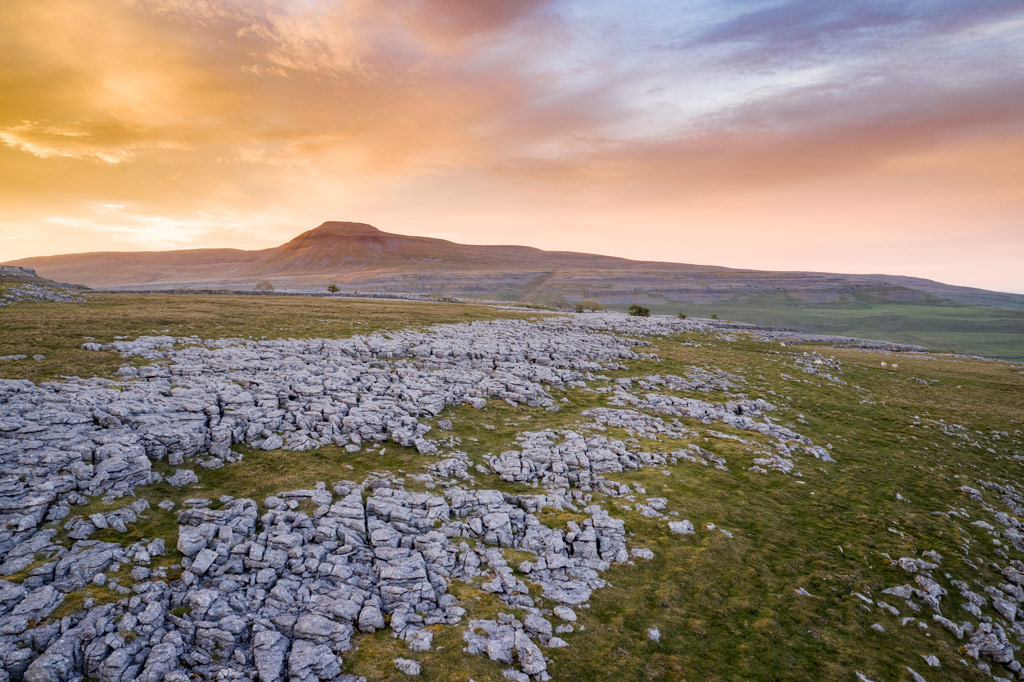
Twisleton Scar in the Yorkshire Dales shot on a DJI Mavic 2 Pro at sunrise. Image credit: James Abbott
Top tips for Aerial Videography
11. The 180 rule for video (use ND filters)
The 180-degree rule is a simple approach to video that ensures movement in the scene is captured naturally with just the right amount of motion blur to achieve this. In a nutshell, you need to shoot at a shutter speed that’s double the frame rate you’ve set.
So, if you’re shooting at 24fps, you’d need a shutter speed of 1/50 or 1/60 sec, and if you’re shooting at 30fps you’d need to use a shutter speed of 1/60 sec. It’s incredibly simple, and the way to achieve a correct shutter speed is a combination of aperture control if your drone has an adjustable aperture, and/or using ND filters to reduce the amount of light reaching the sensor.
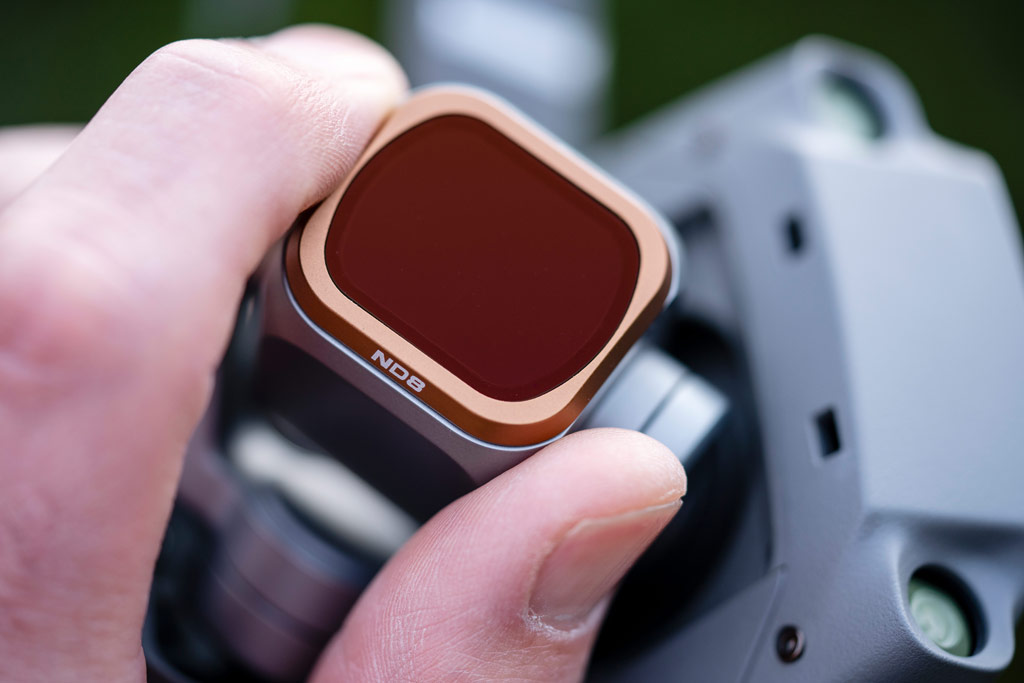
Image credit: James Abbott
12. Which colour profile should you use?
The colour profile you use will most often come down to your desired output for the video alongside your video editing skills. The Normal or Standard profile is like the video equivalent of a JPEG, which means the video is processed in-camera and is usable straight away.
Log or flat profiles, such as D-Cinelike or D-Log M with DJI drones, are designed to capture a larger amount of detail and are a little like Raw files in photography. This profile requires processing in video editing software, but there’s much more scope for making adjustments as well as the ability to colour grade the footage or use LUTs (Lookup Tables) to apply colour grading effects with ease.
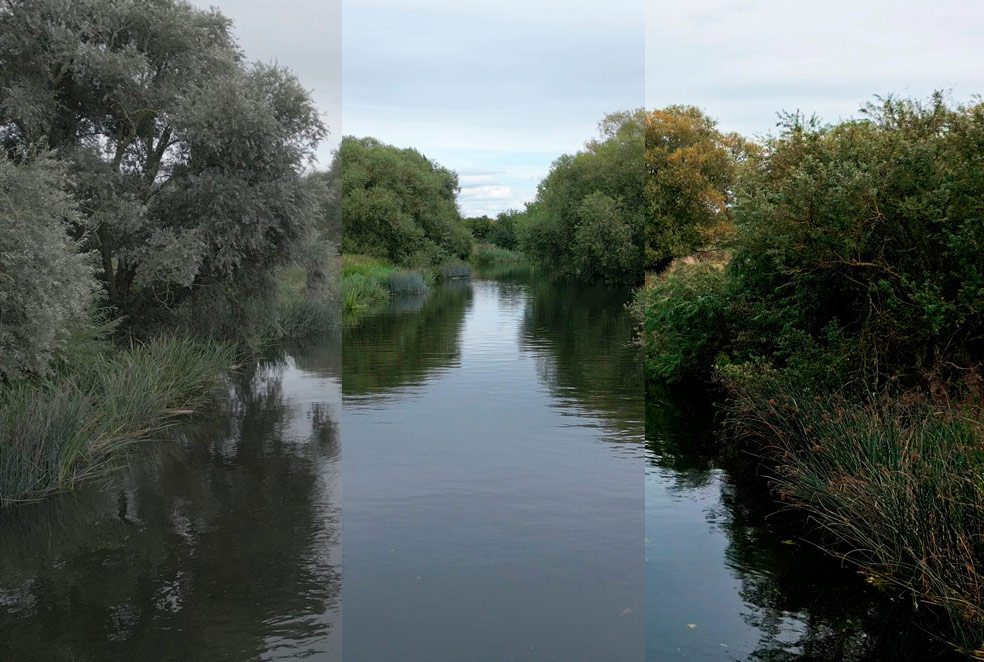
From left to right: D-log flat, Normal colour profile and D-log processed and colour graded. Image credit: James Abbott
13. Shoot video in manual mode
When shooting video, any changes in shutter speed, ISO, aperture (if the drone has an adjustable aperture) and white balance will create inconsistent footage, so it’s always best to shoot manually to lock all variable settings in place.
The only time when shooting with the shutter speed or ISO set to auto is when you’re flying from a bright or dark area into an area of the opposite luminosity. In this situation, having one of those settings set to auto means that the transition from light to dark, or vice versa, will be smooth. Of course, there will also be times when moving from a perfect exposure to over or underexposure is desired for creative reasons.
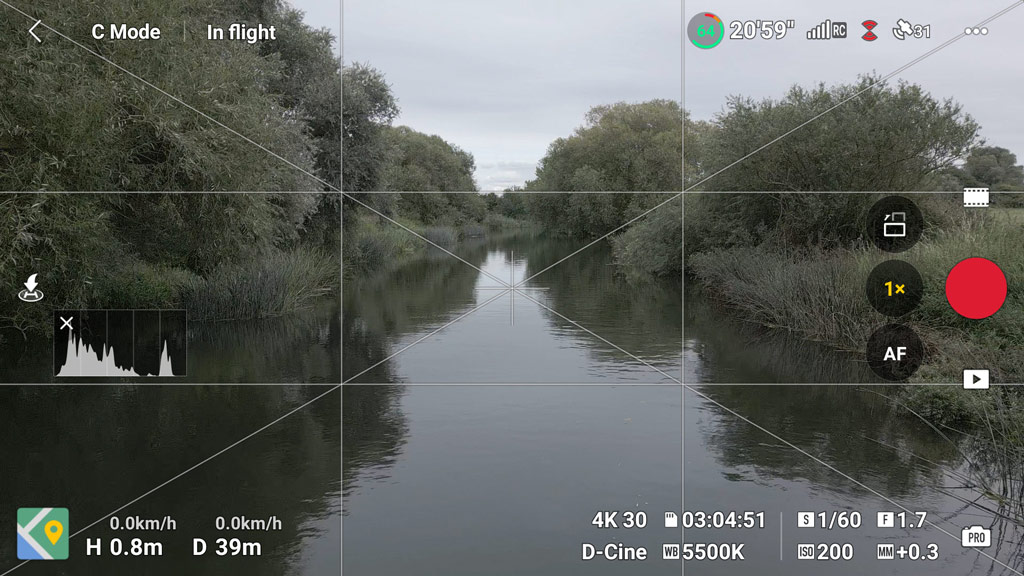
Image credit: James Abbott
14. Use flight manoeuvres for interesting footage
Flying forward while filming is the most basic flight manoeuvre for capturing video, and it’s undoubtedly a winner, especially when paired up with a well-timed gimbal tilt. But you can’t rely on a single manoeuvre to create an interesting set of clips to edit together.
One approach is to mimic traditional camera movements, such as crane lifts and dolly tracking using the drone, while more drone-specific manoeuvres add further visual interest to your footage. A reveal is where you fly backwards over or through an obstacle to ‘reveal’ it when it becomes visible. You can also point the camera straight down and fly upwards, combine it with a rotation and many more.
Image credit: James Abbott
15. Take advantage of your drone’s flight features
When you’re just getting started with aerial video, performing flight manoeuvres takes practice and it will take time for you to become proficient. In the meantime, you can take advantage of Quickshots automated flight patterns that allow you to capture professional-looking video at the touch of an on-screen button.
There are also other flight features including Hyperlapse, which make capturing dynamic hyperlapse videos incredibly easy. With some drones, this feature not only creates a video file in-camera, but you can also save the constituent photos in JPEG and/or Raw files for use as stills or for more advanced manual hyperlapse creation.
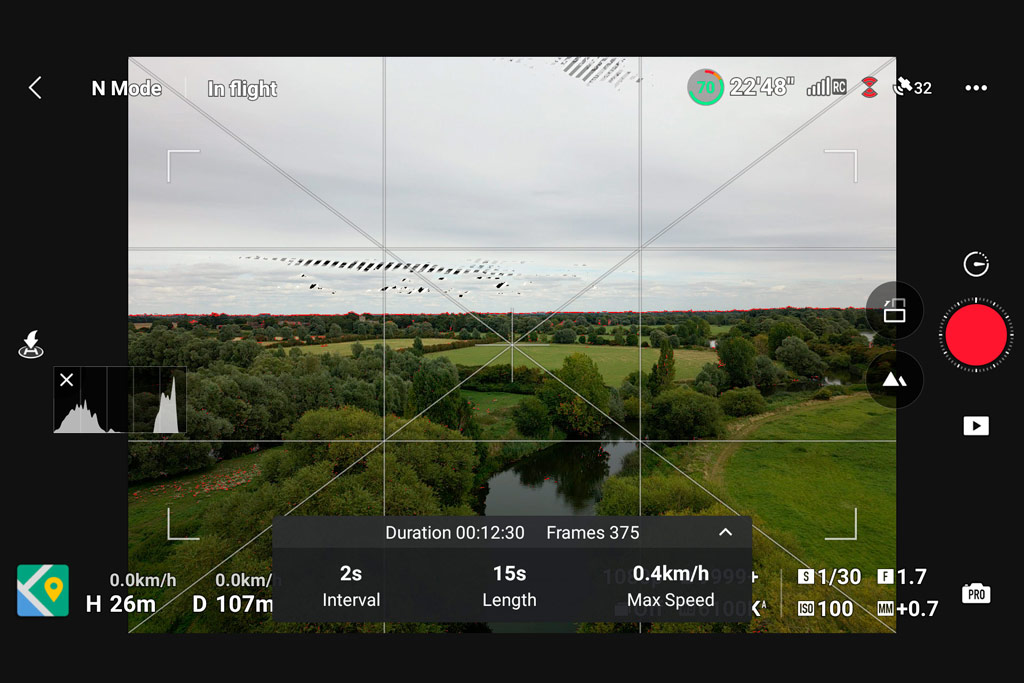
Image credit: James Abbott
Further reading:
- Best Drones with Cameras
- How to edit an engaging FPV drone video
- Drone photography tips for beginners
Follow AP on Facebook, Twitter, Instagram, YouTube and TikTok.