
The great thing about photographing bottles and glass objects is the ability to control the lighting, backgrounds, props and explore fresh ideas. There are so many bottles around us in everyday life from food, beer, wine and spirits to toiletries and perfumes.
Whether you decide to photograph bottles for fun or business it can be challenging as there are so many variables including labels with shiny varnish or metallic foil. Understanding bottle photography forms a foundation for other product photography.
What kit do I need to photograph bottles and glass objects?
- Camera – a mirrorless or DSLR camera is ideal as you’ll need to be able to change lenses.
- Lens – a short telephoto or macro lens around 100mm on full frame or 60mm on APS-C cameras.
- Lights – at least two mains or battery powered studio type flash heads of 200Ws or more powerful.
- Softboxes to diffuse and soften the hard light from the flashes.
- Tripod or studio stand to steady your camera and aid critical focus.
- Diffusion panels to spread and further soften the light from the softboxes. 2mm white acrylic is ideal as it’s easy to clean, semi-rigid and durable. A1 or A2 sheets are perfect diffusers for bottle photography.
- Reflectors to highlight labels and place behind bottles to bring out the colour of the bottle contents.
- Clamps for holding things in place; BluTack for sticking things in place; fine fibre brushes for dusting and gently moving things around.
- Backgrounds – it’s good to keep a variety of A1 size coloured craft card sheets. White, black, grey and silver A1 size foam core boards which also double as reflectors and flags. Sheets of plate glass, metal, pieces of stone and timber all come in useful as backgrounds or props.
- Small spray bottle and glycerine to create a fresh chilled look.
- Microfibre cloth for cleaning bottles.
- Powder free nitrile inspection gloves for handling bottles to prevent fingerprints.
The best lens
A short telephoto lens (around 60 – 80mm) on mirrorless cameras and 100mm on full frame cameras give a reasonable working distance between the camera and bottle whilst reducing distortion and accurately rendering the bottle shape. Some brands pay a lot of money for the design and manufacture of their products and demand that they are reproduced accurately. I prefer the Fujifilm 80mm f/2.8 macro (approx. 135mm on full frame) as it gives a greater working distance between the lens and shooting area allowing easier access to the set.
Camera settings and set-up
The ISO should be set as low as possible to maintain image quality and minimise noise in the darker areas of the frame. Exposure should be set to manual with a shutter speed equal to the flash synchronisation speed for the camera in use. Images should be recorded as raw files; this gives you maximum quality and options during post-processing.
Depth of field
Unless photographing for a specific visual effect the aperture should be sufficiently small to ensure that the whole bottle is in sharp focus. f/11 or f/14 for best depth of field whilst focusing on the label which normally has good contrast. Manual focus is fine, you can set focus using AF and then switch to manual focus. Sharp edges make it easier to cut out the bottle in post-production.
A lens aperture of f/11 or smaller ensures that all is in focus from the label to the bottle edges and stopper.
Colour and white balance
Accurate colour is essential for product photography. This starts in the studio and finishes in post-production. It’s important to use lights from one manufacturer and get to know the colour balance of the flash tubes which may vary from that specified. I rarely use LED luminaires for pack shots or product photography unless wanting to achieve specific effects. Record raw files and ensure that the camera white balance is either set to a custom Kelvin setting of daylight as an indication of colour for the raw preview images.
I always shoot a grey card and Colour Checker in proximity to the products for sampling during post-production image processing. I also work with a colour calibrated display so the colours I see before me are an accurate representation of the final image files.
Calibrated colour displays take the guess work and uncertainty out of producing images with accurate colour. There are a number of colorimeters available from the likes of Calibrite and DataColor. Once you work with a colour calibrated display you’ll notice a marked difference in final image quality.
Flash set-up and softboxes
In order to fire the flash units, you’ll need some sort of trigger unit. Normally this will be a small wireless unit that sits in the hot shoe on top of the camera which then transmits exposure data from the camera to the flash units. Initial exposure can be checked using either TTL (Through The Lens) auto exposure and once the desired exposure is selected the trigger and flashes can be set to manual, or with manual flash and an exposure meter.
I prefer to use manual flash in my studio as TTL exposure can be affected by the tones of the bottle and label. When using a flash meter the incident dome is pointed toward the camera to measure the light falling on the subject. This incident reading is not affected by the tones or reflectivity of the bottle or bottles. With manual flash once you have a set-up that works photograph a quick behind-the-scenes frame and make a note of your settings for a quicker set-up the next time you need it.
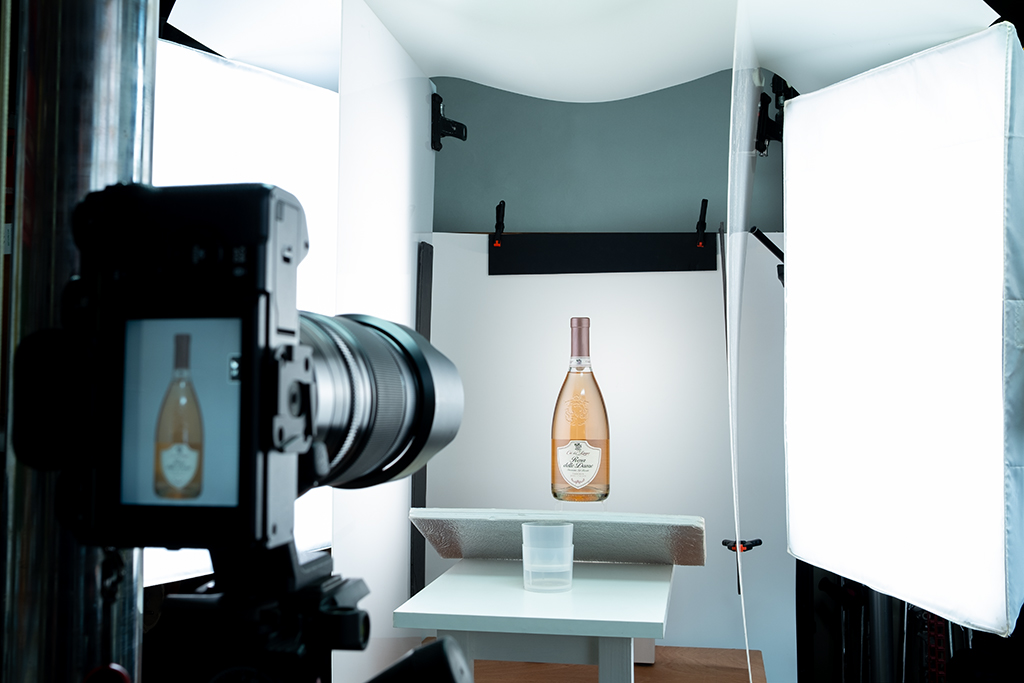
The flashes (strobes) will need securely fixing to light stands with one of the stand legs under the front of the flash for added stability. C-stands which are heavy with a leg design that aids close positioning are ideal. The kind of light you select will depend upon the kind of flash units you use. If using a top-heavy battery mono bloc flash, you’ll need a heavy light stand. If, as in the set-up shown here you use a lightweight flash head such as the Elinchrom Ranger Quadra or ELB500 a nano style stand will be sufficient with a 50 x 70 cm double diffused soft box.
Soften the light – diffusion panels
It’s best to use rectangular soft boxes as they mimic the shape of the bottles being photographed. The soft boxes are positioned behind opal perspex diffusion panels and angled toward the camera to create fall-off in the highlights on the bottles.
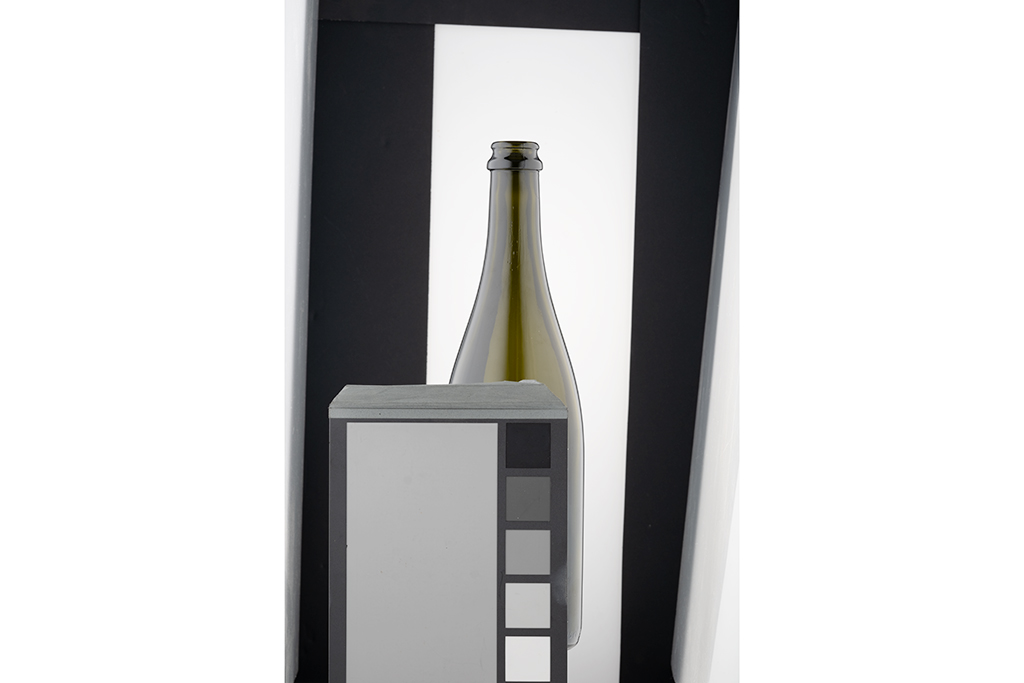
Behind the bottle is another diffusion panel transilluminated by a third flash head set to about one stop over the exposure for the two key lights to show the colour of the drink. The hold in the edges of the bottle, strips of black foam core board are positioned the refract in the bottle edges.
It’s recommended to experiment with the position of the black strips in order that they create a subtle outline and not a black stripe.
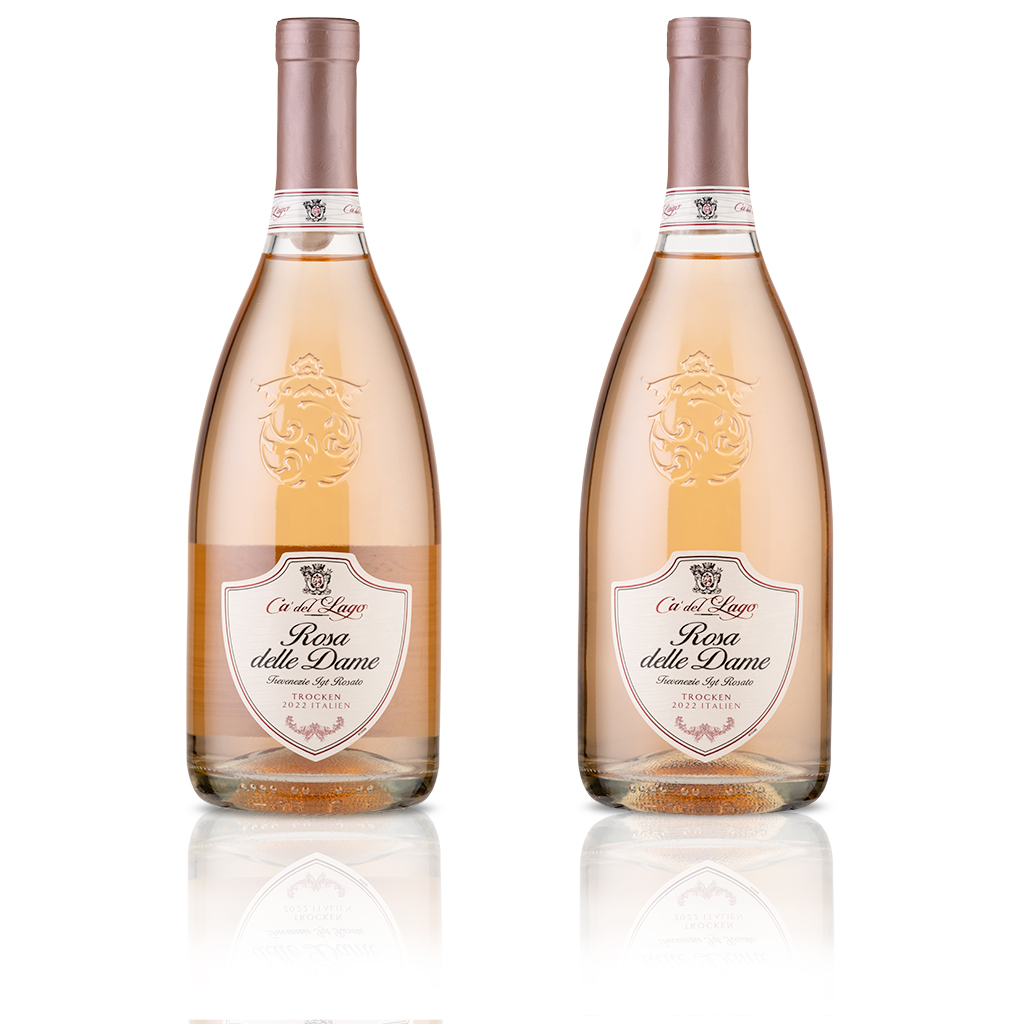
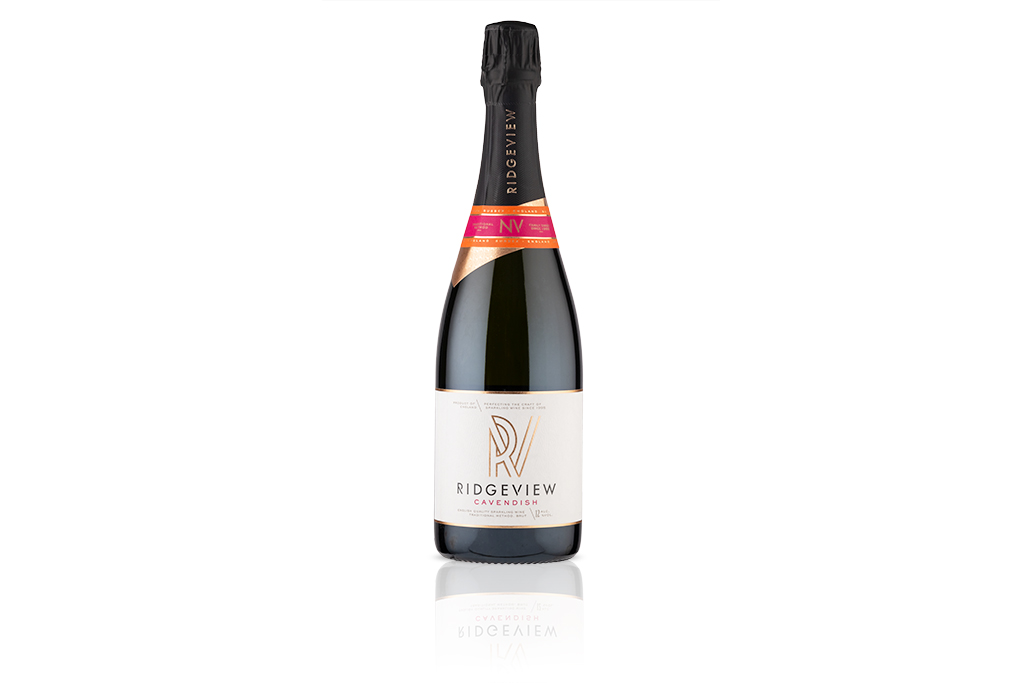
Many wine bottles have a back label that contains statutory information. The back label can be distracting. If possible, ask the client to provide bottles with and without back labels.
The bottle is positioned on a narrow white table made from a shelf 800 x 300mm from a DIY store with custom-made legs to raise the shooting surface 230mm. This allows the diffusion panels to be positioned close to the bottle for optimum smooth reflections.
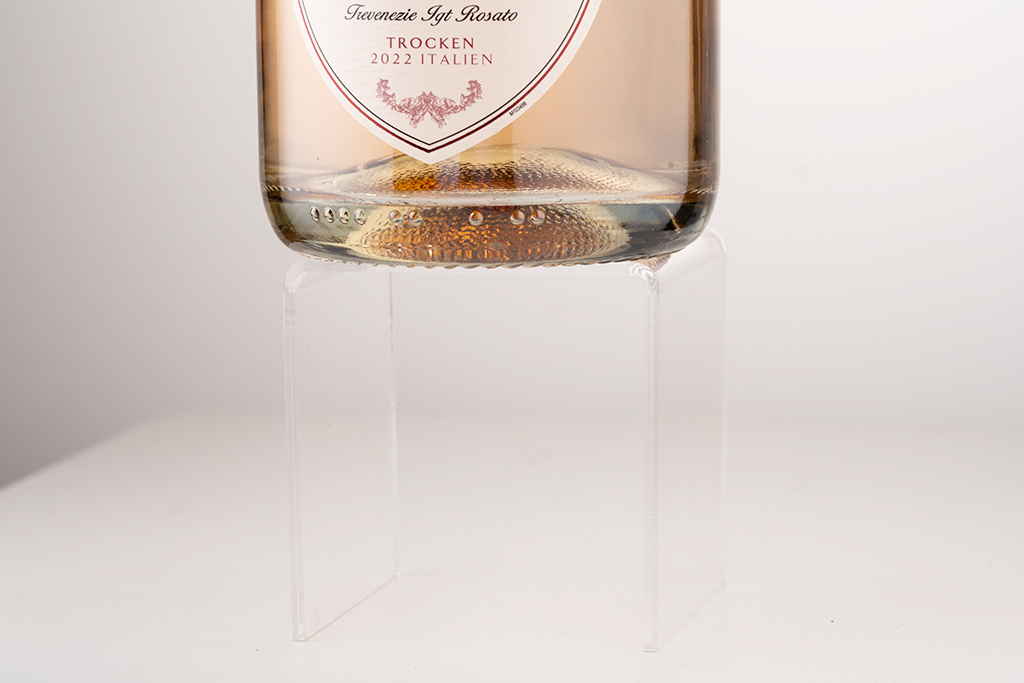
You’ll notice that the bottle is placed on a clear acrylic plinth – this prevents the white table reflecting in the base of the bottle. Above the set is another diffusion panel to block reflections from the studio ceiling and a white reflector propped in front of bottle as a fill light for the label.
When handling bottles they need to be spotlessly clean and free of marks and finger prints. I use either powder free nitrile inspection gloves or clean microbe cloths. During set-up my can use an empty bottle of the type to be photographed as a guide, especially if high-value bottles are to be photographed.
Using a tripod or studio stand
A sturdy tripod or studio stand will provide a steady platform for your camera. A geared tripod head such as the Manfrotto MHXPRO-3WG with both geared and quick release pan and tilt movements.
A studio stand is heavy, solid and expensive. My studio stand is probably 40 or more years old and serves me well for studio product photography. Studio stands are still available and a sound investment if you intend on pursuing studio still life and product photography. Many are available from your favourite auction or online sales website for bargain prices compared to new prices. Studio stands are quick and convenient to use with smooth counter-weighted up and down movements with a lateral arm which is also useful for look-down/flat lay images.
An alternative to a studio stand is a sturdy tripod on a wheeled dolly for ease of movement. Some tripods have a centre column that can be repositioned for use as a lateral arm. Given the choice, your studio floor should be smooth and solid without carpet or other soft covering.
Post-Processing
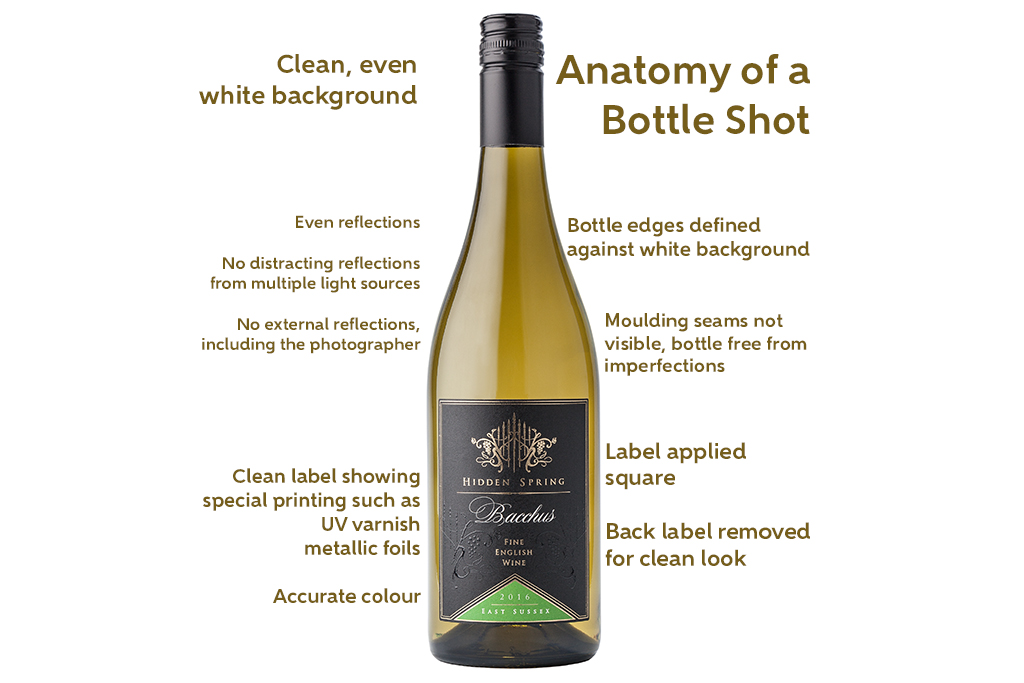
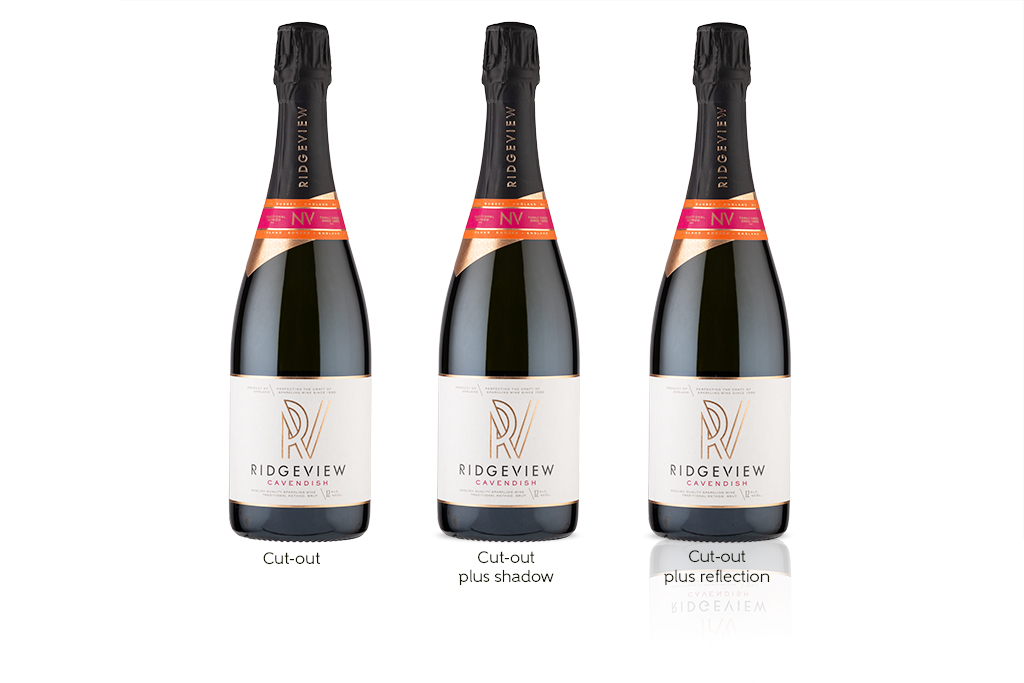
Getting it right in camera can save a lot of work sitting in front of your computer display. Once you’ve saved your raw files, you’ll need to ensure that the colour is accurate by sampling the grey card. Once this is done, you’ll need to create a cut-out of the bottle to place on a white background. Depending on your or your client’s preferences you may want to add a subtle reflection or a hit of a shadow at the base of the bottle for a more natural look.
Bringing it together
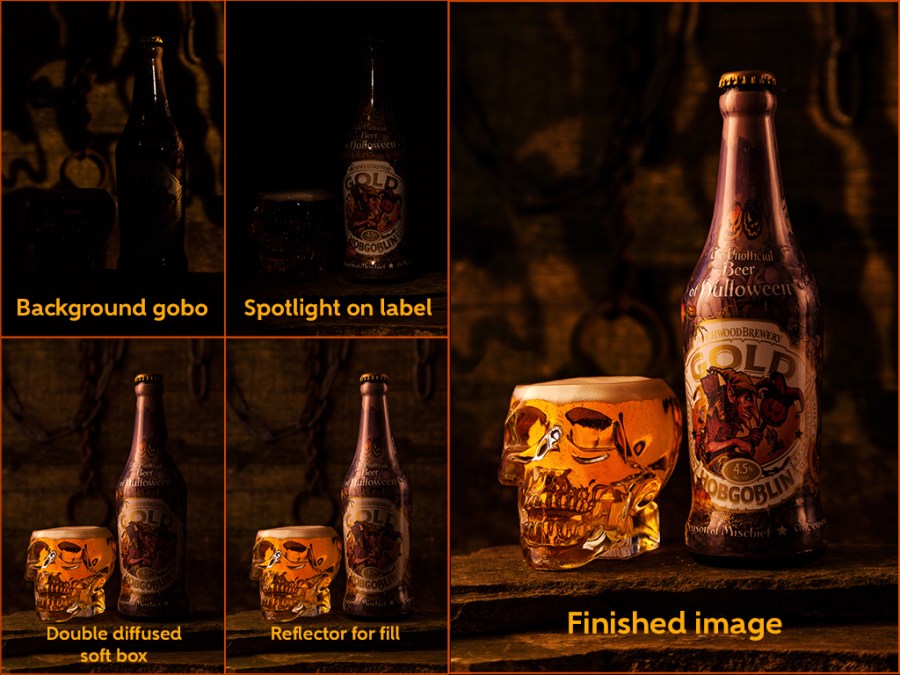
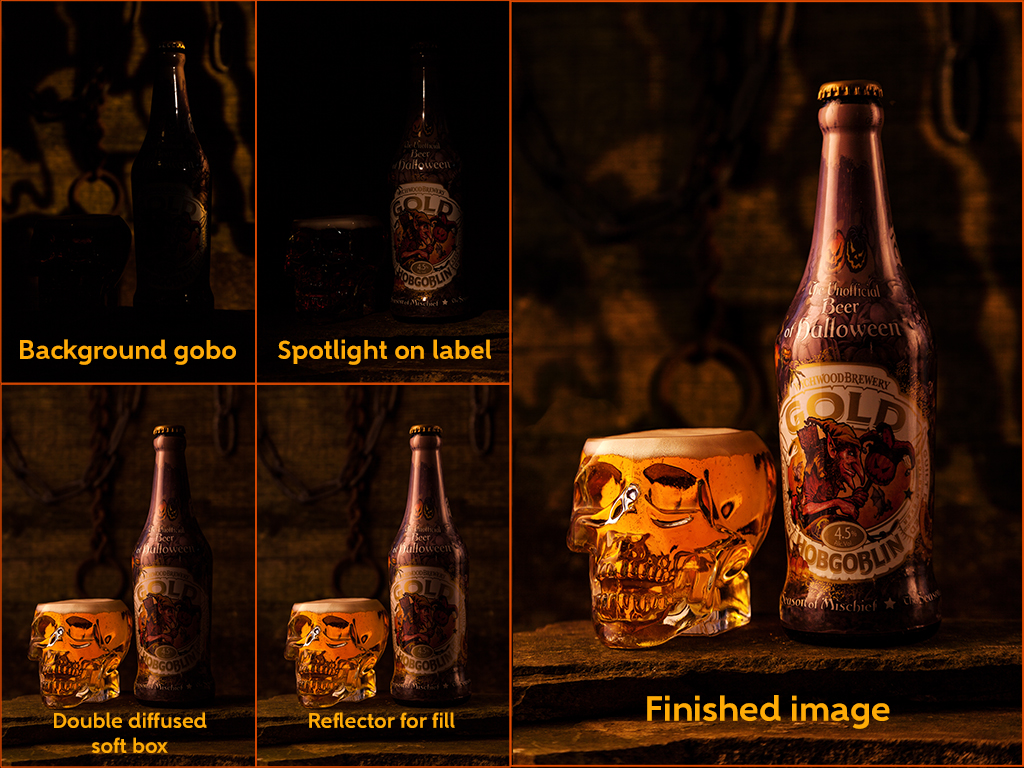
The set-up used for white background bottle shots can be used as the basis for creative bottle shots. This photograph of a beer bottle and skull glass uses essentially the same two diffusion panels with the omission of the back light. The background was lit with a hard light gobo projector with a halloween pattern steel gobo from GoboPlus. A lower powered flash was used to add detail to the bottle label and a gold metallic reflector was cut to shape and positioned behind the glass to brighten the colour of the beer.
Conclusion
This article is intended as a guide and starting point for better bottle photography. Practice and experimentation are recommended for different types and colour of bottles. Few bottles photograph the same so be prepared to make adjustments to the position of the lights, diffusion panels and black strips for the best effect. A small move can make a lot of difference to the final image.
Related reading:
- Still-life photography – How to take perfect still-life photos
- How to create stunning still life flower photos
- Home is where the art is: How to set up a still life studio
Follow AP on Facebook, Twitter, Instagram, YouTube and TikTok.


