
Adobe has two of the world’s most widely used photo editing programs – Lightroom and Photoshop. So, if you had to pick one, which would you choose as your main image editing software? Or do you need both? Will Cheung compares Lightroom vs. Photoshop to help you decide.
As photographers and content creators, we are spoilt for choice when it comes to choosing an image-editing program. There’s a tool for out there for all levels of experience, ability and budget (including some that are free).
Adobe’s monthly Photography Plan is pretty good value via the Creative Cloud monthly subscription, so in this article I’ll look at the pros and cons of its constituent programs, Lightroom and Photoshop free photo editing software
Lightroom vs Photoshop – the background
Lightroom Classic and Photoshop share many features such as the same raw processing engine and functions, but they are very different beasts.
Lightroom is an excellent workflow and image management program with capable cataloguing and keywording functionality that make it easy to keep track of your images; provided you make the effort of rating, keywording and using its collection/smart collection features in the first place.
Being able to search for images by their rating is really useful, but you can narrow it down further by searching for the camera or lens used, or even the ISO rating.
Lightroom has progressed over time with its editing features. Its image-repair and enhancement tools and masking skills mean it’s now possible to make local alterations as well as global changes. Its masking function detects the background, subject, object or sky, and there are gradient and radial select tools. Furthermore, masks can be fine-tuned very precisely, including curves functionality.
You can edit one picture and then copy those changes – including masks – to hundreds of others before batch processing and exporting them, with a choice of file types, which is also incredibly useful.
With the recent addition of Denoise AI, Lightroom has now finally gained excellent noise reduction skills; this feature is also in Photoshop’s Camera Raw.
Lightroom’s image editing skills and its credentials as a one-stop editing software have been greatly enhanced with recent updates. However, the ultimate image editor is probably Photoshop; an advanced editing solution with endless potential. Its usefulness goes far beyond photography; the software is used by graphic designers, publishers, animators and so on.
It is fair to say, Photoshop takes a little more learning than Lightroom. Put another way, if you’re starting with both programs from scratch, you’ll become more proficient more quickly with Lightroom.
Adobe Lightroom Classic and Photoshop are available on subscription only (which is a negative for some people) and there’s a selection of plans on offer through Adobe’s Creative Cloud, for Lightroom and Photoshop combined or each program individually.
You do not have to be online to use the desktop Creative Cloud apps, but you can’t have more than two computers with working software. Try using one of them on a third computer and you will be asked to log out of one computer to allow it.
In this overview, we take a look at performing three key image editing techniques using both programs. For reference, we used Photoshop v24.6 and Lightroom v12.4.
Lightroom vs Photoshop – pricing plans
Via a Creative Cloud subscription, you can get both programs as part of the Photography Plan or subscribe to each program separately.
Lightroom plan (1TB)
$9.99 / £9.98 per month
Photography (1TB)
$19.99 / £19.97 per month
Photoshop
$20.99 / *£21.98 per month – *£9.98 for first three months as of June 2024
Lightroom cloning and healing*
* Healing in Lightroom is now known as the “Remove” tool
A few years ago, there was a gulf between the image repair capabilities of Photoshop and Lightroom. Lightroom lacked the control for intricate edits and the result often looked less than seamless; you’d be better off taking the image into Photoshop to repair it with the very controllable Clone Stamp, Healing brush and so on.
You would have access to layers, selection tools and adjustment masks too. Times have changed, though, and cloning in Lightroom is greatly improved.
Cleaning up anything beyond small sensor spots used to be the province of Photoshop, but the advances in Lightroom mean you get comparable results very quickly and all image modifications are forever retained virtually in the catalogue.
This benefit proved invaluable recently with the arrival of Denoise AI where you could treat old raws and then re-apply any edits you made to the denoised raw.

You don’t get that ability in Photoshop, although there is a limited workaround. Make cloning and image adjustments on separate layers, save the entire file and then archive it somewhere safe for future use. Be aware this takes up storage, and you need to be organised too.
As usual, much depends on what you are trying to clone or heal and Photoshop is more capable of very complex, seamless alterations with the option of different tools.
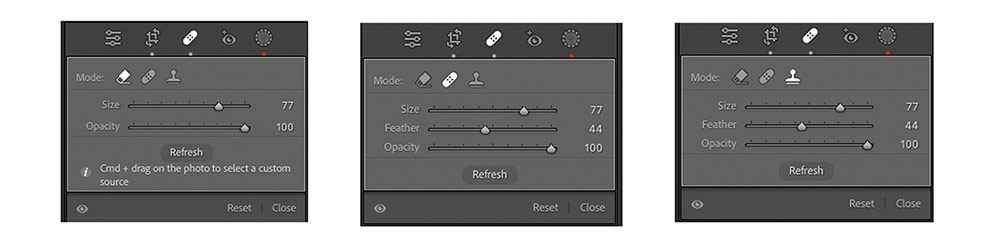
The Content-Aware Remove, the Heal brush and the Clone tools have adjustable parameters of size, opacity and feather (not on Content-Aware Remove).
They are easy to use and work very effectively, although you may have to fine-tune and, for example, move the sample area in the case of the Heal and Clone tools or adjust the size in Content-Aware Remove. Hitting the H key reveals cloned and sampled areas (as seen in the above interface), so deleting cloned areas or moving sampled areas is easy.
Lightroom vs Photoshop – Photoshop cloning and healing
Photoshop has more potential for image repair and the powerful option of layers. Here, I kept it simple using the Healing Brush and Clone Stamp tools and a variety of soft and harder-edged brushes working on a background copy.

Cloning on a separate blank layer gives incredible control over colour, selection and the option of layer modes and if you make a mess of it, there’s no harm done to the image so delete the layer and start again. There’s more control to the brushes in Photoshop and that is a definite plus over Lightroom.
Lightroom vs Photoshop – cloning and healing summary
I used this shot of a large skipper as my sample image, with the two grass stalks on the left that needed removing. It may seem like a simple job, but a seamless result can take a little more effort. However, with the skills of both software, a decent result was achieved within a few minutes.
The takeaway is that Lightroom has come on in leaps and bounds, and seamless edits such as cloning can be successfully achieved in this software. Having the security of Photoshop for more complex editing jobs is very comforting, so this is definitely a reason to opt for Adobe’s Photography package and have both programs available.


Lightroom vs Photoshop – contrast control
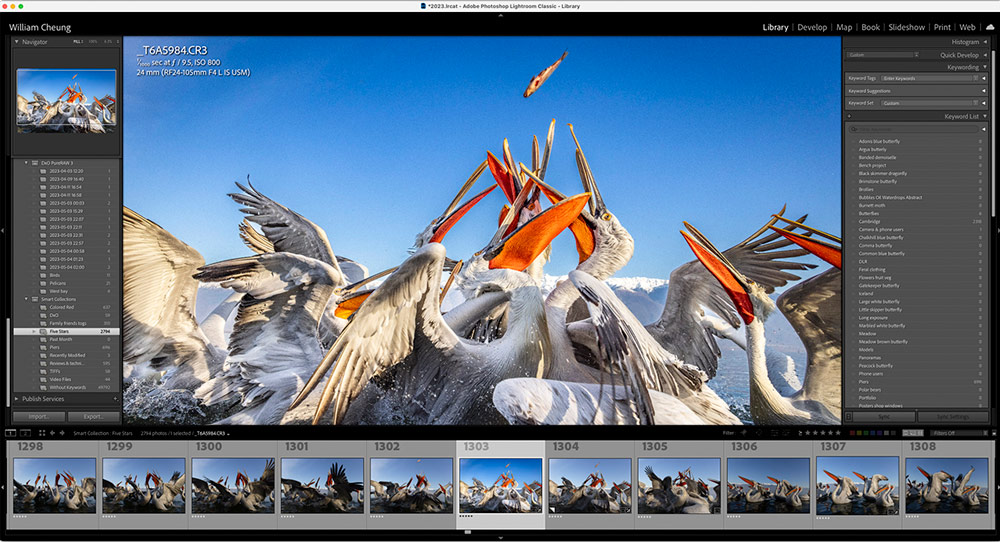
My pelicans at Lake Kerkini picture was taken on a Canon EOS R5 with a 24-105mm zoom at 24mm using aperture-priority AE. A blue sky, low sun, deep shadows and white birds meant contrast was an issue and some work in raw was needed to retrieve the situation.

Lightroom – contrast control
Masking and selection tools are comparatively new to Lightroom but they have been refined and improved over recent updates. Subject, sky, background and people are the four automated masks and they can be refined, subtracted and added to very easily with an extensive menu of effects.

For this image, the birds were selected with a single click using the subject mask. Lightroom made a great job of that and no modifications were required. The same applied to the sky selection. I adjusted and played with both selections using curves, saturation and exposure to get the effect I’d pre-visualised.
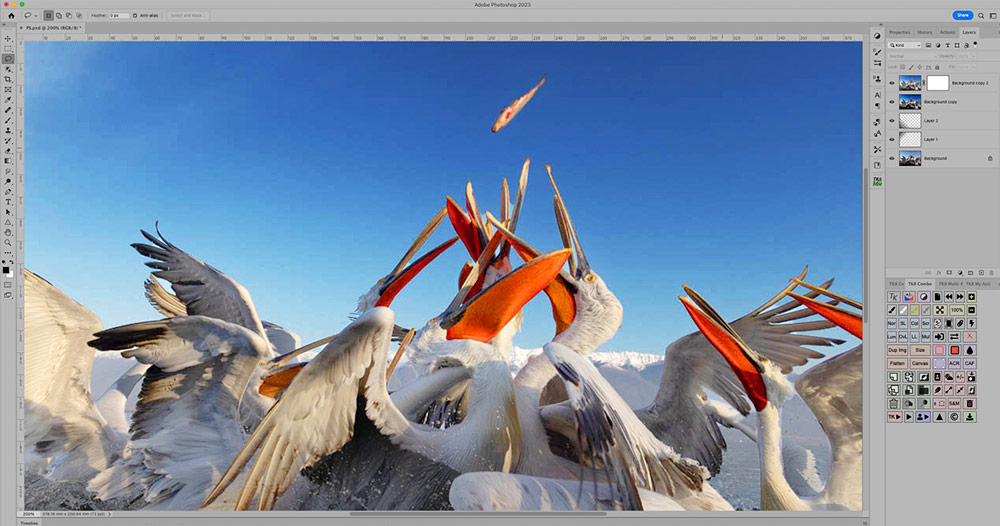
Photoshop – contrast control
Photoshop has always had comprehensive selection skills, but a bit of work was needed for creating accurate masks. Adobe made life easier and accelerated the selection process by adding an automated select sky and select subject to its Select menu. They were the tools used here.
The sky selection was more or less spot on, the subject select mask less so. The selection needed some work so the option and shift keys were used to subtract or add respectively to Photoshop’s automated selection.

With each selection active, I adjusted saturation and curves to get the effect I liked, then used the dodge tool to lighten the shadows and a gradient tool to darken the top left corner.
Lightroom vs Photoshop – contrast control verdict
Photoshop has almost always enabled tremendous control over tones, colours and contrast and with its automated masks, the process is made even easier, so if making selections with the lasso and marquee tools was a problem for you, that is no longer the case.
What has changed is the power Lightroom has gained to make accurate masks with minimal fuss and user expertise. It makes possible results that were hitherto only possible by going into Photoshop (or another well-endowed editing program). In this example, Lightroom was actually quicker to use.
Another big Lightroom benefit is that the same edits, including masks (which get modified if the images are slightly different), can be quickly applied to similar images.
Black and white editing
The medium of black & white is as popular as ever. Shoot JPEGs and you can go mono in-camera; shoot raw and you need to convert to mono in software. There are dedicated mono conversation apps, but both Photoshop and Lightroom deliver good-quality results without leaving the programs.

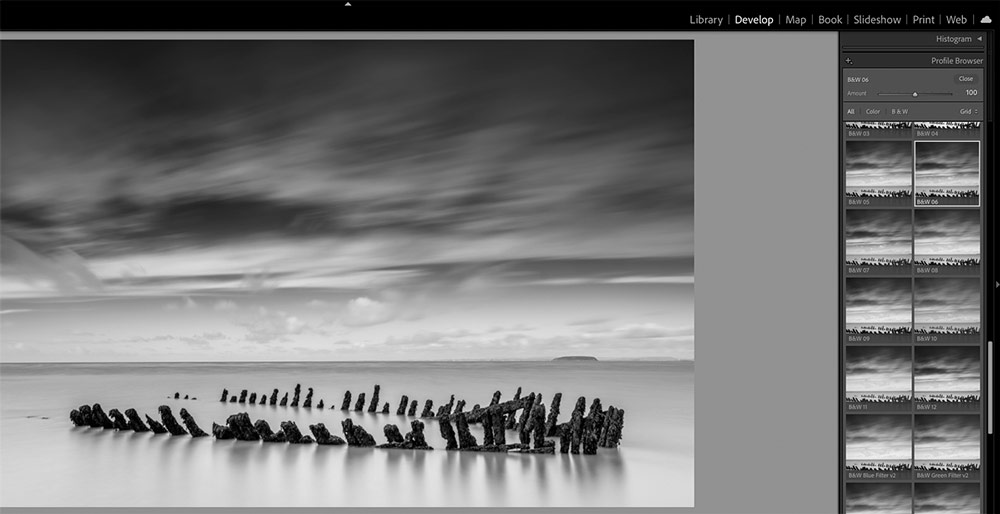
Lightroom – going monochrome
Going monochrome in Lightroom is a one-click procedure in the Develop module. Once black & white has been selected, click on profile and a drop-down menu appears, hit ‘Browse’, scroll down and a selection of mono thumbnails treated with different profiles appear. Just pick the one you like the look of and close the interface.
Exposure, contrast and clarity are the main sliders to use to fine-tune the image. In this image, I added two linear gradient masks, one from the top of and one from below so I could darken the sky and lighten the foreground slightly.

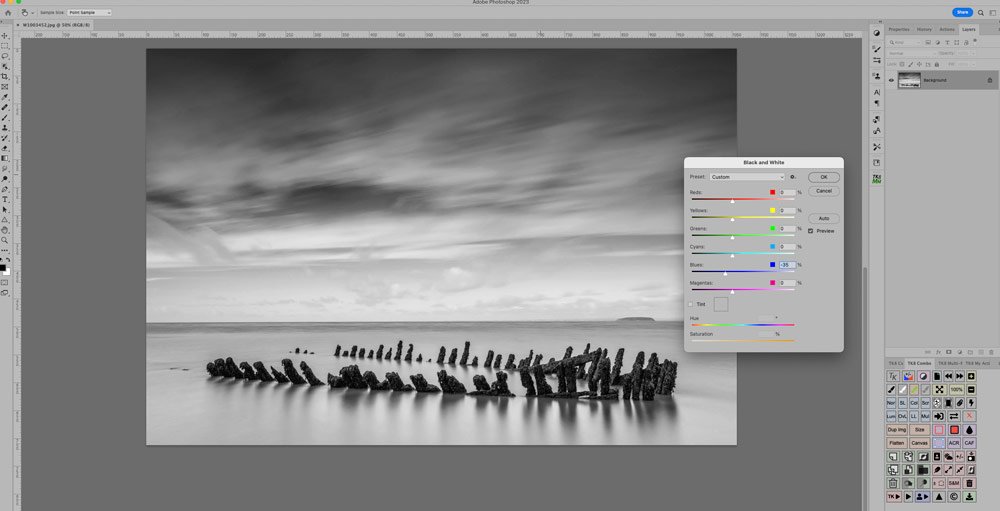
Photoshop – going monochrome
Photoshop offers any number of ways (leaving aside third party plug-ins) to make a good monochrome conversion. A popular and very good one is the Channel Mixer (found by Image>Adjustments>Channel Mixer) and under the preset menu a selection of monochrome profiles including those simulating the use of on-camera colour contrast filters.
However, for this image Photoshop’s mono filter was used – found in Image>Adjustments>Black & white – and here there are six colour sliders available to fine-tune the look. There’s also a selection of mono effect presets. For this image, a curves adjustment was made to increase contrast and two gradients were applied to darken the sky and lighten the foreground.
Film grain can be added by copying the background and going to Filter>Noise>Add noise. Click on Gaussian and Monochrome and adjust the Amount to taste, and then change the layer mode of the top layer to overlay or soft light.

Going monochrome summary
Both Photoshop and Lightroom give very realistic monochrome conversations with not much work. There’s plenty of extra control too so you want to beef up contrast, add a film grain effect or take the fully-toned fine art approach; all are easily achieved.
Using layers
A major point of difference between Lightroom and Photoshop is that one program has layers and the other doesn’t. Whether you need the power of Photoshop layers really depends on how deep you want to take your image editing. If your aim is to produce multi-image montages, you will need layers.
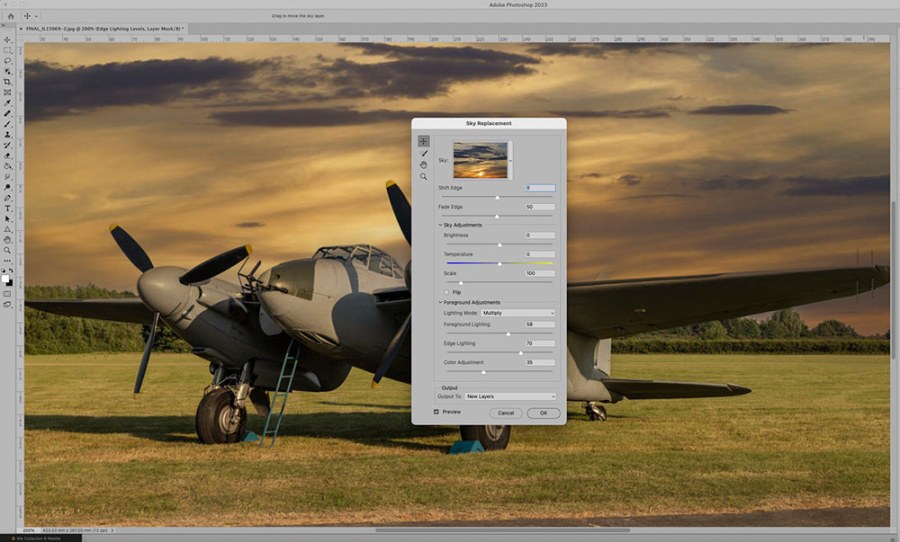
I had fun with this image below of the Mosquito HJ711, taken on a TimeLine Events shoot at the Lincolnshire Aviation Centre.
It’s an ok image but ultimately rather dull, and with no detail in the sky to work with, I decided to replace it. I went for a dramatic pictorial effect rather than reality and technical accuracy. I found a suitable sky in my Lightroom catalogue (I keyword sky images after importing them, so they are quickly available) and exported it onto my desktop in readiness.
Using Photoshop’s Sky Replacement tool (found in the Edit menu), a couple of clicks followed by a few seconds of processing, and it was done, with the replacement sky placed on a separate layer in the document.


Using layers summary
There is no layer functionality in Lightroom so this is not a comparison – but illustrates that if you want to push the creative boundaries, Photoshop with the power of layers is incredibly useful.
Lightroom vs Photoshop – the verdict
Both programs are incredibly well-featured, and while they have commonalities, there are also key points of difference. I can see many photographers doing everything they need in Lightroom, but equally, I can see that applying to Photoshop, too. However, for most keen enthusiasts who shoot and create a variety of images, having both in your workflow would make perfect sense.
In Lightroom, you can organise and keyword your images for quick retrieval and reference, and can enhance, repair, export and print, and get creative too. And everything you do in Lightroom is retained for future reference.
For more advanced work, images can be briefly taken out of Lightroom, into Photoshop or another app, worked on before being saved back into Lightroom
Lightroom’s also not too complex to learn and Adobe’s recent update with Denoise AI (also available in Camera raw in Photoshop) only enhances its overall value for money quotient.
Photoshop is more complex in use, and there’s much more to learn. However, learn the techniques you need, and you have an incredibly powerful and creative tool at your fingertips. If you have a vivid imagination, there is probably nothing that Photoshop can’t do, providing you have the skill.
Therefore, for me the Photography (20GB) package at $9.99 / £9.98 per month with both packages is ideal and it comes highly recommended.
Adobe Lightroom pros:
- Cataloguing, keywording and image search skills
- Subject, sky and background masking skills
- Virtual copies feature
- All adjustments remembered in the catalogue
- Batch processing
- Capable of very big catalogues
Adobe Lightroom cons:
- No layers
- Not everyone likes the image-saving process
Adobe Photoshop pros:
- Incredible editing skills
- Layers
- Huge choice of editing tools
- Good for printing
Adobe Photoshop cons:
- Less easy to use compared with Lightroom
- Complex interface
- Editing tools can be harder to find
Further reading
Best software for black and white editing
Best free Lightroom presets
How to use Photoshop actions for a faster workflow
Follow AP on Facebook, Twitter, Instagram, YouTube and TikTok


