
Snapseed is Google’s free mobile photo editing app and is remarkably good. Expert smartphone photographer Jo Bradford shows how to get the most from it.
For all the camera editing apps for phones that now exist, serious photographers still need look no further than Snapseed (for iOS and Android). Its huge variety of tools and tricks remains as apt and useful today as ever. If you’re investing in one of the best smart phones for photography or shopping for a budget camera phone, Snapseed is the editing app for you.
Far beyond one-click filters and fakery, it’s a serious photo editor with striking creative effects and powerful editing tools. These range from the familiar edits like crop and rotate to more in-depth techniques like curves adjustment. Snapseed is also very straightforward and well designed for touch control. Better still, Snapseed is free, with no strings attached.
Note that, although it’s a Google app, it integrates perfectly well with Apple Photos (simply launch Snapseed and choose the photo to edit from your Library). You can apply a single effect or many, and save your favourite looks as preset effects to be used over and again.
Where to start with Snapseed
A deeper dig into Snapseed reveals amazing editing potential. Let’s begin with curves editing before considering other smart editing features. Curves adjustments are typically found in more advanced desktop photo editing apps; yet are actually very simple to use in Snapseed. Give them a try and you will soon have a feel for them. For more in-depth tips, see my book Smart Phone, Smart Photo Editing, available from all good bookstores.
Curves: the basics
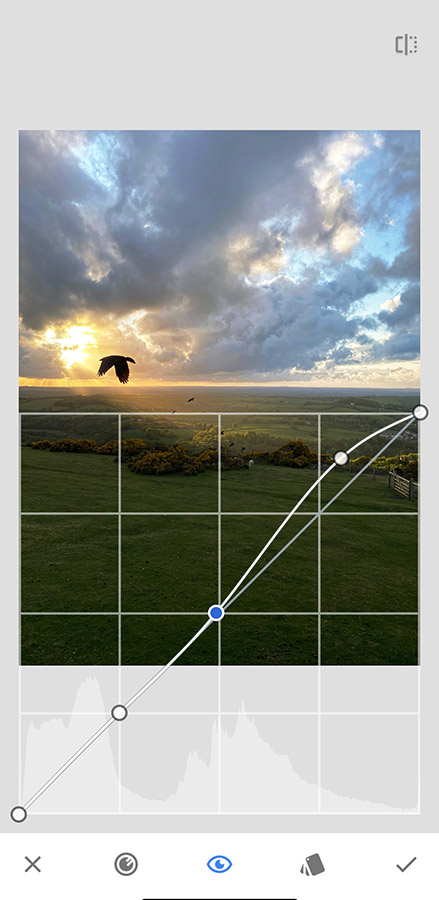
The Curves tool is used to adjust hue, brightness, contrast, highlights and shadows in your photos. Essentially, this is done by dragging blue dots, known as nodes, on a line: down to decrease, up to increase. This very precise way of editing enables much greater adjustment control than when using the contrast slider in the Tune image tool.
Curves will be familiar to anyone used to editing photos on a computer, but for the sake of smartphone users still learning the jargon, we’ll start from the basics.
Opening the tool, we see a straight diagonal line from bottom left to top right laid out in a square box: not a curve as the name suggests. This line, often referred to as the contrast curve, represents the range of brightness and shadow in images. Below it is the histogram graph, which tells us how the light information is distributed in the photo.
The core elements are:
- The existing node at the bottom left of the line represents the black point.
- The existing node at the top right represents the white point.
- The bottom half of the line represents the shadows.
- The middle section of the line represents the midtones.
- The top half of the line represents the highlights.
Nodes can be added to curves adjustments to change the shape of the curve; and the contrast and brightness of the photo.
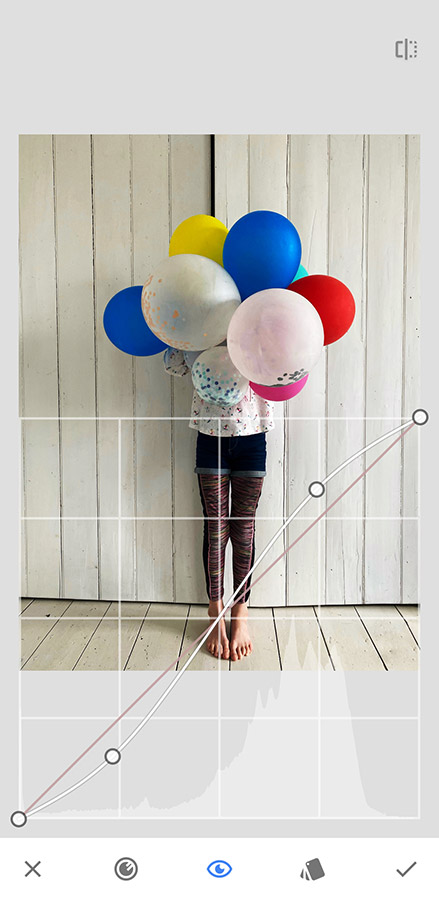
Snapseed offers a selection of preset curves adjustments. Explore these to get an idea of what each does and when you might want to use it. Other nodes may be added by touching anywhere on the line to manipulate the presets further.
As well as the presets, curves can be adjusted manually by tapping the circular icon at the bottom left. This reveals the different curve adjustments options: RGB, Red, Green, Blue, Luminance. The RGB curve is the default selection. Raising or lowering this curve brightens or darkens all the colours in an image simultaneously.
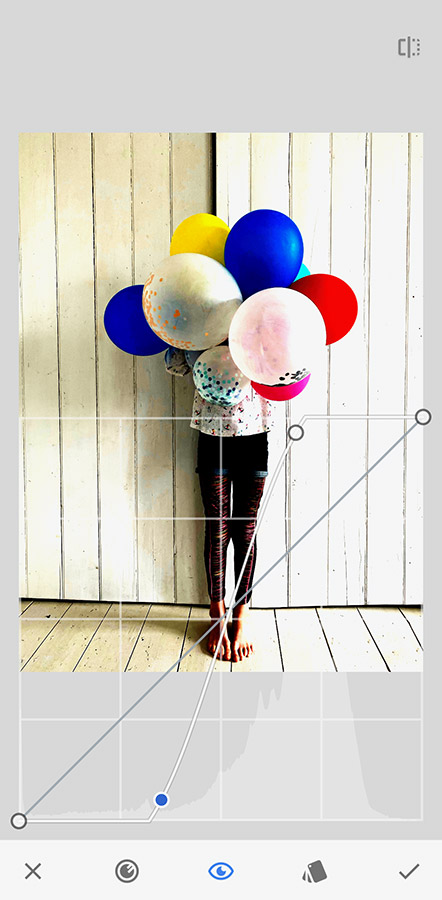
Choose to increase the lightness or darkness of each colour individually by using the Red, Green and Blue icon options:
- Raise the red curve above the diagonal median line to increase the red hues.
- Drag the red curve down below the diagonal median line to increase the cyan (blue/green) hues.
- Raise the green curve above the diagonal median to increase the green hues.
- Drag the green curve below the diagonal median line to increase the magenta (purple/pink) hues.
- Raise the blue curve above the diagonal median line to increase the blue hues.
- Drag the blue curve down below the diagonal median line to increase the yellow hues.
- Luminance affects the brightness of all the colours at the same time; RGB affects the black and white points individually for each of the colours. Raising the luminance curve increases the hues’ lightness.
- Dragging the luminance curve down increases the darkness of the hues.
In practice, you may not need of all of the above. You’re best to start by altering the Luminance curve alone and then experiment with the individual RGB channels as you gain experience, and use the list for reference.
Curves editing
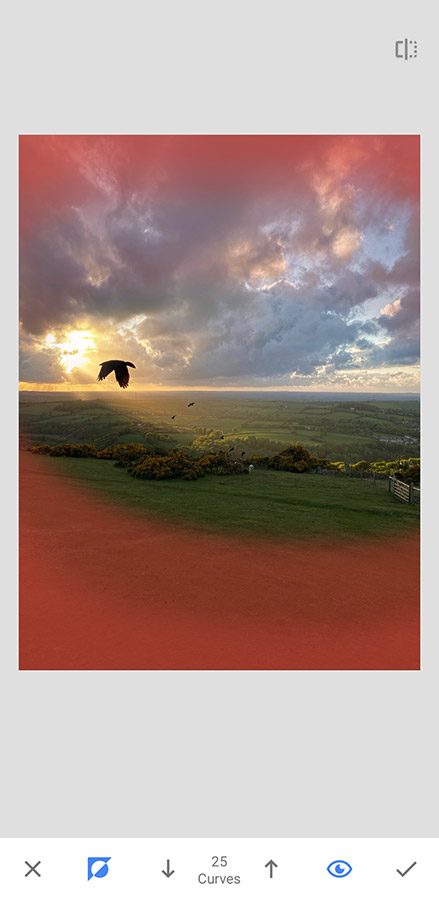
- Tap the eye icon on the bottom menu to hide the curve line and bottom menu ribbon, and see the effects on the image.
- The curve is also known as an S curve, because when used correctly, the shape created looks like the letter S.
- Avoid dragging the nodes to any extremes (such as straight lines, right angles, shelved or stepped patterns) and avoid touching the ceiling or floor of the curves box. To work best, a curve should be soft and rounded.
Vignettes
Vignettes darken the corners of an image to focus attention on the main subject. As with many effects in Snapseed, it’s easy to ‘overcook’ this. You can reduce or increase the strength of the different vignette effects by sliding your finger up and down to access various options, and then left or right to change the strength.
Interestingly, the Curves tool provides a more sophisticated method for creating a vignette than the Vignette tool itself. The latter is limited to a uniform circle, whereas our Curves tool protects the highlights in the image and produces the light and dark areas in any bespoke shape. This is well worth trying.
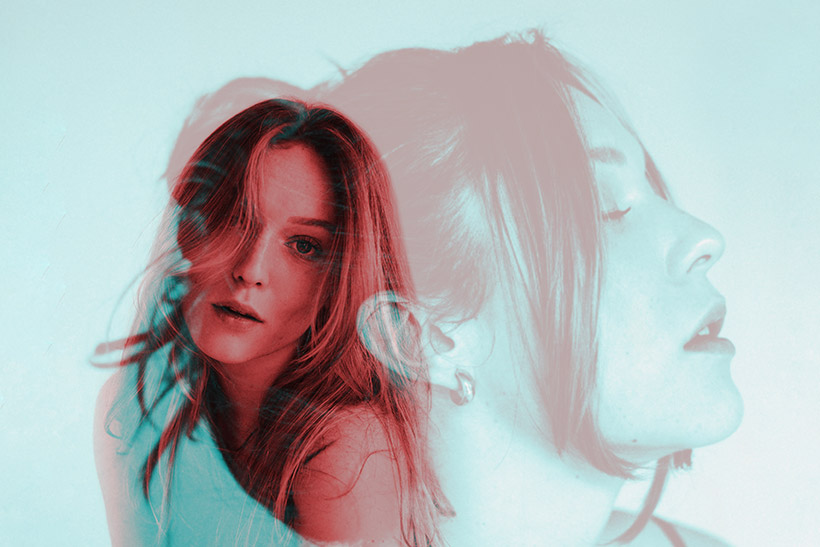
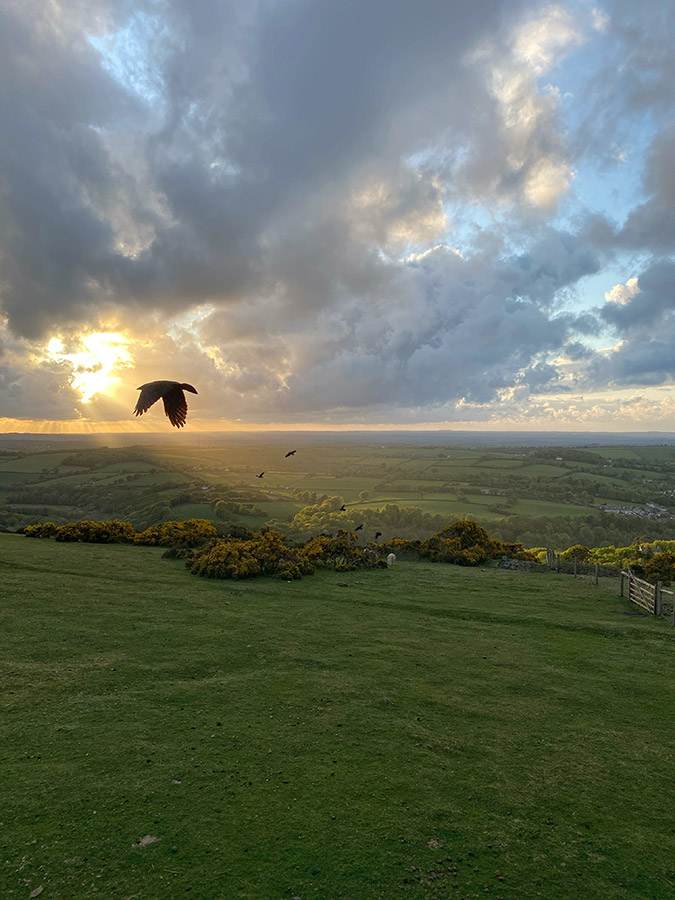
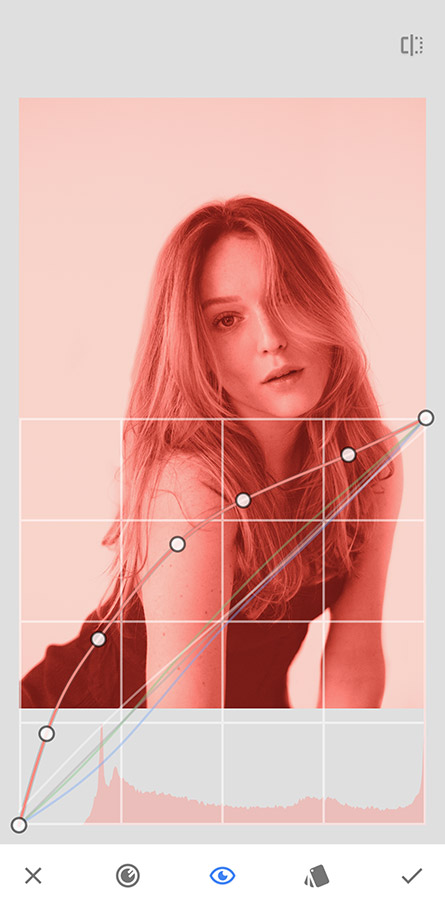
In this picture of a jackdaw, I wanted to use a vignette effect to increase the focus on the bird. I created a new RGB curves layer and placed a node on the RGB line just below the first intersection but snuggled into the corner. By dragging this node down, I increased the shadows in the image. Then I placed a node in the top intersection to hold the highlights in place and protect them in the image.
Finally, I masked in the layer in the edit stack, brushing the outside edge at 25. Then moving in towards the centre graduating the steps by 25 at a time, i.e. 50, 75, all the way to 100. This prevented it from being a hard effect and made it look more natural.
This very subtle change is all about creating mood and atmosphere using the lightest of touches.
Vignettes are very effective for enhancing composition and mood, and you can start with the basic vignette tool and move on to more advanced curve and masking techniques.
Composite images
Another handy tool is Double Exposure. My book, Smart Phone Smart Photo Editing, includes two edits using it. One shows how to overlay two different images of the same subject to create an image that is more than the sum of its parts. The second shows how to create a stylised image that will make the most of your new curves skills. Be sure to choose two images that sit well together, however. Image preparation is essential to clean them up and expand the backgrounds so they can be resized to overlay each other.
How to create a composite image in Snapseed
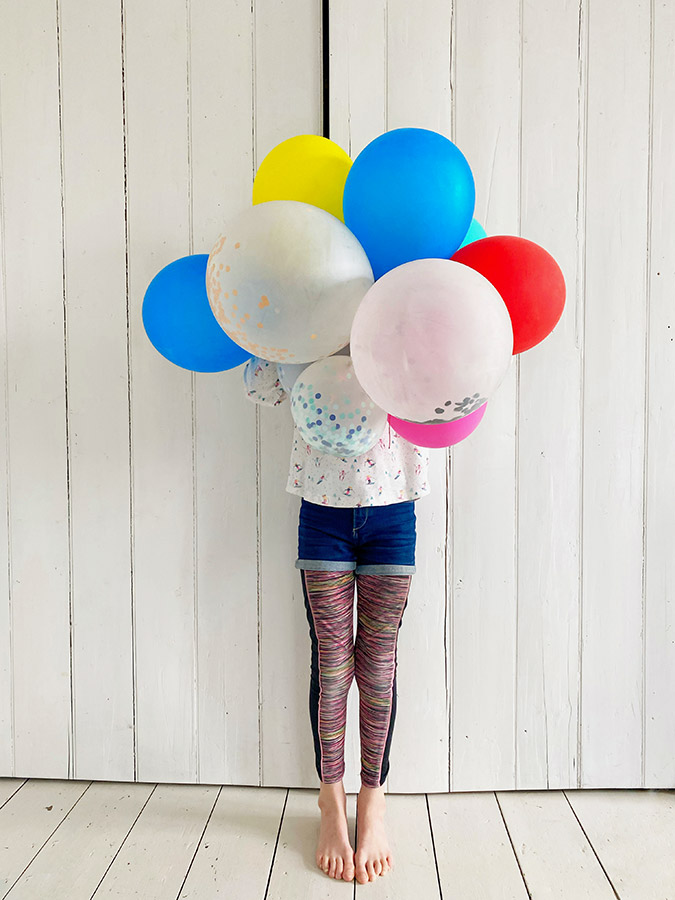
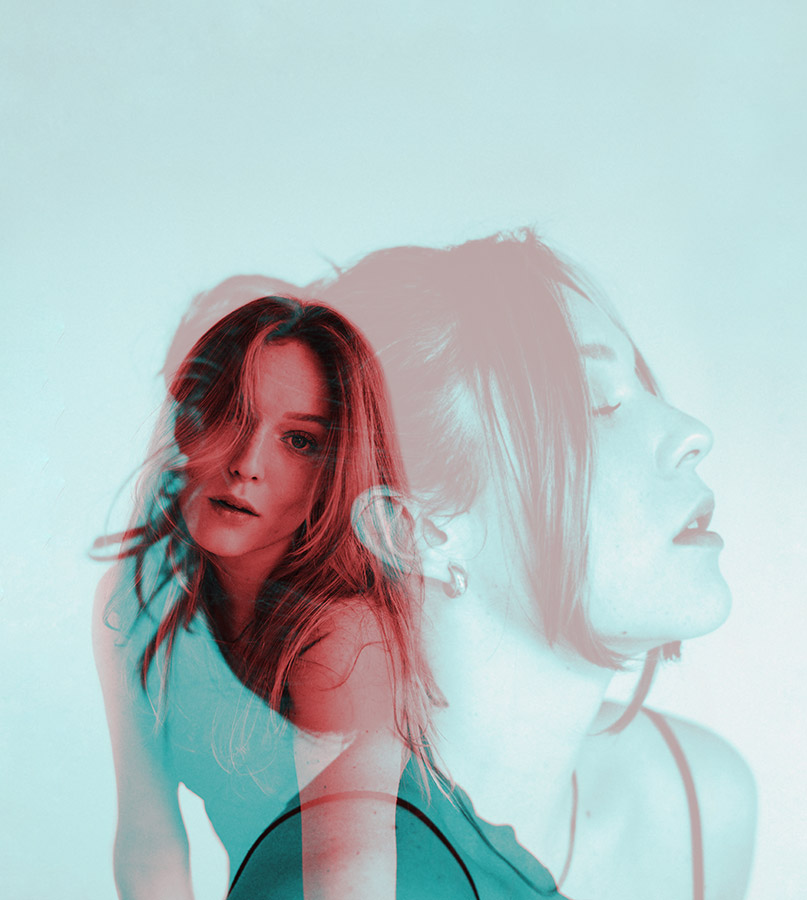
The original images I used here were in colour, so the first job was to convert them, one at a time, to black & white (use the Saturation slider within the Tune image tool, but check highlights, shadows and contrast – again, see my book for more). Once the first image was black and white, I opened the White Balance tool.
The Temperature and Tint were both turned up to +100 to make the image redder before I opened a curves layer and activated the red curve. I dragged this up to make it redder still, then selected hard contrast from the Curves presets to make sure I had strong shadows to work with when the images were blended. Finally, I flipped the image using the Rotate tool to put the subject’s head on the left of the frame. Then, I saved and exported it for later.
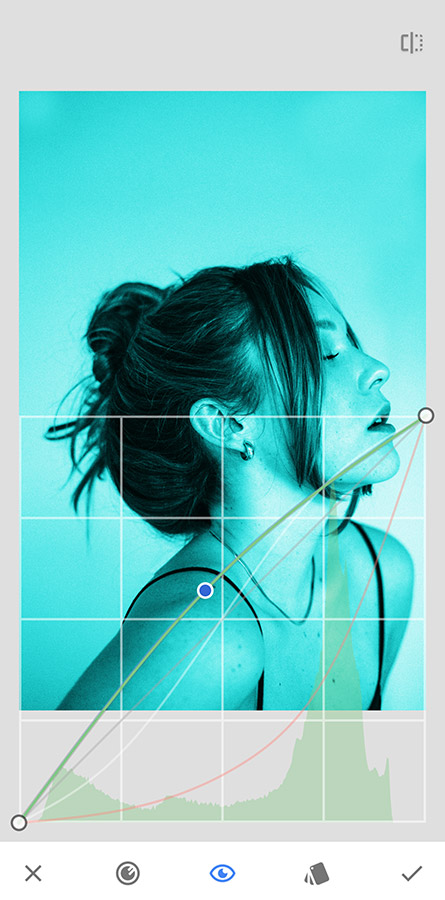
Now the second image. Once converted to black & white, I opened the curves layer again. This time I dragged the green curve up and the red down to remove the red and enhance the cyan, which created the turquoise colour.
After using the Expand tool to increase the frame, and the Healing tool to remove background anomalies caused by doing that, I saved and exported this second image, too. With the red image reopened, I tapped the Double Exposure icon on the bottom screen menu to open the turquoise image, creating an instant overlay ready for further editing.
The Swatch icon in the Double Exposure tool opens the blend method, which allows you to explore ways in which the two images are blended.
The Liquid Drop icon lets you raise or lower opacity so you can control the visibility of both images. You can also use your finger pinch to resize the second image, move it around the frame or change its orientation.
Note that you can reposition only the second image. The first will be static; so make sure you open them in the right order for the image you want to create.
Create your own Looks: Styles in Snapseed
Snapseed’s preset Looks (iOS) or Styles (Android) are ‘ready-made’ combinations of various edit stages that you can use to quickly alter the style of photos. However, you can save a huge amount of time by creating your own Looks/Styles; especially if editing multiple images from the same shoot and using the more sophisticated tools such as Curves. Creating your own Looks/Styles means you can rapidly apply the same edits to a whole set of images. This makes it easier to select the best of the bunch, and can also help establish your own style.
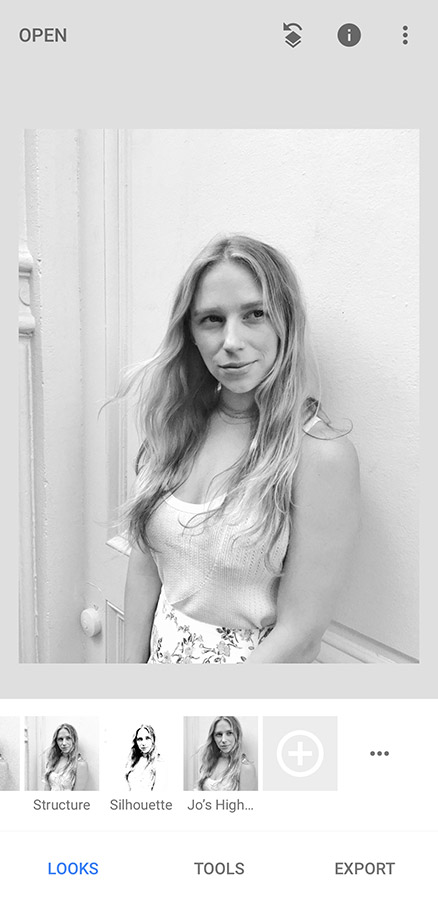
Once you’ve finished editing a photo, select the Looks/Style menu. Swipe through the presets until you reach the Add (+) icon at the end. Tap on this, give your new Look/Style a new name and then select Save. It is as easy as that! Then, next time you open a new photo you can go straight to the Looks/Style menu and select your own one without having to do the work!
You can manage your Looks/Style by simply clicking on the three small dots that are bottom left after the +. You can view them all, rename them, or delete any that you no longer use.
See more:
- How to edit black and white photos in Snapseed
- 10 ways smartphones can help your photography
- 11 best smartphone photography apps
- Best camera phones for photography
- Plus, read our smartphone reviews here
Follow AP on Facebook, Twitter, Instagram, YouTube and TikTok.


