Menus in modern cameras can be so extensive it’s easy to get lost in them. Angela Nicholson reveals seven great camera features that you may not have known you had.
Live Bulb, Live Time and Live Composite
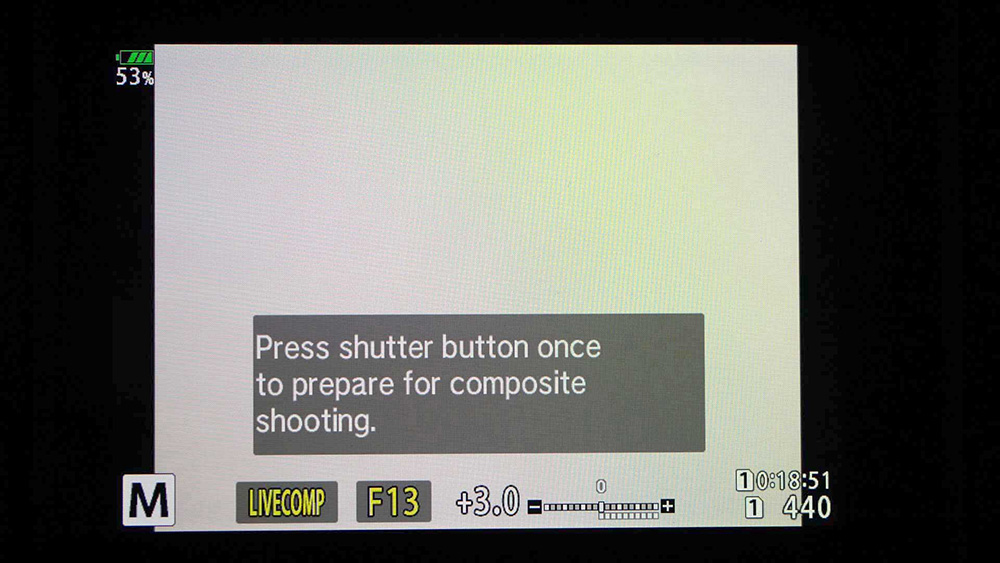
Some Olympus cameras must be in Manual exposure mode to access Live Composite mode. Photo credit: Angela Nicholson.
Olympus, now OM Digital Solutions, was the first camera manufacturer to introduce these clever features. And even now, only Panasonic has introduced something similar. Their purpose is to take the guess work (or maths) out of shooting long exposures.
With most cameras you need to switch to Bulb mode when you want to shoot exposures longer than 30 or 60 seconds. And when Bulb mode is activated, the shutter is held open for as long as the shutter release (either on the camera or a remote release) is held down – although it’s often limited to 30 minutes. It’s great for nighttime photography and shooting with a Big Stopper ND filter over the lens to enable water or cloud movement to be blurred.
Normally, if you’re using an ND filter to extend the exposure time, you have to calculate how long the exposure needs to be on the basis of the shutter speed without the filter. If you’re shooting at night, you can experiment with high ISO settings and a wide aperture to calculate how long the exposure should be at the aperture and ISO that you want to use.
Live Bulb mode does away with all of that because you see the image build up on the screen or in the viewfinder of the camera. You simply close the shutter once you’re happy with how the image looks.
While Live Time mode is similar to Live Bulb Mode, in Live Time mode the shutter opens with a press of the shutter release and is closed with a second press once you’re happy with the way the image looks on-screen.
Live Time mode is complicated by the fact that the long exposure is made up of a series of shorter exposures. The clever part is that the camera composites the images using the equivalent of the Lighten blend mode in Adobe Photoshop. As a result, after the first exposure, only the brighter areas of subsequent images appear in the final image. It means that it’s not the right choice for shooting a scene in which the subject brightness doesn’t change. However, it’s perfect for photographing traffic trails and fireworks.
How to use Live Composite mode
Before you switch to Live Composite mode, it’s wise to take a test shot or two to find the correct exposure for the ambient lighting. Some Olympus OM System cameras have a B setting on the mode dial that allows you to access Live Composite mode. Others and on the Panasonic Lumix G90, you have to turn to Manual exposure mode and extend the shutter speed time until you go past 60 seconds, Live Bulb and Live Time until Live Composite mode is activated. Meanwhile, Live Composite mode is activated via the menu in the Panasonic Lumix S5.
Next, on an Olympus camera, press the menu button and set the exposure time to the base exposure that you found from your test shots. Now, when you press the shutter please, the camera will take the first shot and set the base exposure. With that done, press the shutter release again to set the camera shooting continuously. It will capture a series of images using the same exposure time as the first. Keep a close eye on the image on the back of the screen and press the shutter release again once you’re happy with the image.
Live ND Shooting
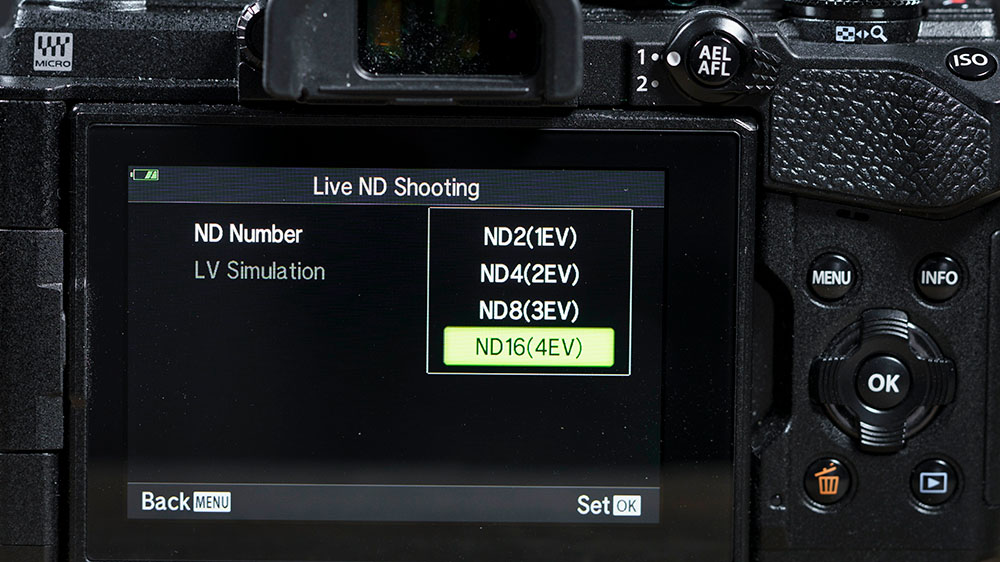
The OM System OM-5 has four strengths of ND filter available but the OM-D E-M1X and OM-1 each have five. Photo credit: Angela Nicholson.
Live ND Shooting mode is another great feature introduced by Olympus and it was first seen in the Olympus OM-D E-M1X, but it’s also found in the OM System OM-1 and OM-5. It reproduces the impact of attaching a neutral density (ND) filter to a lens to extend the exposure time. This enables movement to be blurred in daylight.
Live ND Shooting can only be used when the camera is set to manual or shutter priority mode.
OM System tidied up the menu system for the OM-1. You’ll find Live ND shooting in the Computational Modes section of the menu. The OM-5 doesn’t have the refreshed menu system so Live ND Shooting is found in Shooting Menu 2.
The E-M1X and OM-1 have five ND strengths available for selection, running from ND2 (1EV) to ND32 (5EV), but the OM-5 has just four and tops out at ND16 (4EV). The option that you select depends upon the exposure that’s required without the filter effect and the exposure time that you’d like to shoot with. If you need an exposure of 1/60sec without the filter, using the ND16 setting extends it to 1/4sec while the ND32 setting takes it to 1/2sec.
Once the ND setting is selected, adjust the exposure time to give the correct exposure. The image in the viewfinder and on the screen of the camera can become ghost-like as the camera shows the impact of the long exposure with any movement blurred.
Traditionally, you’d expect to mount a camera on a tripod when you’re shooting long exposure images. The OM System’s in-body image stabilisation (IBIS) system is so effective that you can often get away without using one if the shutter speed is less than a second. In some cases you can get sharp handheld images with exposure times longer than 1 second.
In-camera raw-editing
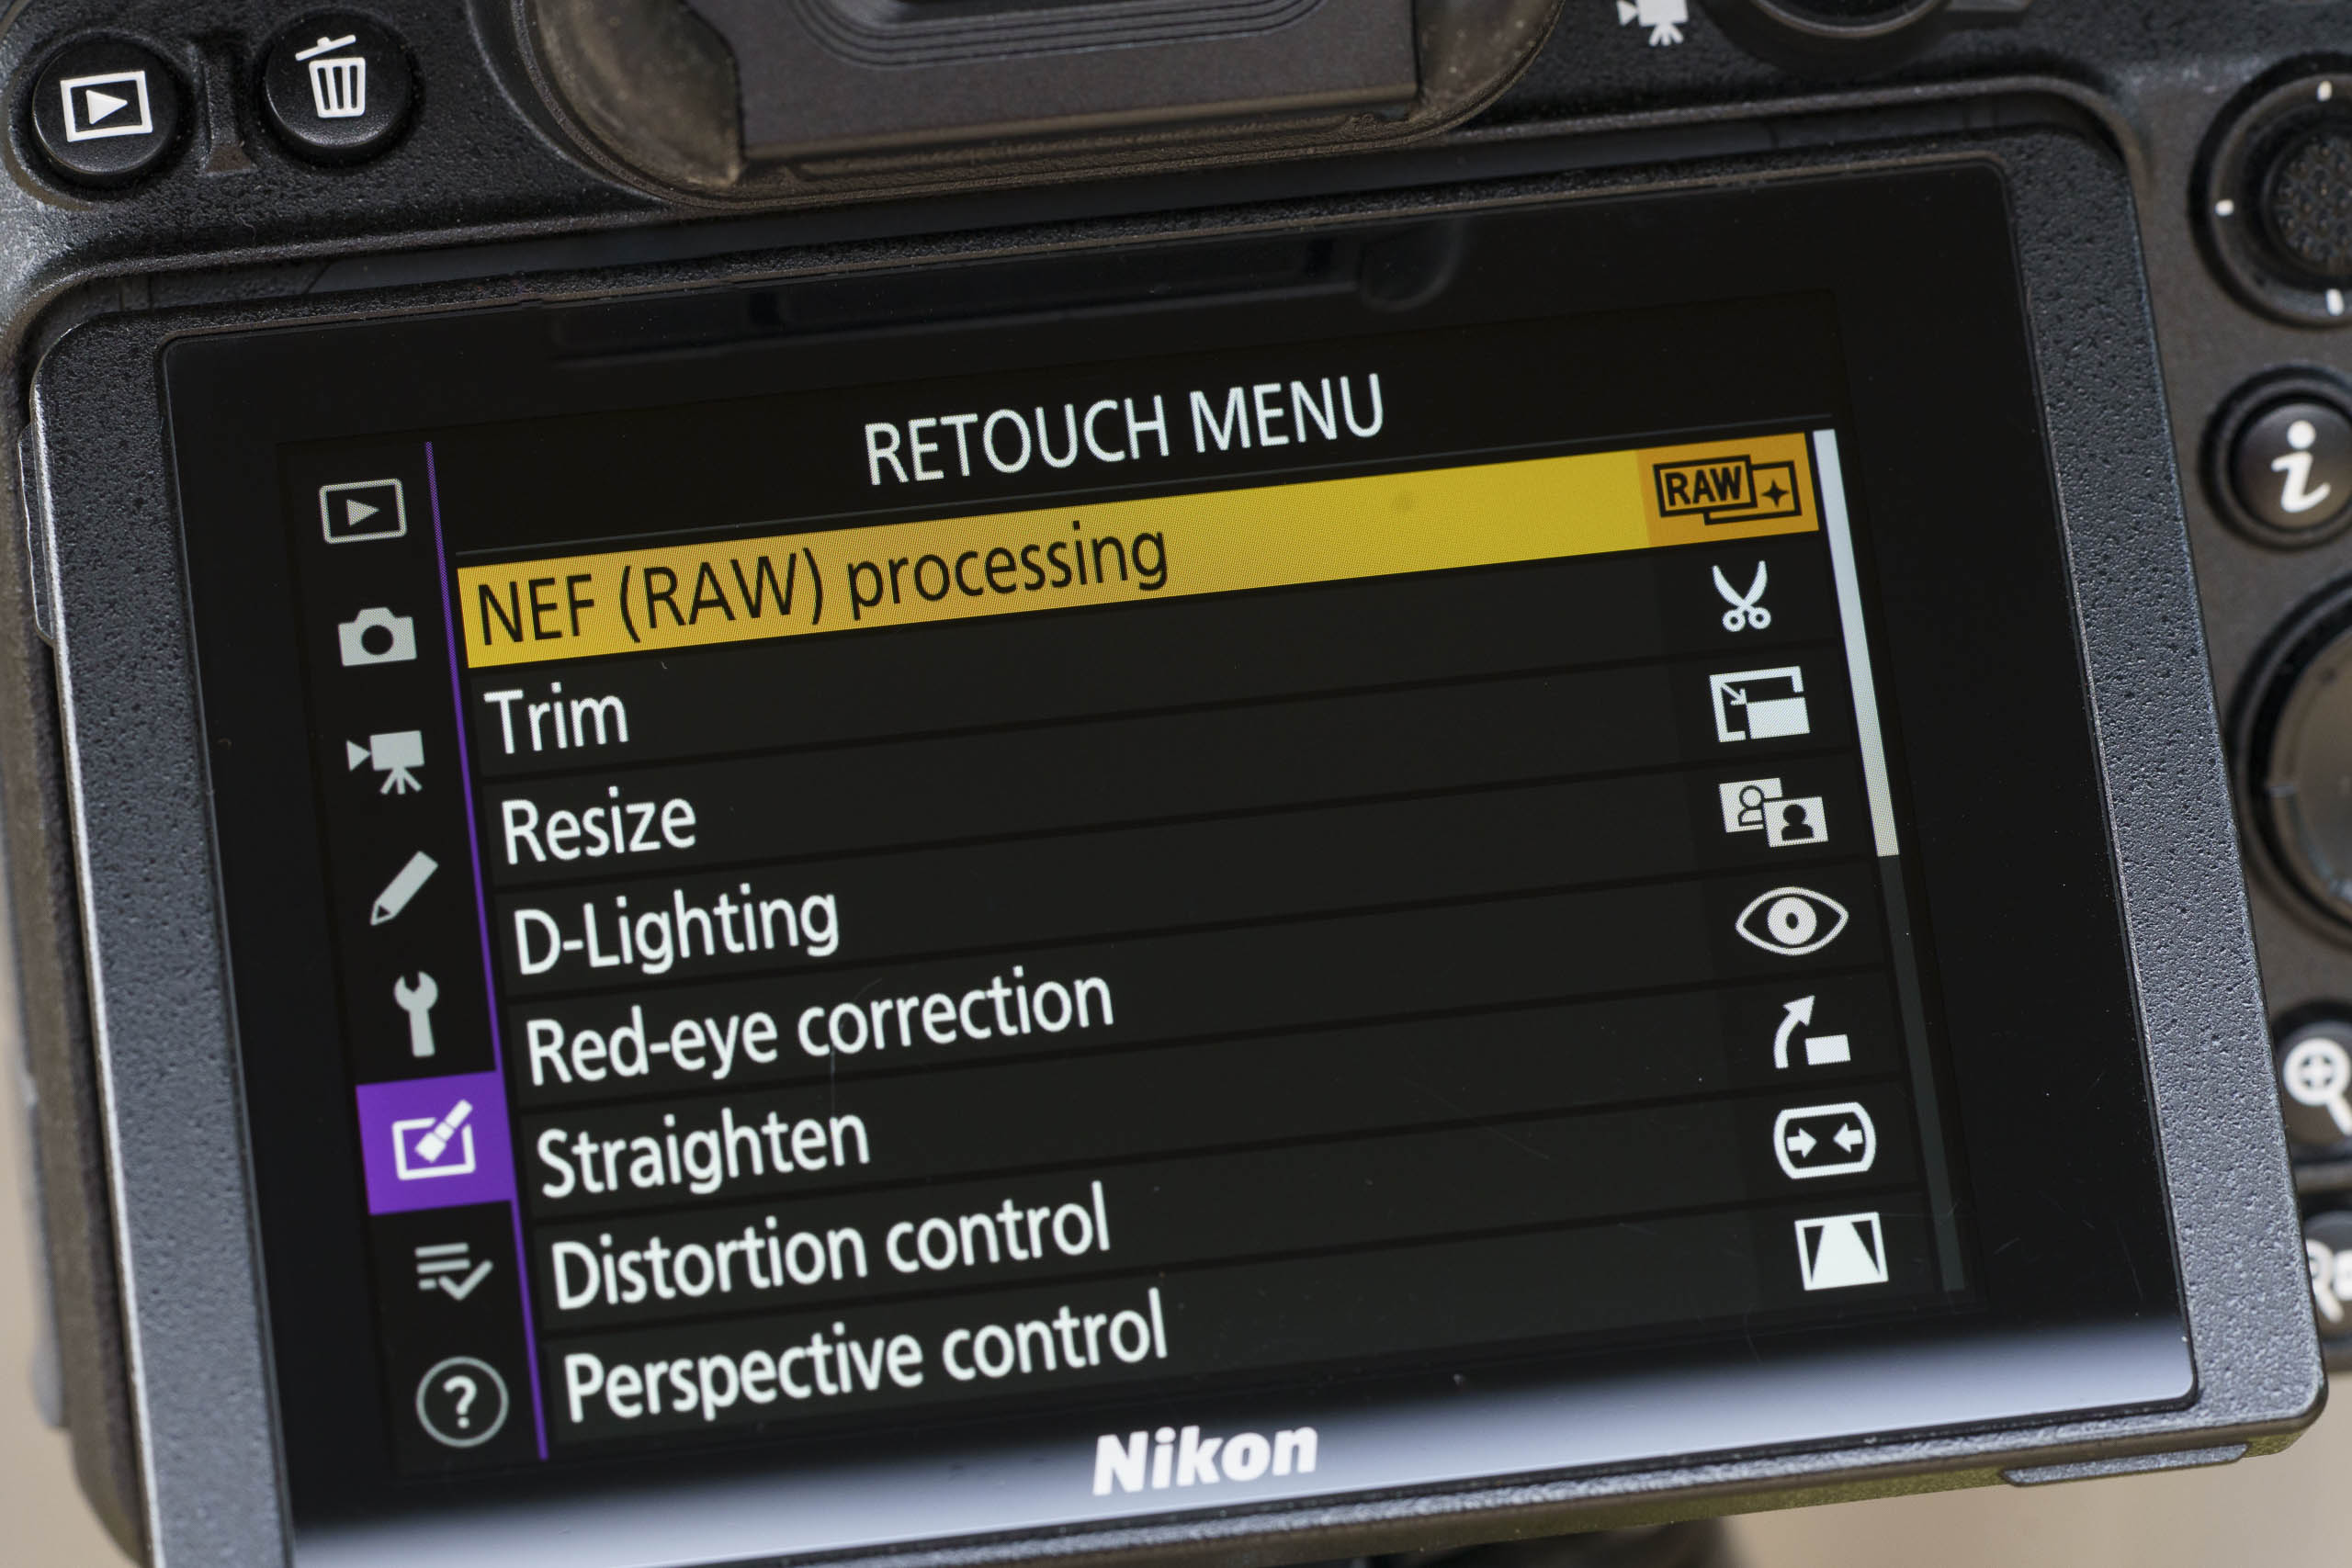
In-camera raw editing is found in the Retouch menu of Nikon cameras. Photo credit: Angela Nicholson.
Many photographers like to shoot raw files to ensure they have the maximum amount of data and flexibility with their images and in-camera raw-editing, which is offered by many cameras (Sony models being a notable exception) is a great way of creating the images you want without having to fire-up a computer. It’s also a nice way to spend a few minutes as you wait for your coffee to arrive in a cafe or when you’re on the train home after a day out with your camera.
Just like processing a raw files using a computer, you can make some fundamental changes to your images such as adjust the white balance or alter the Film Simulation, Picture Control or Picture Style very easily.
As a rule, you either need to select the raw-editing controls in the camera’s menu and then select the image(s) to work on or you select the image first and then find the raw-editing controls in the menu.
Here’s how it’s done with Nikon Z-series cameras:
- Press the menu button, navigate to the Retouch Menu and select ‘NEFF (RAW) Processing’ at the top of the screen. Tap on the screen, press the ‘OK’ button or press the right navigation key to select the option.
- On the next screen, tap on ‘Select image(s)’, press the ‘OK’ button or press the right navigation button.
- You can now see and scroll through the images available for processing. Tap on the one(s) you want to edit to put a yellow box around them and then tap again to put tick in their top right corner before pressing the ‘OK’ button.
- You’ll now see a preview of one of images you selected and all the available adjustment controls in a column on the right.
- As well as being able to adjust aspects such as the white balance, exposure compensation, Picture Control, High ISO Noise Reduction, Vignette control, Active D-Lighting and Diffraction compensation, it’s possible to change the image colour space and set the quality and size of the final Jpeg output. The options are the same as you find at the shooting stage.
- Navigate to the feature that you want to adjust. Either tap it on the screen, or press the ‘OK’ button to see the options available for selection.
- As well as being able to switch between Picture Controls, it’s possible to adjust the Picture Control’s sub-settings. This means you can adjust the Saturation of the Landscape Picture Control, for example. You can also adjust the overall impact of the Creative Picture Controls.
- Once you’ve finished making the edits, highlight ‘EXE’ at the top of the adjustment column. Press the ‘OK’ button to save the image as a Jpeg with the new settings – the raw file is still available on the card. If you selected multiple images to edit, they will all be processed with the same settings.
Pixel Mapping
Fujifilm X-T5 Pixel Mapping_DSC8379 ©ANicholson: It only takes a few seconds to map the pixels of the Fujifilm X-T5’s sensor. Photo credit: Angela Nicholson.
While luminance and chroma noise is to be expected when shooting at high sensitivity (ISO) settings, the pattern of the noise is random. If you see a spot that is a single colour and is always in the same place in your images, that can be a sign of a ‘dead’, ‘hot, or ‘stuck’ pixel. This is something that is most often seen in long exposure images and/or at high sensitivity (ISO) settings when any flaws in a pixel are amplified.
It’s very easy to deal with the odd pixel when you’re processing a still image. However, it’s a pain to have to do it in every shot. Fortunately, many cameras feature something called ‘Pixel Mapping’, which is designed to deal with the problem. Thankfully, it’s a very simple process that just needs to be done once when you spot a persistent hot pixel.
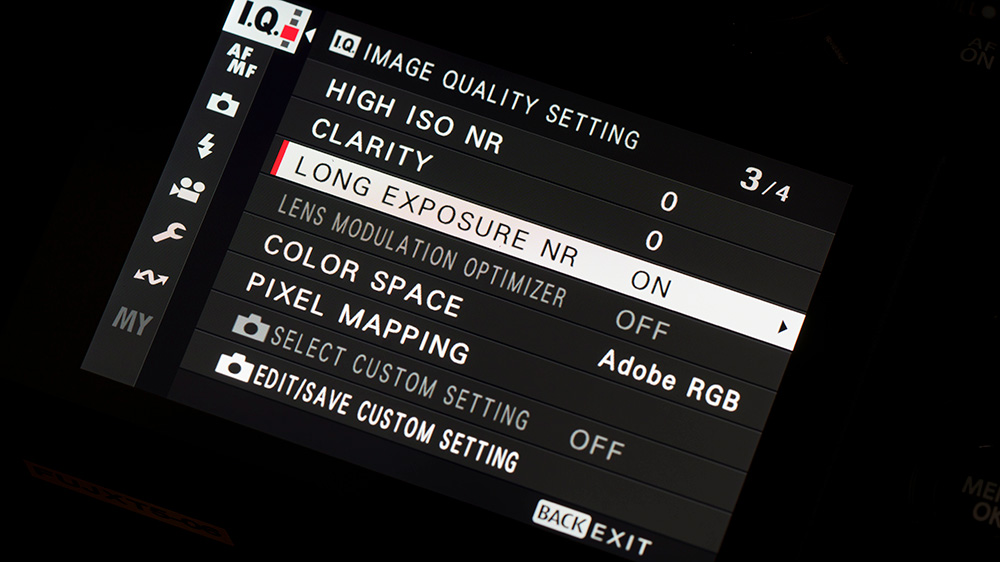
On the Fujifilm X-T5, for example, you’ll find ‘Pixel Mapping’ listed on the third page of the Image Quality (IQ) menu. To use it, simply select the option in the menu and press the ‘OK/Menu’ button. Then press the ‘OK’ button again when you see ‘Start Pixel Mapping’. It’s all done in a matter of a couple of seconds.
Long-Exposure Noise Reduction
Long exposure noise reduction doubles the time it takes to produce every image, but it’s very effective. Photo credit: Angela Nicholson.
Long-exposure noise reduction is a very useful feature for anyone who shoots long exposures. It shouldn’t be confused with high-ISO noise reduction or Pixel Mapping as it works in a different way.
The problem with long exposures is that the sensor heats up as you shoot. This can cause noise to build-up in images. Thankfully, unlike high-ISO noise, long-exposure noise tends to not be random. This makes it relatively easy for the camera to remove it on a shot-by-shot basis.
The drag of long-exposure noise reduction, however, is that doubles the time that it takes to capture each image. That’s because when it’s active, the camera takes a second ‘dark’ exposure with the shutter closed after each shot. It uses the same exposure time as the image exposure. It then extracts the noise that it finds in the dark frame from the image. It’s very effective, if a bit tedious.
When the long-exposure noise reduction system is turned on, most cameras will only activate it when the exposure is 1 second or more in duration. However, some cameras, have an ‘Auto’ setting which does the same thing, as well as an ‘On’ setting.
Focus stacking
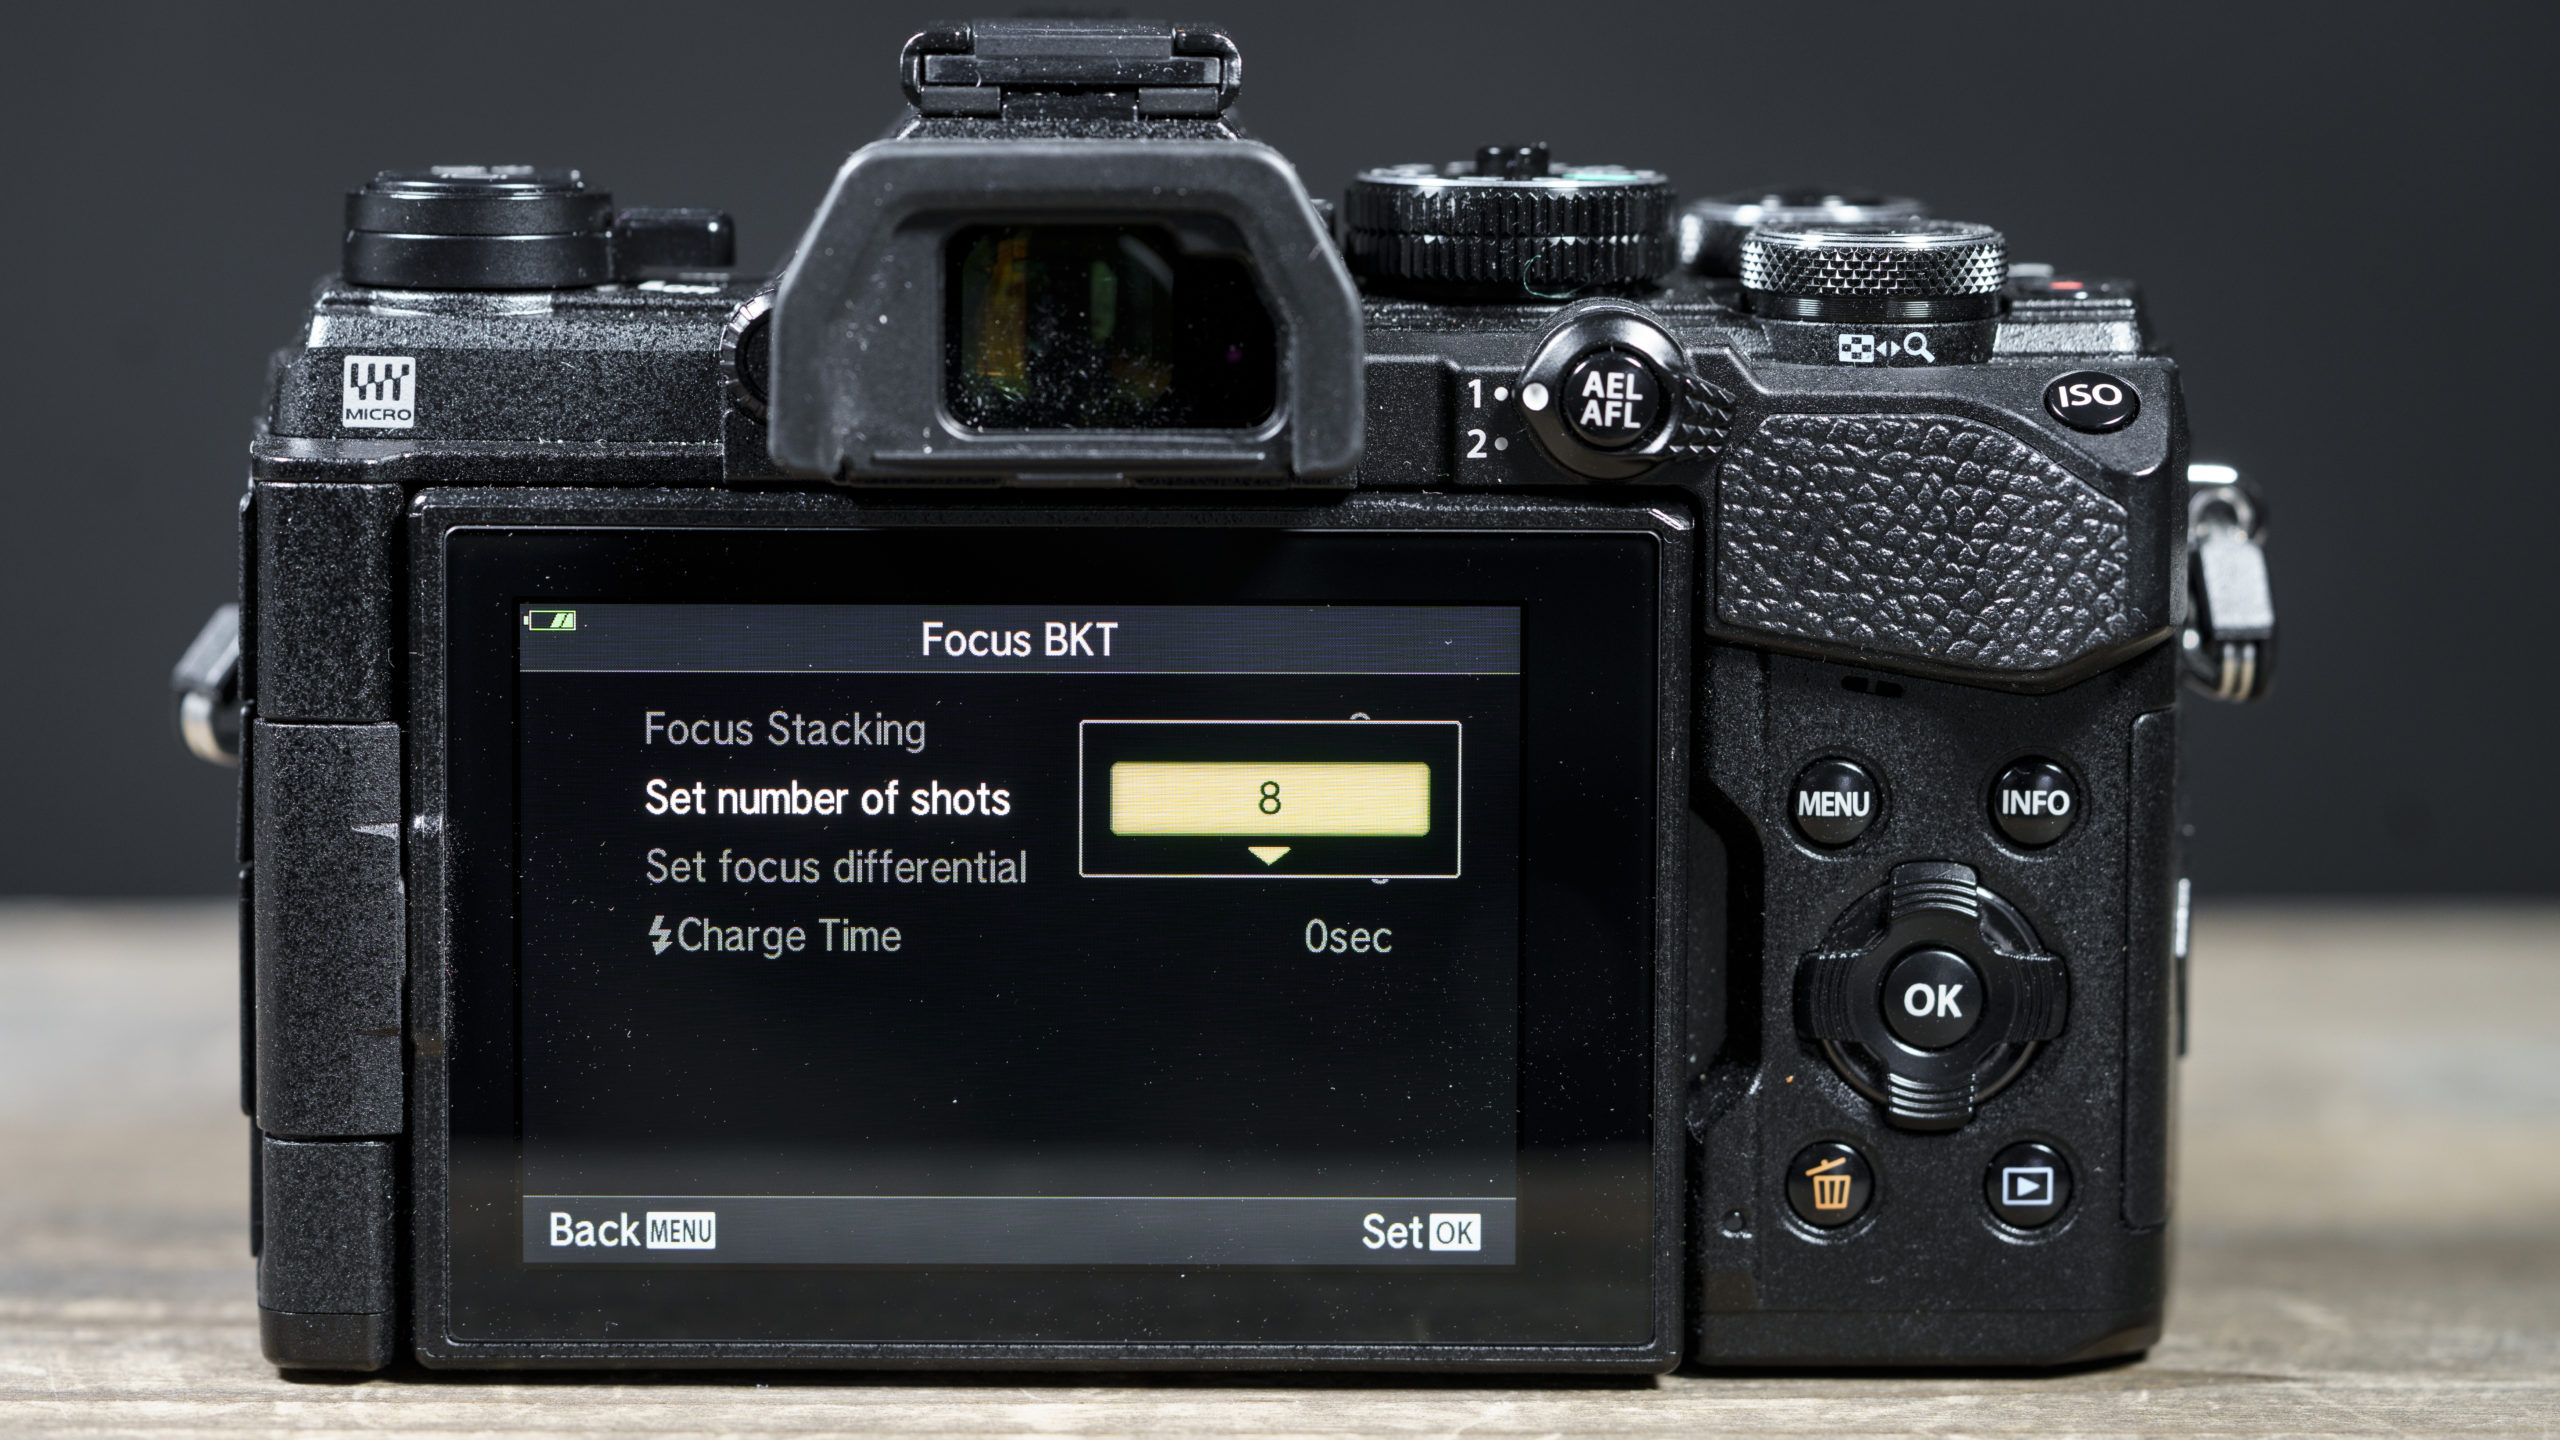
Focus stacking is made simple by the OM-5’s stepped process. Photo credit: Angela Nicholson.
Focus stacking is a technique that has been around for a long time. It enables photographers to capture greater depth of field than normal in their images. It’s very popular amongst macro photographers but it’s also useful for landscape photography. A key benefit of focus stacking is that you can use a lens’s optimum aperture rather than shoot with a very small aperture to get extra depth of field and encounter the associated image-softening that’s caused by diffraction.
Focus stacking relies upon capturing a series of images with the focus moving through the scene between shots so that every part of it is sharp in at least one photograph. The images are then composited together to create a single image that is sharp from the foreground to the background. Dedicated focus stacking software such as Helicon Focus is available (for from $30 per year) to composite the images. It can also be done in other editing software including Adobe Photoshop.
In the past, photographers had to move the focus point between the shots manually. This can take time, especially if you have to wait for the camera to stop wobbling between each shot. Now, however, several cameras now have a focus stacking feature that sets the camera to adjust the focus automatically between shots as a series of images is captured.
Some cameras such as the OM System OM-1 and OM-5 go a step further by compositing the images in-camera, but you still get all the original images as well in case you want to composite your own version using software. With the OM-1 you can composite up to 15 images whereas with the OM-5 you can only composite 8 images.
Here’s how it’s done with the OM-5:
- Navigate to ‘Bracketing’ in Shooting Menu 2, press the right navigation button and select ‘On’.
- Scroll down to ‘Focus BKT’, press the right navigation button, select ‘On’ and press the right button again.
- Switch Focus Stacking to ‘On’. Use the other menu options to set the number of shots that you want to capture as well as the focus differential from 1 (narrow) to 10 (wide). It’s worth experimenting with the focus differential setting. The impact will vary depending on the lens, aperture and focus distance.
- Press the ‘OK’ button repeatedly to exit the menu, ensuring that the Bracketing is set to ‘On’.
- Focus a little further away from the closest part of the scene that you want to be sharp. Then press the shutter release button to capture the sequence of images. The camera will take a series of images, starting with a couple ahead of your original focus point and several behind.
- When the images are transferred to your computer, you’ll find that if you shoot raw and Jpeg files simultaneously, you have both files for each of the base images and a composited Jpeg.
If you want to get even greater depth of field than can be obtained through the automatic Focus Stacking system, set the Focus Stacking to ‘Off’ in step 2 and then the number of images can be set up to 999, with the same Focus Differential options as is available in step 3. Now the camera will capture a sequence of images without compositing them. They can then be combined using focus stacking software.
Webcam use
A full-frame camera might be overkill but it will make your video calls look a lot better than the average webcam does.
Using a ‘proper’ camera can really raise your Zoom game. Instead of using a virtual background, you can open the aperture to blur the background naturally. It’s also possible to set an appropriate white balance, adjust the exposure and set the Film Simulation, Picture Control or Picture Style so the image looks better than with a standard webcam.
The popularity of video calls during the pandemic spurred several camera manufacturers to make it easier to use a regular camera as a webcam. Unless you have a capture card, the first step is to download the manufacturer’s webcam software for your camera. This is called EOS Webcam Utility for Canon cameras, Fujifilm X Webcam for Fujifilm cameras, Nikon Utility Webcam for Nikon cameras and Sony Imaging Edge Webcam for Sony cameras.
In each case, the software enables you to access the camera as a webcam for use in popular video platforms such as Zoom and Facebook Live.
To learn about the webcam software needed for each camera, click here.
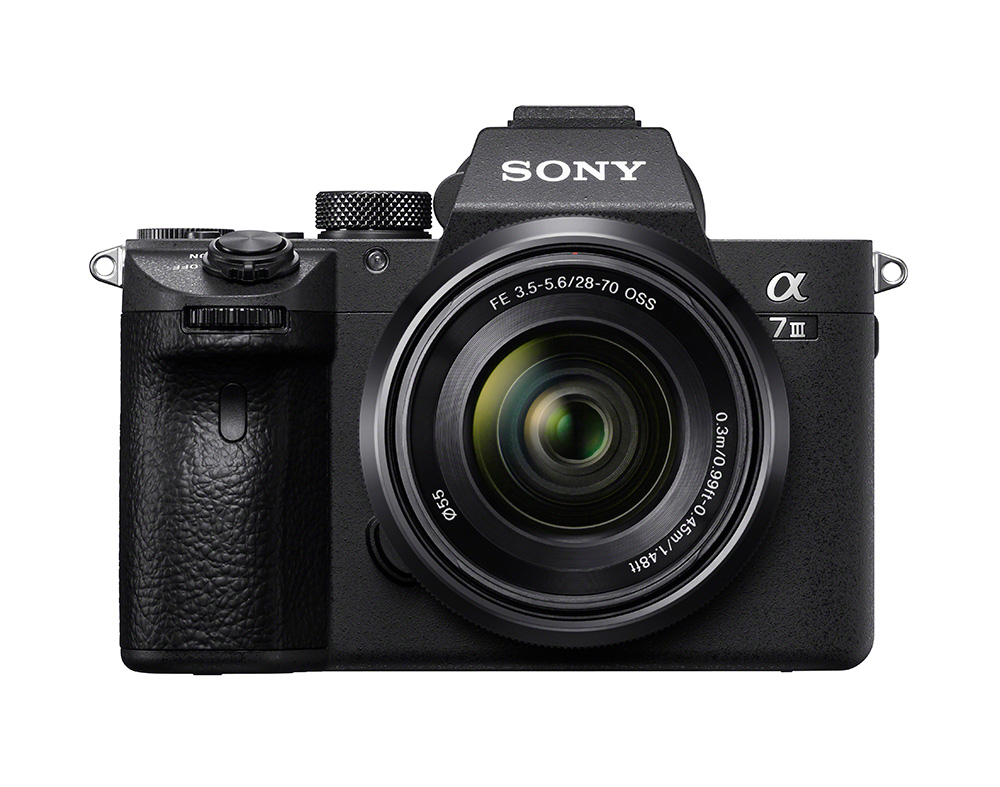
Here’s how to use a Sony A7 III as a webcam:
- Download and install Sony Imaging Edge Webcam on your computer.
- On the camera, go to the Network section off the menu and under Transfer/Remote. Ensure that Ctrl w/Smartphone is set to ‘Off’.
- Now go to the Setup4 in the Menu and set the USB Connection to PC Remote.
- The next step is to connect the camera to the computer via a USB cable.
- Now when you open your preferred video meeting software, you should find Sony Camera (Imaging Edge) in the camera options.
What camera features do you use on your camera that you can’t live without? Let us know!
Featured image credit: Miss Zhang via Unsplash.
Further reading:
In-camera photo editing: which maker does it best?
Focus stacking: How to achieve pin sharp macro shots
Follow AP on Facebook, Twitter, Instagram, and YouTube.