
Extend the passage of time to create stunning, ethereal landscape images. Two top landscape photographers, James Abbott and Guy Edwardes guide you through the world of long-exposure photography and share their tips, techniques, and landscape photography kit to help you take captivating images.
James Abbott’s tips for using filters for long-exposure landscapes
Every landscape photographer strives to put their stamp on the locations they shoot, and while most are best shot at a specific time of day to take advantage of the best light possible, one way of finding your unique voice is to take control of exposure times using ND (neutral density) filters.
Lower-strength ND filters can be as simple to use as attaching them to a lens and shooting normally, while the more extreme filters ranging from 6-stops and above require a little more care and attention to ensure correct exposures. In this long-exposure masterclass, we’re going to take a closer look at long-exposure landscapes and how to successfully shoot them using ND filters to achieve a range of effects.
Filter densities explained
Filter manufacturers use different methods of displaying ND filter densities. These include how many stops of light the filter reduces, which is the easiest, optical density, and ND factor. Once you buy into a filter system, it pays to familiarise yourself with the method used so you can quickly identify filters.
ND filters compared
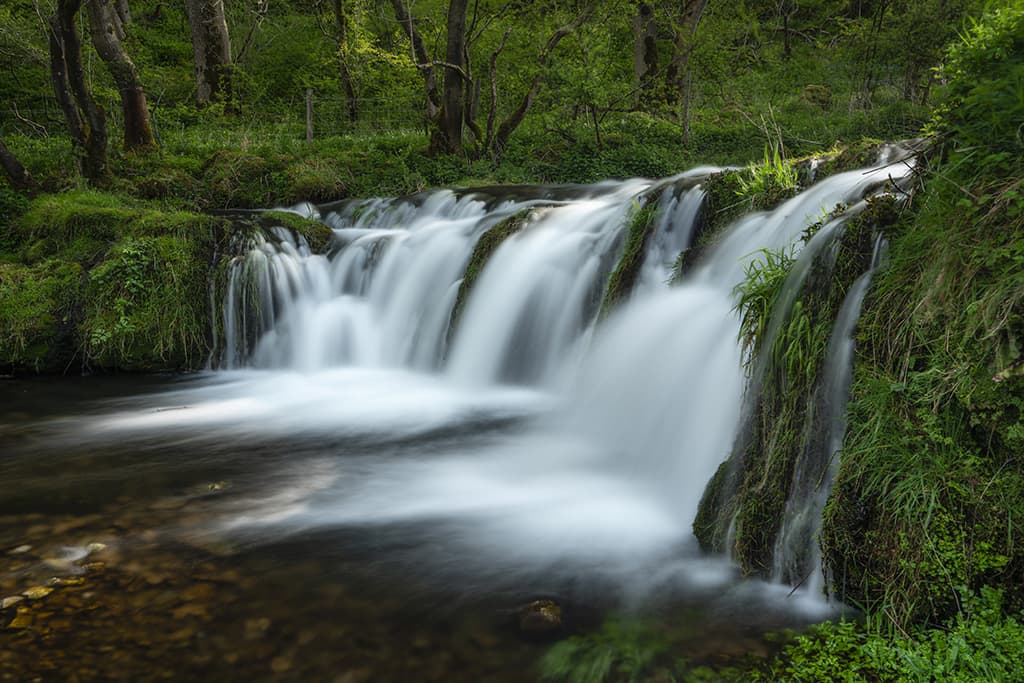
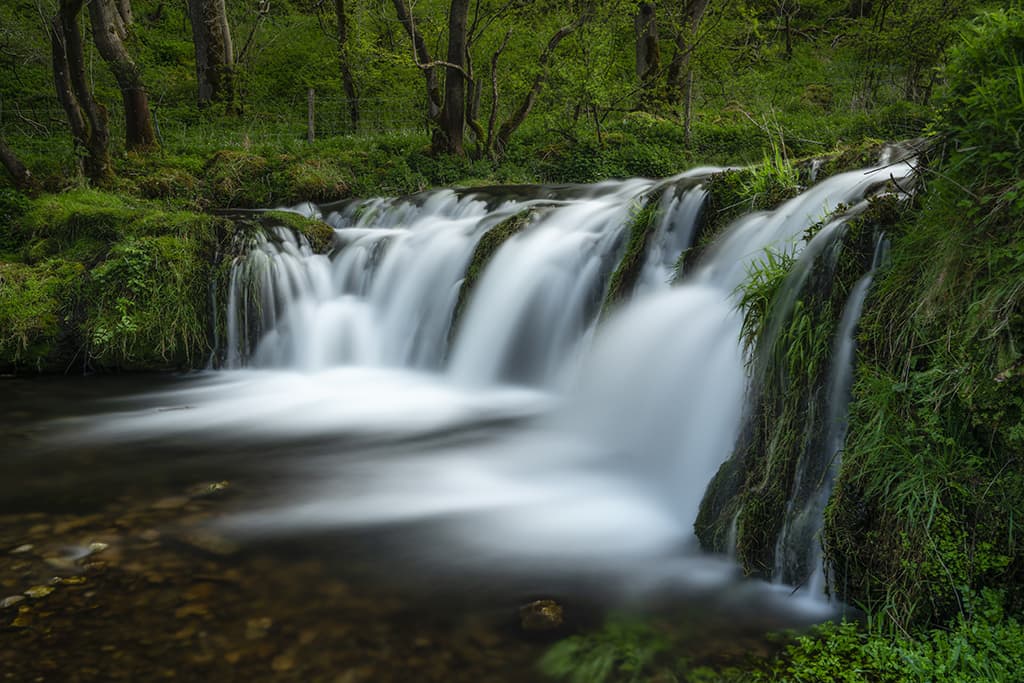
ND filters come in a range of light-reducing densities, and with screw-in filters you can get variable ND filters with strengths ranging from around 1.5 stops to 8 stops. For ultimate flexibility and control, the four filters that you need to control overall exposure are: a polarising filter, a 3-stop ND, a 6-stop ND and a 10-stop ND.
You can buy other densities, but with these four filters you’re covered for practically every eventuality. The four images here were shot in bright conditions so exposure times show a clearer progression of blur as filter strength is increased.
Polarising filter 1/10 sec: Polarisers are often used in combination with ND filters as they remove surface reflections from water and can deepen blue skies, but, with the ability to reduce exposure by up to 1.5 stops, can also be used as a weak ND filter.
3-stop ND 0.8 sec: The humble 3-stop ND filter is arguably the most versatile of all ND filters since it’s ideal for shooting in low light conditions and around golden hour when you wish to achieve a longer exposure but not one that’s several minutes long.
6-stop ND 5 seconds: 6-stop ND filters require exposure to be calculated, either by counting stops or using an exposure calculator app. This filter is best used when a 3-stop ND doesn’t extend exposure time enough, but a 10-stop filter makes exposure times unnecessarily long.
10-stop ND 1 minute: 10-stop NDs were the first ‘extreme’ ND filter to be released and provide the ability to shoot extremely long exposures in low light conditions, or even exposures that are 30 seconds or longer in bright and sunny conditions.
How to use extreme NDs
Learn how to correctly calculate exposure when using high-density ND filters that throw the standard rules of exposure out of the window
Extreme NDs, Big Stoppers and Little Stoppers are all names you may have heard of. In a nutshell, these simply refer to ND filters that reduce light entering lenses by more than 4 stops. ND filters in this category can’t be used like lower-strength NDs where you simply attach them to the lens and shoot as normal; these ones require you to calculate exposure based on what the ‘standard’ exposure should be, then shoot in Bulb mode and manually time exposures if they’re longer than 30 seconds.
Unfortunately, most cameras have a maximum shutter speed/exposure time of 30 seconds, which is often too short when using extreme NDs. Owners of higher-end Fujifilm cameras such as the X-T4, GFX100S and X100V can set exposure times up to 60 minutes in duration so you don’t have to shoot in Bulb mode.
For everyone else though, Bulb mode is the key to long-exposure success. On a technical level, a long exposure is essentially any shutter speed that’s too slow for the camera to be handheld without causing camera shake. However, for the aesthetics of landscape photography, it’s often not until shutter speeds are around one second that photographers consider exposures to be long.
Exposures up to 30 seconds using extreme NDs can be dealt with by the camera; beyond this we have to manually time exposures and hold the shutter open in Bulb mode. Let’s take a look at how it’s done.
How to calculate correct exposure times
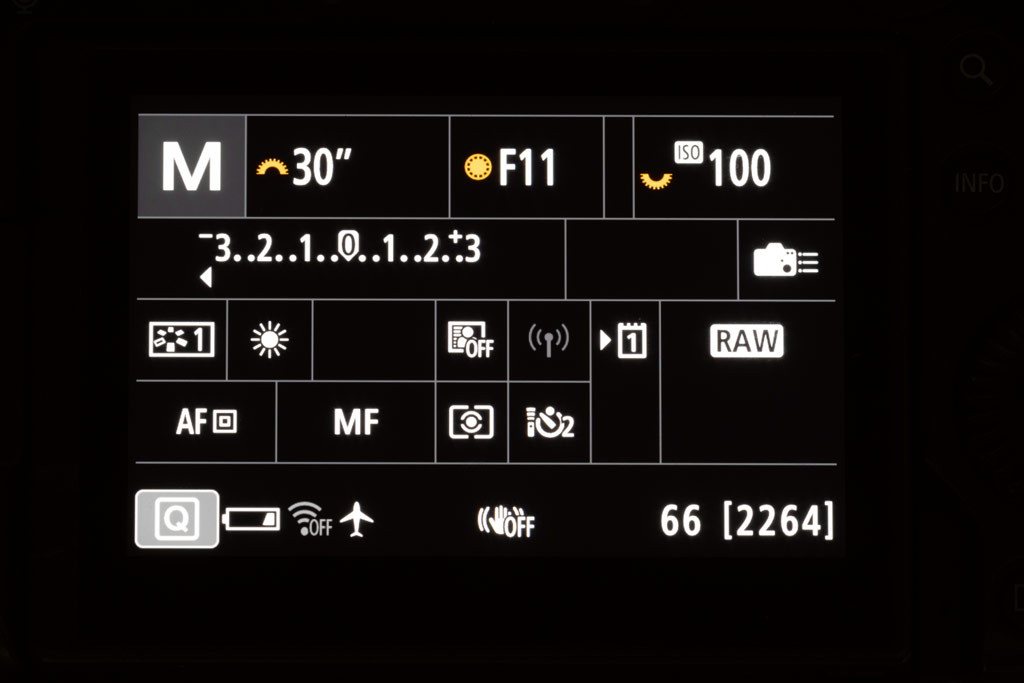
1. Attach ND grads: Securely attach your camera to your tripod to ensure that it can’t move during the exposure, and compose the shot. At this stage, attach a filter holder and any ND grads required to maintain sky detail. Manually focus 1/3 of the distance into the scene beyond the foreground for a large depth of field and to lock focus.
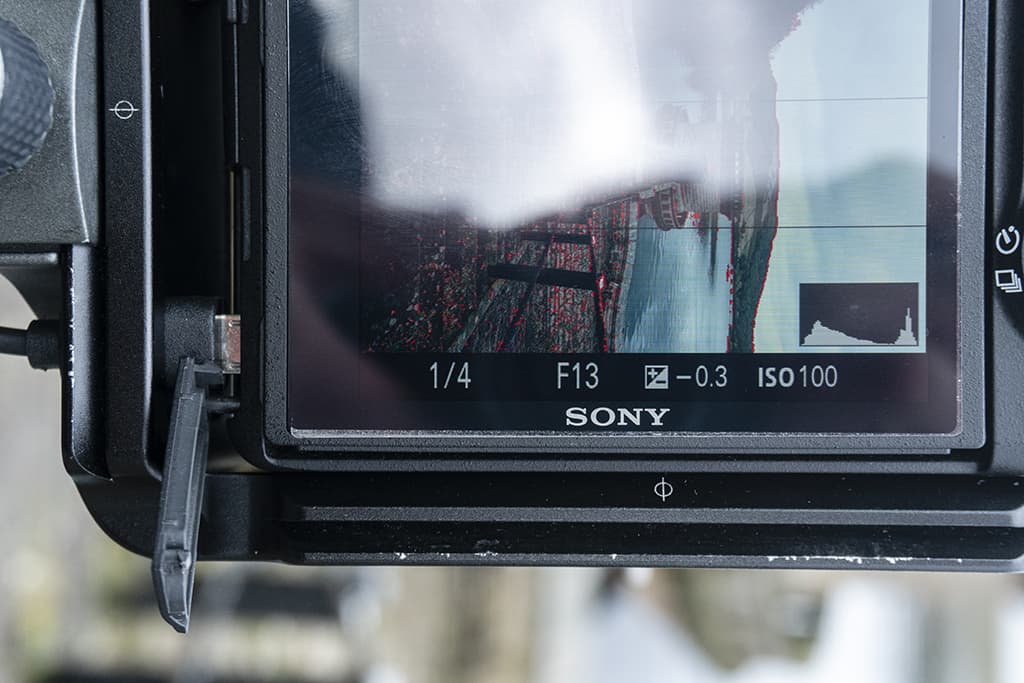
2. Identify ‘normal’ exposure: Select aperture priority mode at f/11 with ISO 100 and apply any exposure compensation as required for a correct exposure. The shutter speed here was coming in at 1/4sec, but if it was much slower than this it would have been beneficial to increase ISO to 200 to halve the exposure time.
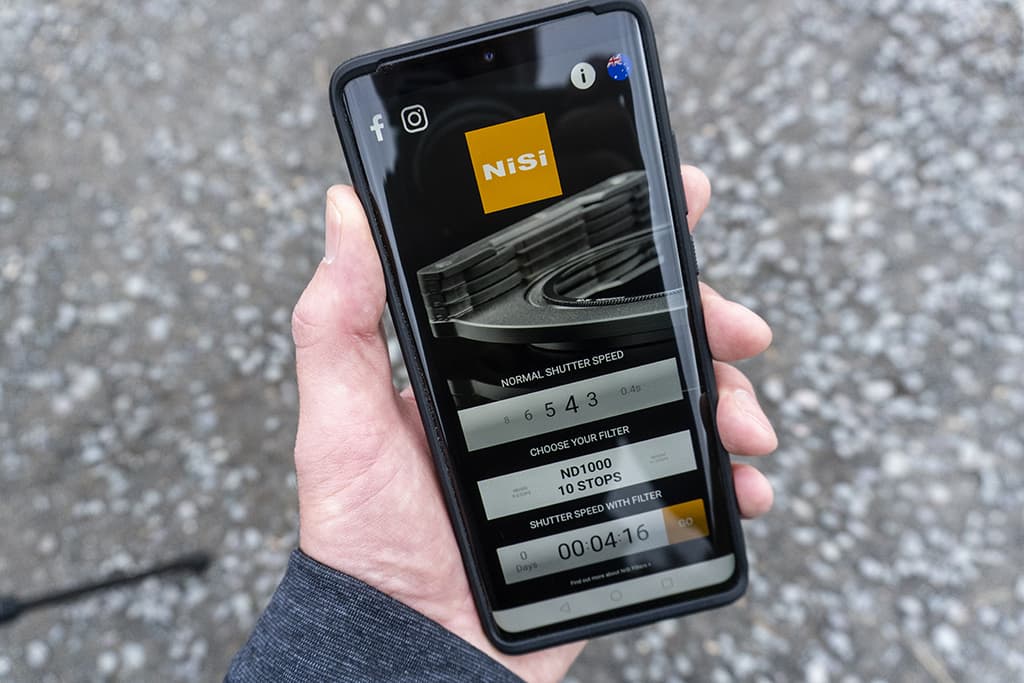
3. Use a calculator app: Use a free exposure calculator such as the LEE Stopper app or NiSi Filters app. Both allow you to select which filter density you’re using, and you simply need to input the standard exposure time for the app to then give you the exact exposure time required. Both apps feature a timer.
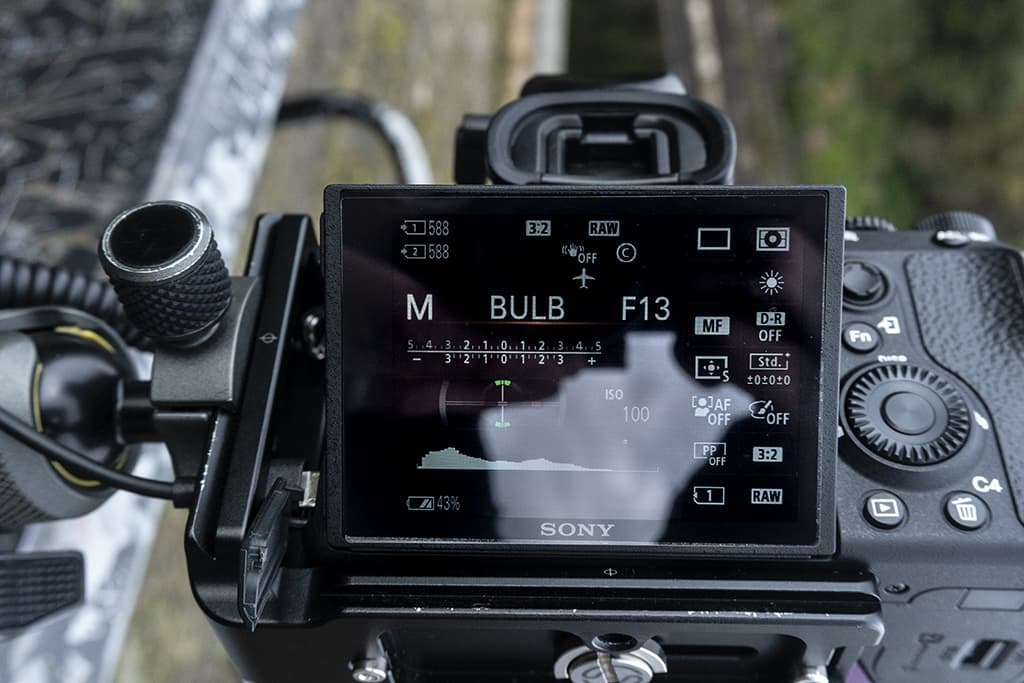
4. Shoot the long exposure: Set the camera to manual mode and if the exposure is longer than 30 seconds, rotate the thumbwheel until Bulb is shown. Make sure aperture and ISO are the same as in step two, and you’ll need to use a shutter remote to release the shutter at the same time as starting the app timer.
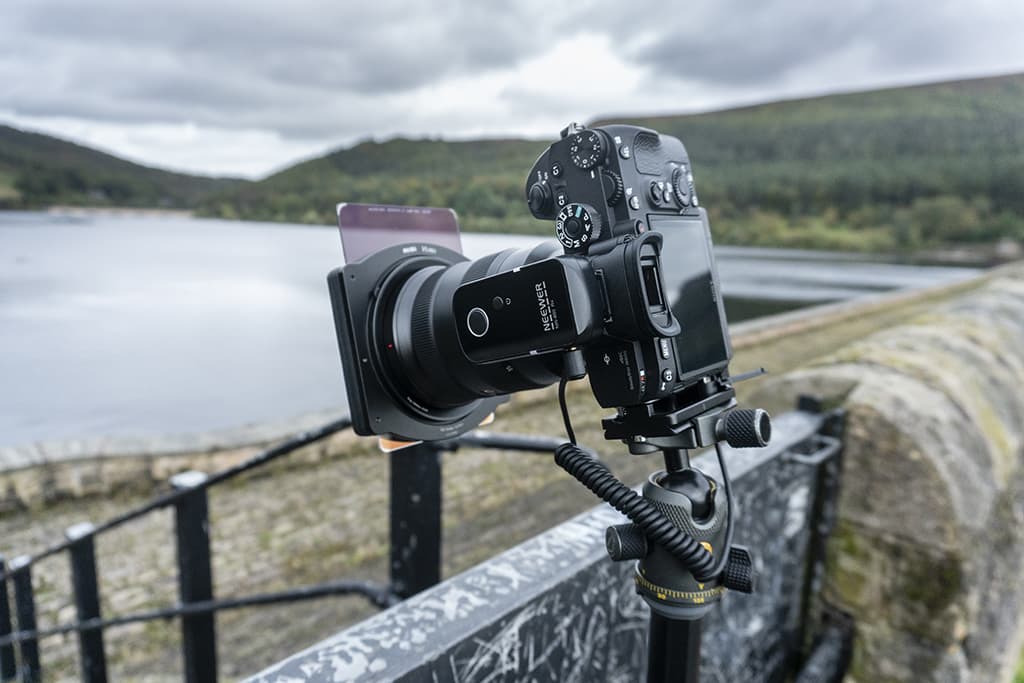
5. Reattach filters and shoot: Attach your chosen ND filter and then the graduated ND if you used one. Release the shutter with the remote, at the same time as the app timer, and make sure it locks to hold the shutter open – depending on model. Press the shutter button to end the bulb exposure when the timer ends.
Approaches to long-exposure
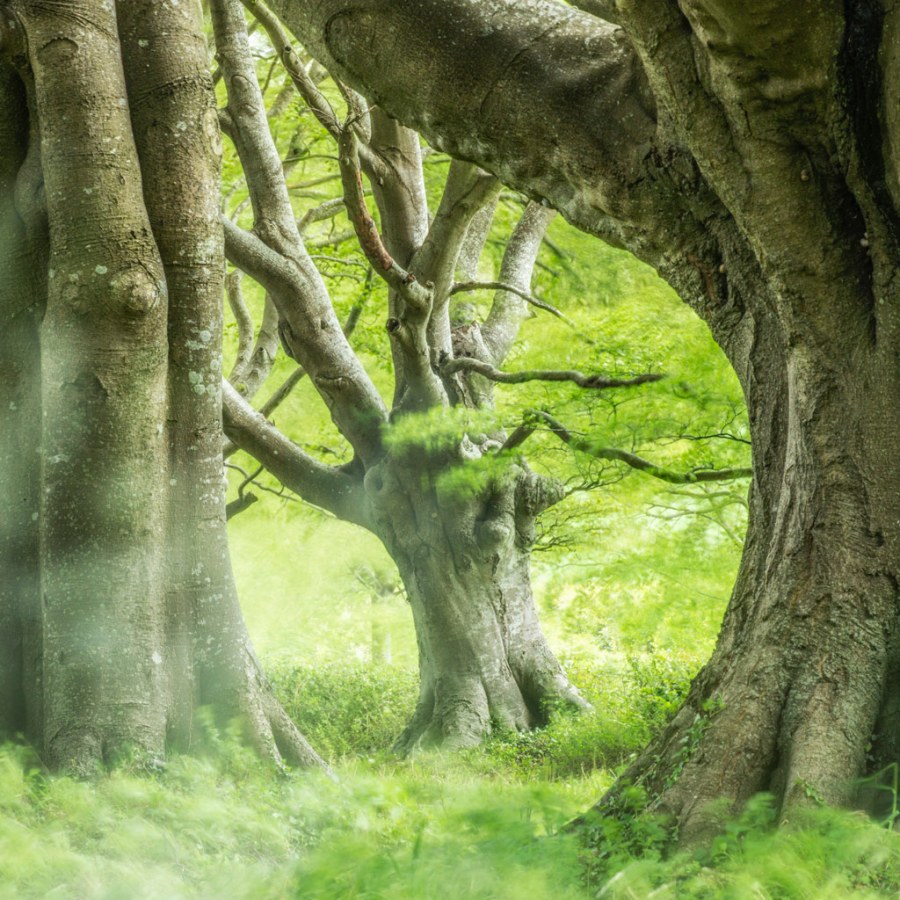
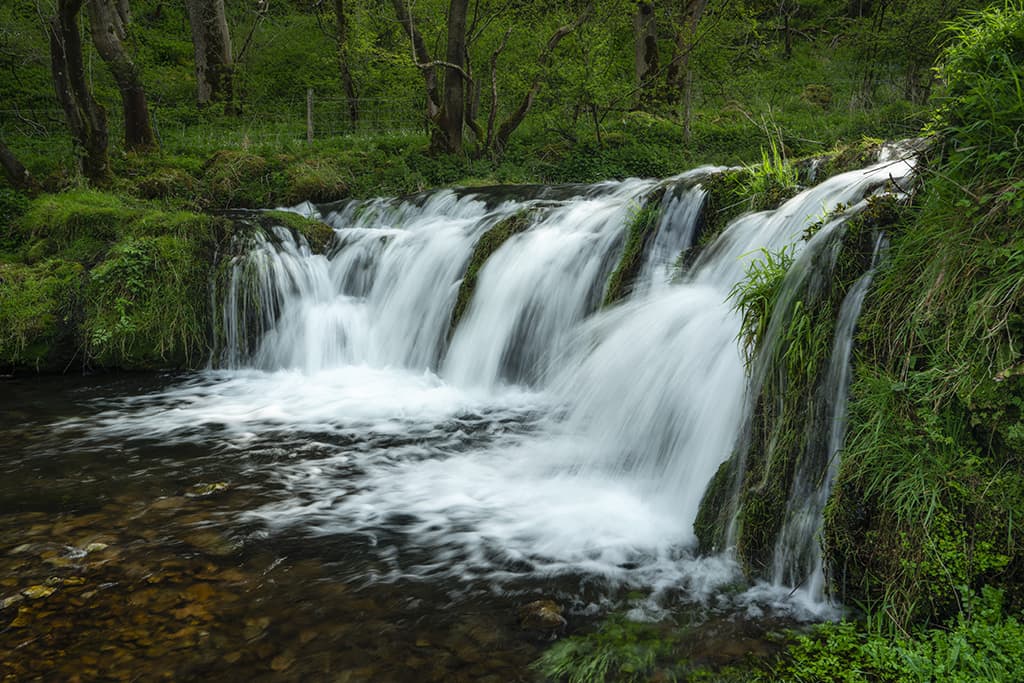
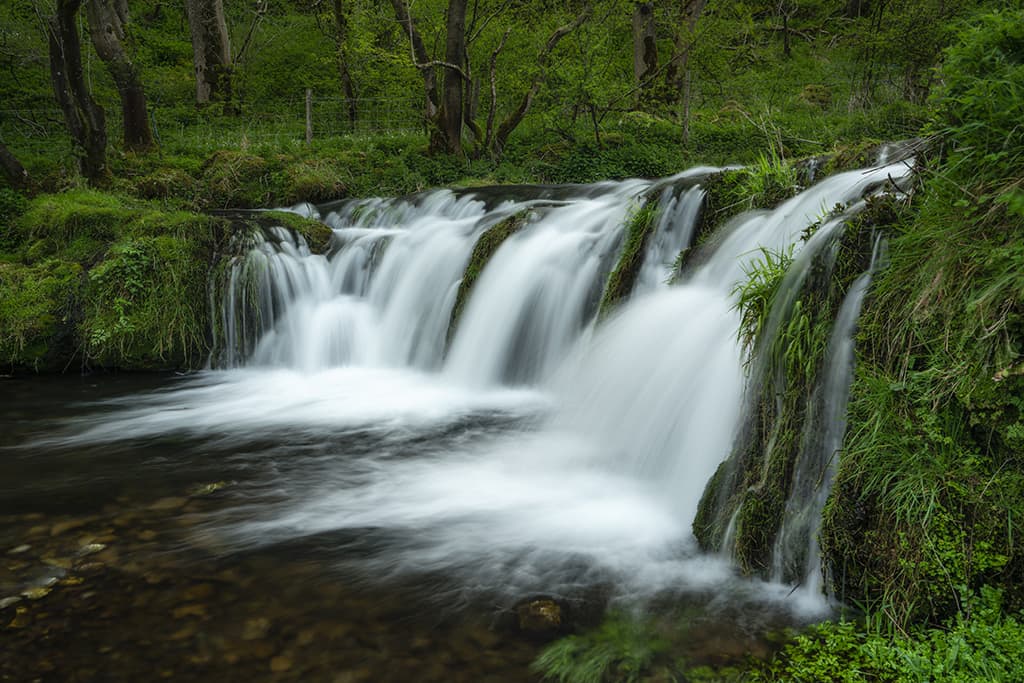
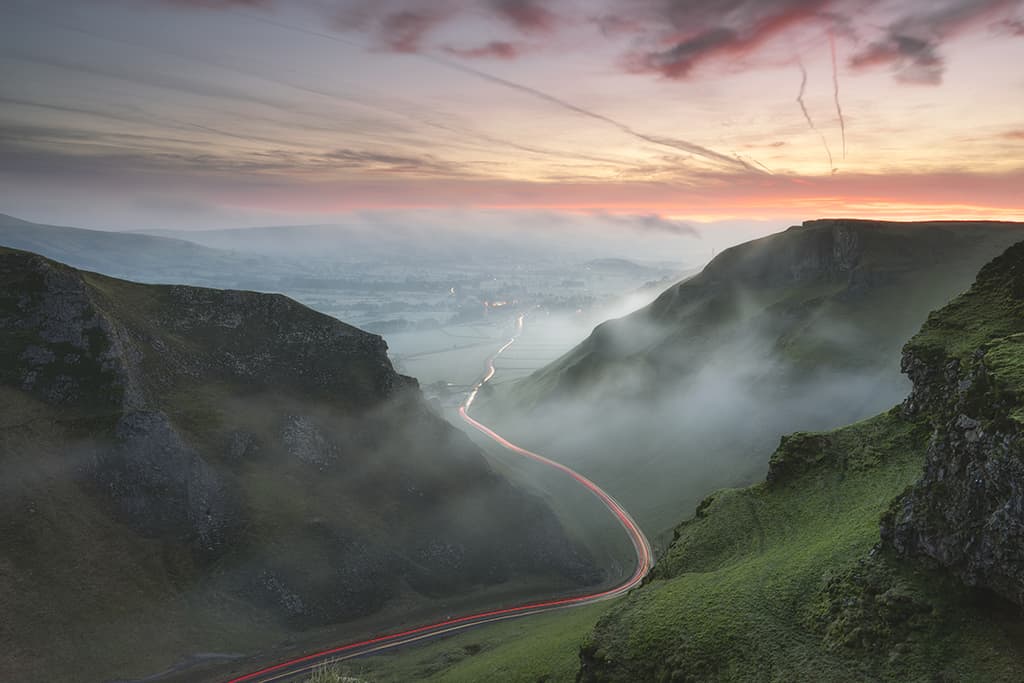
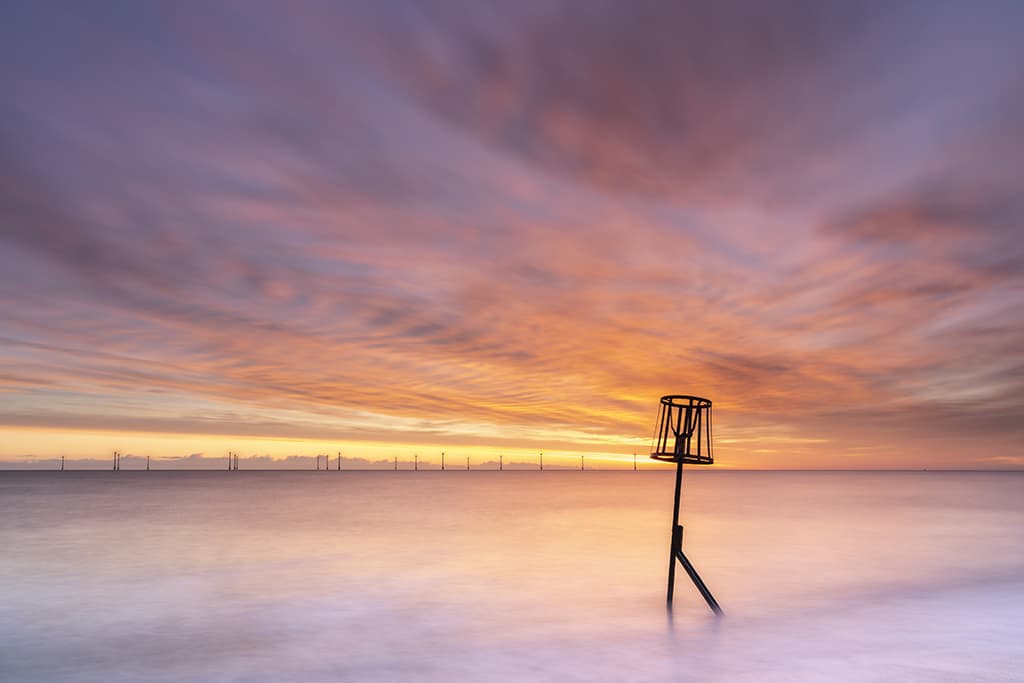
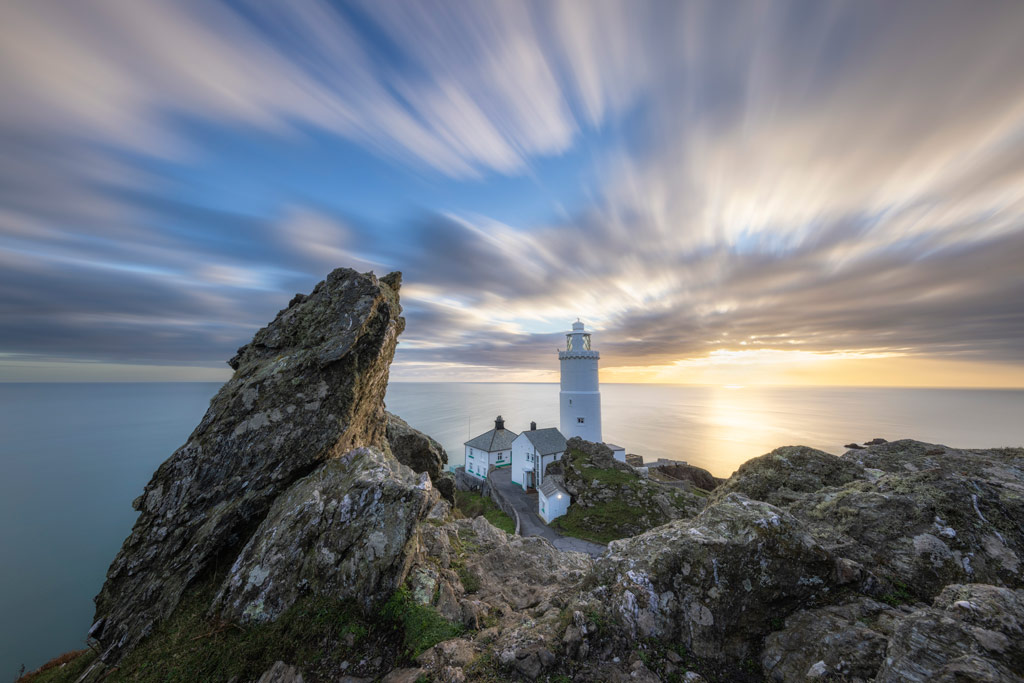
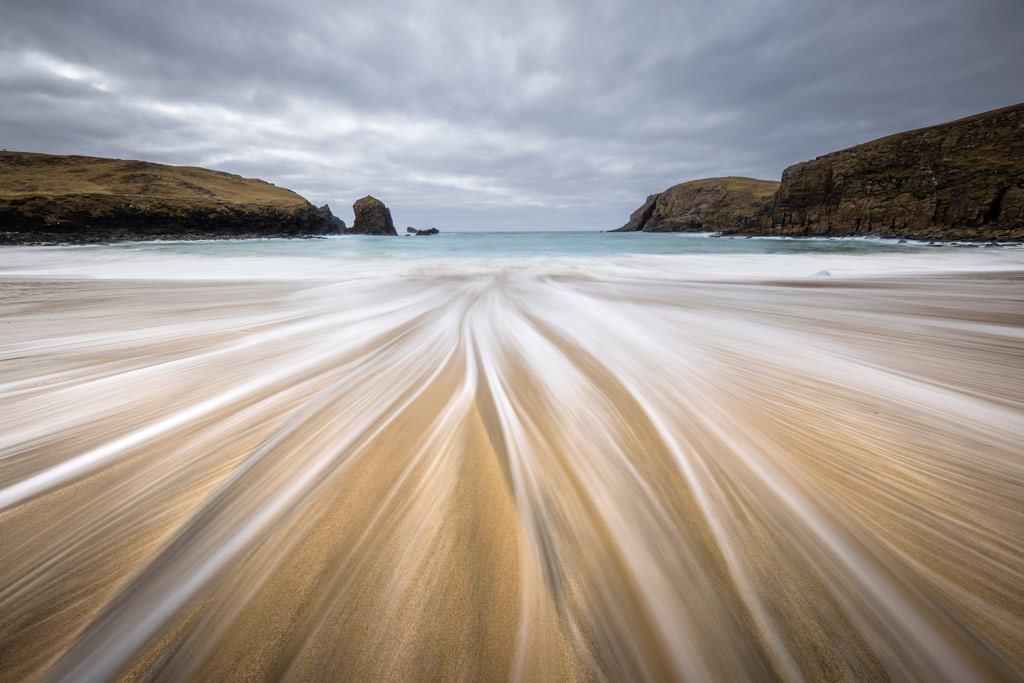
All landscapes have moving elements, whether it be grass, water or clouds etc. Many even have a combination of some or all of these factors, so there’s always a huge amount of potential for creative long exposures. The most dramatic, and often interesting, movement can be found in water and clouds, and exposure time itself can produce drastically different results depending on what you’re aiming for.

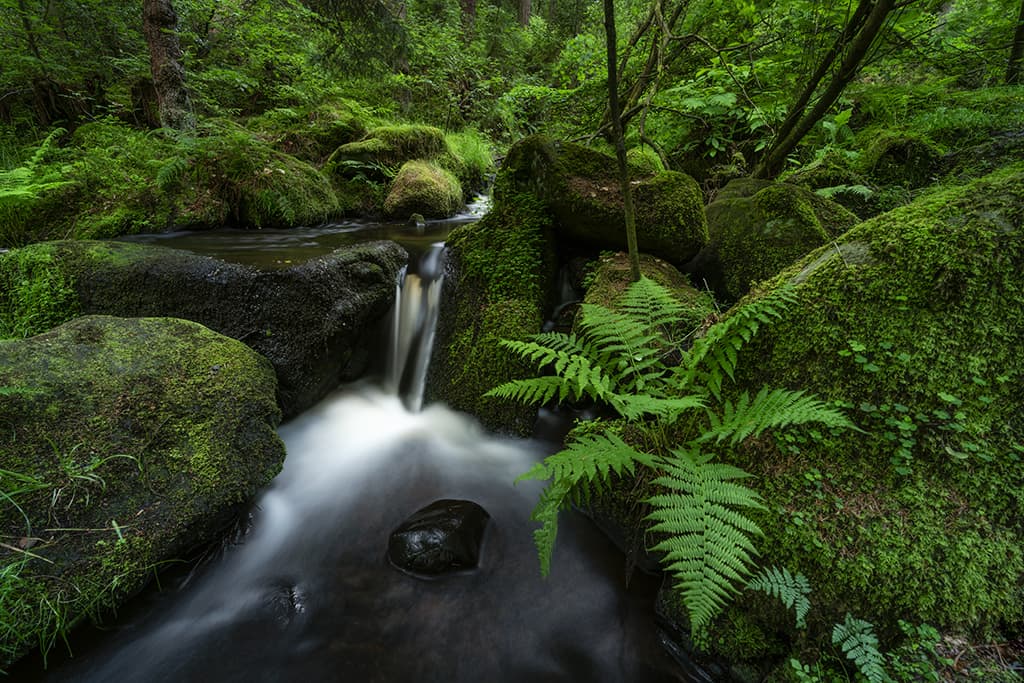
Scenes with clouds in the sky look great when you use a long exposure to capture them streaking towards the camera. The exposure required could be anywhere from 30 seconds to several minutes, depending on how fast the clouds are moving. With water, exposures between 1 and 3 seconds provide the most texture and definition in it, while exposures of 30 seconds and above create a silky water effect in waterfalls and the completely smooth water in lakes and the sea.
The latter is a popular approach when it comes to shooting minimalist images of a tree, for instance, surrounded by silky-smooth water.
Getting the look
One thing that will always make long exposures effective is a static visual element within the scene that remains pin-sharp. Not only does this contrast and accentuate the movement within it, it also acts as a visual anchor that avoids images becoming a pure blur and ultimately abstract.
Personal preference will often dictate which exposure time you opt for, but light levels can also be a factor; it’s easier to extend exposure time than reduce it, which is why it’s essential to carry several ND filters with you when shooting landscapes. For instance, when shooting waterfalls, you’ll often be in dark locations so a 3-stop ND filter may allow you to achieve exposure times of 1-15 seconds while shooting in the morning.
However, shooting in the afternoon might require a 6-stop or 10-stop ND to be used to achieve an exposure long enough to blur clouds.
Fake the effect in Photoshop
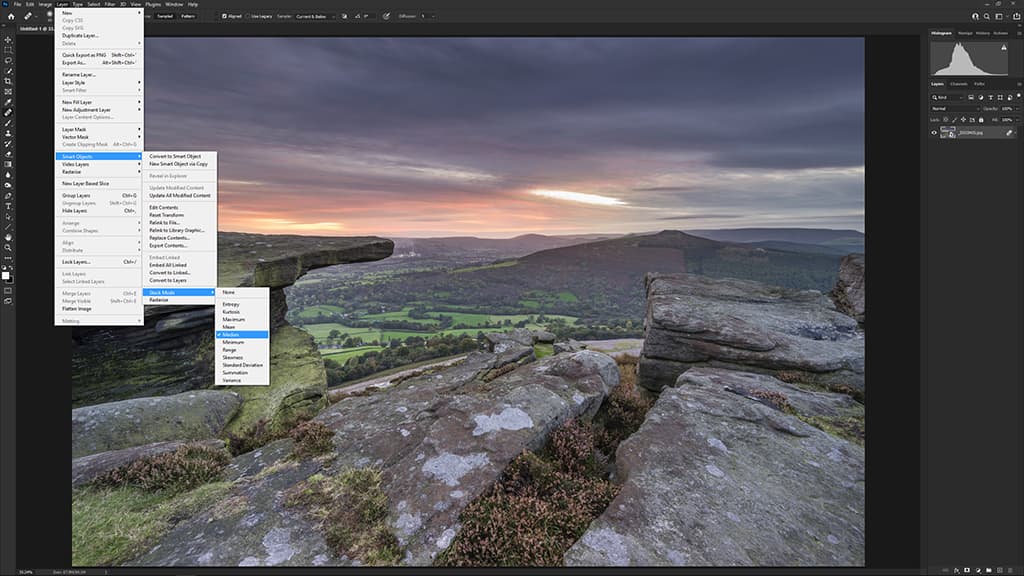
You can fake the look of ND filters by shooting five to ten exposures of a subject with the camera on a tripod. You then need to sync the raw files in Lightroom before opening all the exposures as Layers in Photoshop. Next, go to Edit>Auto-Align Layers and leave the Projection set to Auto and hit OK.
On the Layers panel left mouse click on the top Layer, hold down Shift and click on the bottom Layer so all are selected, then right mouse click on the Layers and select Convert to Smart Object. Once the Smart Object has processed, go to Layers>Smart Objects>Stack Mode>Median. Once the mode has been applied the image will look like a long exposure.
Finally, flatten the image and crop the edges to remove space left after the image alignment.
James’ Kit list
Tripod
A tripod is essential for long-exposure photography because the camera must be kept completely still during exposures to avoid camera shake in areas of the scene that should be sharp.
Shutter remote
Using a shutter remote allows you to fire the shutter without touching the camera and causing camera shake. They’re also necessary for shooting in Bulb mode to manually hold the shutter open.
Exposure calculator apps
The LEE Stopper and NiSi Filters apps allow you to dial in the standard exposure and will calculate the exposure required for a variety of ND filters including 6, 10 and 15-stop NDs.
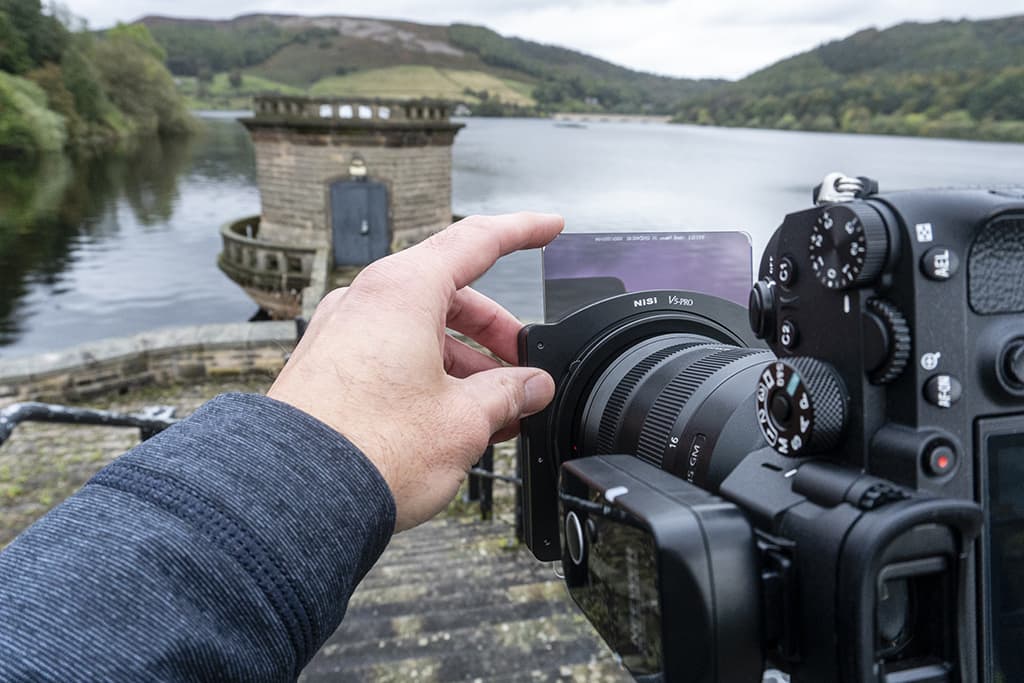
Filter holder
If you plan to combine ND filters with graduated ND filters to maintain sky detail, you’ll need a filter holder where 100mm filters slot in place and can be stacked according to requirements.
Variable ND filter
Variable ND filters are a budget option providing a variable density ranging from roughly 1.5 stops to 8 stops, which is controlled by rotating the front part of the filter.
James Abbott
James is a freelance photographer and photography journalist specialising in creating shooting and editing techniques that help photographers improve their skills. His first book, The Digital Darkroom: The Definitive Guide to Photo Editing in Adobe Photoshop and Affinity Photo, is on sale now. www.jamesaphoto.co.uk.
Guy Edwardes’ tips for creative long exposures in landscape photography
I think it’s important to start by stressing that I never use long exposures just for the sake of it! I always consider whether a long exposure is appropriate, as well as how long it should be. There are certainly times when a longer exposure is beneficial, but at others it can be detrimental. My incentive for using longer exposures is to help inject life and a sense of movement into otherwise still images of the landscape. The exact length of exposure required for this will vary and may depend upon several factors.
I always work in manual exposure mode when shooting long exposures. This allows me to choose the perfect aperture, ISO and exposure time, and to then use neutral density filters to control the brightness of my image. I also use manual focus, as stronger neutral density filters can cause the autofocus to hunt. In this article I will run through the three main reasons why I might consider the use of a long exposure in my own landscape photography.
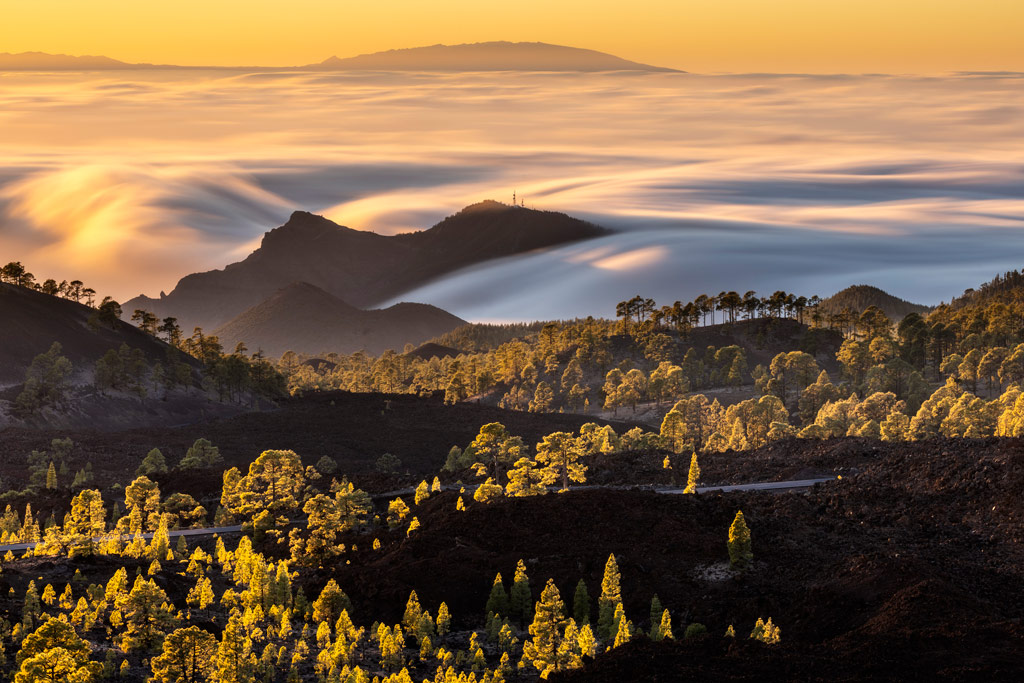
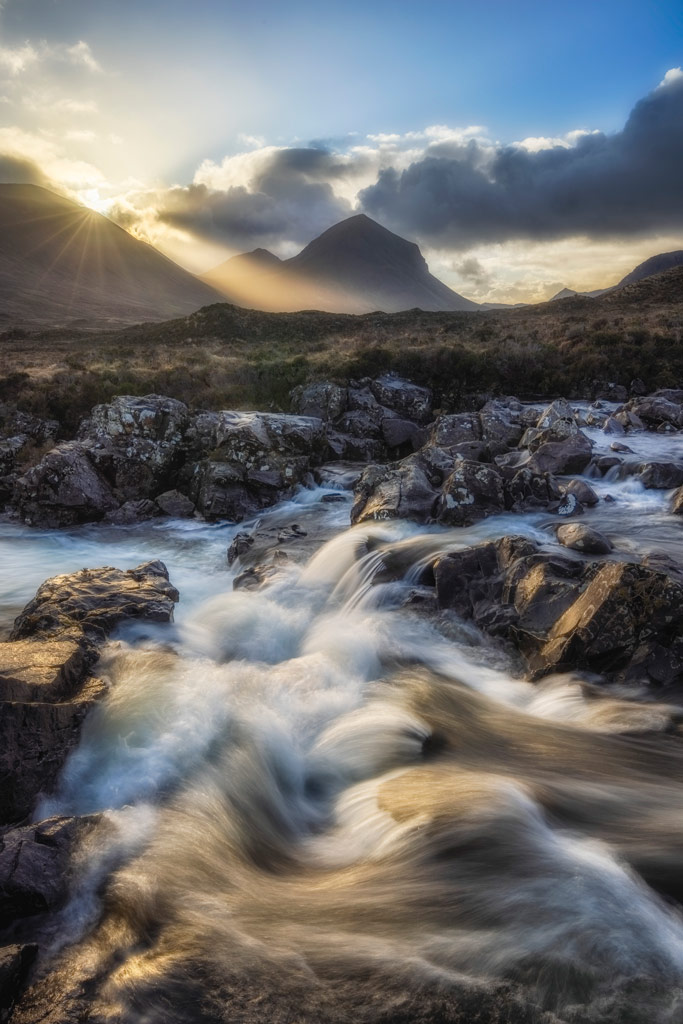
Capturing cloud movement
Long exposures can add a dramatic effect to a landscape scene, especially when clouds are moving quickly and in the right direction! The best effect will be achieved when using a very wide-angle lens and when clouds are either moving towards the direction you’re photographing, or directly away from it. You may need to experiment a bit to find out exactly how long your exposure will need to be, as this will depend upon how quickly the clouds are moving. It could be anything from a few seconds to several minutes, and you would control this using neutral density filters. Whenever you shoot long exposures it’s worth taking several frames to choose from later, as the effect will be slightly different in each one.
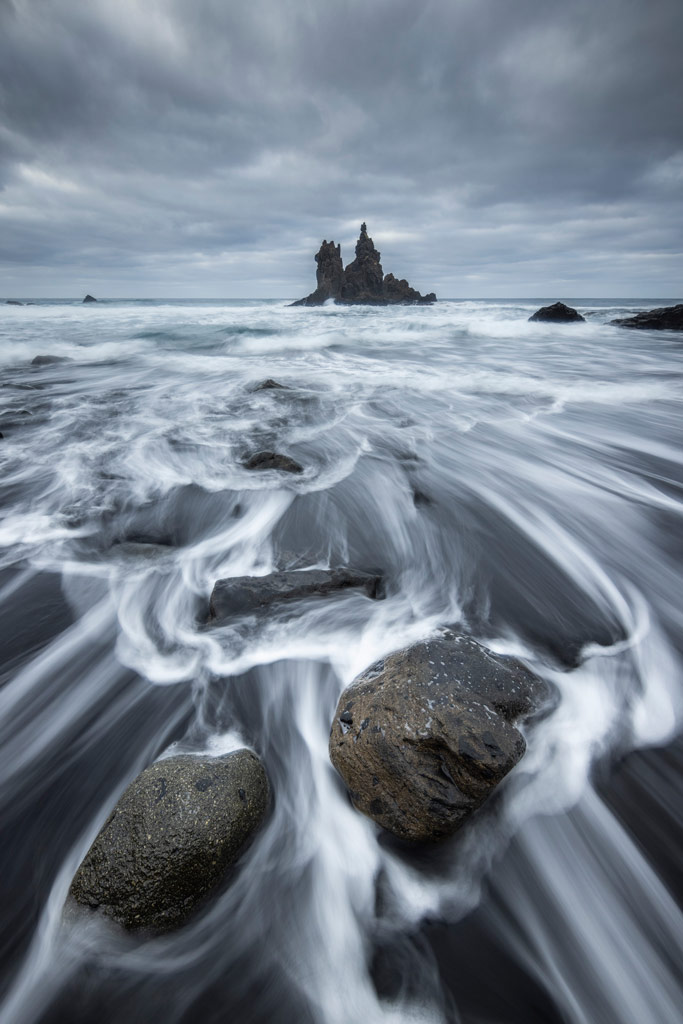
Creative control of water movement
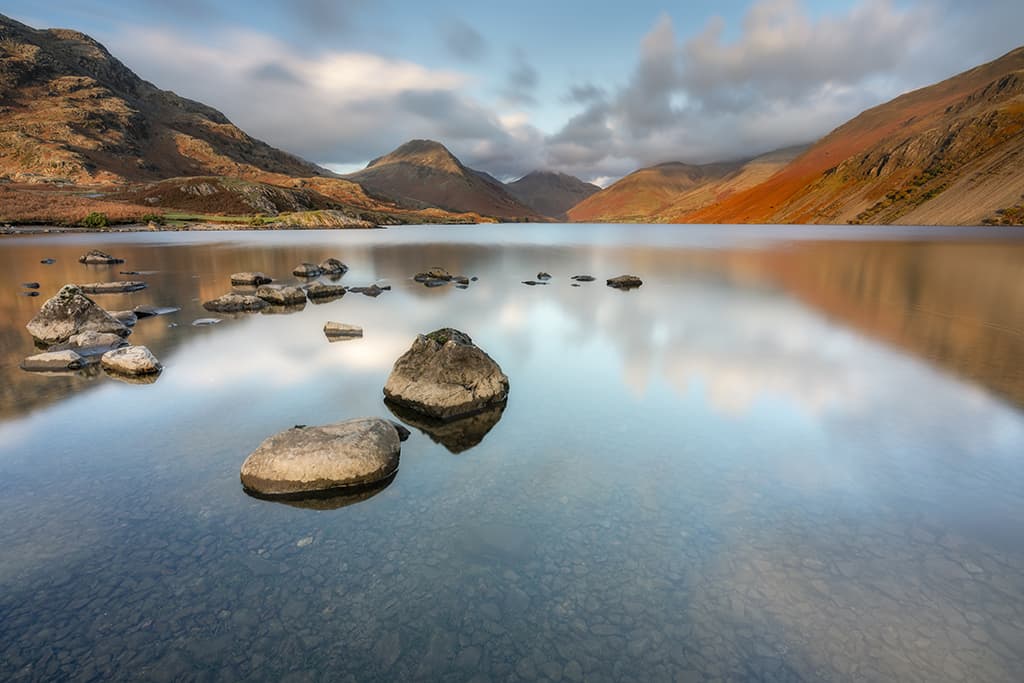
For me the most effective use of long exposure times is to control the way moving water is recorded in my landscape images. In coastal locations I may be looking to smooth out the texture and contrast of ripples and waves to help emphasise features such as boulders, piers, sea stacks and rock arches. In poor light I often use very long exposure times of several minutes to create minimalist seascapes by smoothing out the water to an almost glass-like state.
A longer exposure time can also be used to create separation between the flowing water in a river and static rocks within the river and along the riverbank by reducing contrast and texture in the water. Using a fast shutter speed to capture landscape images that include moving water can result in a ‘frozen in time’ look that seems unnatural to my eye. To overcome this, I will decide upon an appropriate exposure time that I feel suitably captures the flowing nature of the river at the time.
Working with the conditions
In windy weather when vegetation is blowing around, I often choose to work with the conditions, rather than fighting against them. The latter usually results in compromises to image quality from using high ISO settings and wider lens apertures to achieve a shutter speed fast enough to freeze wind movement.
Therefore, try sticking to a low ISO setting, along with the aperture you require for sufficient depth of field, and simply allow the vegetation to blur during the resulting long exposure. This approach can help to capture a more atmospheric result, indicative of the weather conditions at the time. It should be obvious that you deliberately intended to blur the vegetation, so a neutral density filter may be required to set a long enough exposure time, although in overcast light a polarising filter is normally sufficient.
Problems to overcome
Always take the time to use neutral density filters to achieve your long exposure, rather than expanded low ISO settings or a very small lens aperture, both of which are detrimental to image quality. Remember to turn off in-camera and lens stabilisation when shooting long exposures, otherwise the stabiliser can blur the whole image. Long exposures cause the camera sensor to get hot, which in turn can lead to ‘hot pixels’ showing up in your image. For this reason, it’s best to turn your camera off whenever you’re not taking pictures to allow the sensor to cool. Some camera bodies include the menu function ‘pixel mapping’ to remove hot pixels – it is worth running this before taking any long exposures.
Another option is to use in-camera long exposure noise reduction, but this takes time and is therefore impractical when shooting very long exposures. Perhaps the best solution is to shoot a final long-exposure image with your lens cap on. This black frame will still show the hot pixels and can be used to perform a dark frame subtraction in Photoshop. Place the dark image as a new layer on top of the image you’re working on and change the blending mode to subtract. Most hot pixels will vanish, and the remainder can be removed using the spot healing tool.
There is certainly a degree of trial and error in long-exposure landscape photography, but as a creative technique it may help to elevate your landscape shots to the next level.
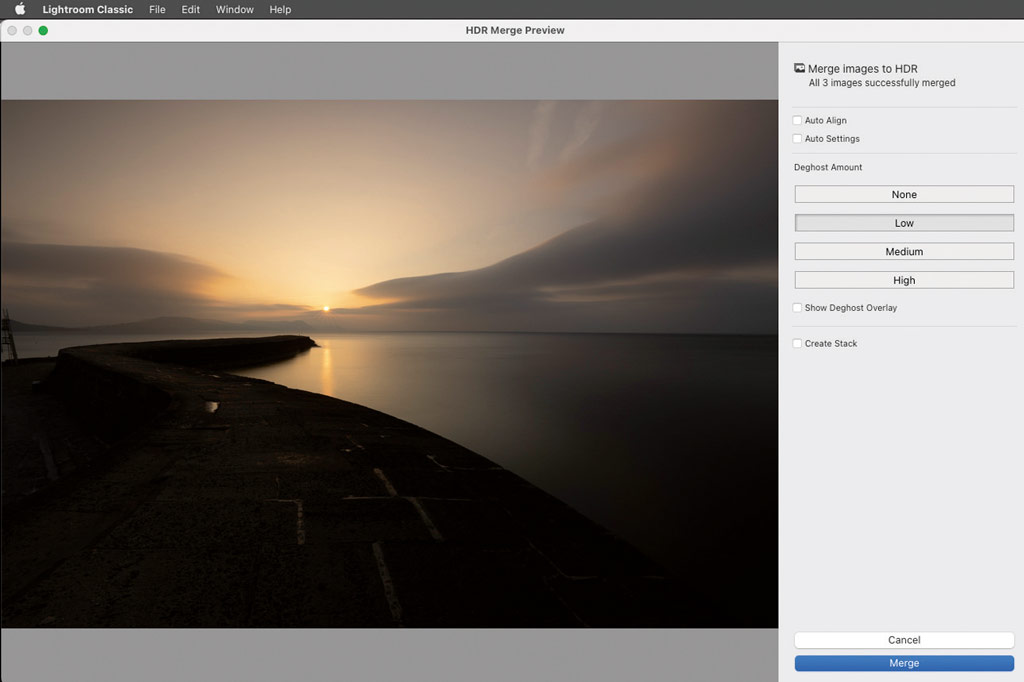
How to shoot moving water with long exposures in high-contrast lighting
1. High-contrast scenes require exposure bracketing and blending if you don’t use graduated ND filters. However this can cause problems when shooting long exposures with moving water, as the water effect will vary in each bracketed frame. I overcome this by using a variable neutral density filter (VND).
2. Choose the ideal camera settings for your shot. This would normally be a low ISO to minimise noise and a middle aperture for the best image quality. You can also set what you consider the perfect exposure time for the effect you’re trying to capture.
3. Turn the VND filter until the scene appears dark enough to capture plenty of detail in the brightest highlights. This can be judged by using the live histogram on your rear LCD screen. Note that if you have the sun in the frame this first image will be very dark indeed! Take the first image.
4. Without changing any camera settings, carefully turn the VND filter until 1-2 stops brighter. Take a second image. Repeat this process until you’ve captured a final image with plenty of detail in the darkest shadow areas. The number of images required will depend upon the contrast in the scene.
5. The water movement in each frame will be similar, as the exposure time remained the same. Therefore, the resulting set of images can be blended, in Adobe Lightroom (Merge to HDR) into a single DNG RAW file with expanded dynamic range. This can then be processed as normal, but with the increased capacity to recover highlight and shadow areas. If using an exposure time of only a few seconds, it may be necessary to refine the end result by blending the best single exposure for the water with the HDR file using layers and masks in Photoshop.
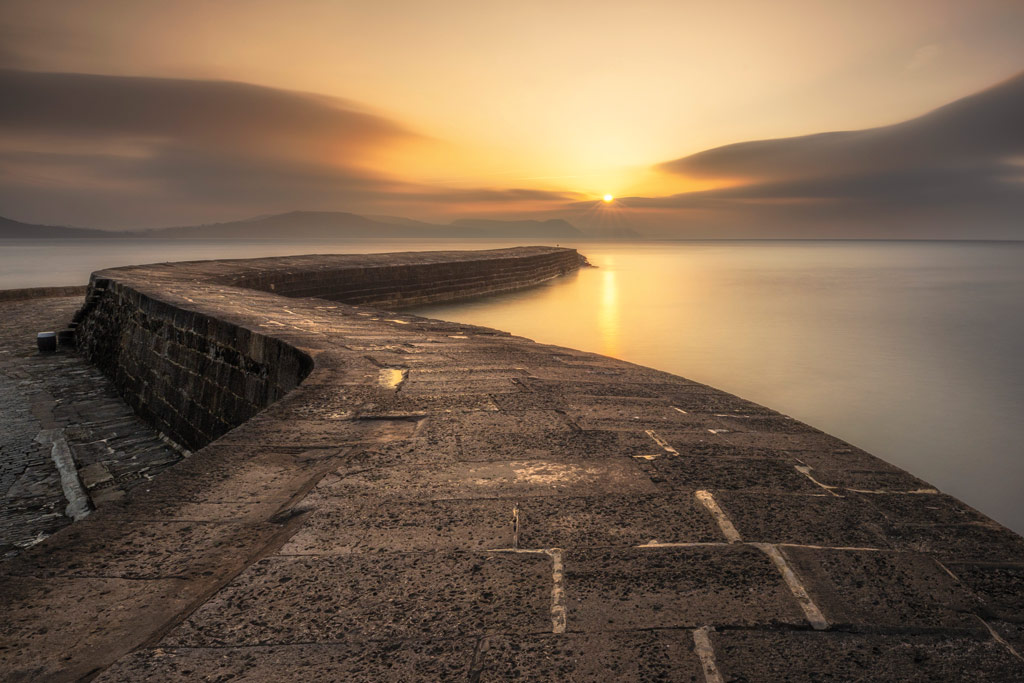
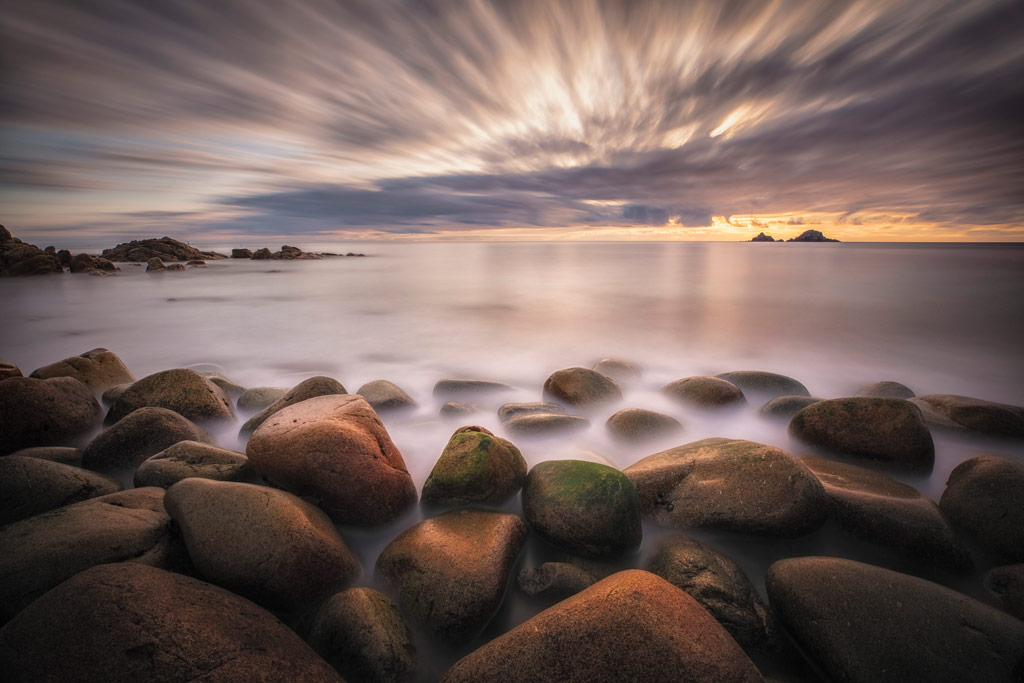
Why it Works
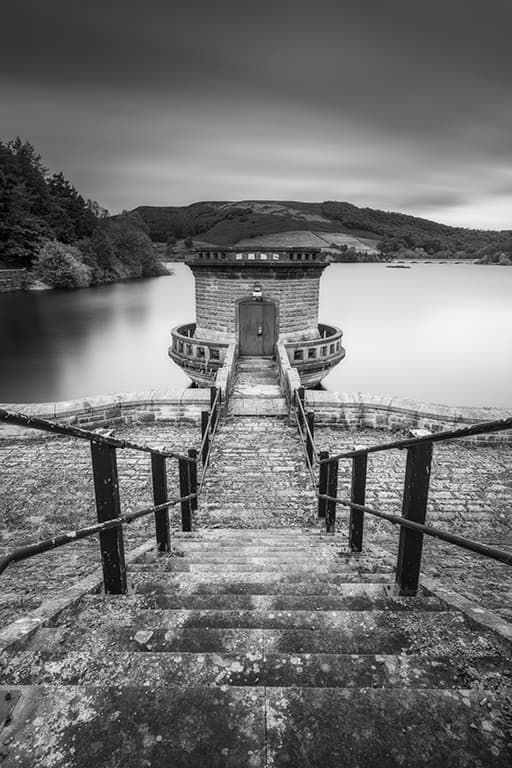
For this shot of Porth Nanven in Cornwall I used a very long exposure time of five minutes. This was achieved using a 15-stop neutral density filter. It is a single exposure at f/11 and ISO 100 to maximise image quality. I opted for such a long exposure for two reasons. Firstly, as the clouds were moving directly towards me and I was using a 16mm wideangle lens, I knew that a long exposure would transform the clouds into streaks that would help to draw the viewer’s eye into the centre of my composition. Secondly, I wanted the nice smooth boulders to form a prominent and important element in the foreground. The water flowing around the boulders during the long exposure has helped to isolate individual boulders, as well as simplify the overall composition by smoothing out the texture and contrast in the waves and ripples; otherwise the image would have looked very busy.
Guy’s Kit list
Wide-angle lens
Although lenses from wide-angle to telephoto can all be used successfully for shooting long exposures, ultra- wide-angles tend to produce the most dramatic effects if you’re trying to capture water or cloud movement. My Canon EF 11-24mm f/4L is my most-used lens when shooting long- exposure landscapes.
Tripod
A sturdy tripod and head are essential for long- exposure landscape photography. Spiked tripod feet and a weighted bungee cord can help improve stability, especially in windy conditions. I use a Sachtler Flowtech 75 video tripod and Really Right Stuff BH55LR ballhead.
Neutral density filters
I recommend having a minimum of 3-stop, 6-stop and 10-stop ND filters available. Even 15-stops can be useful in very bright conditions. I use a set of Breakthrough drop-in ND filters and variable ND filter via my Canon EF-RF drop-in filter adapter.
Remote release
For exposure times longer than 30 seconds you may need a remote release to use the bulb setting on your camera. However, many modern cameras allow bulb to function through the use of touch shutter, or the setting of longer exposure times directly.
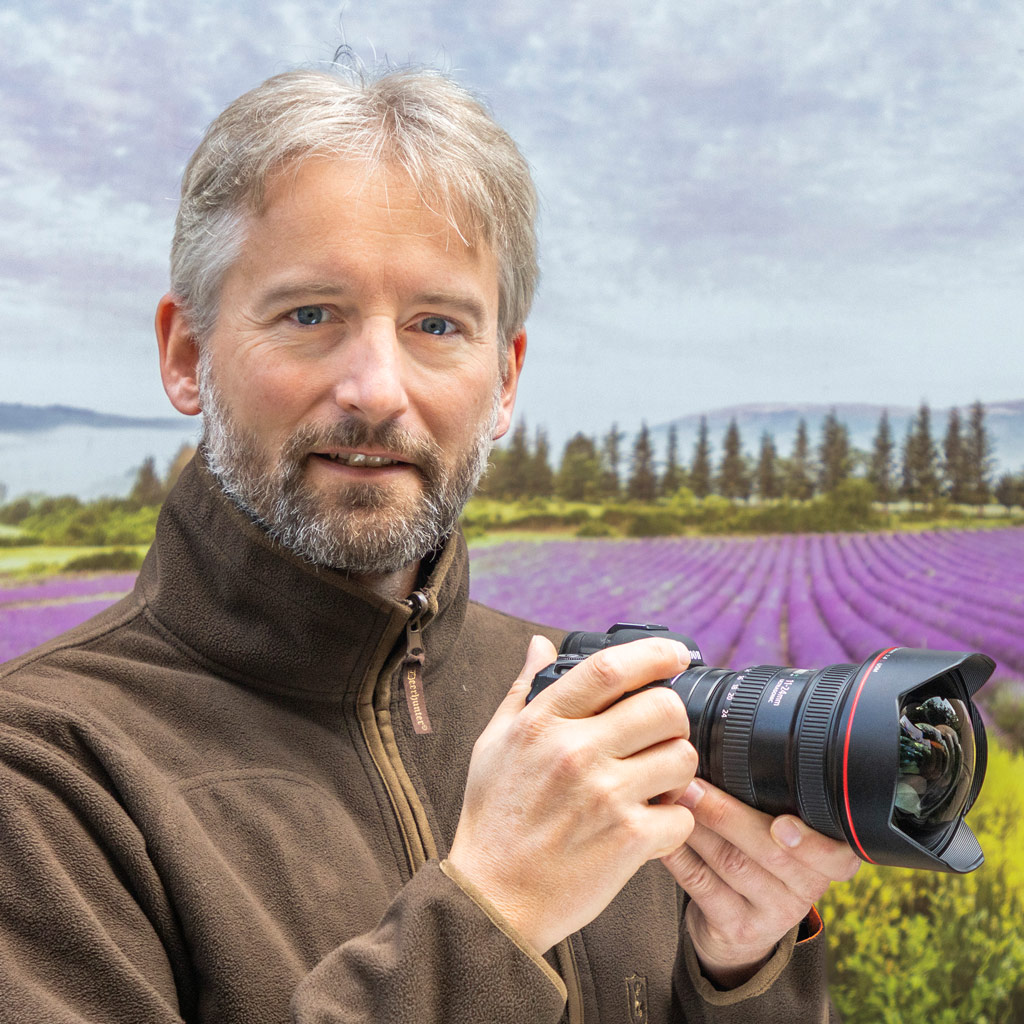
Guy Edwardes
Based in his home county of Dorset, Guy has been a professional landscape and nature photographer for almost 30 years. He is represented by major picture libraries, and he runs a series of photographic workshops and tours around the world. See his latest work and available workshops at www.guyedwardes.com.
Further reading:
- The top three filters you need for superb landscape shots
- Lee filters Super Stopper targets long-exposure photography
- Guide to fine art landscape photography
- Guide to Moonlight Landscape Photography
Follow AP on Facebook, Twitter, Instagram, YouTube and TikTok.


