

Amateur Photographer verdict
DxO PhotoLab 7 remains one of the very best raw editors. It will appeal to those photographers who value image quality above all else.- Excellent for noise reduction
- Integrated colour profile tool
- Lens correction with tons of supported lenses
- No luminosity masks
- Basic black and white tools
DxO PhotoLab 7 Elite edition at a glance:
- Raw editing software
- Mac and Windows
- Free 30-day trial
- Non-subscription, one-time purchase
- Fully-featured Elite edition costs $229/£209 ($109/£99 if upgrading)
- Pared-down Essential edition costs $139/£129 but doesn’t have DeepPrime, LUTs, colour calibration or HSL
- Support for Fuji X-Trans Raw files
- www.dxo.com
With an emphasis on image quality and the sort of tools photographers regularly need, DxO PhotoLab has long been amongst the best photo editing software, especially for those who shoot raw. PhotoLab 7 continues the trend with considered updates and features that build on DxO’s excellent reputation for raw processing. It’s all about optimising and enhancing what the camera captures, rather than transforming it with special effects or generative AI.
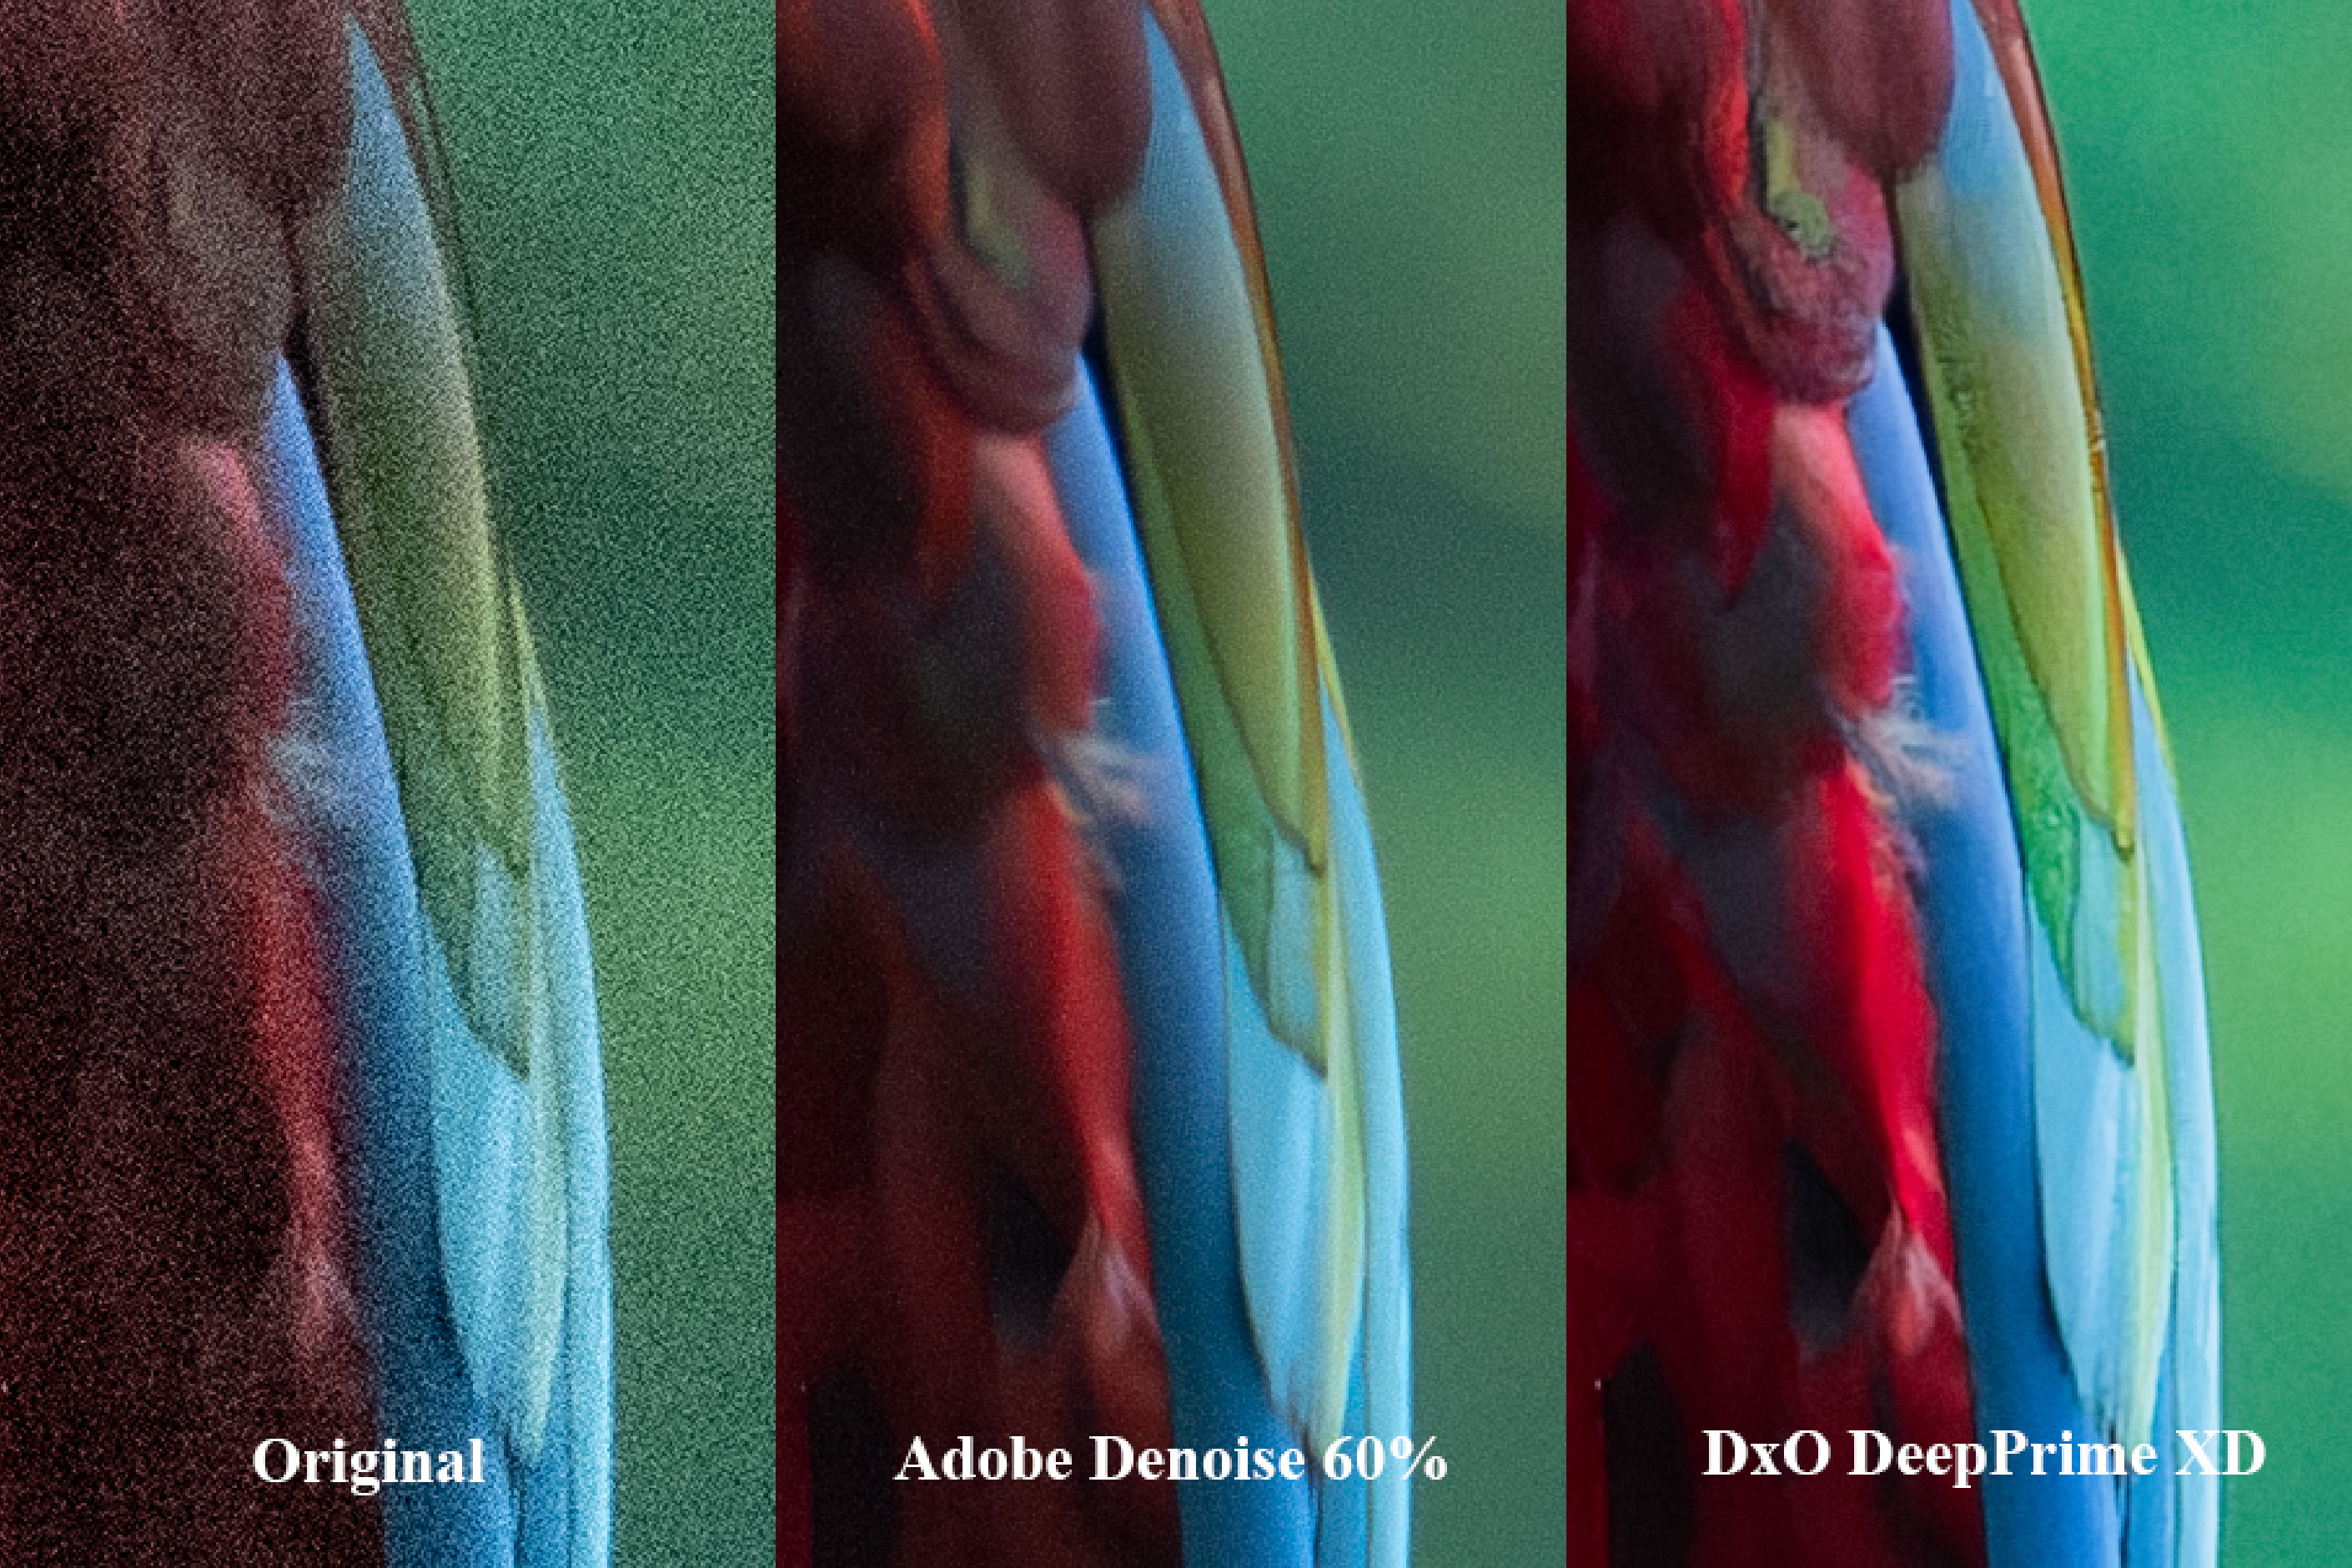
DeepPrime XD Noise reduction
The only feature that utilises AI in PhotoLab 7 is certainly its best. First introduced in PhotoLab 6, DeepPrime XD is able to clear up noisy photos to an astonishing degree. If you have photos shot at high ISOs that you thought were unusable, think again. DeepPrime XD can extract an incredible amount of detail, cut down the grainy luminance noise and build in extra fine detail and sharpness.
Noise reduction is something DxO has always excelled at. But Topaz Denoise AI and Lightroom Denoise are both excellent alternatives. In the current noise wars, DeepPrime XD is – for me – still the best there is, but the gap is certainly smaller than it once was.

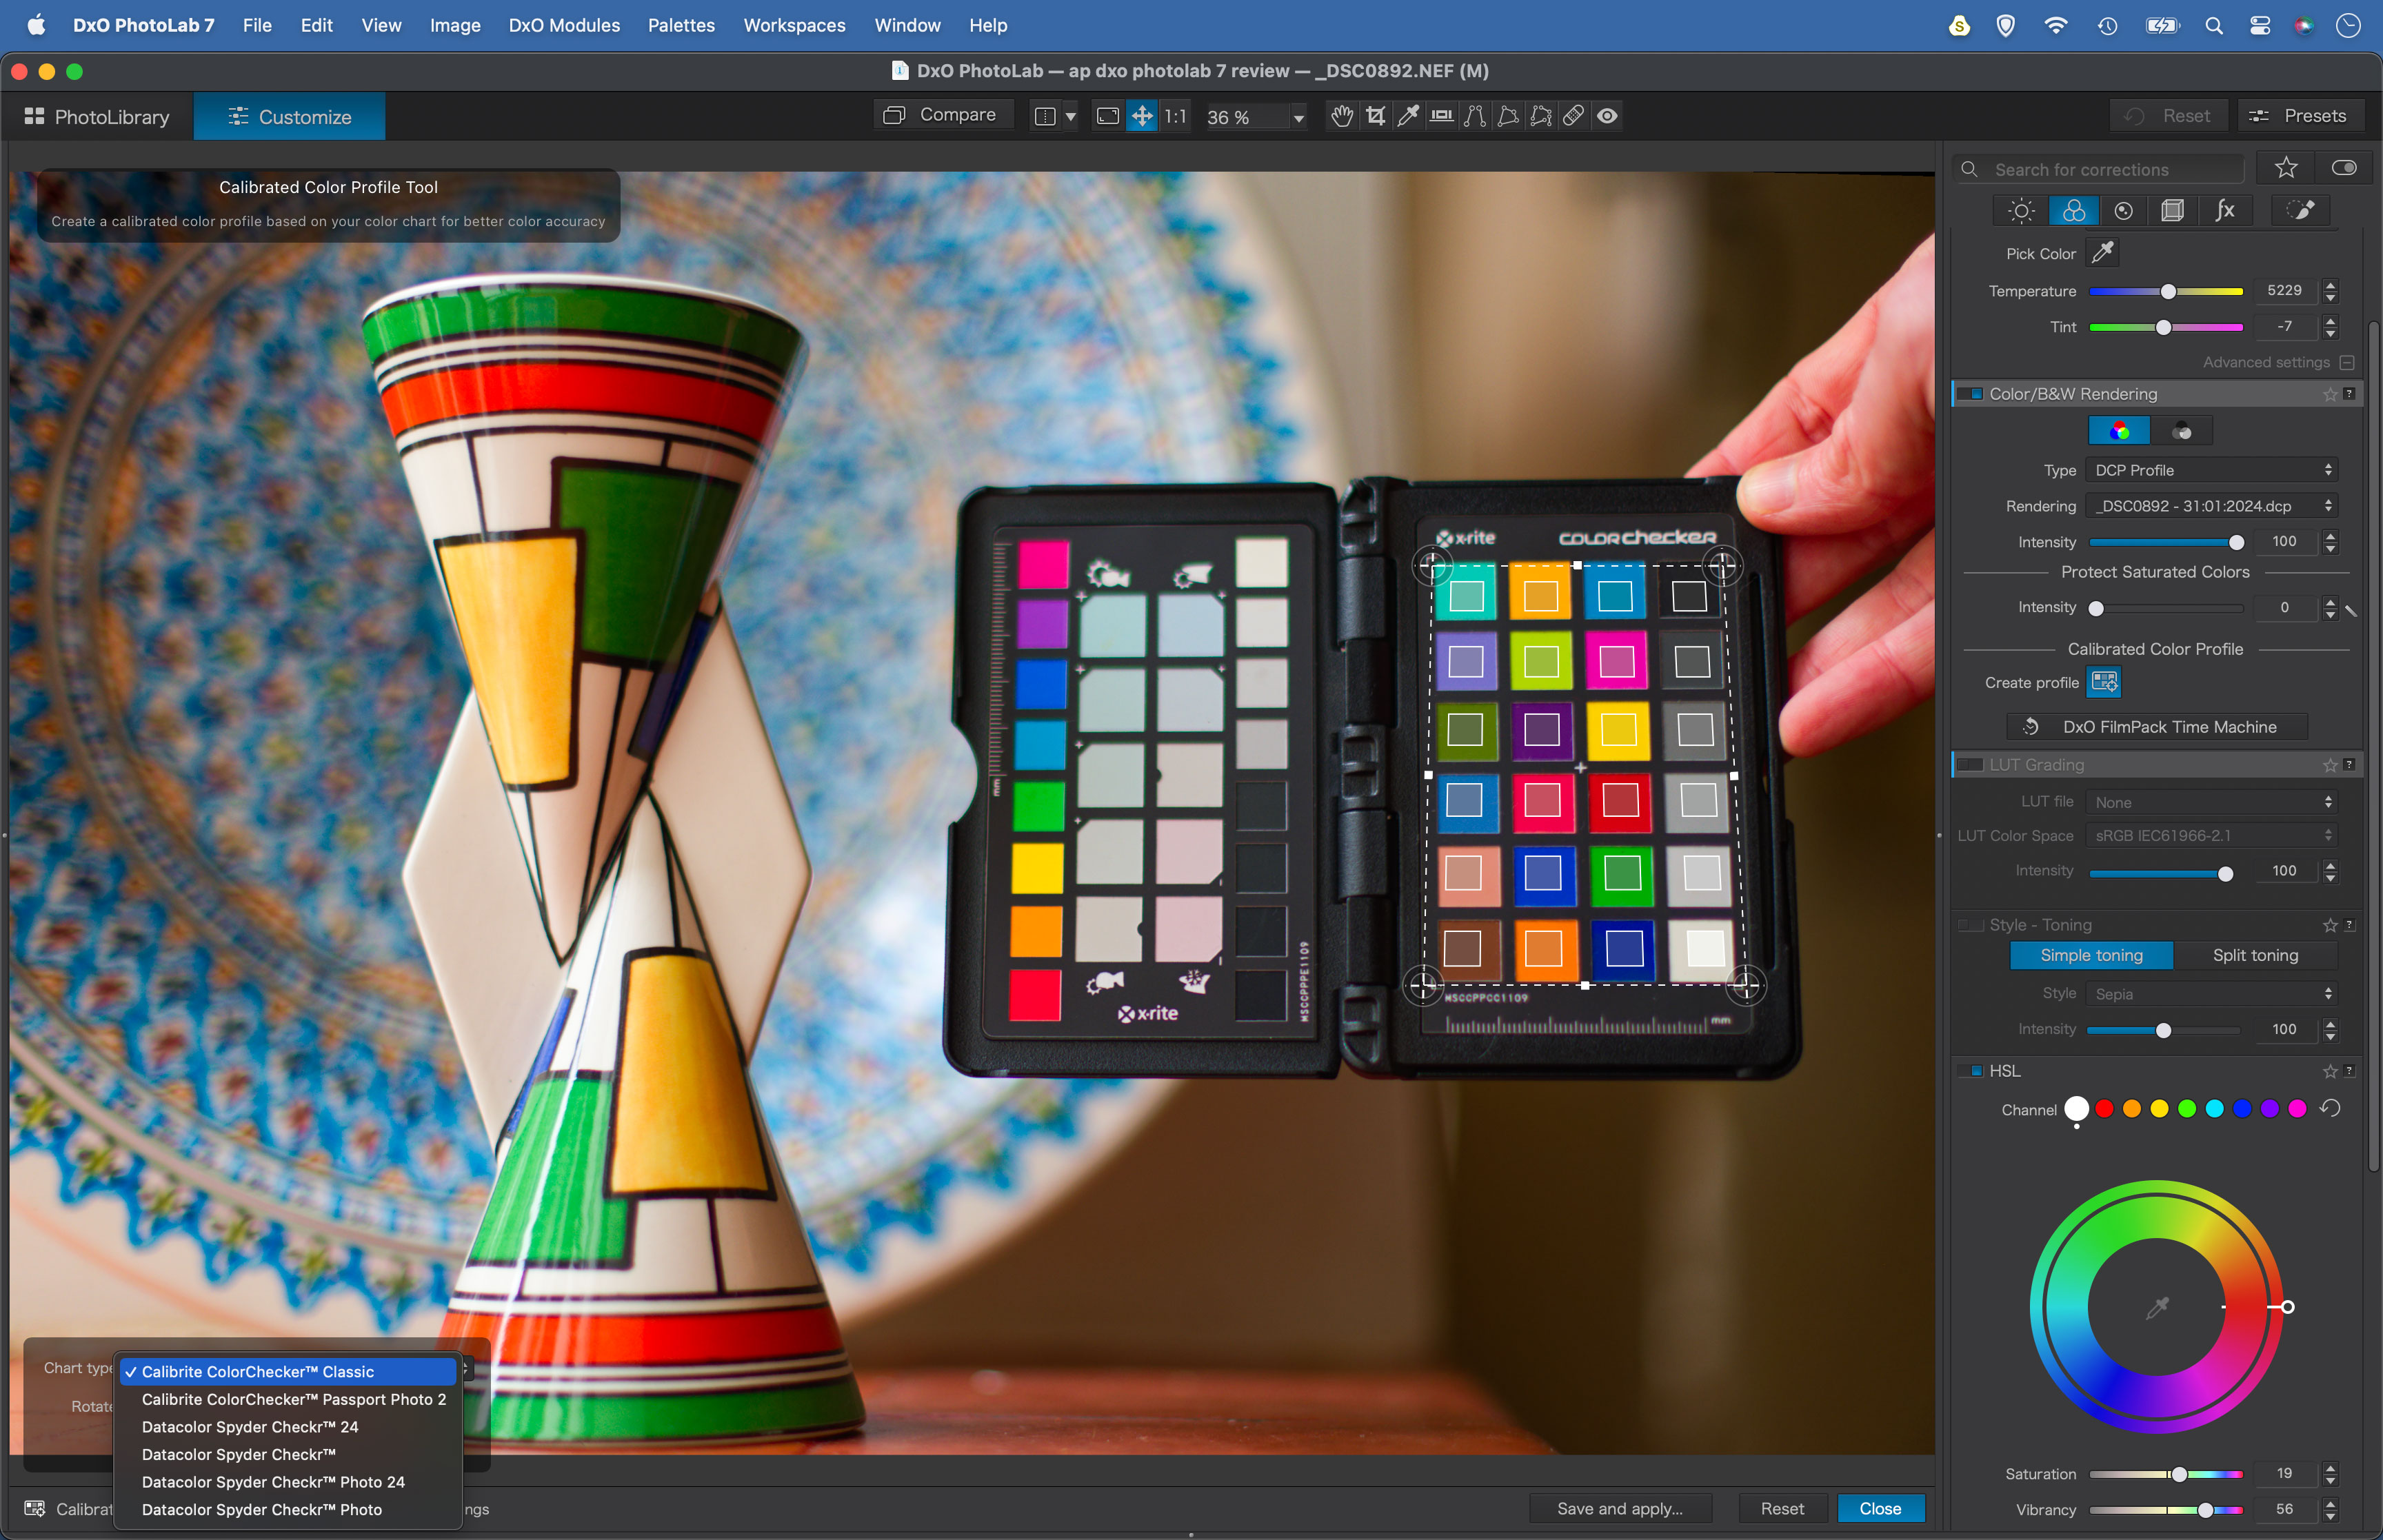
Colour calibration
A welcome new feature in DxO PhotoLab 7, the Calibrated Colour Profile tool allows you to get supremely accurate colours by including an industry standard colour chart (from Calibrite or DataColor) in the frame for reference. Once done, you can create a custom colour profile by dragging a box over the colour checker, then tweak it to fit the grid of colours.
This is the sort of feature that will be of great benefit to some photographers, while completely overlooked by others. I think it’s brilliant. For those who need accurate colours, it may well be a workflow gamechanger.
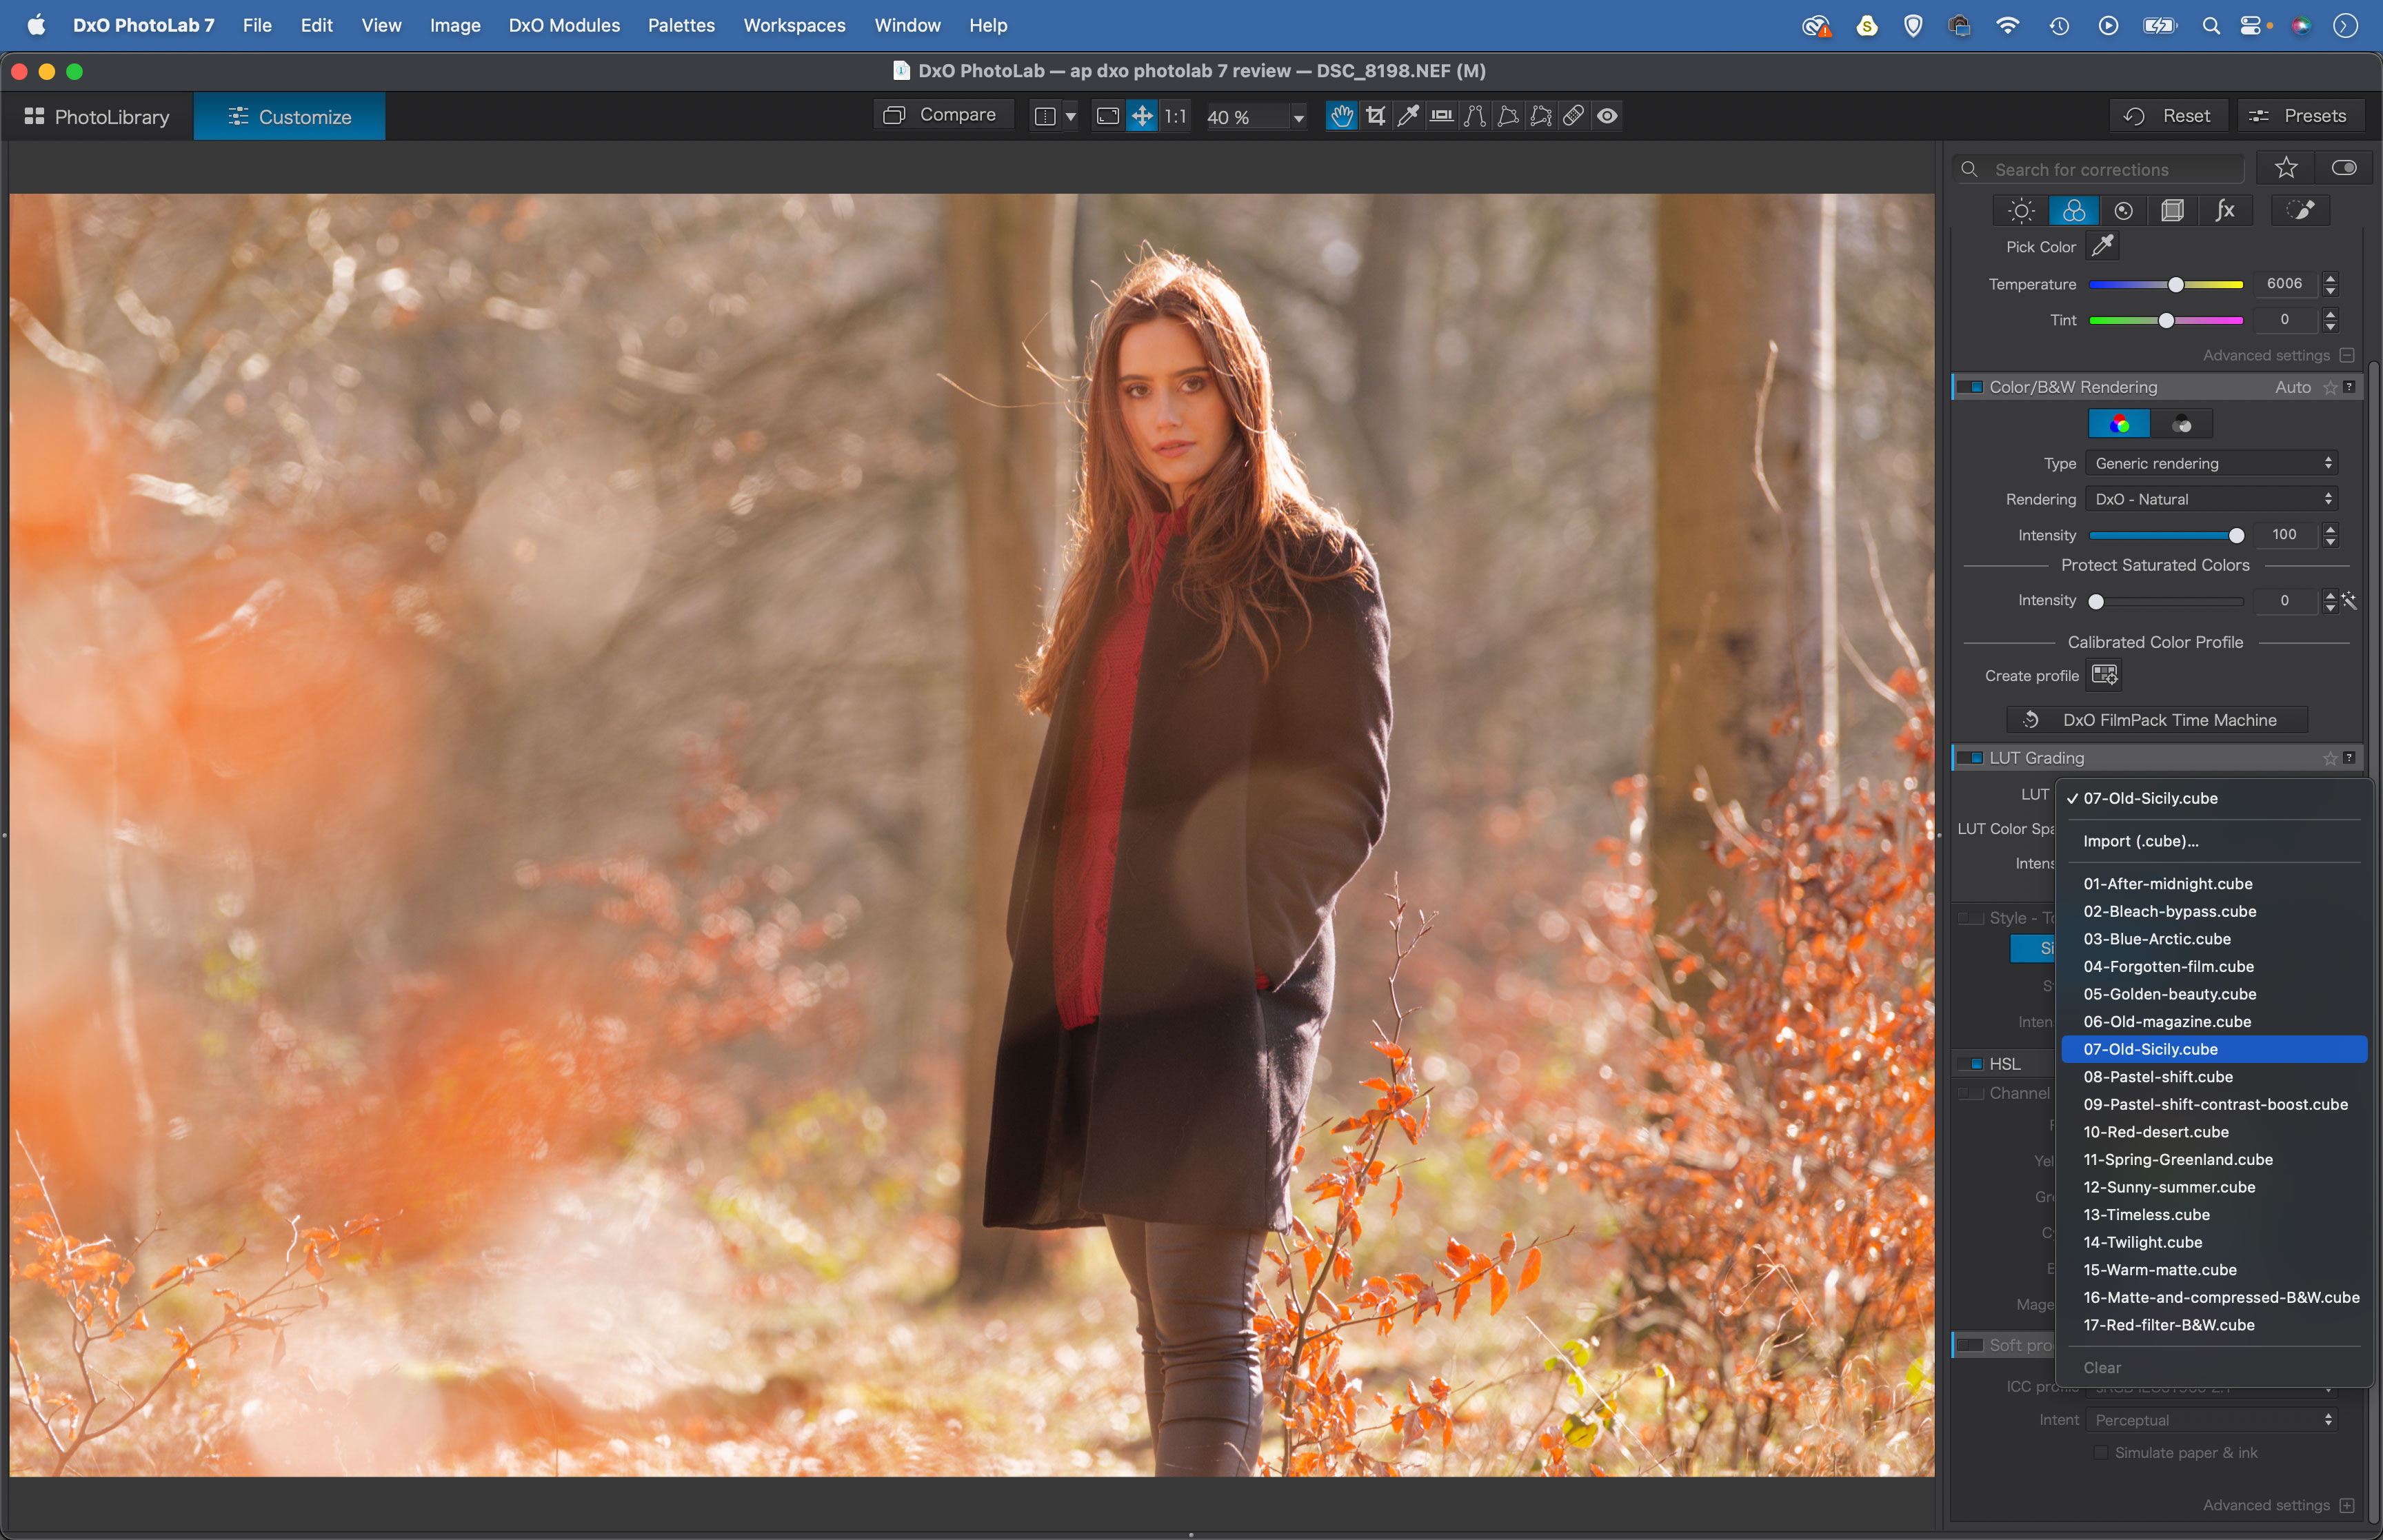
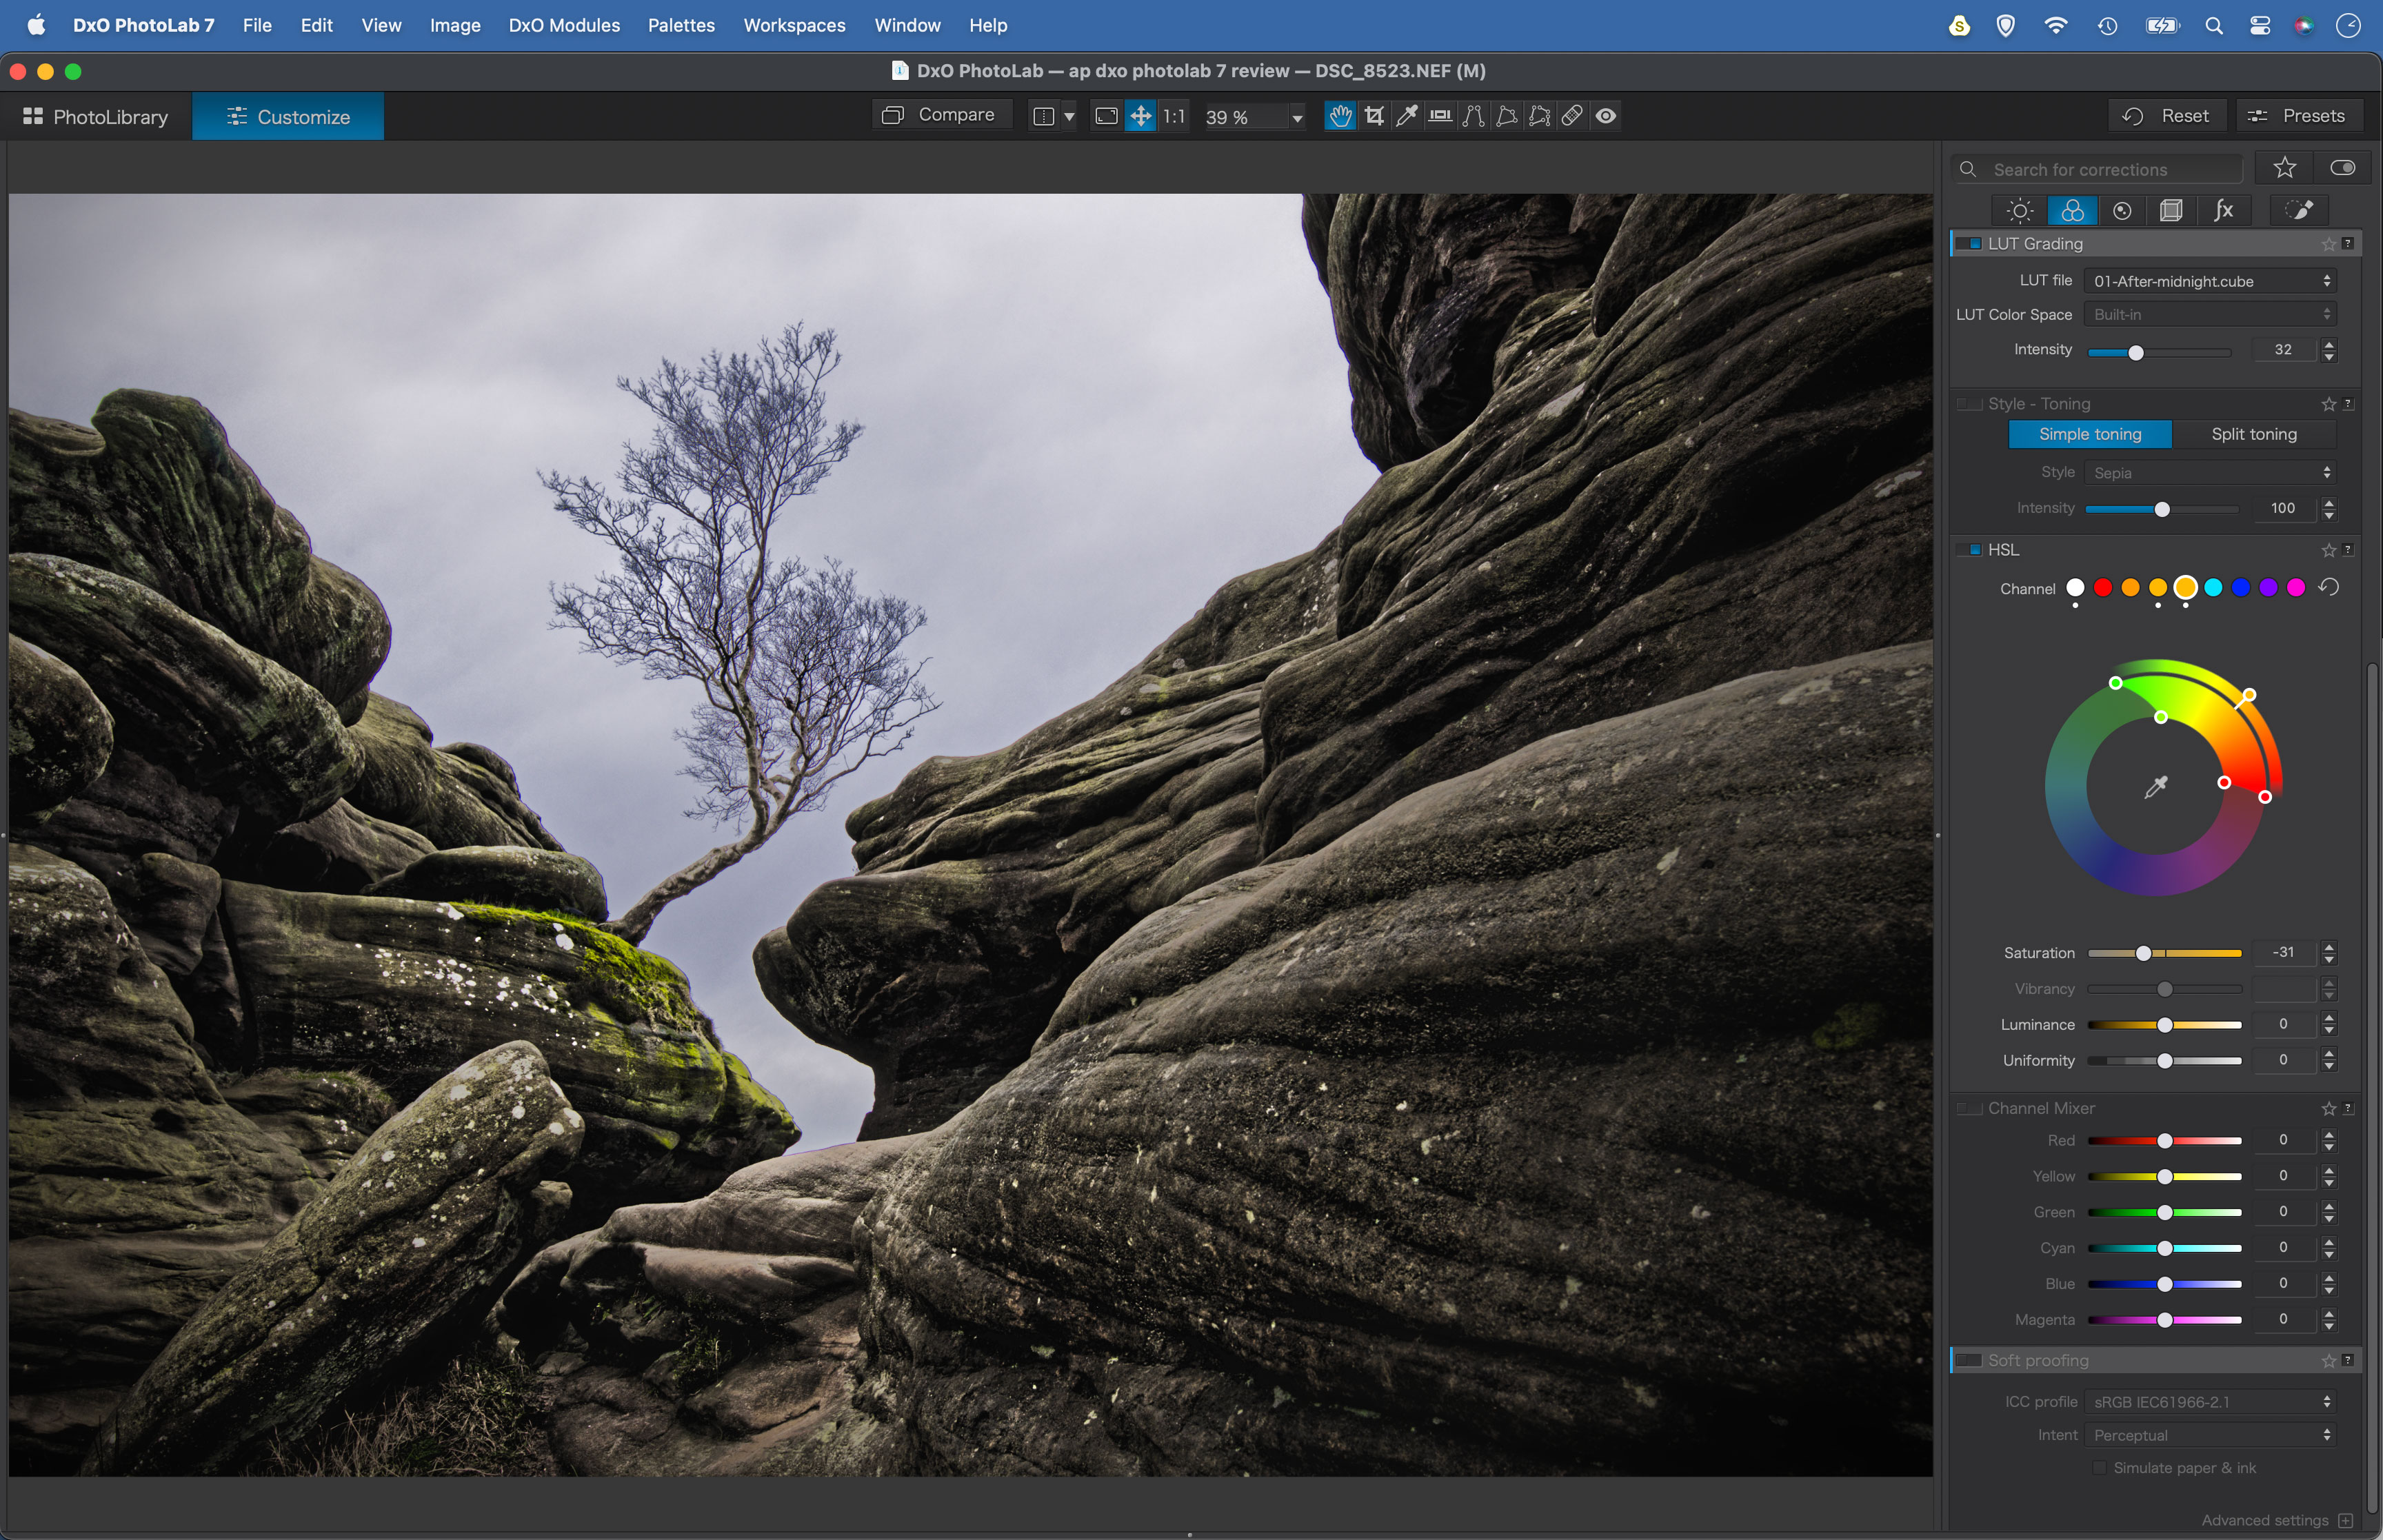
LUTs
Invaluable to video editors, LUTs (Colour Lookup tables) are increasingly being used in photo editing. If you’re unfamiliar with LUTs, imagine all the colours in an image are laid out in a table with two columns, and each shade in the spectrum is transferred from column A to column B. This is effectively what LUTs do, and the great thing is, they’re universal. So you can go beyond the 17 initial offerings in PhotoLab 7 and import third party LUTs in the common .CUBE file format. These one-click colour treatments allow you to change the look and feel of your photos in an instant. The integration into PhotoLab is nicely done.
Black and white controls
Black and white has often seemed like a bit of an afterthought in previous versions of PhotoLab. Perhaps this is because the role is performed so ably by two sister apps, the excellent Silver Efex in the Nik collection or the bolt-on FilmPack 7 with its range of analogue-inspired presets. Now PhotoLab 7 has upped its monochrome game with several black and white rendering options and a Channel Mixer that lets you fine-tune the luminosity of six colour ranges.
The Channel Mixer is a decent addition, but it would be better if there was some sort of on-image control for altering colours rather than just sliders (like in Lightroom), as pushing and pulling the sliders can often lead to image break-up. It also doesn’t allow for very large shifts in brightness, so it’s hard to – for instance – make a blue sky look dark and dramatic.

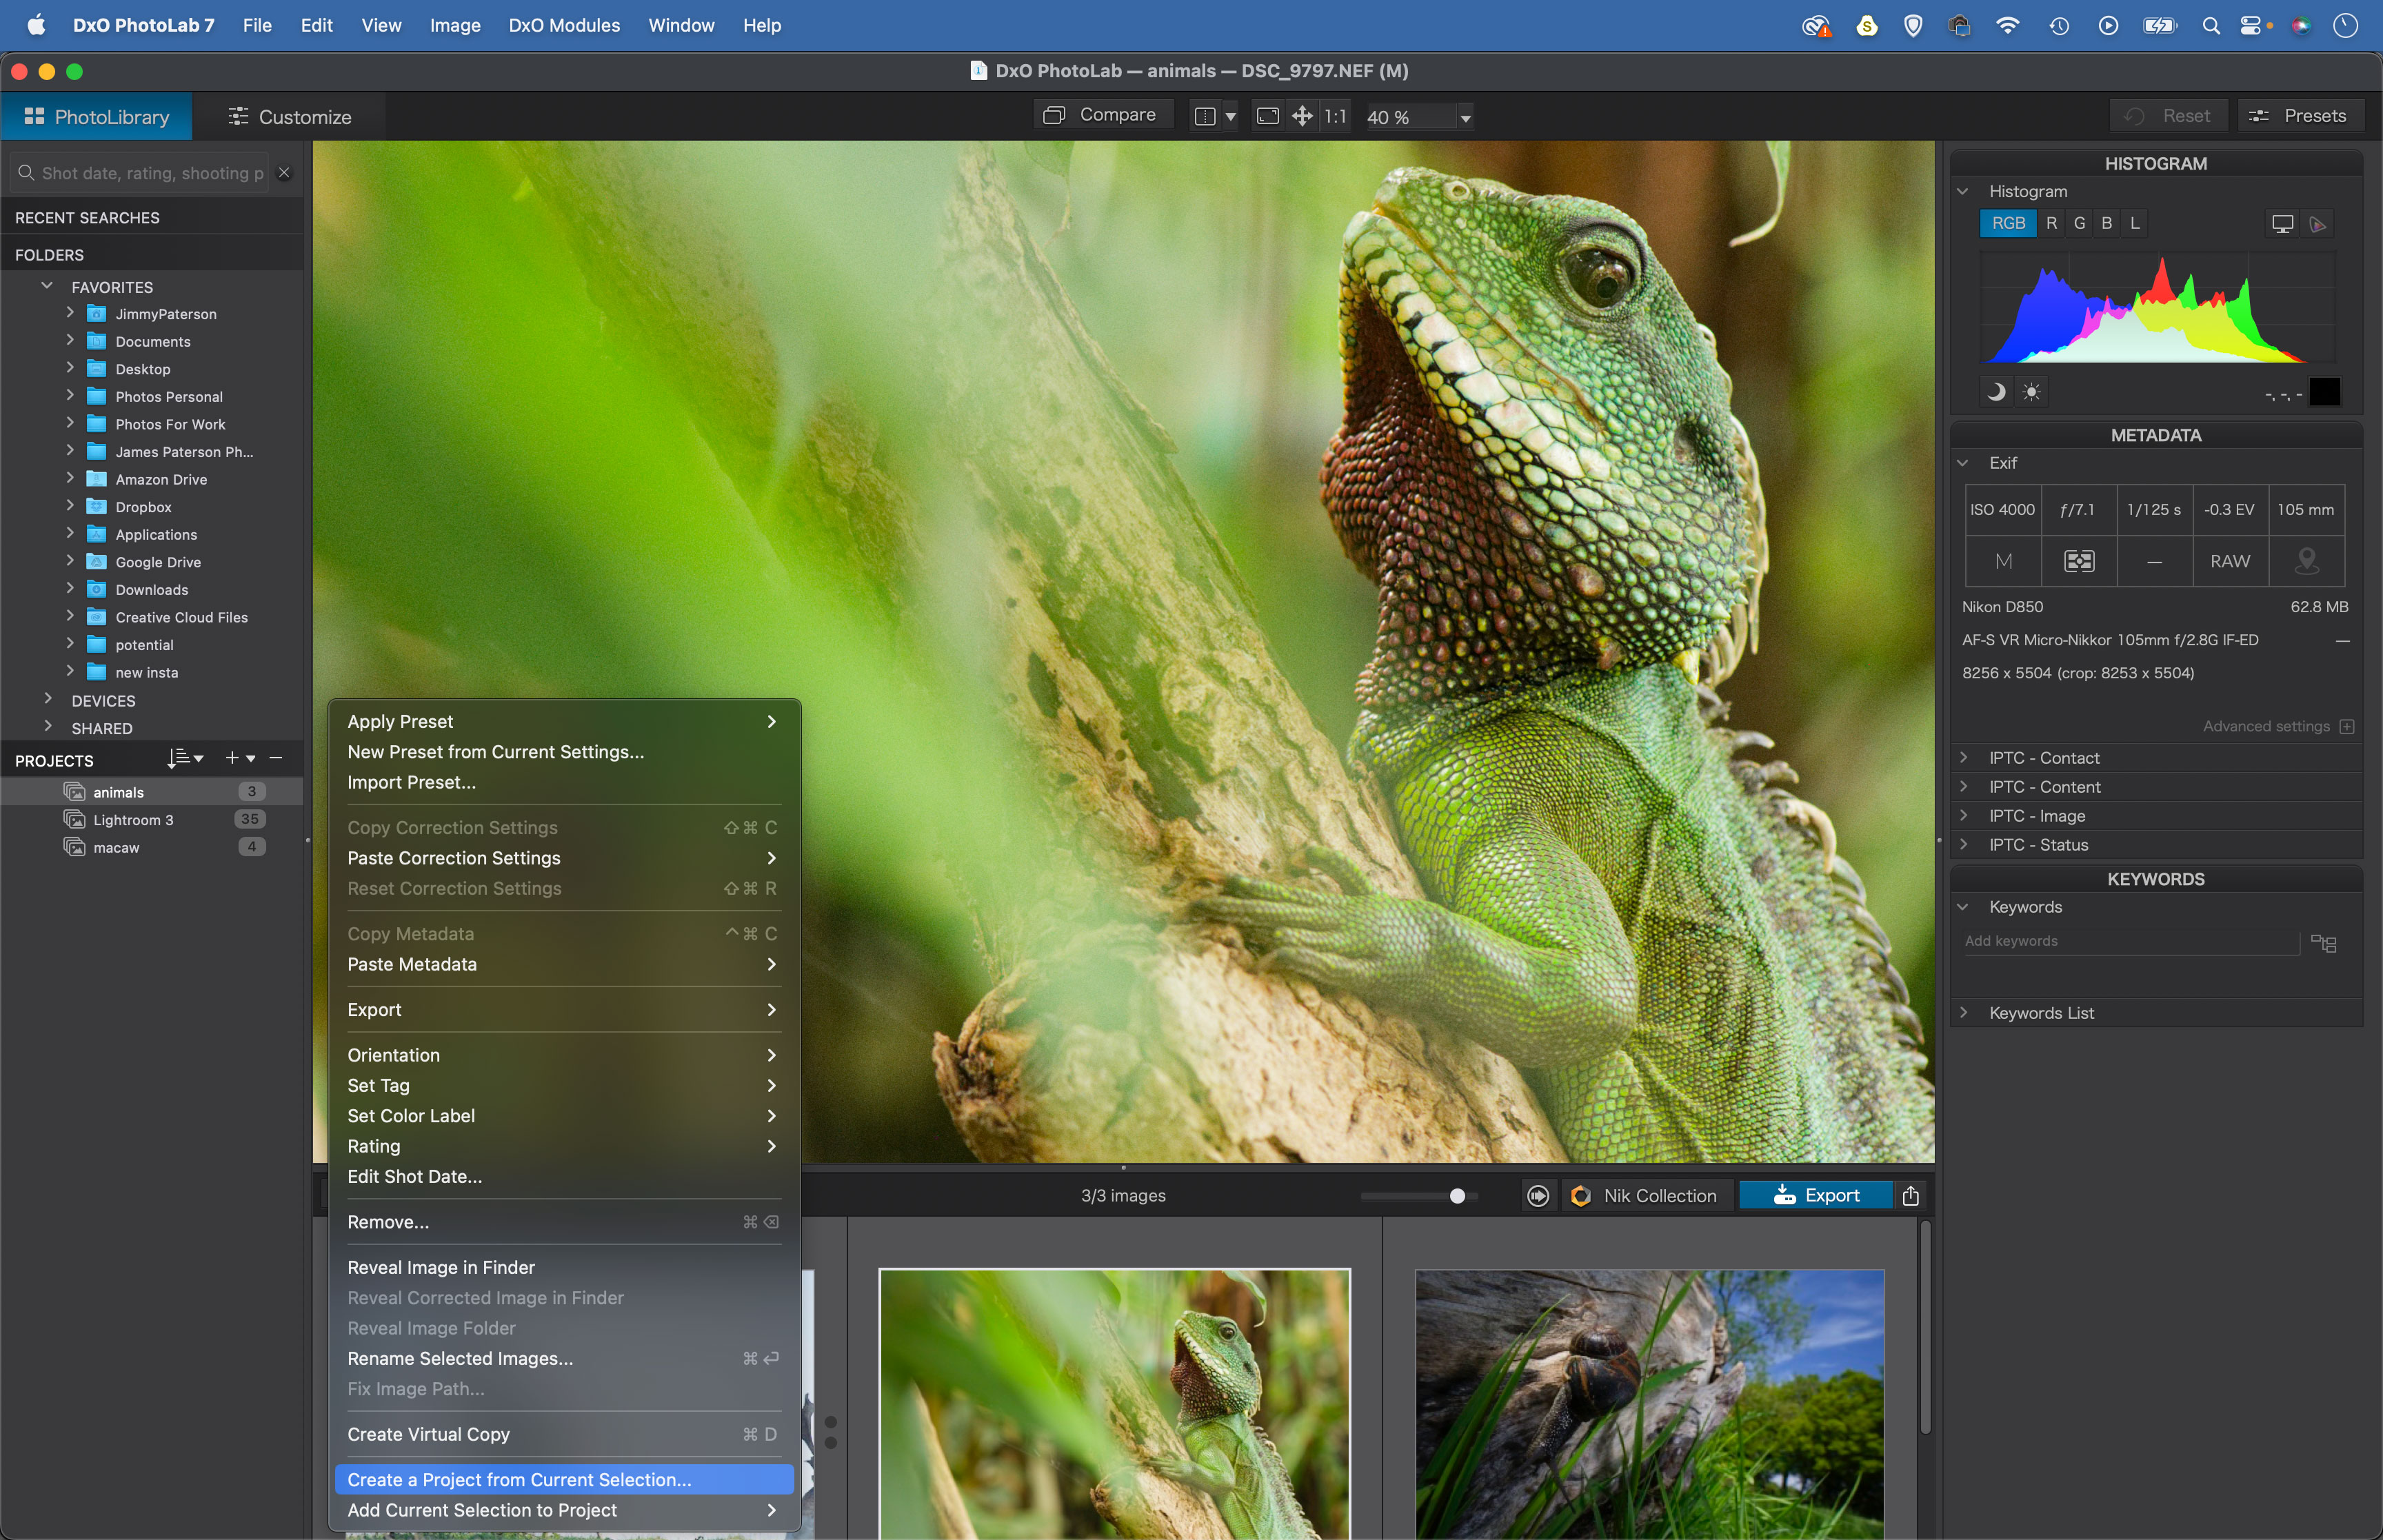
PhotoLibrary
The PhotoLab 7 interface is split into two distinct spaces accessible via buttons at the top left, PhotoLibrary and Customise. PhotoLibrary is where you can organise, rate, add keywords and sort your images. The PhotoLibrary workspace offers a simple structure that is largely dependent on how you organise folders on your hard disk. Unlike Adobe LIghtroom there’s no need to import images and no Catalog. The PhotoLibrary isn’t as comprehensive an image organiser as Lightroom, but it’s efficient and simple to use.
Customise workspace
Customise is the workspace where you enhance your photos. There are a series of panels on the right side under the headings Light, Colour, Detail, Geometry, Watermarks and Effects, and Local Adjustments. Within these you’ll find a host of powerful editing tools. These include the superb ClearView Plus which lets you cut through haze, and Smart Lighting for balancing high-contrast scenes. Along the top of the interface are several tools, including the ReTouch tool for removing objects and distractions. Separate windows open for Presets and Export controls.
You can fully customise panels by dragging them around and docking them wherever you please (especially helpful if you have a dual monitor setup). Overall the interface is as clean and uncluttered as one would expect, and it shouldn’t take new users too long to find their way around it.

The raw workflow
While you can open and edit jpegs and tiffs into DxO PhotoLab – and get perfectly good results – it’s geared towards photographers who shoot in raw. Essentially you have more headroom when editing raw files than you do with jpegs, and more of a safety net if you need to correct exposure mistakes. The trade-off is that raws require an extra step in your workflow to process, so you need a quality raw processor to optimise your photos. In this regard, DxO PhotoLab is superb. Thanks to its raw demosaicing and lens correction tools, it produces raws with an exceptional level of quality.
The PhotoLab workflow
Like similar raw editors, DxO PhotoLab 7 employs parametric editing. This means that when you make changes to an image, you’re not permanently altering the pixels within, rather you’re making alterations to how the image is previewed in the software. Changes are only ‘burnt in’ when the image is exported in another file format like a jpeg or a tiff.
The parametric system of editing brings all kinds of benefits. Because the original image file remains independent, any changes can be adjusted or undone at any stage. It also makes it easy to batch-process a whole set of images or create Virtual Copies. These allow you to take a single image in different directions and, because these edits are saved as tiny sidecar data, there’s no need for memory-hogging copies of the original image file on your hard drive.
Optical corrections
When you first open a raw photo into DxO there are immediate signs that things are happening. You’ll see a list of Optic Module Correction Profiles pop up, with a suggestion to download them. These modules are created in the DxO lab through extensive testing of thousands of camera/lens combinations. This testing started 20 years ago so it includes a huge roster of older lenses, and the list is regularly updated with the newest lenses and camera bodies.
Each individual combination of camera and lens has its own characteristic optical flaws, and the modules are tailored to correct them. You only need to download once, then the correction is applied thereafter. As such, every raw image opened in PhotoLab 7 is automatically optimised, with distortion, chromatic aberration and vignetting corrected and sharpness enhanced. This is like a cheat code for your camera, making up for shortcomings like corner softness and fringing and producing a better image straight off the bat.

Revamped local adjustments
One of the key features of any image editor has to be local adjustments. The ability to isolate areas of an image with masks and make tonal changes to those areas is essential for crafting tonally balanced photos. In PhotoLab 7, we have a range of tools for targeting parts of the image. There’s a linear gradient for making straight transitional adjustments, brush and auto brush tools that let you paint over areas, and Control Points that intelligently isolate areas based on the pixel values within a circular or linear area.
Local Adjustments have been overhauled in PhotoLab 7. In previous versions the Control Point placed onto the image would expand to show all manner of tonal sliders in the ‘equaliser’, which could lead to a cluttered interface and obscure the image. Now the tools are listed in the Adjustments panel at top right, and after adding a control point the tonal sliders also appear in this panel, so you have a much cleaner view of the image and the adjustment being made. If you’re familiar with the previous system then this might take some getting used to, but overall I think it’s an improvement to the user experience.

New HSL local color adjustments
A headline new feature in PhotoLab 7, local HSL adjustments allow you to fine-tune specific colour ranges within your masks. After making a mask, you can choose from eight predefined colour ranges or adjust the wheel to define your own custom range, then tweak the hue, saturation and luminosity of the range. It’s a powerful, brilliantly designed tool that will be of benefit to those photographers who demand fine colour control.
Aside from the interface tweaks and HSL tool, there’s little difference between local adjustments in PhotoLab 7 and PhotoLab 6. In this regard the tools are not as advanced as Lightroom/Photoshop’s AI-powered masking, and Control Points are a Marmite feature that some find intuitive while others may struggle with. There are also some usability issues. The Auto Brush makes a mask that doesn’t reveal where the edge detection has occurred, which makes the tool rather useless.
There is also a new Luminosity Mask feature for local adjustments that lets you zero in on areas based on brightness, but somewhat irritatingly it’s only available to those who have purchased DxO FilmPack 7 (at £275 for the combined PhotoLab/FilmPack bundle). With its roster of fine analogue film effects, FilmPack seemingly has very little to do with luminosity masking. As such it’s hard to see this as anything other than a brazen attempt at upselling.
Worth upgrading from PhotoLab 6?
If you have PhotoLab 6 then you’ll already be well aware of the excellent editing tools on offer in DxO software, but with an upgrade cost of £109 to move from PhotoLab 6 to 7, is it worth it? For some, the revamped local adjustments and colour calibration tools will justify the cost, but if you’re happy with PhotoLab 6 and you don’t need the colour calibration tool then it might be worth waiting until the next version (or until DxO has one of its regular sales).
What about if you own PhotoLab 5? There’s a big leap in features (DeepPrime XD for one) and a better user experience in PhotoLab 7 which justifies the upgrade price. Those who own PhotoLab versions 1-4 are out of luck as they do not have the option to upgrade, so will instead have to pay full whack for PhotoLab 7. It’s worth noting that if DxO continues this policy and only allows those with either of the previous two iterations to upgrade, those with PhotoLab 5 will not have the option to upgrade to PhotoLab 8 further down the line.
How does the price compare with the opposition?
The main competition to PhotoLab is Adobe Lightroom (subscription at $9.99/£9.98 per month). Many will prefer to pay once rather than for a monthly subscription, but if you’re thinking long term then you also need to consider the cost of upgrades. If you think you’ll be wanting to upgrade regularly to the latest PhotoLab – which usually comes out yearly – then the cost of Adobe’s Photographers package (which includes Lightroom and Photoshop) is cheaper and offers a depth of features that PhotoLab cannot match. Of course you could upgrade every other year and pay a bit less, or stick with PhotoLab 7 for the foreseeable, but then you wouldn’t get regular updates.
For many, the big reason to use PhotoLab over Lightroom has long been for noise reduction. But now Lightroom has Denoise, the gap has narrowed and Adobe’s package – with its superior library tools – becomes more attractive. But the beauty of standalone programs like PhotoLab 7 is that you’re not locked into a subscription. You have a choice whether to upgrade or stick with a program you’re happy with.
The pared-down alternative: PureRaw 3
Perhaps recognising that the raw demosaicing, optical corrections and noise reduction features are the key strengths to their software, DxO also offers a simple package that combines all three in DxO PureRaw 3 ($129/£115). It can work as a standalone or as a Lightroom plugin. If you’re already locked in to Adobe Creative Suite then PhotoLab 7 is probably surplus to requirements, but PureRaw 3 is a worthy supplement.
PhotoLab 7: The Verdict
DxO PhotoLab 7 remains one of the very best raw editors. It will appeal to those photographers who value image quality above all else.
The highlights are its lens corrections, raw demosaicing and DeepPrime XD, which is still the pinnacle of denoising technology. But these features are the same as in PhotoLab 6 and – however excellent – the newly added colour calibration, updated local adjustments and LUT functionality may not be enough to persuade current users to upgrade.
It’s certainly not perfect. There’s the irritating omission of Luminosity Masks, underwhelming black and white tools, rudimentary photo organising, local adjustments that are starting to look a tad outdated, and a pricing structure that – depending on your needs – may not offer the best value for money.
All that being said, where it’s good, it is stupendously good. The key question for most photographers will always be this: which editor will allow me to craft the best possible image? In this regard, PhotoLab 7 has you covered.

Article by James Paterson, patersonphotos.com
Related reading:
- Latest DxO updates boost colour-editing choices
- Dxo PhotoLab Elite 6 review
- Advancing your image editing with Color Efex Pro from the Nik Collection by DxO
Follow AP on Facebook, Twitter, Instagram, YouTube and TikTok.


