In the context of digital imaging, Adobe Photoshop has around for a very long time, and it’s now one of the go-to programs when it comes to the best photo editing software. But is that always justified? Find out in this full review.
Adobe Photoshop 24.3 at a glance:
- Well-known photo editing and graphics program
- Features a wide ranging of tools for working with popular image formats
- Includes Camera Raw as a plug-in for raw processing
- Recent updates have included a wide range of AI tools
- Mac or Windows
- Subscription only
- Bundled with Lightroom for $9.99/£9.98 monthly (20Gb storage), or $19.99/£19.97 monthly (1Tb storage)
- Adobe.com
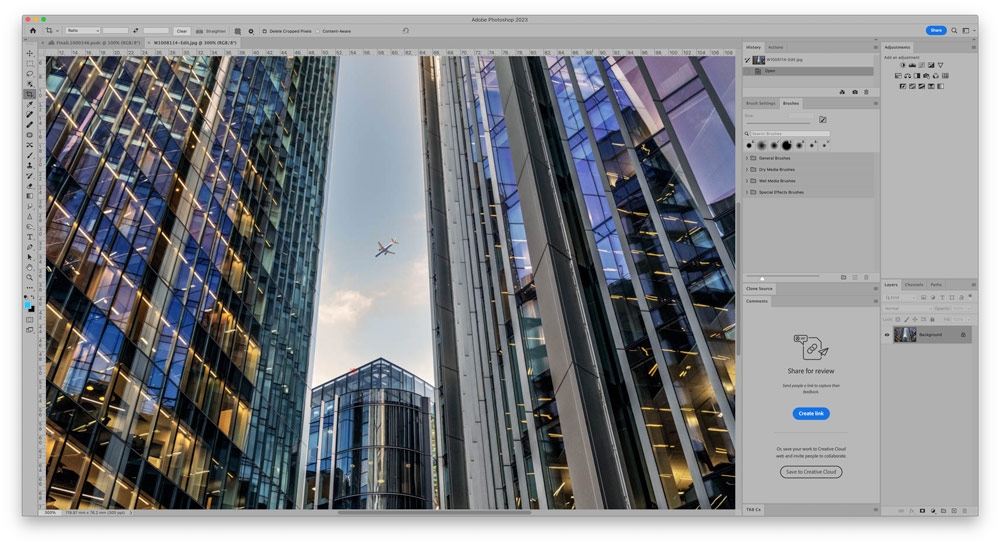
This is the default Photoshop Photography workspace but creating your own to suit your preferences is easy enough. Image credit: Will Cheung.
In the context of digital imaging, Adobe Photoshop has around for a very long time. Developed in 1987 and sold to Adobe in 1988, Photoshop soon became an integral app to many industries and the leading app for photographers as computers got more and more powerful and digital imaging evolved. Adobe added Photoshop to its Creative Suite and renamed it Photoshop CS in 2003. Its non-destructive editing power continued to be improved notably its compositing and selection skills.
In 2013 Adobe introduced its Creative Cloud subscription service and announced that Photoshop would no longer be available as an outright purchase. It’s fair that this move was not universally welcome, but 10 years later the CC subscription is still going strong. A major benefit of subscription is the fact that you always have the latest software at your disposal and Photoshop is regularly updated to support the latest cameras, iron out bugs, have performance enhancements and new features added.
Many subscribers access the program along with Adobe Lightroom as part of the Photography package – check out its recent Denoise AI updates, which are particularly welcome. Less experienced readers might also wish to try out the more beginner friendly Photoshop Elements and alternatively, If you’d rather not pay a subscription, check out our guides to the best subscription-free photo editing programs)

Adobe’s Photography subscription plan is the best value option for most photographers and content creators. For $9.99/£9.98 a month you get Photoshop (desktop and iPad), Lightroom (Classic, Mobile, cloud), Portfolio and 20GB cloud storage. If you need more storage and both softwares the price goes up to $19.99/£19.97 a month.
This review was done on a M1 Mac Mini using Photoshop v24.3 which was introduced in March 2023. This review includes some of the features introduced at various times over the past year. Highlights include the choice of Device or Cloud mode for Select Subject processing in August 2022 while in October we got automatic selections on hover, improvements to the Object Selection tool and the chance to share comments and collaborate with colleagues and clients. We’ve seen various neural filters too, including Landscape Mixer, Super Zoom and the Photo Restoration filter.
Adobe Photoshop: Share it
Share for Review is a Photoshop innovation that means you can share images and ask for comment without having to leave the app. How useful this feature is depends on what you do and how you like to work. It has time-saving potential for professionals double-checking that their work suits their clients or perhaps for an editorial team ensuring that the pictures match the words.
However, it is one of those features many enthusiast photographers might not appreciate initially, but use it a few times and they might wonder how they managed without it. For enthusiasts, being able to quickly elicit an opinion on their work from their mentor, friends or camera club members is potentially invaluable. Feedback goes straight into the Comments window in Photoshop. Go to Windows>Comments to have this feature working.

The latest Photoshop has the facility to share images with family, friends, colleagues and clients. Use Invite to Edit and they can even edit them.
To share an image, click on the Share button or use File>Edit>Share For Review, create a link which takes a few seconds and then you can invite people by email or share the created link on social media. Recipients do not need to be Adobe CC subscribers or to have Photoshop.
The latest update in the Share For Review workflow is the option of setting a password to limit access to your public review links. You can take the Share For Review feature further and actually send an image for colleagues, clients or fellow photographers to edit.
Go to File>Invite to Edit and the image is uploaded to the Creative Cloud and a link is created and shared in the same way as Share for Review. The recipient can now work on the image in Photoshop and either save it or download it onto their system. Only one person at a time can edit the shared image so if you have the image still open they will get a warning message but they can download a copy.
Adobe Photoshop 24.3: Object Selection tool
Photoshop had powerful selection and masking tools from early on and cleaning up images and image compositing have always been key benefits of the software. Adobe has continued developing and refining its tools to make selections and masks more accurate and easier to use and added popular features including Sky Replacement and Content-Aware Fill.
In recent times, Adobe has enhanced Lightroom by giving it impressive masking and selection tools making it perfectly feasible to produce excellent results. However, Photoshop and its advanced features deliver more accurate, even more controllable results.

The latest Photoshop version gives an improvement Object Selection tool with better object detection with more refined edges so there’s no further need to modify selections.
The Object Selection tool (short cut key W) is designed to speed up selection workflows. It first arrived in v21 and has seen various improvements since. Among them, in v23.4 preserving hair details was added; in v23.5 Select Subject Cloud offered finer selections; and in v24.2 there was improved object detection and refinement.
To select an object automatically tick the Object Finder box but before you hit Select Subject there are two options to consider: Device for speed or Cloud for more detailed results. Whichever method you use, the software does the work and you’ll see the familiar ‘marching ants’ around the detected object. Cloud does take literally a few seconds longer and on my test images this mode proved more accurate so is worth using.
If you don’t tick the Object Finder box, there is the choice of Rectangle or Lasso modes that you can drag around your target to make the selection.
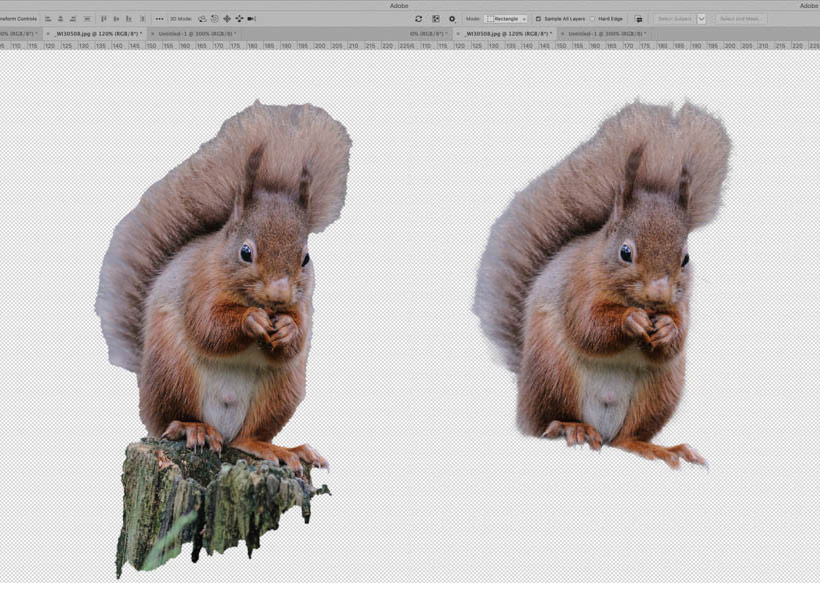
In this example, Subject Detect showed the Cloud setting (right) gave a more accurate selection and took four seconds compared with half that time in Device mode. Image credit: Will Cheung

I tried the Object Selection tool with Subject Detect in Cloud mode on this studio portrait of model Carla Monaco. Hair is always a challenging subject to select but Photoshop did a very good job. There’s still work to be done but it is a very decent result achieved with a single click and in four seconds. Image credit: Will Cheung
Selections be modified in the Object Selection tool with the Options bar or use one of Photoshop’s other selection tools. Use the Shift key while using the tool to add to a selection or Alt (Mac)/Option (Windows) to subtract. The selection can be further tweaked using the Select and Mask workspace in the Object Selection toolbar.
Here you can use either Color Aware or Content Aware and then edge detection and other tools to fine-tune selections. Right-clicking on the image brings yet more options including Content-Aware Fill and Delete and Fill Selection, feather and selection inverse.
Adobe Photoshop 24.3: clean up your images quickly
The Object Detection tool can also remove unwanted clutter from your pictures quickly by drawing the lasso or rectangle across the object you want to remove, and the software then makes its selection. With selections you usually have to modify or feather the selection to avoid hard edges. Using this tool, Photoshop applies selection modifications automatically.
I tried the tool on a range of images. On this portrait shot at the Brighton Pride Festival, the streetlamp lurking in the background spoilt the composition. Removing the offending lamp can be done using the Clone Stamp tool but I thought it would be a good test for the Object Detection tool. With the Object selection tool active I used the lasso selection mode and drew a rough outline around the streetlamp. I did try the rectangle mode and that picked up the shoulder and more of the hair.

Taken at the Brighton Pride Festival a few years ago, the streetlamp in the background was an annoying distraction that I wanted removed.
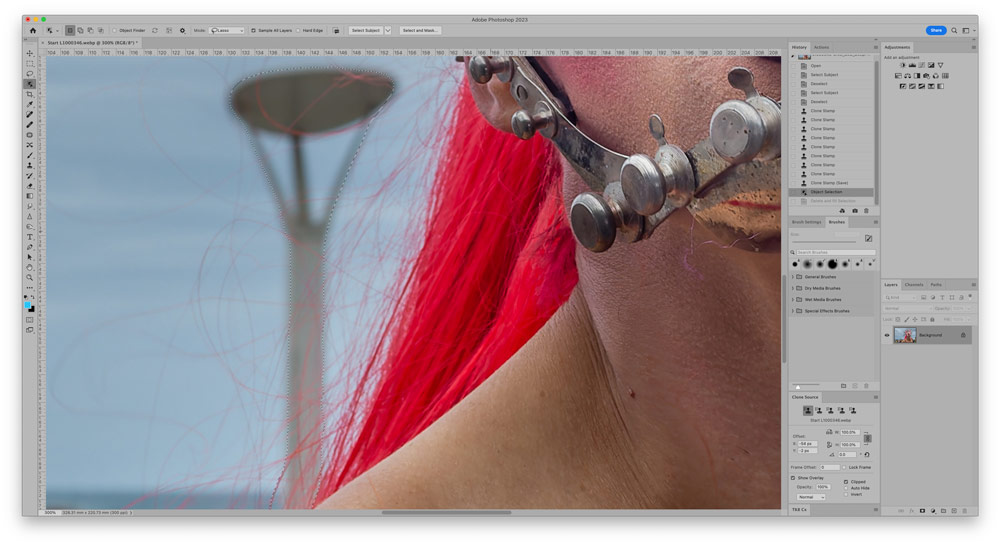
Using the lasso tool within the Object Detection tool, I drew a rough line around the streetlamp and Photoshop made the selection which was pretty accurate.

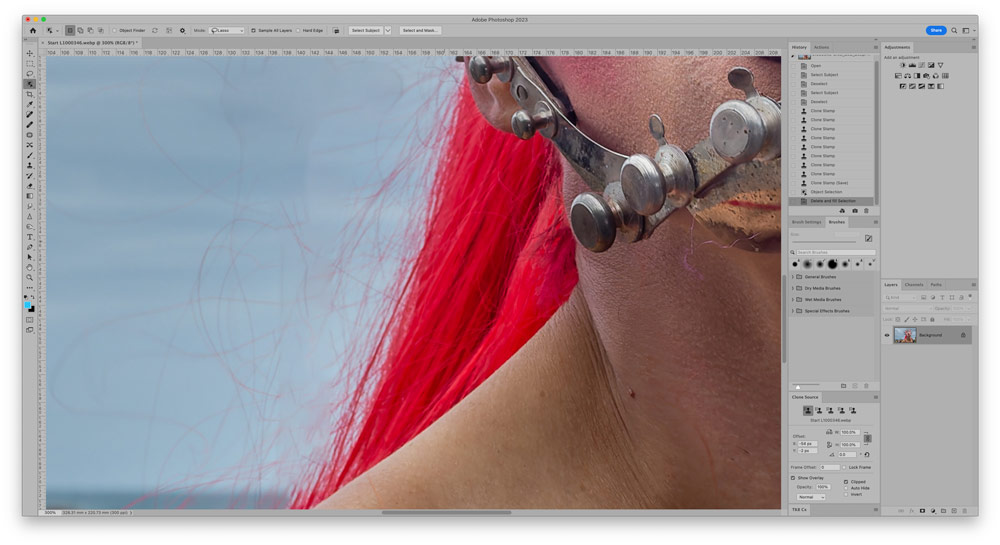
The final result is what Photoshop managed automatically using the Object Detection tool, using the Shift and Delete keys to delete and fill. More editing work is needed for a seamless result, but Photoshop did a fine job quickly. Image credits: Will Cheung
Once selected with the lasso tool I hit Shift and the Delete key and Photoshop did the rest, replacing the lamp with sky. The result is good though not perfect but I didn’t expect that because I knew the strands of hair would be an issue. Nevertheless, it is pretty good result even when examined using the magnified view as shown above.
Adobe Photoshop 24.3: Photo Restoration neural filter, beta version
Photo Restoration is a new Neural filter launched in Photoshop v24.0. Go to Filters>Neural Filters and download the beta Photo Restoration filter. Open your target image, go to Filters>Neural Filters and click on the Photo Restoration filter’s switch. To test the filter, I used several old family snapshots that I had digitised using a flatbed scanner.
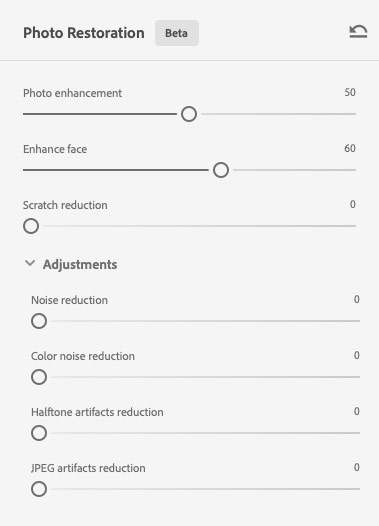
The filter’s default settings are Photo Enhancement at 50, Enhance Face at 60 and Scratch reduction is 0. Click on Adjustments and a drop-down menu of more adjustments is available.
I tried the Photo Restoration filter with various settings and the process took around a minute on a 15x10cm at 300ppi TIF file. The default settings are Photo Enhancement slider at 50, Enhance Face at 60 and Scratch Reduction at 0 and these do a fine job, but I couldn’t resist experimenting with the sliders. Scratch Reduction was definitely worth using and tidied up the old print well without looking too false. A setting within the range of 20-60 seemed best. Regarding the other two sliders, I found the best results were not too far from the defaults, ie the Photo Enhancement slider within the range of 50-80 and Enhance Face at 60-80.

Start image

The Photo Restoration Neural filter did a decent job with this old snapshot. The settings used were Photo Enhancement at 80, Enhance Face at 80 and Scratch reduction 20 Image credit: Will Cheung

To give an idea of the range of effects possible I put the start image through the restoration filter at different settings.
Top left: Default, Photo Enhancement at 50, Enhance Face at 60 and Scratch reduction 0
Top right : Photo Enhancement at 50, Enhance Face at 60 and Scratch reduction 60
Bottom left: Photo Enhancement at 80, Enhance Face at 80 and Scratch reduction 80
Bottom right: Photo Enhancement at 100, Enhance Face at 100 and Scratch reduction 100
Most people will have old family snapshots in a shoebox somewhere and many will be organised and have the most valuable prints digitised ready to clean up. Of course, repairing images takes time so Photoshop’s restoration filter will help you tidy up your precious snapshots efficiently. It works well and the benefit was obvious on the old prints I tried. The trick, as with most editing filters, is not to be aggressive with the sliders because that gives unnatural looking results, so the best advice is to take it easy.
Adobe Photoshop 24.3: Super Zoom
If you’re a keen nature photographer you’ll have a telephoto in your lens armoury, but it still might not be powerful enough to make a small, distant subject large in the frame. This is where having a high resolution camera is handy because you can crop into the original to produce a tighter composition without impacting too much on image quality while maintaining a useful file size, but there is a limit to how far you can do before the image starts to deteriorate.
You can now get specialist software such as Topaz’s Gigapixel AI that can upsize images with minimal quality loss. Photoshop’s solution is the Super Zoom neural filter – which is no longer a beta filter – that enables image files to be magnified by up to 4x, either as a whole or zoomed in.
In Photoshop, the filter is accessed via Filters>Neural filter> Super Zoom where the image can be magnified up to 4x. The filter has two ways of working. The image can be outputted as a new document, so the entire image is enlarged by the selected zoom ratio, or in layer mode where the magnified image sits as a new layer.
For this test I used an image of a greenfinch shot on the Canon EOS R5 at ISO 12,800. I started with layer mode and zoomed into the image by 2x and 4x where processing time took 4mins and 11 mins respectively.
The original file is a 9.2MB JPEG which opens out to 69.3×46.2cm at 300ppi. Use Super Zoom in the layer mode means the resulting file has two layers with the zoomed image having the same dimensions sitting on top of the original, so needs flattening before saving.

The original image was cropped to give the effect equivalent to a 4x zoom in the Super Zoom filter. File size is 517KB, 17.4×11.6cm at 300ppi.

This is the 2x zoomed image in the Super Zoom filter cropped to give the effect of the 4x zoom image. File size is 1.7MB, 34.2×22.8cm at 300ppi.

This was the image treated to a 4x magnification in the Super Zoom filter. File size is 5MB, 69.3×46.2cm at 300ppi.
The enlargements above show that the Super Zoom tool does a decent interpolation job and the 2x and 4x magnified image looks fine considering it is a big file of an image shot at ISO 12,800. Performing some noise reduction on the original image before putting it through the Super Zoom filter and using its image enhancement controls would obviously be a benefit.
In document mode, the process times were more or less the same and you just get a single-layer interpolated image of the whole frame. The 2x zoomed image opens out to 128×92.5cm while the 4x zoom is a massive 254x185cm – both at 300ppi – and the saved JPEGs at level 12 were 189MB and 518MB respectively. When I first tried to save the original 4x zoomed image, I got the warning that it had to be saved as a Large Document Format or psb file. Saving a copy as a JPEG got round this.

A full-frame image from the Canon EOS 20D.

Processed in Photoshop’s Super zoom (from left to right) 1x, 2x and 4x giving files measuring 3504×2336 pixels, 7008×4672 pixels and 14,016×9344 pixels. Files were enlarged by 100%, 50% and 25% respectively to give the same subject size on screen.
The Super Zoom filter deserves its place in Photoshop. While the high megapixel of current cameras means the need for upsizing for really big prints is not the issue it once was for most photographers, being able to crop into images and still have a big file is a real benefit. Super Zoom does this job pretty well. It also performs a good interpolation too when a bigger file is needed from a smaller original.
Adobe Photoshop 24.3: Verdict
Adobe Photoshop continues to go from strength to strength and, in my view, it remains the most powerful image editing software around. Indeed, it has more features than most photographers need and there are plenty of excellent and powerful software available for those who prefer not to give their business to Adobe. See here for our guide to the best subscription-free photo editing tools
All that said, $9.99/£9.98 a month for both Photoshop and Lightroom remain excellent value and a relatively small outlay for what you get. Lightroom is one of the best programs around for developing an efficient photo-editing workflow and its editing skills are only getting better. Meanwhile, Photoshop has incredible potential with its huge feature set that goes way beyond satisfying the needs of photographers. The subscription model might not suit everyone, but getting the combined power of both Photoshop and Lightroom at a reasonable monthly outlay is a huge asset for all serious photographers.

Further reading
How to use Photoshop Actions for a faster workflow
Best software for black and white editing
Best free photo-editing software
Best software for black & white editing
Adobe Lightroom Denoise – how does it compare?


