This Monday April 8, the US, Mexico and Canada will be getting a total solar eclipse, while parts of the UK will experience a partial solar eclipse. Here are some tips on how to view and photograph the solar eclipse safely.
Where to view the solar eclipse
Called the “Great American Eclipse”, the solar eclipse will be fully visible from around 11:00 local time in Mexico. It will then make its way to US states like Texas (at around 13:30 local time) and New York (at around 15:25 local time) as well as Canada (at around 17:15 local time).
A partial solar eclipse will be visible from western parts of the UK, Ireland and Scotland from 19:55 BST until the sun sets. The Royal Astronomical Society reports that the partial solar eclipse will be visible with up to 34.5% of the sun obscured by the moon in Galway, Ireland. Other cities including Glasgow, Dublin, Liverpool and Manchester are also expected to be able to see the partial solar eclipse.
Stay safe by using filters
It’s important to remain safe, whether you’re out to photograph a total or partial eclipse. Even a 99% partial eclipse is bright enough to blind the unwary viewer. Remember to take great care at all times, including for your camera.
Fortunately, safe and inexpensive solar filters are available.
The most popular is the Baader Astro Solar film. This sheet of high-quality Mylar blocks the sun’s visible light and all the other dangerous wavelengths of light (ultraviolet, infrared, and so on) and delivers a safe view that is ideal for photography with DSLR cameras.
You can purchase the filter as an A4-sized sheet. The material can be cut and mounted onto the front aperture of a lens. The good news is that the A4 film is quite cheap (about £20) but if there is a downside it’s that you have to take great care when making custom-made filter holders.
The procedure isn’t difficult and can be carried out using scissors, sticky tape and cardboard, but it’s critical that once the filter is attached to the lens it is safely secured and so it can’t be knocked off the lens or blown off by the wind while being used.
It should also be regularly checked for scratches and pinholes that could let dangerous amounts of unfiltered sunlight through.
How to photograph the eclipse
With a DSLR/ Mirrorless
Best results will come from using mid- to long-focal-length telephoto lenses. Bear in mind, though, that we are photographing the sun from a rotating planet and for this reason every astronomical object (moon, sun, stars) appear to move across the sky quite quickly when using long-focal-length lenses, so you’ll be continually re-centering the sun in the frame.
It’s not too much of a problem as the eclipse progresses at a leisurely pace. You can be sure to get good focus and composition without having to hurry.
The Mylar film will produce images of the sun that have a whitish-purple tinge to them. Many may find this unattractive, but it easy to assign a small amount of false colour using the Colour Balance menu in a photo-editing app or program to just ‘warm up’ the colour of the sun.
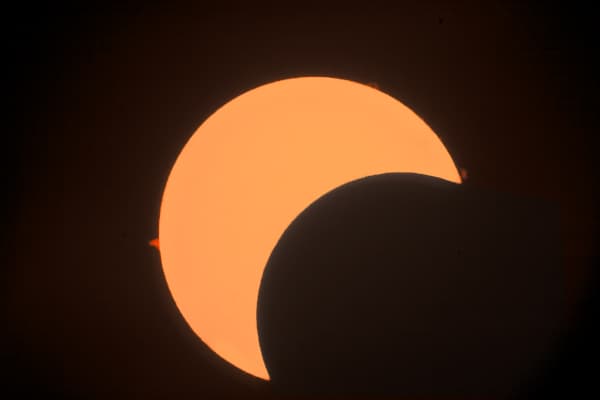
If you’re lucky, there may be several sunspots visible on the solar surface if you’re viewing a partial eclipse. These will look like tiny dark markings. Longer lenses may show some structure and these will certainly add some interest to the eclipse photography. Sunspots are areas on the sun that are about 2,000°C cooler than the sun’s surface (known as the photosphere and radiating at just under 6,000°C).
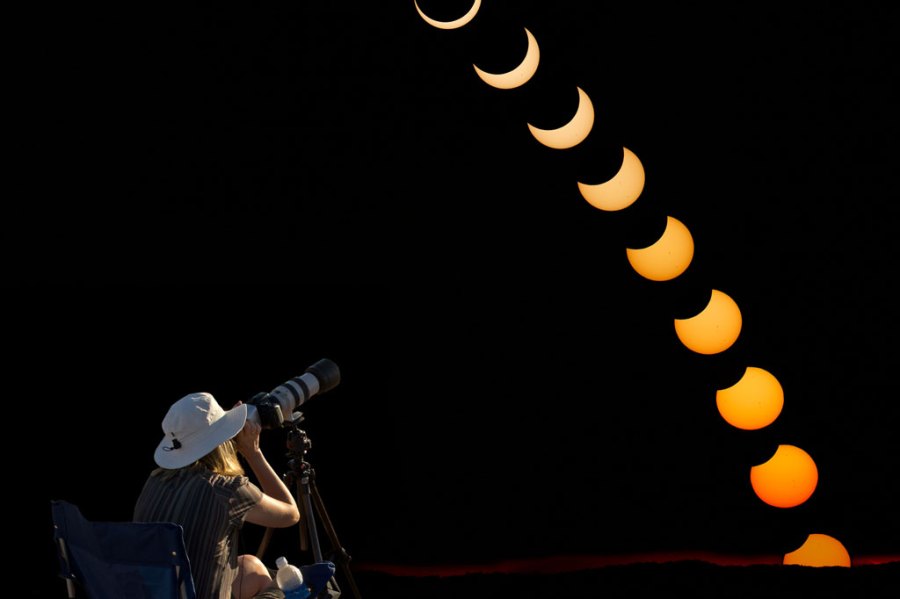
Even if working with short-focal-length lenses, it’s possible to be creative. You could show composited images of multiple stages of the eclipse. Perhaps even set the eclipse against a dramatic landscape.
With a smartphone (iPhone and Android)
Some of the newest smartphones, like the Samsung S24 Ultra and Xiaomi 14 Ultra, have cameras clearly created with photographers in mind.
But don’t be discouraged if your phone does not boast such features or is an older phone. You can still get pretty decent photos of the eclipse and here’s a short summary of how.
First off, we recommend wearing protective glasses as well as placing some over your smartphone camera. Using a tripod or selfie stick is a good idea. You’ll want to keep your device as still as possible when taking photos of the eclipse. Tap your screen to lock your focus and manually lower the exposure to balance out the brightness of the sun. Word of warning: Do not give way to the temptation to zoom excessively. Your photos will not be as clear.
Using a card and a pinhole
Another option is to project an image of the eclipse and photograph that. All you need to do is make a small hole in an opaque piece of card and project the sun’s image onto a second, white piece of paper or card.
Line up the pinhole and white card with the direction of the sun, without looking through the pinhole!
Interestingly, if you are observing the sun near to a tree that has leaves on it, you may get to see multiple images of the eclipsed sun on the floor as its light is broken up by the leaves.
This is a safe way to observe the eclipse if you don’t have any proper filters. Don’t assume that enough attenuation of the sun’s light will occur and close your lens down all the way. It won’t. Using any other form of opaque material to block the sun is very unsafe and not recommended.
How to make a pinhole camera and take photos in 10 steps
With luck, you should be able to get some good pictures of this unusual natural event but please take great care to protect your eyesight and equipment!
Related articles:
- Best Cameras for Astrophotography
- Best lenses for Astrophotography
- Essential guide to astrophotography