
Photo by David Morton
Producing strong images of small British mammals in the wild can be tricky. Some photographers would even go so far as to say that, with certain species, it’s almost impossible. That’s why Paul Hobson took three readers to the Westcountry Wildlife Photography Centre in Lifton, Devon. The centre provides an opportunity to photograph a range of captive mammals, such as brown rats, otters and voles. Importantly, the site offers the opportunity to photograph these small mammals in constructed sets, allowing for shots that, in the wild, would be a time-consuming and headache-inducing endeavour.
Paul explains that producing strong images of small mammals can be difficult because they are seldom seen in their natural environment.

‘These animals can be difficult to track down because they are so small and secretive,’ says Paul. ‘Unlike photographing humans, animals can be frustrating to work with as they don’t follow verbal commands. They’re incredibly active, so the photographer has to be able to call upon his or her skills and work quickly to maximise the opportunities as they occur. Specific sets will allow us to explore the basics of creating good images and to consider different approaches. There will also be an opportunity to look at some of the larger animals they have here, such as the European beaver and wild boar, and we’ll see that the same rules apply.
‘Strong mammal portraits produce powerful images that are always in demand,’ Paul continues. ‘Working at the Westcountry Wildlife Photography Centre gives us an excellent opportunity to practise techniques that will increase the ability to capture successful wildlife images.’
Each AP reader was asked to bring along their own cameras, lenses and tripods. Paul asked the readers to bring a lens that allowed close focusing, such as a macro or a lens with a macro feature. Alternatively, they could bring a mid-sized lens such as a 200-300mm with extension tubes.
Paul is passionate about wildlife photography and feels strongly that British wildlife is a subject that is being sorely neglected in contemporary photography.
‘From a conservation point of view, I think there’s a danger that we’ve become transfixed by big foreign animals,’ says Paul. ‘So many British wildlife photographers seem to have lost touch with their immediate environment. They’re zooming all over the world just to capture the same few images of the same tigers and zebras. But that neglects the kind of wildlife that could easily be found in their back garden. There’s no reason that creatures such as bank voles and harvest mice can’t be interesting.’
Westfield Wildlife Photography Centre

- Location
Westcountry Wildlife Photography Centre, Upcott Grange Farm, Broadwoodwidger, Lifton, Devon PL16 0JS. Tel: 01409 211 578. Website: www.wcwpc.co.uk. Email: [email protected]. The facility has a wide range of established indoor and outdoor sets in place that house various species. All sets are fully enclosed with specially designed portals to allow unimpeded vision of the animals inside. They are planted to mimic a range of natural habitats with fully mature vegetation, rocks, logs and established landscaping. The centre can be reached by following the A388 and coming off towards Virginstow or by following the A30 and coming off towards Cross Green. - Admission charges
Day rates: Minimum of four individuals with animal handler and photographer £179. Weekend group photography courses: Arrive Friday and depart Sunday night with accommodation, breakfast and a packed lunch included, and animal handler and photographer in attendance (minimum of four individuals) £330. All bookings must clarify which species you wish to photograph in advance.
Your AP Master…
 Paul Hobson
Paul studied environmental science at Sheffield University and has worked as an environmental sciences lecturer for 25 years. With more than 20 years’ photography experience behind him, Paul was specially commended in the 2008 Wildlife Photographer of the Year competition and two of his images were exhibition finalists in the British Wildlife Photography Awards 2009. Paul regularly lectures on wildlife photography and also runs workshops. Visit www.paulhobson.co.uk
The AP readers
 David Morton
David is from Somerset and is a sales person for an outdoor clothing brand. His photographic interests include portraiture, mountain photography, wildlife and landscapes. He uses a Nikon D700 with 180mm macro lens. ‘To be able to photograph these small mammals in these sets has been fantastic,’ says David. ‘It’s hard work trying to photograph small animals in the wild, but it’s a great set-up here.’
 Pam Sherron
Pam is from Devon. She is retired and uses a Canon EOS 500D and Tamron 80-270mm lens to shoot wildlife. It has been a really enjoyable day,’ says Pam. ‘It’s a great photographic opportunity. I learned how important it can be to get the background out of focus to accentuate your subject.
 Di Wilkins
Di is retired and lives in Devon. She has a love of shooting macro photography and uses a Canon EOS 5D Mark II with 100-400mm and 100mm macro lenses. ‘The location is brilliant,’ says Di. ‘I’ve learned a lot from Paul, not only about photography but also about the animals. It’s made me realise how at risk our small mammals are. Photography days like this can help to raise awareness.’
Would you like to take part?
Every month we invite three to five AP readers to join one of our experts on an assignment over the course of a day. The experts are Paul Hobson (wildlife), Tom Mackie (landscapes) and Cathal McNaughton (street photography). Paul next workshops will be in July and October and Cathal will be holding sessions in June and September, and Tom in May August and November.
If you would like to take part, visit transport.kelsey.host/amateurphotographer/masterclass for details of how to apply. Please remember to state which Masterclass you would like to attend and make sure you include your name, address, email address, daytime telephone number and two or three examples of your work in your application. Each participant will be able to use his or her own camera, lenses and other equipment
Creating your own sets
Building your own set can allow
you to previsualise how you want your shot to look, which is a virtually
impossible task when shooting in the wild. However, it’s important to
be disciplined when collecting material to work with.‘Don’t rush out and
grab the first thing that looks interesting,’ says Paul. ‘Spend some
time researching and collecting the right props. It’s crucial to ensure
that the set is in keeping with the natural history and environment of
the creature you’re working with. You wouldn’t have a short-tailed field
vole in a set made to look like a forest because that isn’t realistic
as they live in fields. So make it visually appealing, but in keeping
with your subject. Also, be careful not to overwork your set. Make sure
it’s not too busy, otherwise it could end up looking horribly contrived.

‘Make
sure you previsualise your image so you can have some control over your
composition and where the animal will appear in the shot. You can
persuade the creature to go to certain places by placing a little food
under some moss or leaves, or you could even make a little tunnel that
they’ll hopefully move through and poke their head out of. Once you’ve
previsualised your shot, you can ensure that everything remains
balanced.
‘When building the set, it’s crucial to provide places
in which the animals can shelter and hide. They need to have somewhere
to retreat to otherwise they’re going to become incredibly stressed and
that’s really not what wildlife photography is about. The welfare of the
subject is more important than your image.’
Manual Settings
‘With
regard to settings, I prefer to use aperture priority,’ says Paul.
‘Aperture priority allows you to determine the depth of field and
therefore the background. Over the years, through trial and error, I’ve
learned to understand which f-stop and shutter speed will be appropriate
for each subject. That understanding is an important skill to develop.
Aperture priority also allows you to produce work with shallower depths
of field and therefore faster shutter speeds, such as 1/100sec. This is
crucial to get a nice diffused background and means you don’t have lots
of blurred images. Small mammals don’t stay in one place for too long
and they can be off in the blink of an eye.
‘There are a lot of
people who set their ISO to automatic so the speed doesn’t get too low. I
don’t do that because I like to know what ISO my camera is set to all
the time. I’ll choose a higher ISO if I want to. I don’t need the camera
to tell me.’
Autofocus vs manual
According to Paul, while using autofocus is a good idea, it is not without its problems.
‘If
you’re shooting small mammals and using autofocus, there’s always a
risk that the lens will lock onto the animal’s nose and not the eye,’
says Paul. ‘There can be many occasions when you look through the
viewfinder and place the focus sensor over the eye that the focus
doesn’t catch. Bear in mind that when photographing small mammals the
subject is quite small, but the camera’s sensor is quite large.
 Photo by Di Wilkins
‘One
way that you can tackle the problem is to hold down the shutter halfway
and let the focus settle. Then you can tweak it manually and get the
eyes sharp. Of course, if you’re dealing with something like a vole,
then it is unlikely to stay in one position for too long. The
alternative is to use a tripod and set up your camera pointing at a
location where you feel sure the animal will appear. Then turn off
autofocus and trust your eye. Autofocus is a brilliant tool, but you
mustn’t let it drive your photography. It can be particularly good in
“servo”, otherwise known as focus tracking, where the lens will keep the
subject in focus as it moves around the frame, but don’t rely on
autofocus. Learn when to override it and turn it off.’
The Background
‘The
first thing I learned as a wildlife photographer is that your
background is as important as your subject,’ says Paul. ‘When you’re
shooting wildlife, having the wrong background can destroy your image.
If you’re photographing a small mammal such as a bank vole, for example,
it’s likely that you’ll want to keep the subject relatively large
within the frame and create a nice portrait shot with the head and
shoulders. However, if there’s a white leaf or a distracting line in the
background, your eye is going to be drawn to that straight away. If
that happens, the quality of the image is lessened significantly.
 Photo by David Morton
‘So
many shots can be ruined by not paying attention to the details. A way
to tackle these potential problems is quite simple: use the depth of
field preview button. It’s one of the most neglected functions on a
camera. I’ve actually had people say that they pressed it and thought
they’d broken their camera because everything went dark. It’s there for a
reason, so use it.’
 Photo by David Morton
At eye level
One of the most important things to remember when arranging a shot is to get the eyes of the subject in focus.
‘It’s
definitely true that the viewer will look at the eyes first,’ says
Paul. ‘I suspect it’s something that’s been passed down to us through
hundreds of generations, something primitive and instinctive. As humans,
we engage one another with eye contact because it’s a part of
communication. When the eyes of an animal are in focus, it creates a
level of intimacy that relates to meeting their eye level. Having the
eyes in focus draws you into their world.’
 Photo by Pam Sherron
Something else Paul was keen to point out was how important it is to shoot from the same eye level as your subject.
‘If
you get down to the animal’s level you see the world as the subject
sees it,’ says Paul. ‘Importantly, getting down low pushes the
background a lot further away, so it becomes more blurred and that can
really help to accentuate your subject. If you stand over the subject
and angle your camera pointing down, then there is no background to push
out of focus – there’s only the ground, which can contain many
distracting elements and render your image quite flat. But, if you shoot
at the subject’s eye level, you can keep your f-number quite low and
push your background right out of focus.’
Framing and Composition
It’s
important to have a good idea of where you want to have your subject
within the composition and how you want the shot to be framed because a
bad composition or framing decision can ruin a shot.
‘As your
wildlife subjects are surrounded by things such as branches, grass and
leaves, you have ample opportunity to experiment with framing,’ says
Paul. ‘The environment offers you lots of natural framing devices. Think
about what you want in the foreground, up top and around the sides of
your subject. Even empty space can be used to your advantage.
 Photo by Pam Sherron
‘It
is also worth experimenting with where you want the animal to sit
within the frame. You can have the subject central, just off-centre or
quite low down. Each position says something different. Sometimes your
composition will be dictated by the environment or the behaviour of the
animal itself. However, more often than not it is down to you to
previsualise and know what will look best.’
Captivity vs the Wild
‘With
small animals in the wild your biggest challenge is going to be how to
get close to them,’ says Paul. ‘While you could potentially shoot them
in those conditions, it would take a lot of preparation and baiting.
You’ll actually find that many shots of mammals such as dormice and
harvest mice are done in captivity. The chance of getting them in a good
enough pose in the wild is almost non-existent.
 Photo by David Morton
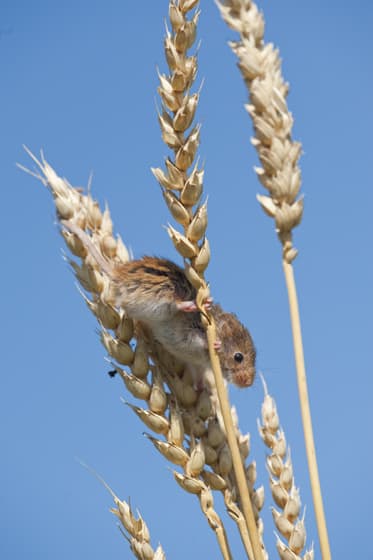
‘Most
of the shots of harvest mice that you see are done in captivity,’ says
Paul. ‘It’s incredibly rare to see them in the wild. When you see a shot
of a harvest mouse it will be among barley. That’s the classic harvest
mouse shot, but it’s completely false. In the UK these mice don’t live
in places like barley fields – in fact, they haven’t done so for about
50 years. The fields used to be full of weeds and insects for them to
eat, but then we started spraying the fields with pesticides and the
environment became too hostile for the harvest mice to survive. There’s
also not enough cover in these areas now. So even though shots of
harvest mice on barley are common, they’re unreal. When taking pictures
of harvest mice, as well as tackling the classic barley shot, it’s worth
attempting to get it on some weeds, which are more common to
its natural environment.’
Tripod and Lenses
Tripod
 Photo by Di Wilkins
‘The
most obvious advantage of tripods is that they give you more control
over how you compose your shots,’ says Paul. ‘You have the ability to
fine-tune your shot, which is a tricky thing to do if you’re shooting
handheld. The weight of the camera in your hands can often make you rush
your shot because you want to get it done. A tripod allows you to
meditate on your shot and recompose if you feel the need to.’
Lenses
With
so many lenses on the market, it can be overwhelming knowing which lens
to use to capture your subject. However, shooting small mammals has its
ideal lens in the form of macro.
‘I’ve always used a 180mm macro
lens for shooting small mammals,’ says Paul. ‘If you’re using a 100mm
lens, you have to get twice as close to the subject as you would using a
180mm for the same size image. The 180mm gives you a little more
distance and that makes a big difference when shooting subjects like
this. However, 180mm lenses from the major manufacturers can be quite
expensive. If you want something a little cheaper it could be worth
looking at third-party or second-hand lenses. They may still be pricey,
but it’s worth the investment.’
Using natural light, fill-flash
Every photographer shooting on location hopes for good light on the day, but is bright sunlight always ideal?
‘If
you’re working in a natural environment, many people will tell you that
the best light occurs in the first and last hour of daylight,’ says
Paul. ‘This is because the light is lower and as a result the shadows
are pushed underneath the animals, which makes the image appear a lot
more dramatic. Working with bright sunlight and small mammals can cause
some problems.
 Photo by David Morton
If
you have bright sunlight the animals are likely to stay in the shade
and under cover. Also, with direct light you’ll cast shadows, which can
be a serious issue if you’re working within a quite tight environment
like a set.
‘I find that a bright overcast sky is the ideal.
Dull light can actually be used to your advantage. If you are faced with
this kind of light, I recommend setting your white balance to cloudy.
It allows you to bring out the details of the environment when there are
no shadows.’
Fill-flash
‘I have some serious
reservations about using fill-flash with small animals,’ says Paul. ‘I
believe that it can be harmful to them. If you’re shooting dormice, for
example, you have to consider how big they are compared to that bright
flash, which is likely to be within a few feet of them. People forget
how intrusive flash can be.

Photo by Di Wilkins
If
you put yourself in a dark room with two or three flashes and have them
going off one after the other, it takes you a little while to get your
vision back. Now put yourself in the dormouse’s position and imagine the
same thing. I’ve seen many wildlife photographers relentlessly firing
off a flashgun at a small mammal and it makes me really angry.’
Patience
Many
wildlife photographers will tell you that patience is the most
important discipline that can be learned when shooting on location, but
even within the controlled environment of a wildlife photography centre
you may find yourself waiting around for that perfect shot.

‘In
the wild, if it’s warm, the animals will stay in the shade and that’s
how they’ll behave in your set,’ says Paul. ‘They’ll scuttle around in
the overgrowth and stay under cover as much as they can. If the
conditions are cool you may get lucky, but also bear in mind the animals
are likely to be quite wary of you. This is especially important when
you fire your camera’s shutter, as the sound is likely to scare them at
first. However, if your set is created in the correct way and you’ve
given the animals a tunnel to poke their heads through, your patience
will pay off.’


