Filters explained: We look at the use of filters in photography and explain the different types…
Filters explained
With so much reliance on image-editing software these days, it’s easy to forget that there was a time when photographers had to do things differently. Long before white balance could be shifted at the click of a button, or contrast could be adjusted until it looked right on an LCD, photographers used filters to change something about the light coming into the camera.
The use of filters has understandably declined as digital technology has progressed, but for a number of reasons it hasn’t negated their use entirely. In fact, many pros will still keep a couple tucked away in their kit bag.
Here, we look at some of the most common filters available, and explain what to look out for when buying one.
Polariser filters
 Polarisers sort light into a single plane, and by doing so they can be used to help darken blue skies and also to reduce reflections.
When shooting in fine weather conditions, for example, the darkeneing of a blue sky helps to bring out clouds and give the scene more impact.
Minimising reflections, meanwhile, can be used across many situations, from shooting through windows to taking pictures of water where reflections may be distracting.
Polarisers come in either linear or circular types, although the latter is generally the recommended option as linear types can confuse the metering and focusing systems of modern DSLRs.
Neutral Density Filters
 Neutral Density filters reduce the light that is able to enter a lens, and as they affect all wavelengths equally they have (at least in theory) no effect on colour.
Photographers will typically reach for these when the conditions don’t allow a long enough exposure for the desired result, such as when trying to shoot for a few seconds in fine conditions or for particularly long exposures in darker ones.
For this reason they are often used for land and seascapes, to blur the movements of water or clouds. They are available in different strengths, right up to particularly strong types such as Lee’s Big Stopper which cuts down ten stops of light from reaching the sensor.
Neutral Density Graduated (ND Grad) Filters
Neutral Density Filters are also available in graduated versions, where one side of the filter is treated with the effect while the other is not. Their most common application if for landscapes where the foreground will typically be darker than the sky; by using a graduated filter the camera can strike a better balance between the two extremes, as the intensity of the sky will be reduced.
These filters vary by the gradation between the treated and untreated areas, with soft filters offering a smoother gradation than harder types. The type you will need depends on what it is you’re shooting, although a good rule is to match the filter to the scene you are shooting. So, if you can see a clear definiton between two areas (such as when shooting a horizon), try using a harder filter first as softer filters tend to be better suited where there is a more gradual shift between different areas.
Coloured Filters
 Coloured filters are used primarily for black and white photography, as a means of controling tone rather than colour. They work by filtering out certain wavelengths of light while letting others pass through, and by doing so they change the contrast between different areas.
The use of a yellow filter results in a slight boost to contrast, and is particularly effective in portraiture as it covers up blemishes.
Orange filters offer a medium contrast, and so are suited for capturing landscacpes where clouds or other brighter details needs a little enhancement against darker details, while red filters provide the strongest effects and so are often used for dramatic landscapes or even for architecture.
If you’re not sure which to use type to use, a good rule to remember is that a particular colour of filter will typically lighten details with its own colour, as it will allow these wavelegnths through while blocking others (therefore making them darker).
Skylight / UV filters
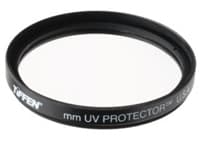
 Skylight and UV filters are often used to protect the front of a lens, the logic being that any damage caused to a filter is preferable to any damage to the front element of a lens.
Both filter ultraviolet light, although skylight filters are slightly pink in order to compensate for the blue casts sometimes present when shooting landscapes and other outdoor scenes. This was a popular choice with film photography, although they are required to a lesser extent today thanks to the auto white balance systems found in all digital cameras.
As the sensors inside digital cameras are sensitive to some UV light, there remains a case for the use of these filters, although the idea of keeping one permanently mounted on a lens is a contentious issue. This is largely because the extra element through which light has to pass will always decrease light transmission and can degrade image quality through creating reflections.
More expensive UV filters are often multicoated to help maximise light transmission, and some claim to be more neutral in colour than cheaper types.
What to look for:
- Filters with shallow profiles may be better at keeping vignetting to a minimum, particularly when a lens is used at a wide apertures.
- Filters typically come in resin, glass and polyester varieties. The latter is the cheapest although optically they can’t match the other two types, which tend to be more expensive.
- Circular filters may be mounted straight onto a lens, while square filters require an adaptor and holder. This makes circular filters more suitable for frequent use, such as when kept on a less all the time, although square filters are more flexible in that they can be used with a variety of lenses. Some, such as ND grads, are also impractical to use in a circular form.


