
We all want sharp shots, but this becomes especially challenging in low light and night photography where the camera will normally increase the exposure time with a slower shutter speed – but this does introduce the risk of camera shake.
The traditional solution is to increase the camera’s ISO setting, or sensitivity. This will make it possible to use faster shutter speeds to combat or eliminate any camera shake. But an increasing number of cameras offer an alternative – in-body stabilization, or ‘IBIS’. This can help keep images sharp at slower than normal shutter speeds, so that you may not need to increase the ISO setting.
So is IBIS always an effective alternative to increasing the camera’s ISO setting? Sometimes, but not always. We explain why IBIS and ISO don’t do the same thing, and when to choose one over the other, or both.
What is ISO?
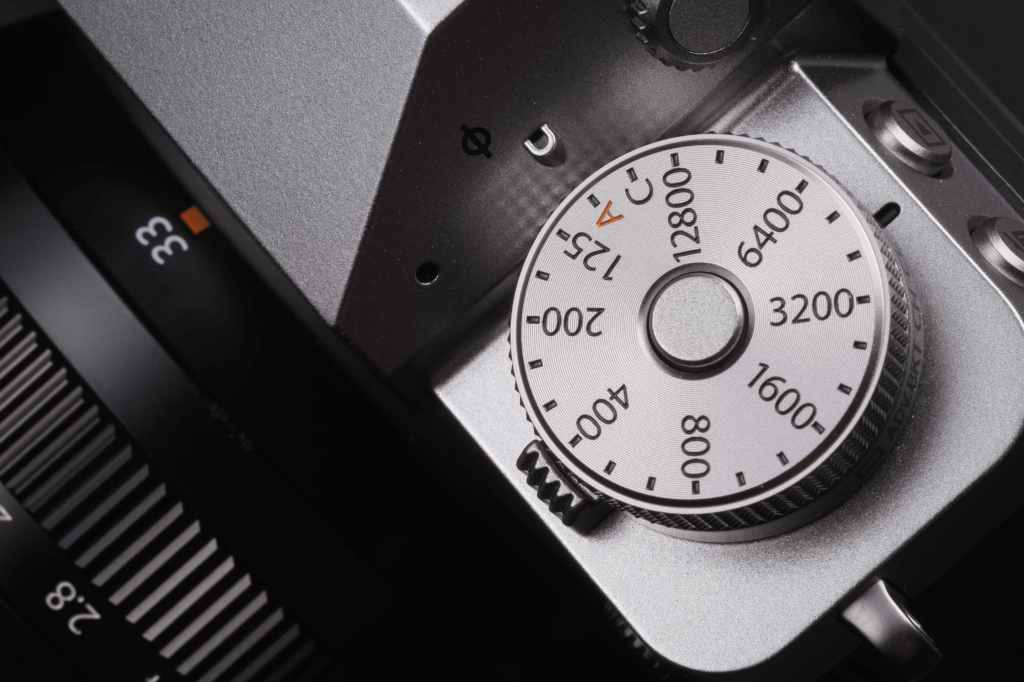
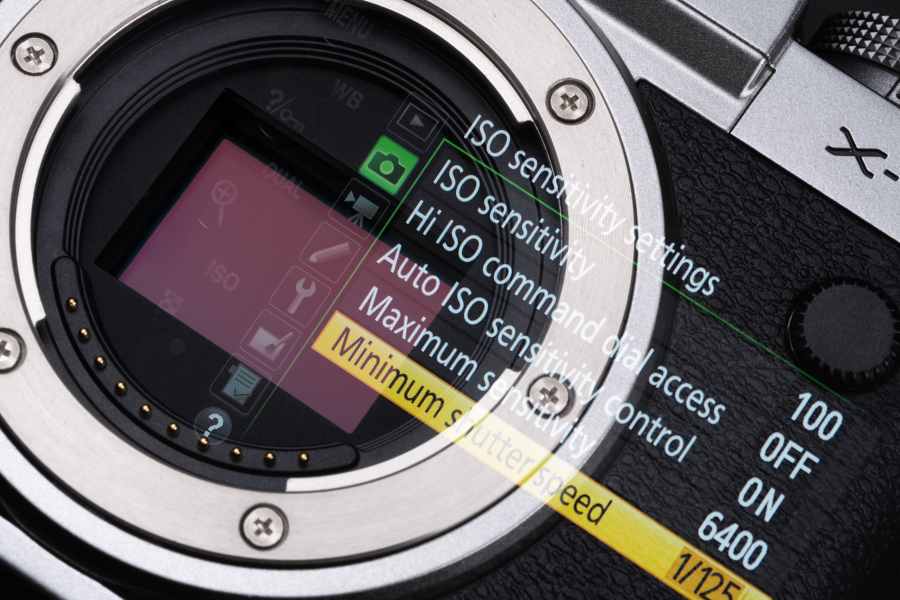
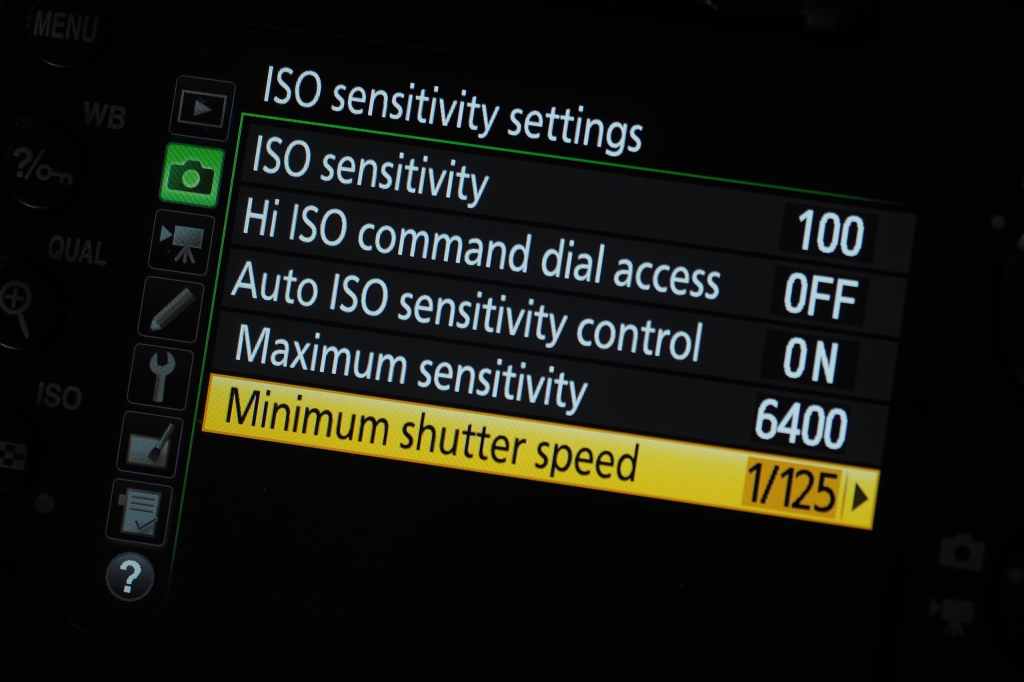
ISO is like a volume control for your sensor, increasing its sensitivity to light. It’s usually adjusted in menus, but on the Fujifilm X-T5 and some other cameras it gets its own dial. Photo: Fujifilm
ISO is the sensitivity setting of the camera sensor. You can increase the ISO value to make the sensor more sensitive to light, which allows for faster shutter speeds in low light so that there’s less risk of camera shake. However, increasing the ISO setting also progressively reduces the image quality, introducing visible noise. This is why photographers generally like to avoid high ISO settings, though usually it’s an acceptable compromise in order to get a sharp shot. With modern cameras you can generally push this ISO up to 6400 and beyond before you see serious image deterioration, and this is one of the factors we test in our camera reviews.
- ISO is part of the so-called ‘exposure triangle’ alongside shutter speed and lens aperture.
What is IBIS?
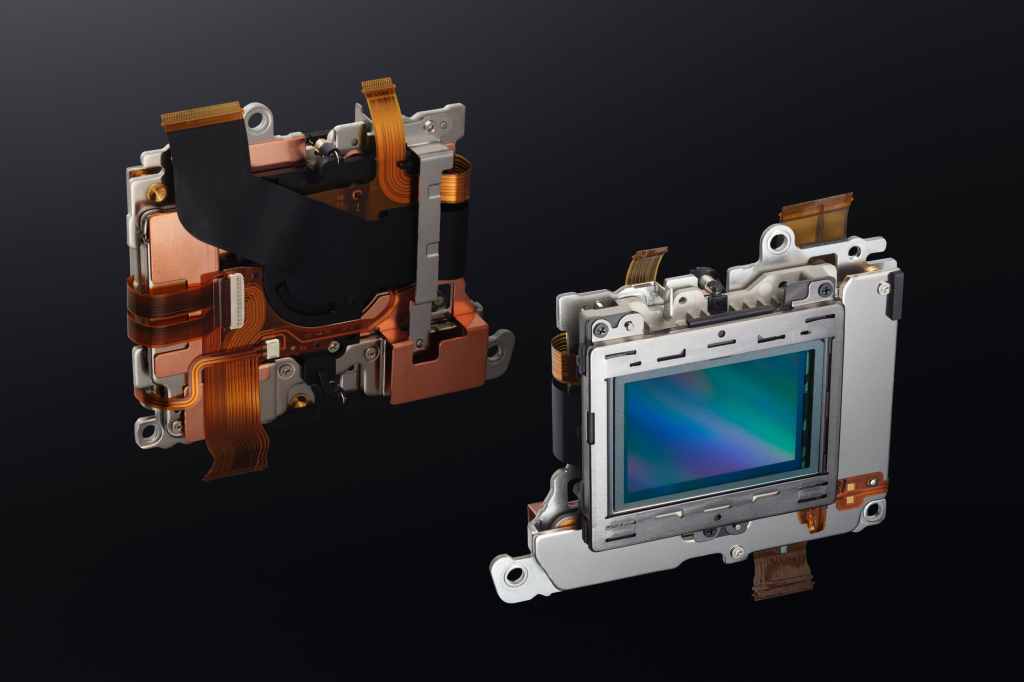
In-body stabilization systems can move the sensor to compensate for any camera movement during the exposure. Photo: Nikon
‘IBIS’ stands for ‘in-body image stabilization’. It’s a mechanism that moves the sensor to compensate for any movement during the exposure, which is detected by tiny gyroscopic sensors in the camera. This can give you sharp shots at shutter speeds where you would normally expect camera shake and blur. The effectiveness of an IBIS system is usually measured in EV values, or ‘stops’, so that a system that offers 5EV compensation could let you get sharp shots at shutter speeds 5 stops slower than the normal ‘safe’ speed.
- In-body stabilization works well for mirrorless cameras, but in-lens stabilization works better for DSLRs because it stabilizes the image in the viewfinder too.
‘Safe’ shutter speeds explained
There is a rule of thumb used by photographers to work out the slowest shutter speed it’s safe to use without getting camera shake. You take the effective focal length of your lens (allowing for the different crop factors of different cameras) and then divide it into 1 to get the minimum shutter speed. So that for a 50mm equivalent lens, the minimum ‘safe’ speed would be 1/50sec, while for a 24mm lens it would be 1/24sec (let’s say 1/30sec as the nearest equivalent).
- ‘Safe’ shutter speeds are not always safe. Like so many things in photography, they are a guide rather than a cast-iron guarantee.
This rule doesn’t always work, though. Some people are better at holding a camera steady than others and may be able to shoot at 1/25sec with a 50mm lens, for example, while others who aren’t good at hand-holding might need to double the ‘safe’ speed to 1/125sec, say. It’s only a guide. There’s also no guarantee that all of your shots will be sharp at these ‘safe’ speeds, either.
Camera movement vs subject movement

This handheld low-light shot shows the difference between IBIS and ISO. I could have used a lower ISO and relied on the camera’s in-body stabilization to keep the lighthouse sharp. The quality would have been better but the lantern would have been blurred and the beams of light would have disappeared. To capture this moving subject, the only solution was a higher ISO to allow a shorter exposure. Photo: Rod Lawton
All this talk of ‘safe’ shutter speeds applies only to accidental camera movement. Sometimes it’s subject movement you need to think about, such as when photographing a basketball match indoors under artificial lighting.
- The only way to freeze subject movement is with a fast enough shutter speed; image stabilization only corrects camera movement.
In short, increasing the ISO setting gives you faster shutter speeds, which can help freeze both camera movement and subject movement. In-body stabilization only corrects camera shake – you will still need to increase the ISO to get faster shutter speeds for fast-moving subjects.
IBIS ratings and what they mean in practice
In-body stabilization systems are tested by CIPA, an independent testing body. The results are quoted as the maximum compensation that can be achieved in EV values, though this does not guarantee you will always get these results. In addition, the test figures are achieved with specific cameras and lenses that you may not own. It’s not unusual to find that the effective compensation you get yourself is only half the maker’s best-case figure, though some cameras can match or exceed these figures – it all comes back to how good you are at hand-holding cameras.
- Although the quoted IBIS performance of a camera is tested in precise conditions and delivers an exact figure, it’s best to think of IBIS as extra insurance rather than a guarantee of sharp shots. It’s definitely worth having, but you should balance the quoted figures with your own testing.
Why Auto ISO can be simple and effective
Your camera’s Auto ISO setting will increase the ISO only by as much as it needs to, shot by shot, in order to maintain a ‘safe’ handheld shutter speed. It’s not just useful, it’s often invaluable. Photo: Rod Lawton
If you do need to use a higher ISO in low light, the ideal would be if the camera could raise it by just enough to achieve a minimum shutter speed for a sharp shot – and that’s exactly what the Auto ISO setting on your camera will do. What’s clever about Auto ISO is that it will adjust the ISO on a shot-by-shot basis, so it’s never higher than it needs to be and you always get a ‘safe’ shutter speed for the lens and zoom setting you’re using.
Typically, you can set the maximum ISO you want the camera to use, and whether it should use a ’normal’ safe speed, a slower one (if you’re confident in your hand-holding skills) or a faster one (if you’re not). The camera is adjusting both the ISO and the shutter speed in a split second in a way that you would almost certainly do manually if you had time.
- If your camera does not have IBIS, the Auto ISO setting can deliver much of the same security, albeit via increasing the ISO. And if you are using a lens with its own optical stabilization, the camera may take that into account too when choosing a ’safe’ shutter speed.
High ISO noise and noise reduction
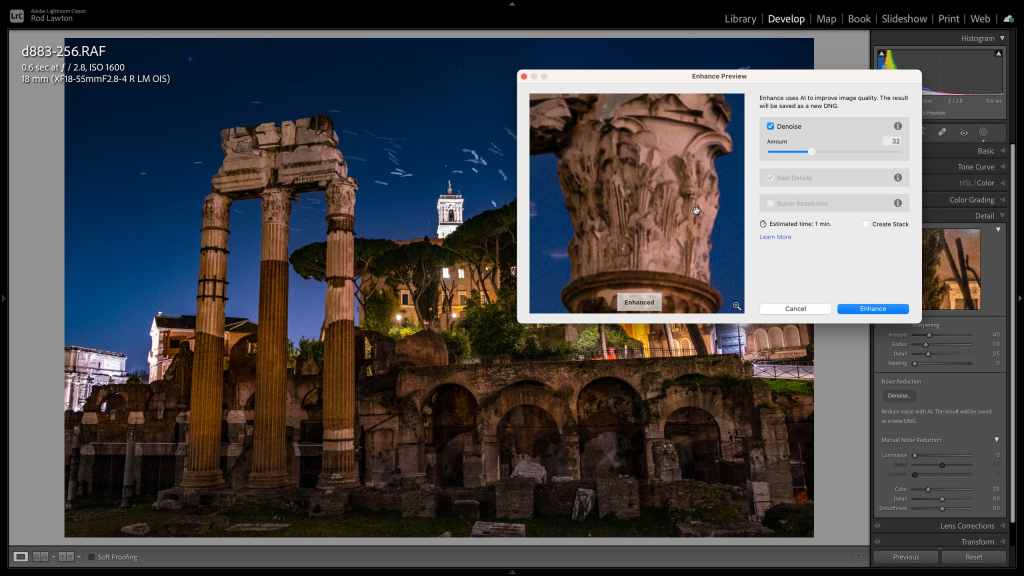
Advances in camera sensors, processors and now AI-driven noise reduction in software is changing our ideas about ‘acceptable’ ISO settings. This is Adobe’s new AI Denoise tool in action. Photo: Rod Lawton
For many photographers, the prospect of image noise is enough to put them off using higher ISO settings, but rather than resisting high ISO settings out of principle, you should check your own camera’s performance to see where the quality reaches a point you consider unacceptable. It might be a lot higher than you think.
Your image processing software will make a difference too. If you shoot raw and use Lightroom or Adobe Camera Raw for processing, the default sharpening and noise reduction settings can actually make the image noise look worse than it is. Other raw processing tools like DxO PhotoLab and Capture One can produce noticeably less noise in high-ISO images, and the latest AI-powered denoising processes such as DxO DeepPrime XD and Adobe’s new AI noise reduction (now in Lightroom) can transform high ISO image quality for genuinely jaw-dropping results.
- Don’t believe the doom-mongers. High-ISO images can be perfectly good, especially with the latest AI software.
IBIS vs ISO: conclusions
Both of these tools allow for sharp handheld shots in low light and, of the two, in-body stabilization may look the most appealing because it means you don’t have to increase the ISO setting, or at least not by as much. We all know that higher ISOs mean lower image quality.
However, IBIS systems can only correct camera movement, not subject movement, while the faster shutter speeds from a higher ISO setting can do both. What’s more, IBIS systems have limits in the shake compensation they can apply, and they are often lower in real-world use than the makers’ best-case test figures.
It’s great to have both. But if your camera does not have IBIS (and you don’t have stabilized lenses either), you can use your camera’s Auto ISO setting to get the same effect. Both camera sensors and image processing software have come a long way in a short time, and high ISOs are no longer the issue they once were.
Related reading
Follow AP on Facebook, Twitter, Instagram, and YouTube.


