
Nik Collection 6 is a collection of eight premium plug-ins with hundreds of filters, effects and presets at your fingertips, making it a great addition to your photo editing software.
Be aware that DxO has recently released a Nik Collection version 7 to supercede this 6 collection. Note, however, that they have removed Nik Perspective from this release, to the consternation of many users.
Nik Collection 6 at a glance :
- $149 / £135 for three lifetime licences. Upgrade $79 / £69
- Mac and Windows compatible
- U-point technology for precise local adjustments
- New Control lines tool
- New last used edits feature
- Integrates with Photoshop, Lightroom and Affinity Photo
- Nik Sharpener and HDR Efex now updated
- 30-day free trial available
- www.dxo.com
Introducing the Nik Collection 6
The Nik Collection 6 suite includes eight plug-ins – available for Windows and macOS – for Adobe Phtoshop, Adobe Lightroom, DxO Photo Lab and Affinity Photo. The palette shown below is what you see in the Photoshop workspace. If you prefer, they also function as standalone apps, but individual plug-ins are not available to buy on their own.
The collection is available to buy outright for $149 / £135, or for existing Nik owners the upgrade price is $79 / £69.
The license allows the software to be installed on three computers. There’s no subscription option.
See the different DxO licences and packages
What are the 8 different DxO Nik plugins?
- Nik 6 Dfine: Removes digital noise exactly where required, locally or globally, without destroying detail
- Nik 6 Viveza: Lets you quickly shape colour and manipulate tones
- Nik 6 Perspective: Fix perspective and distortion for geometric perfection or creative effects such as miniature
- Nik 6 HDR: Two tools, to work with a single image or multiple images to produce one high dynamic-range image
- Nik 6 Color Efex: Control color, tone, contrast, and more with a vast collection of editable filters
- Nik 6 Analog Efex: Enjoy analog film effects with this plug-in
- Nik 6 Silver Efex: For excellent black & white photo conversions with film profiles, coloured filter effects and much, much more
- Nik Sharpener 6: Comprises two components: Presharpener for enhancing raws and Output Sharpener for controllable sharpening for display and printing among the options
Who are DxO Labs?
DxO Labs is world-renowned for its optic correction modules, with over 80,000 camera/lens combinations in its database. But it also has an impressive software portfolio: PhotoLab, a capable editing app; PureRaw, a cutting edge denoising program for camera raws; and the Nik Collection, a suite of powerful creative and technical apps.
DxO acquired the Nik Collection from Google in 2017. But its history goes back to 2009, when software firm Nik bundled its imaging plugins Dfine, Viveza, Color Efex Pro, Silver Efex Pro and Sharpener Pro into a single suite; the Ultimate Edition of these apps sold for $599.95. Google bought Nik Software in 2012, and the Google Nik Collection was marketed for a more affordable $149.
It was made even more accessible in 2016 when Google offered the whole package as a free download, and not surprisingly its popularity soared. This was fuelled by the fact that the plug-ins were really very good; Silver Efex Pro being the standout performer with its superb black & white conversion skills and an extensive bank of legacy film profiles.

When DxO acquired the portfolio, it was put on sale as the Nik Collection 2018. For $69/£59 you got seven plug-ins: Analog Efex Pro 2, Color Efex Pro 4, Dfine 2, HDR Efex Pro 2, Sharpener Pro 3, Silver Efex Pro 2 and Viveza 2. Since then, we’ve seen DxO apply its development skills and each update was brought significant improvements and workflow tweaks. In 2020’s Nik Collection 3, the headline was the addition of Perspective Efex; the following year in Collection 4 we saw updates to Viveza and Silver Efex; and in 2022, Color Efex and Analog Efex were redesigned for Collection 5.
Nik Collection 6: Features
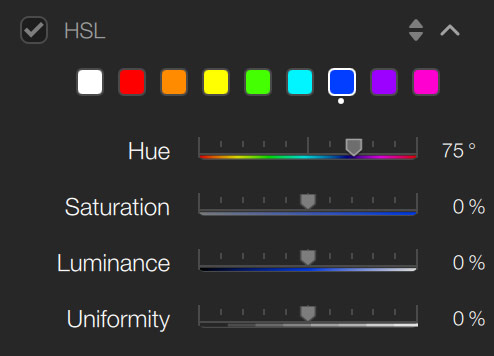
This brings us right up to date with Collection 6. Three of the eight apps – Color Efex, Dfine and Perspective Efex – have acquired new features and improved functionality. Specifically, Color Efex gains a useful new Hue/Saturation/Luminance (HSL) slider; Dfine has had an overhaul to its user interface and also now allows users to save denoising profiles; while Perspective Efex gains the powerful ReShape tool previously seen in DxO Viewpoint 4.
Recently, Sharpener and HDR Efex have enjoyed major updates with refreshed interfaces that match the other plug-ins and gained new features. Sharpener allows you to target sharpness where needed with U Point technology while HDR Efex works with single or multiple images, also has U Point technology for local fine-tuning and there’s a choice of presets too.
While each plug-in can be used a standalone app, they can also be used without quitting out of DxO Photolab, Photoshop, Photoshop Elements, Lightroom Classic and Affinity Photo. All this comes at $149 / £135 for three lifetime licences while owners of previous collections can upgrade for $79 / £69.
Control yourself
One of Nik’s standout editing tools is its U Point technology with Control Points, which enable precise and easily controllable adjustments to images. In Collection 6, U Point technology has seen comprehensive upgrades and the latest Control Points enable users to make edits with greater accuracy than ever. There’s also a completely new tool, Control Lines.
Digging into the detail, the key takeaways of the improved U Point technology are: Control Point diffusion allows greater control of the strength and style of adjustments; Control Lines brings the power of Control Points to linear gradients; Control Points and Control Lines can now be inverted; and both tools can be used with Color Selectively sliders for specific alterations.

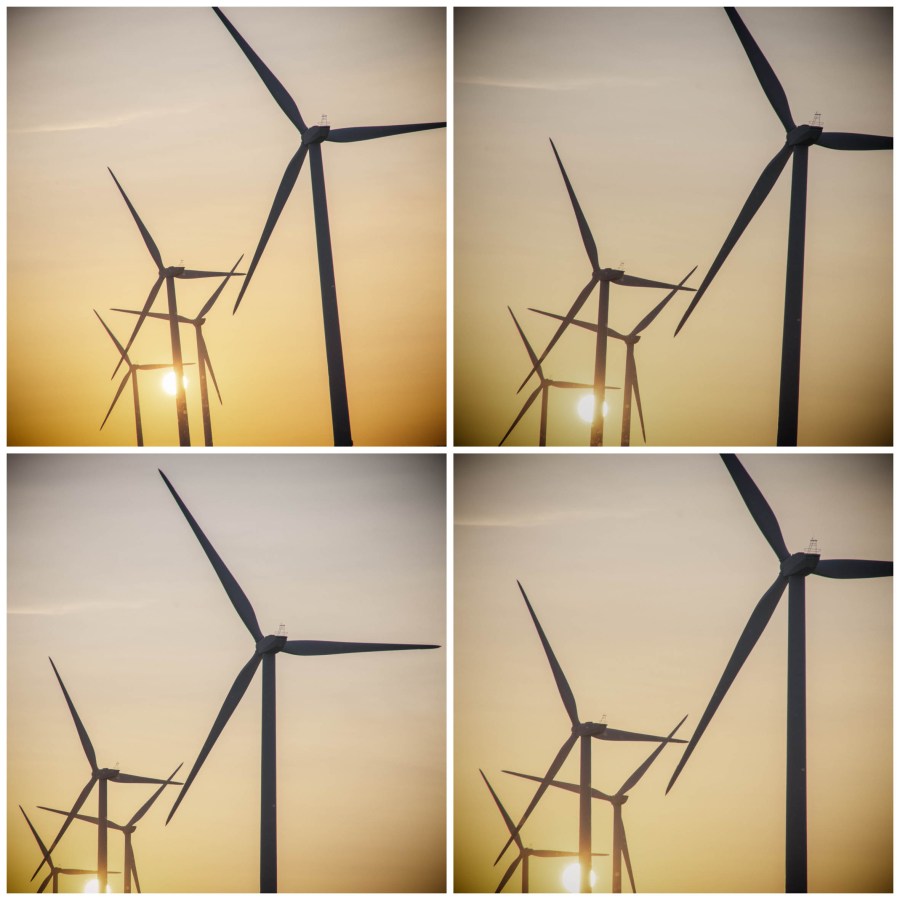
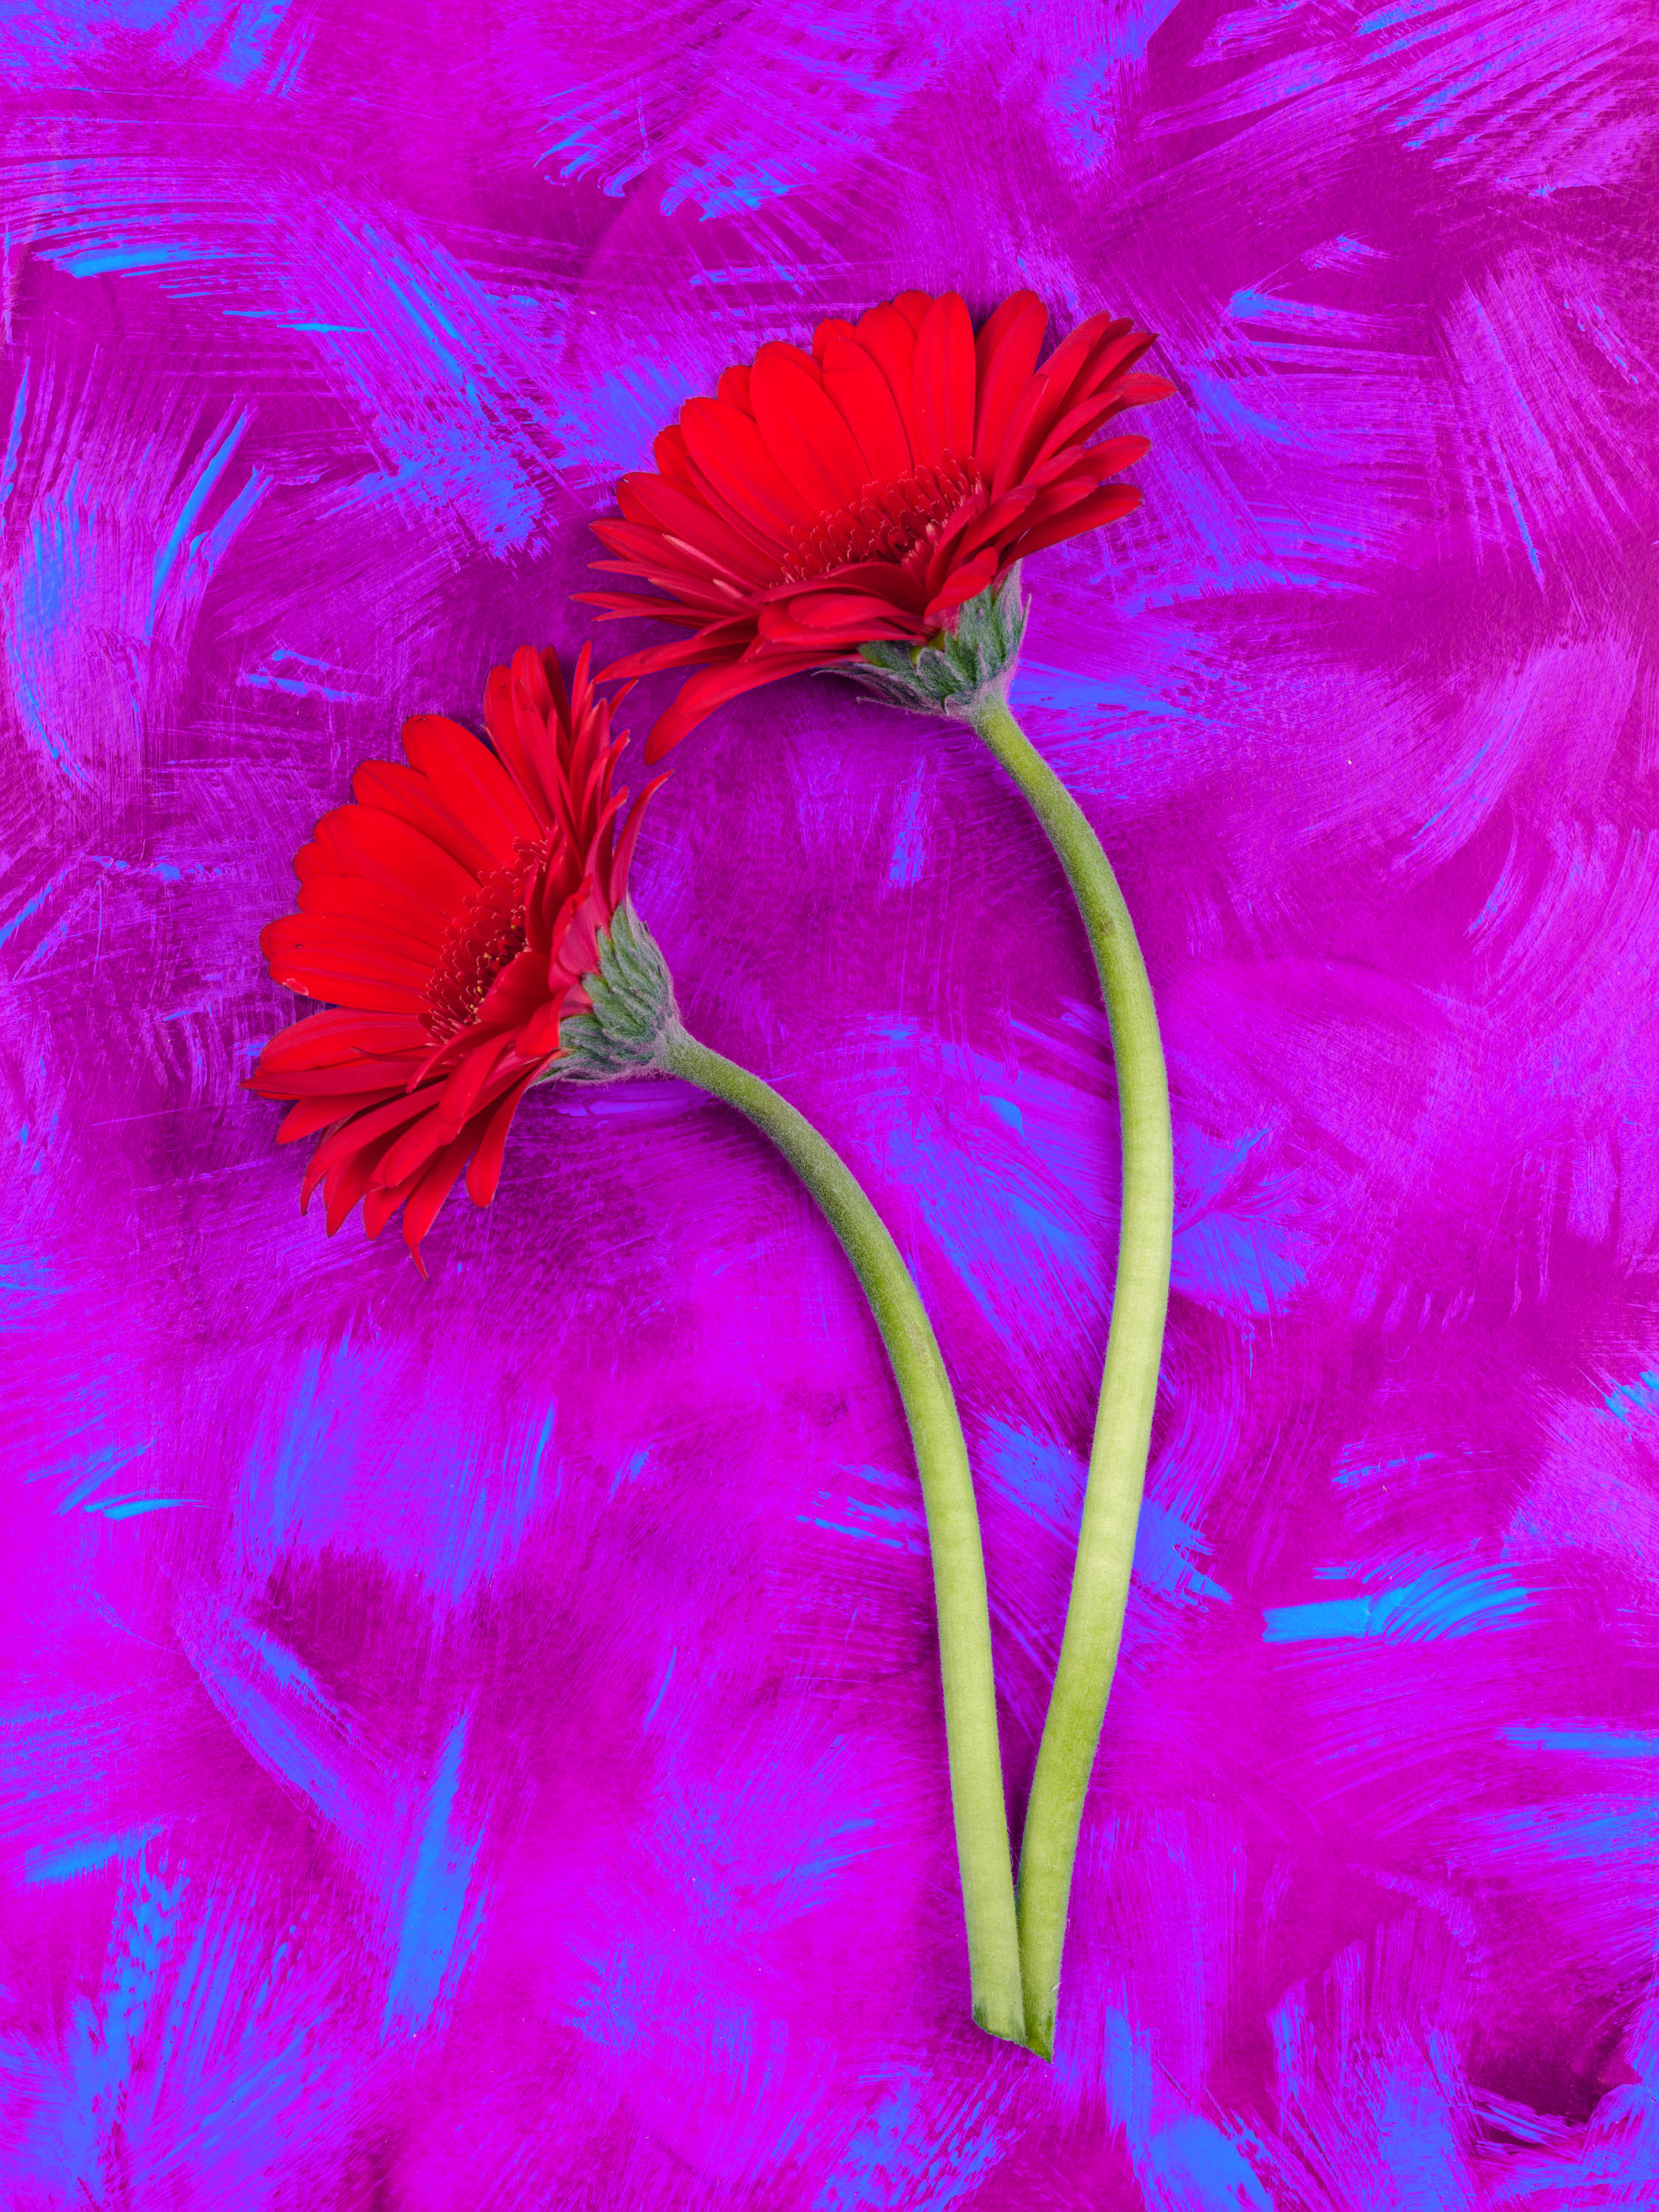
Taken on a Fujifilm X-E3 with 18mm f/2.8 lens, exposed at 1/350sec at f/11 and ISO 250.
Image credit: Will Cheung
Pre-update, Control Points could be placed on any part of the image with the click of the mouse, and the circular area resized to suit the area to be adjusted and then settings could be tweaked in real-time to fine-tune brightness, contrast and colour. It was also easy to duplicate Control Points and you could use as many as required to achieve the desired effect across a larger area and they can be saved along with other changes as a preset. At the other extreme, a small Control Point can improve details within the picture.
Post-update, all that editing control is still there, but the Collection 6 brings significant benefits. Control Points are still circular but now a Diffusion slider allows you to feather the mask. This slider’s default setting is 100, ie maximum diffusion, and to check the masking effect there’s a Show/Hide mask option.
The new U Point tool – Control Lines
Completely new to Collection 6 is a U Point tool called Control Lines. They have the precision of Control Points but the functionality of a linear gradient. When you need to darken a pale sky or brighten a dark foreground this tool will pay for itself in no time. Previously, to darken a large area you had to use several Control Points close together, slightly overlapping and sometimes the effect could be patchy. Control Lines solves that problem and they can be dragged across the image at any angle and the depth of the working area can be adjusted to suit the area you want to alter.
On complex edits with multiple Control Point/Lines in play, each mask you add can be named (sky, face etc), grouped together and switched on and off which makes workflow easier when you’re fine-tuning the image. Plus, all the masks and other adjustments you make can be saved as named presets for future use. If you forget to create a preset, the last 15 edits including any Control Points/Lines are available with a single click. The Last edit feature is available in Analog Efex, Color Efex, Silver Efex and Viveza. For fully non-destructive editing in Photoshop you can turn your edits into a Smart Object at any stage within the plug-in.

I love using U Point tools, but it bugs me that the pull handles of the selective adjustment sliders attached to each Control Point/Line are too small and you have to be very precise with the mouse click to grab hold of them. That said, the sliders in the adjustments interface do the same job, although the process is then marginally slower.
U Point technology is just one of the suite’s headline features which is why I have concentrated on its skills, but there is so much more, especially the incredible selection of presets to get creative with. Whether you use presets as they are or use them as starting points and then tinker from there, there’s the opportunity to develop an individual style and that’s a very good thing.
Finding your way around a new software is always a challenge and here, with eight plug-ins, the learning curve is perhaps steeper than usual. That said, there’s a commonality in the interfaces that does make life easier as you go from app to app. Without exception, the apps work very well and after a few weeks spent with the Collection, my workflow got faster and faster, thanks to time invested early on playing and creating some presets. Then I could import several similar images at a time from Lightroom into the plug-in and process batches at a time.
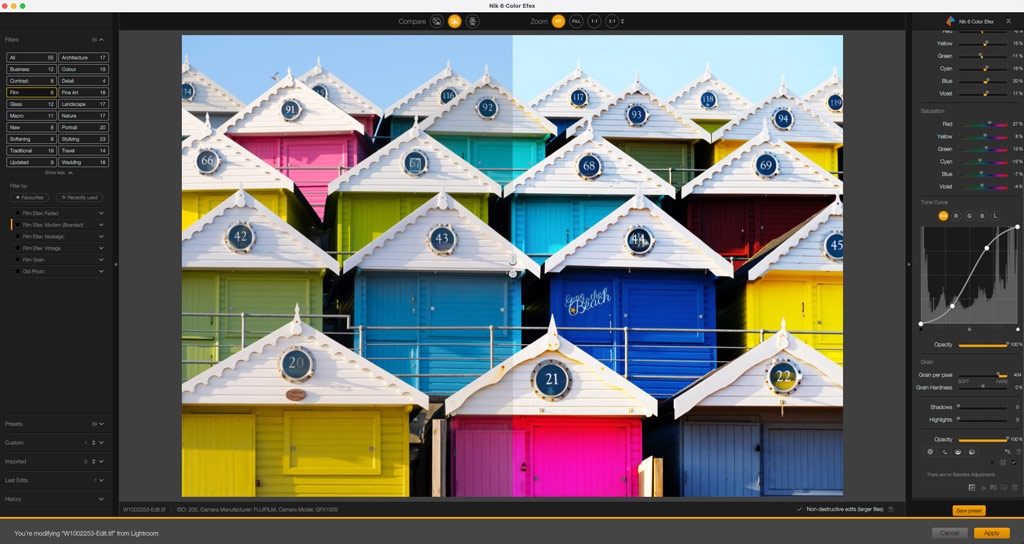
Nik 6 Color Efex – Fun with colours
Nik 6 Color Efex is a powerful tool with huge potential and there’s not much that it can’t achieve. On the left side of the interface, there are 55 preset filters grouped together in 19 categories, so many filters appear more than once. If anything, I feel there are too many preset filters and, at least to start with, the choice is daunting. Of course, it is true that not every filter will appeal, so you’ll soon narrow them down to those useful for your photography.
Once a filter is selected, the parameters appear on the right side where they can be adjusted. If you find a filter is not to your liking, it can be deleted for another attempt. The tools and masks used can be saved as a preset and the Last edit panel stores the used tools for the past 15 previous edits.
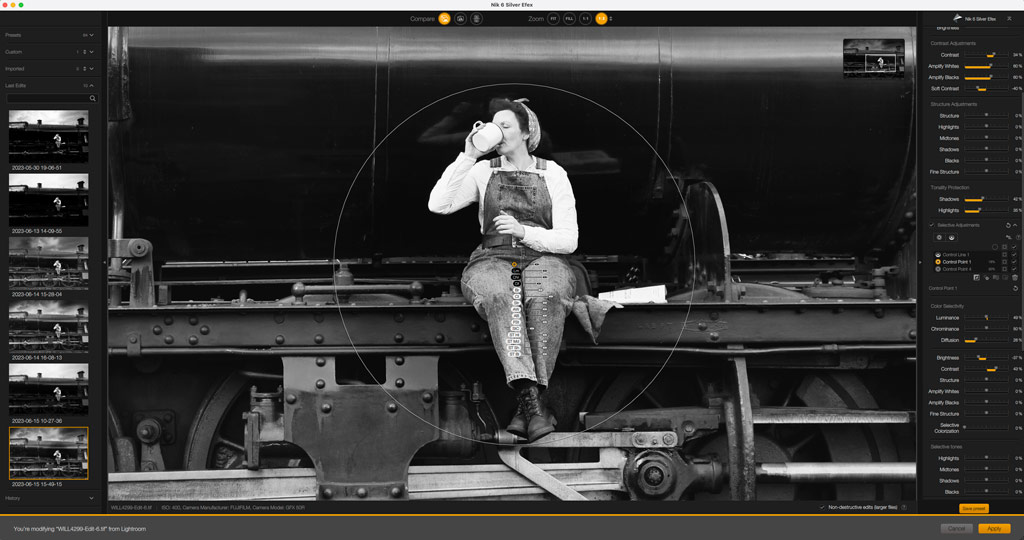
Using Nik 6 Silver Efex
Silver Efex is an excellent and very powerful black & white converter. The original raw here was captured at a TimeLine Events shoot at Didcot Railway centre using a Fujifilm GFX 50R.


I took the original raw image straight into Nik Silver Efex without any adjustments. I looked through the presets on the left side of the interface until I found one I liked. In this case I settled on 015 Full dynamic (harsh) which tonally lifted the whole image but especially the shadows and left me with just the highlights to work on.

For the sky, I used a Control Line and starting from the top, I dragged it to overlap the loco and used the brightness and highlight sliders to give the required look.
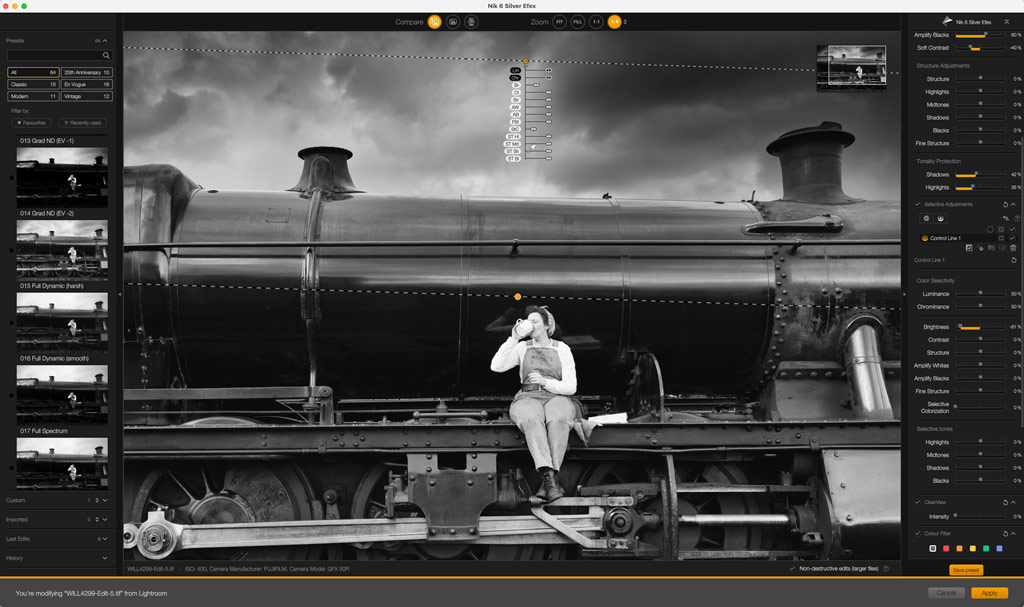
The area around the right funnel was a tad too dark while the re-enactor looked too pale, so I resolved those issues with a couple of Control Points. The effect of a Control Point varies depending on where it’s sitting so move it around the area you want to affect and when you have it in the right place, use the Shadow, Highlight and Brightness sliders to tweak the result.
Nik Collection 6: Verdict
Committing to buying a suite of eight individual apps of disparate skills will not appeal to everyone. I loved using Silver Efex, Color Efex and Viveza, and I reckon Perspective and Analog Efex are worthwhile apps too. Personally, I have no need for Dfine because I use DxO’s PureRaw; and HDR Efex and Sharpener I probably wouldn’t use because I’m happy with Photoshop/Lightroom. That’s potentially three out of eight apps redundant from my perspective.
If you did some simple arithmetic: eight apps at $149 / £135 is less than $20 / £20 each, but five apps works out at less than $30 / £30 each. That is still great value and Silver Efex is easily worth that, but the value for money calculation will vary from person to person and you need to factor this into your buying decision. Perhaps Nik should offer individual apps or apps in packages, ie Color Efex and Silver Efex together.
When all is said and done, however, it is what it is and the Nik Collection 6 costs $149 / £135 for a lifetime licence and that is very decent value. It is a powerful set of plug-ins with huge potential and the latest handling improvements with Control Points and the addition of Control Lines enhances its overall appeal.
A fully functional 30-day trial version is available, so that’s the place to start if you want to try the Collection for yourself.
Follow AP on Facebook, Twitter, Instagram, YouTube and TikTok.


