All things being equal, the less light there is in a scene, the longer an exposure you’ll need for it to be correct. So, when you’re working in low light, such as for twilight shoots outdoors, or in dimly lit interiors, you’ll often be using slower shutter speeds. And slower speeds can mean you get camera shake in your images. Shake happens when the camera is moved during an exposure, and this affects sharpness.

Image stabilisation is a tool that’s exceptionally useful, especially when you need to grab candid shots like this one on the move. Nikon D810, 24-70mm, 1/15sec at f/5.6, ISO 800
Even tiny vibrations can show up, and the slower the shutter speed you use, the more noticeable it’ll be, though this very much depends on how good you are at holding the camera still. Camera shake also becomes more pronounced at longer focal lengths, so with the same handholding technique you’ll notice more shake at 55mm than you would at 18mm. Of course, this isn’t a new problem.
Camera shake during exposures has been a factor in photography for as long as there has been photography. Shooting in low light or not, historically, you’ve got two options to fight it: increase the shutter speed so an exposure is short enough for camera shake not to be noticeable; or keep your camera more stable in some way during the exposure. As well as tripods and monopods, today we also have image stabilisation (IS) to help with the latter.

Image stabilisation can keep static subjects sharper at slow shutter speeds, but it can’t do anything about subject movement. This can be a problem, but also a creative opportunity. Nikon D810, 24-70mm, 1/6sec at f/16, ISO 400
IS compensates for camera shake, so that the image projected onto the camera’s sensor is kept still during the exposure – or more still than it would have been otherwise – and with most modern camera systems featuring some form of it, it can be amazingly useful for low-light photography. But it’s not without its limitations, so here are some tips on understanding and using it better.
When do you need IS?
As most photographers will remember, before image stabilisation hit consumer camera lenses in the mid 1990s, we used the Reciprocal Rule to work out how low a shutter speed we could use without incurring camera shake. That rule states that your shutter should be at least as fast as the inverse of the focal length you’re using. So, a 200mm lens would need a 1/200sec shutter speed or faster.
The longer the lens, the more camera shake is magnified and therefore the faster a shutter speed you need to offset it. Of course, this was always a fairly arbitrary rule as it also depended on outside factors such as your handling skills, the weather, and how many coffees you’ve had. IS is rated in stops, so if you want a rough idea of how slow you can expect to shoot when it’s turned on, just take the Reciprocal Rule and factor in the claimed IS benefit of the camera or lens.
So, for that 200mm lens you’d be looking at attainable shake-free images around 1/13sec for a four-stop IS system, or just over a second for a class-leading 8-stop IS system as on Canon’s new EOS R6.
Remember you need to apply any focal length crop factor to those calculations though, so a 200mm lens on a 1.5x crop sensor would be equivalent to a 300mm lens for the purposes of calculation. Relate this to shorter lenses and it can appear that IS is less of a requirement.
But if you’re working in low light, then it’s well worth keeping it switched on when handholding the camera, because it will improve results at marginal shutter speeds where you could conceivably hold the camera still anyway. It’s also worth remembering that IS can be particularly helpful on very high-resolution sensors which naturally show camera shake more acutely.

Above: Stabilising the sensor or lens also lets you use smaller apertures or intentionally slow the shutter as when overexposing in mist. Nikon D810, 24-70mm, 1/4sec at f/14, ISO 400
Which is the best type of image stabilisation?
Although manufacturers all have their own names for image stabilisation, the technology used to compensate for camera shake is broadly split into optical and mechanical solutions.
Optical IS is lens-based and uses gyro sensors to detect movement which is then compensated for by shifting an element or group of elements within the light path.
Mechanical IS (which is also called sensor-shift, in-body IS or IBIS) moves the sensor in the camera body to compensate for any movement that it detects. In both cases, the greater the camera movement, the more the element or sensor needs to shift to compensate, so there are physical limitations to the amount of stabilisation that can be achieved.
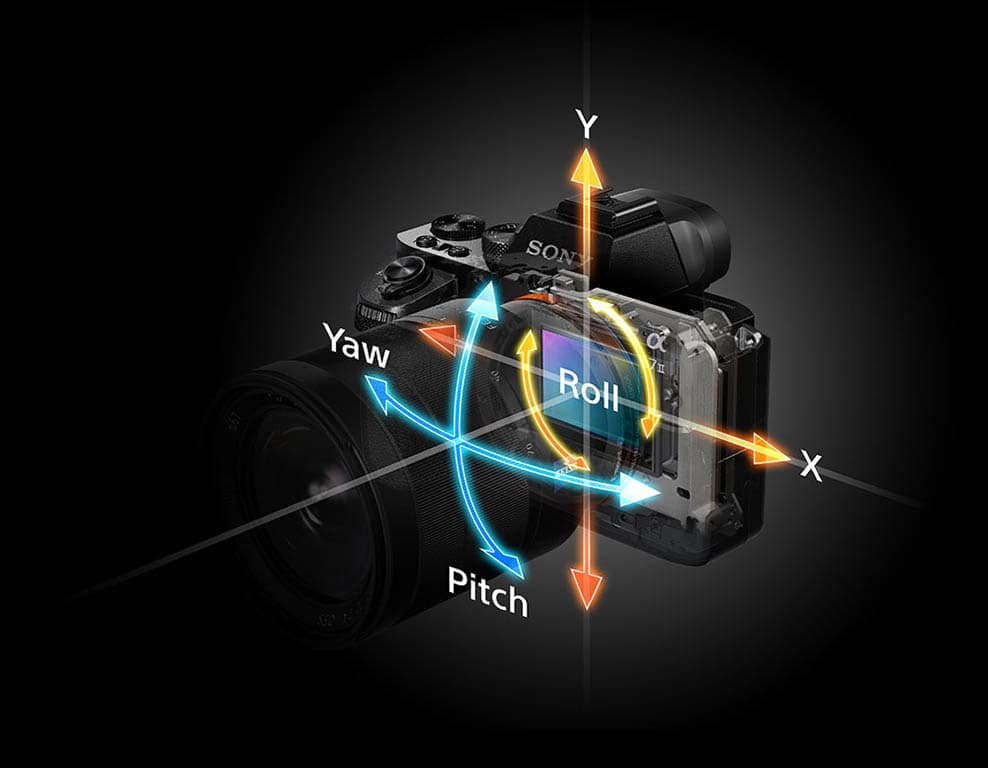
Today’s sensor-shift or IBIS systems should allow five axes of correction
Which is better?
Well, they both have their advantages. With optical IS there’s an argument that it’s better because it’s tuned to individual lenses. Plus, with longer lenses, larger movements are required in stabilising movement, and these are easier to achieve in a lens than in the body, because in theory the lens barrel can be widened. Optical IS also helps with low-light AF on DSLRs, because the light is stabilised when it reaches the AF sensor.
The downsides are that IS-equipped lenses tend to be larger and cost more, and can usually only correct for pitch and yaw movements of the camera. It’s also claimed that optical IS can degrade the bokeh in defocused areas as the light is shifted, but the differences are negligible. You may also hear sound from the optical IS unit, though the same can be said for some sensor shift technologies, too.
With mechanical IS, the biggest advantage is that the system should work with any lens you mount on the camera, so it’s a one-time cost. You can even fit legacy optics, though you may need to set the focal length manually via a menu if the lens doesn’t communicate with the body automatically.
Modern mechanical sensor shift systems can also stabilise across more axes than an optical system, so instead of just pitch and yaw movements these ‘five axis’ systems will also correct for roll around the lens axis, which becomes problematic during long exposures, along with vertical and horizontal motion that causes blur with close-up shooting. As a by-product of using in-camera stabilisation, non-IS lenses are cheaper and smaller, and there’s less to go wrong with them!
As for the downsides of mechanical or sensor-shift IS, the main thing is that this method can be less effective when using very long lenses, because the sensor needs to move more to compensate, and is physically restricted in doing so by the camera body. IBIS also increases the camera’s size and cost.
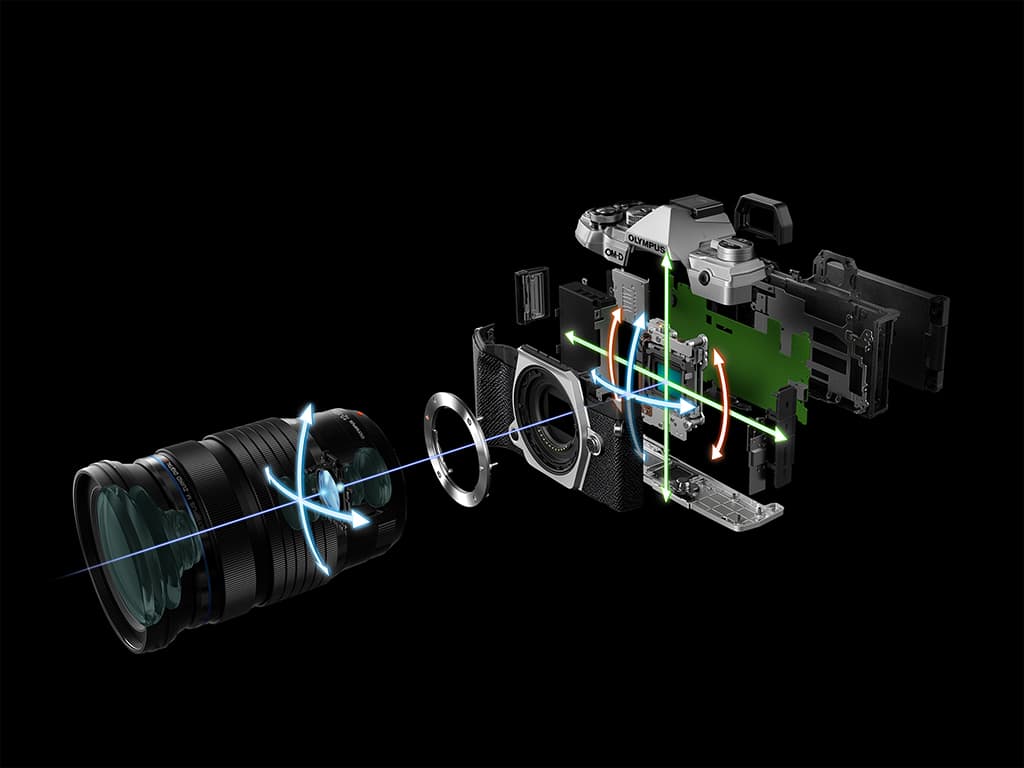
Modern mirrorless cameras will often use a dual IS system that combines sensor shift and optical stabilisation, increasing the effectiveness and application
What about dual IS systems?
Increasingly, mirrorless camera systems now use a mix of the two technologies, with a mechanical sensor-shift system in the camera as well as optical IS in some – but not all – lenses. For instance, Nikon’s Z 70-200mm f/2.8 S lens still has a VR mode, even though the full-frame Z-series cameras have IBIS.
If you use first-party IS lenses with your chosen body you can expect them to work together, and this best-of-both-worlds approach increases the amount of stabilisation offered by taking the best of both technologies.
What are the limitations of IS?
Photographers relying on IS for increased sharpness in low-light conditions are faced with one main challenge: subject movement. Anything moving in the scene will be blurred if the shutter speed isn’t fast enough to freeze it. You can see this in street scenes with blurred pedestrians and cars, and even use it for creative effect. Ultimately, it’s up to you to get the shutter speed right for the subject and IS will still be a benefit in the wider scene. IS should also be turned off when shooting from a tripod.
That’s not necessarily because it will cause problems, though. While older systems could suffer from what’s called a ‘feedback loop’, where they detected their own vibrations and softened the image, modern IS technology should detect a lack of movement. But switching IS off saves battery power, which can be an issue in low-light photography, so whenever you’re sure that vibration isn’t an issue, switch it off.

Using stabilisation on very long telephoto lenses is a must, but exposure settings also matters. Here -1EV was used (image cropped). Nikon D810, 80-400mm, 1/60sec at f/6.3, ISO 400
Sharpness and stability
Remember that stabilisation comes from you as well as any IS mode in the camera or lens. Having this technology is no excuse for poor technique, and the better you hold your camera, the sharper the shot will be with or without IS turned on. There are lots of things you can do to improve handholding technique, including bracing yourself against objects, lying down or supporting a longer lens closer to its front element so the balance is better.
Using burst mode can also increase your chances of a sharp image, as you’re more likely to catch a moment of stillness in your body. In managing low-light shutter speed and therefore the need for IS, it’s also well worth considering whether your subject is correctly exposed. Some low-light scenes, especially those with dominant shadows, will naturally force the shutter speed down – leading to overexposure and unnecessarily longer shutter speeds, unless you take steps to compensate.
What about video?
With video, shutter speed is more restricted than it is with stills. Typically you’ll be shooting at 1/50sec or 1/60sec for smooth 24fps, 25fps or 30fps video. While subject movement is less of a factor, image stabilisation is just as important for handheld video – particularly when using longer focal lengths and if you’re moving the camera around.
Using the optical or mechanical stabilisation handheld, video will look smoother and if you don’t have a gimbal these technologies can smooth out vibrations from walking and panning. On top of the regular IS modes, you may also find a digital or electronic stabilisation mode for video. This method is more about processing the signal than stabilising the light.
Captured footage is shifted from frame to frame to compensate for motion, meaning that a little of the footage is cropped. But this is better than shaky footage. If you’re recording with a mic close to the camera it’s important to use a system that’s as near to silent as possible or it will be picked up on the soundtrack.
Further reading
Shots not sharp enough? Get sharper shots today
Get sharper shots handheld

