When it comes to capturing a sunset sky, it can be very tricky to balance out the exposure. The most vibrant part of the sunset sky is usually the area around the setting sun, but shooting into the sun usually results in a foreground in deep shadow. What if we want to capture detail in both the sky and land? One solution is to capture two or more bracketed exposures – one taken to record detail in the sky, the other for the land – then blend them together afterwards by taking the best parts of each exposure and combining them in Photoshop. This involves a combination of selections, layer masking and toning tricks. We’ll explore the process here, and look at a few simple effects you can use to boost a sky in Photoshop.
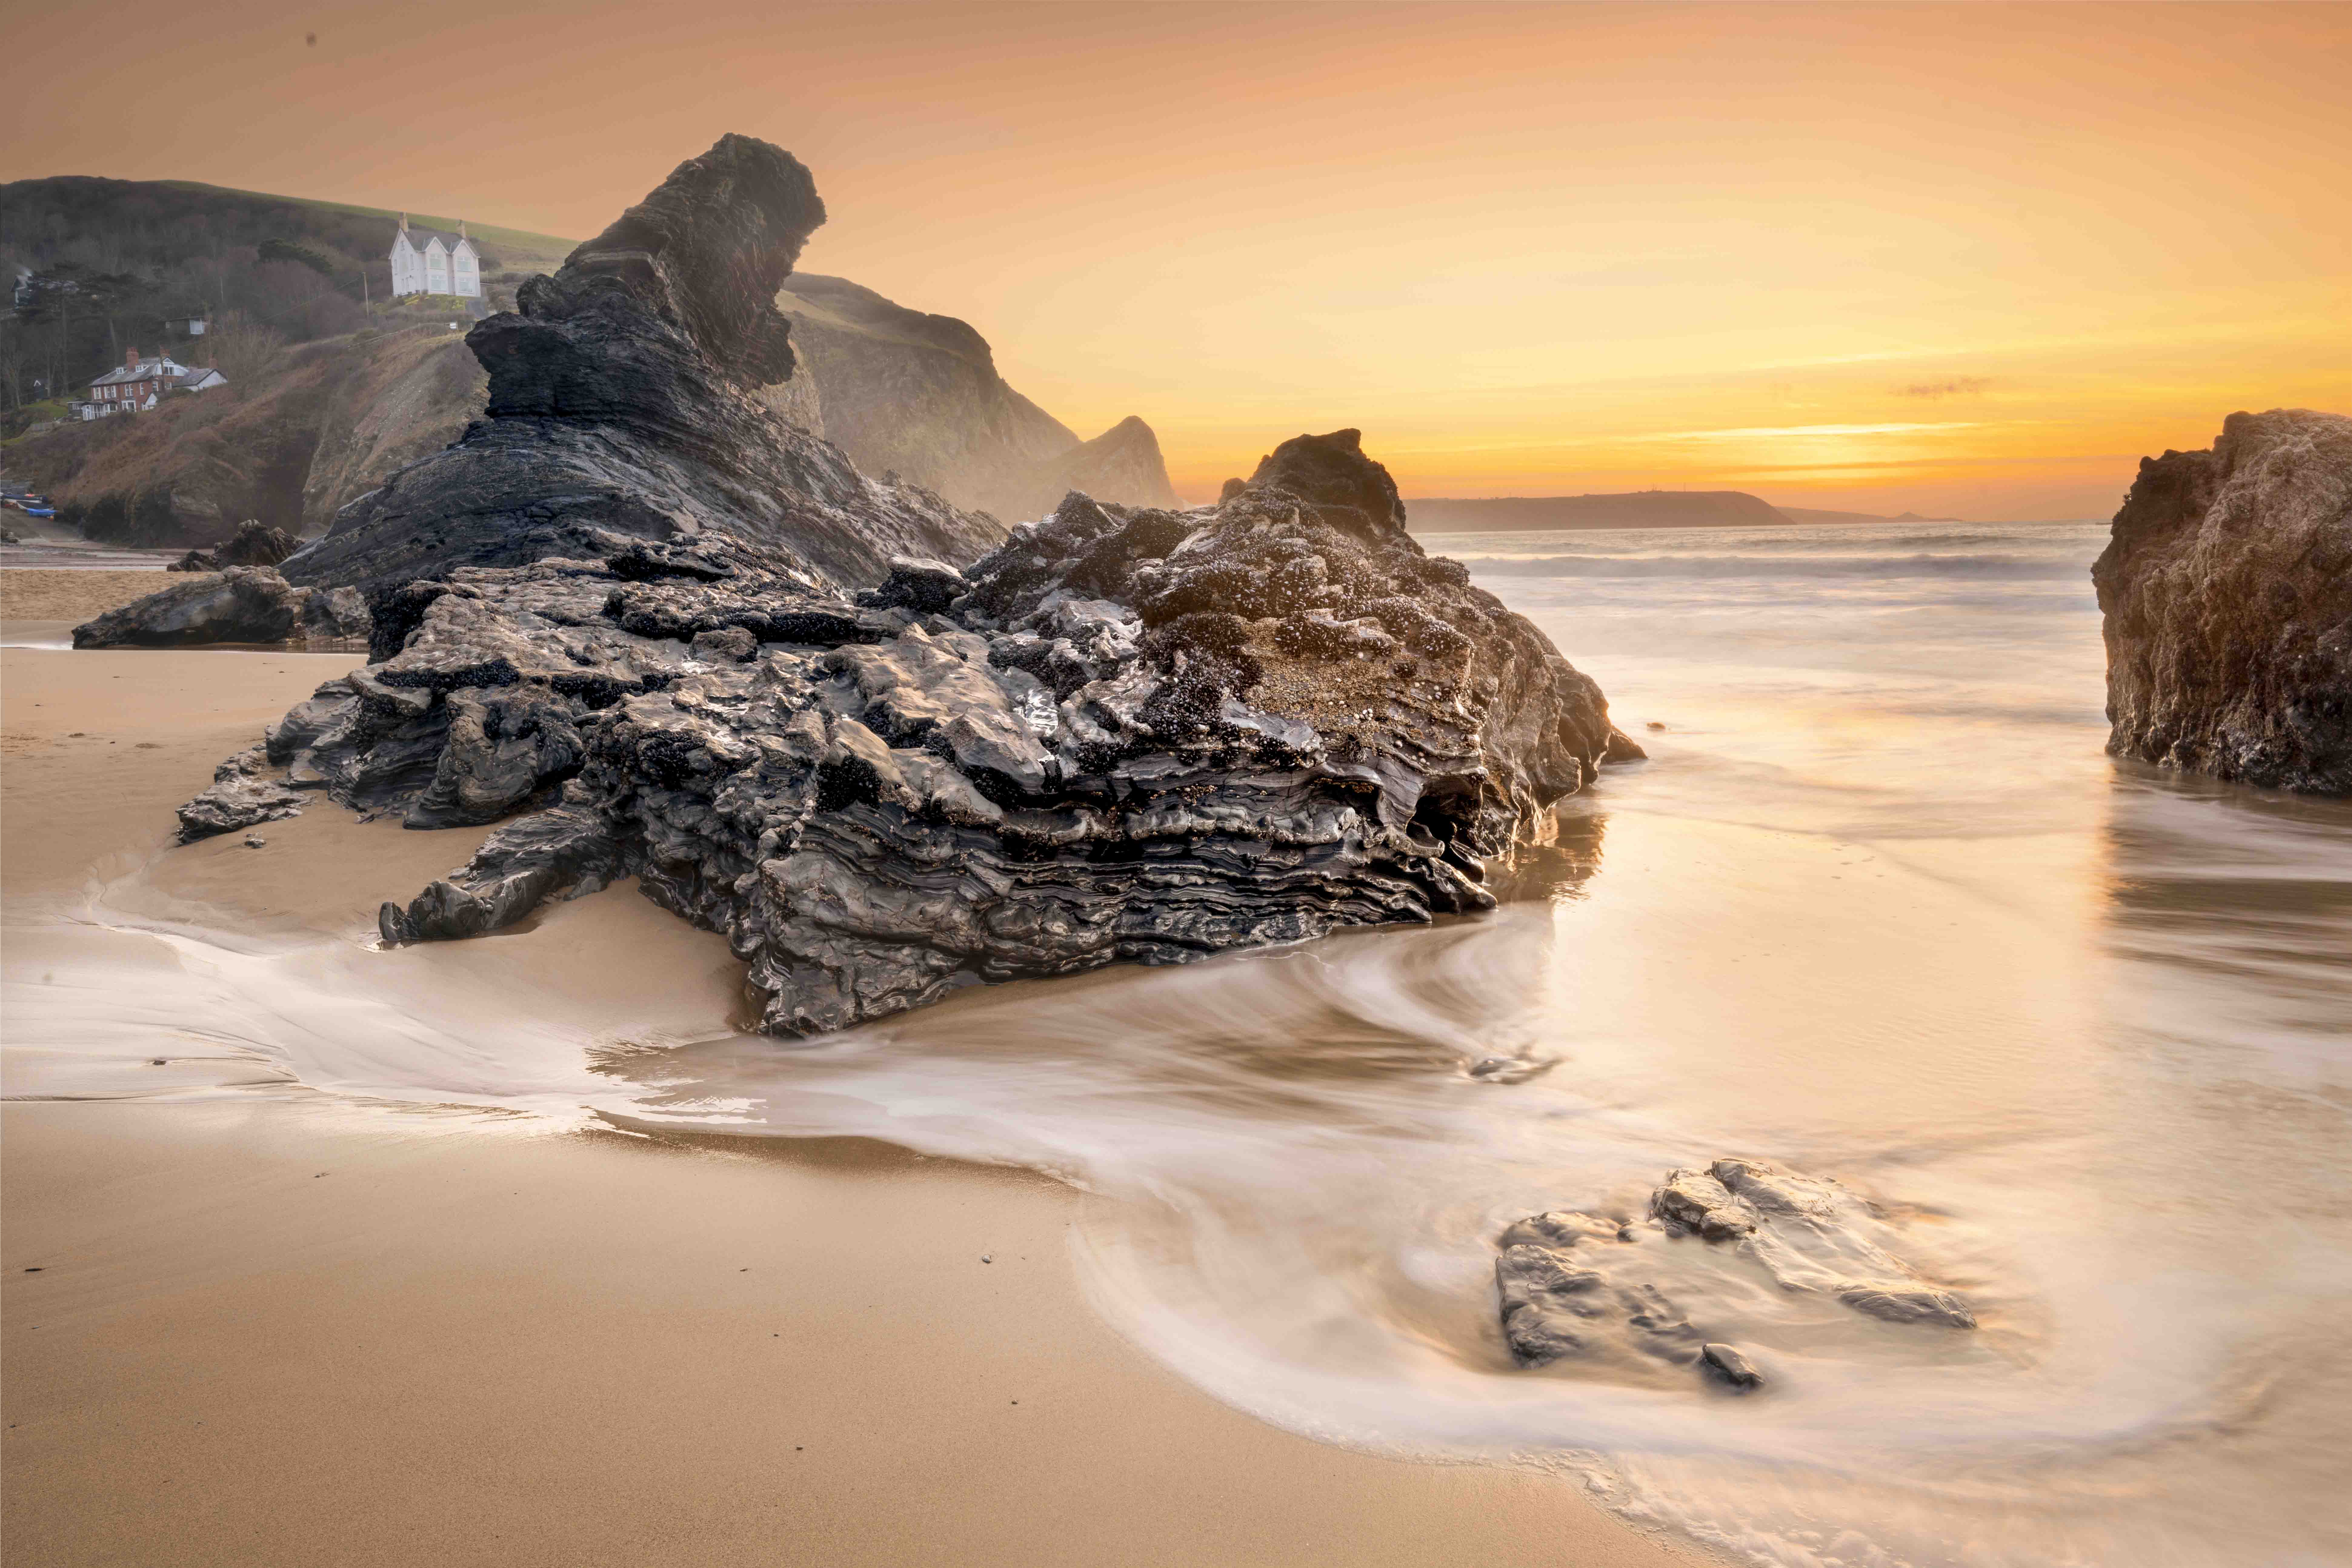
Combine the colourful sunset from one exposure and correctly exposed foreground from the other to create this balanced scene
Initial toning
Photoshop is the best in the business at blending images together, so it’s ideal for combining two exposures – one taken for the sky, the other for the land – into one seamless image. The first stage in this technique is to process the two images to boost the tones, which we’ve done here in Photoshop’s Camera Raw plugin. Of course, we can ignore the sky in the lighter image and the land in the darker one and simply concentrate on enhancing the area that we intend to use. For a sunset sky like this a boost in Temperature and Tint can help to give the image a warmer feel that enhances the mood (make sure both images have the same white balance settings). It’s also a good idea to remove chromatic aberration, as colour fringing can occur along the horizon line, making it difficult to blend the images together.
Step by step guide: Photoshop
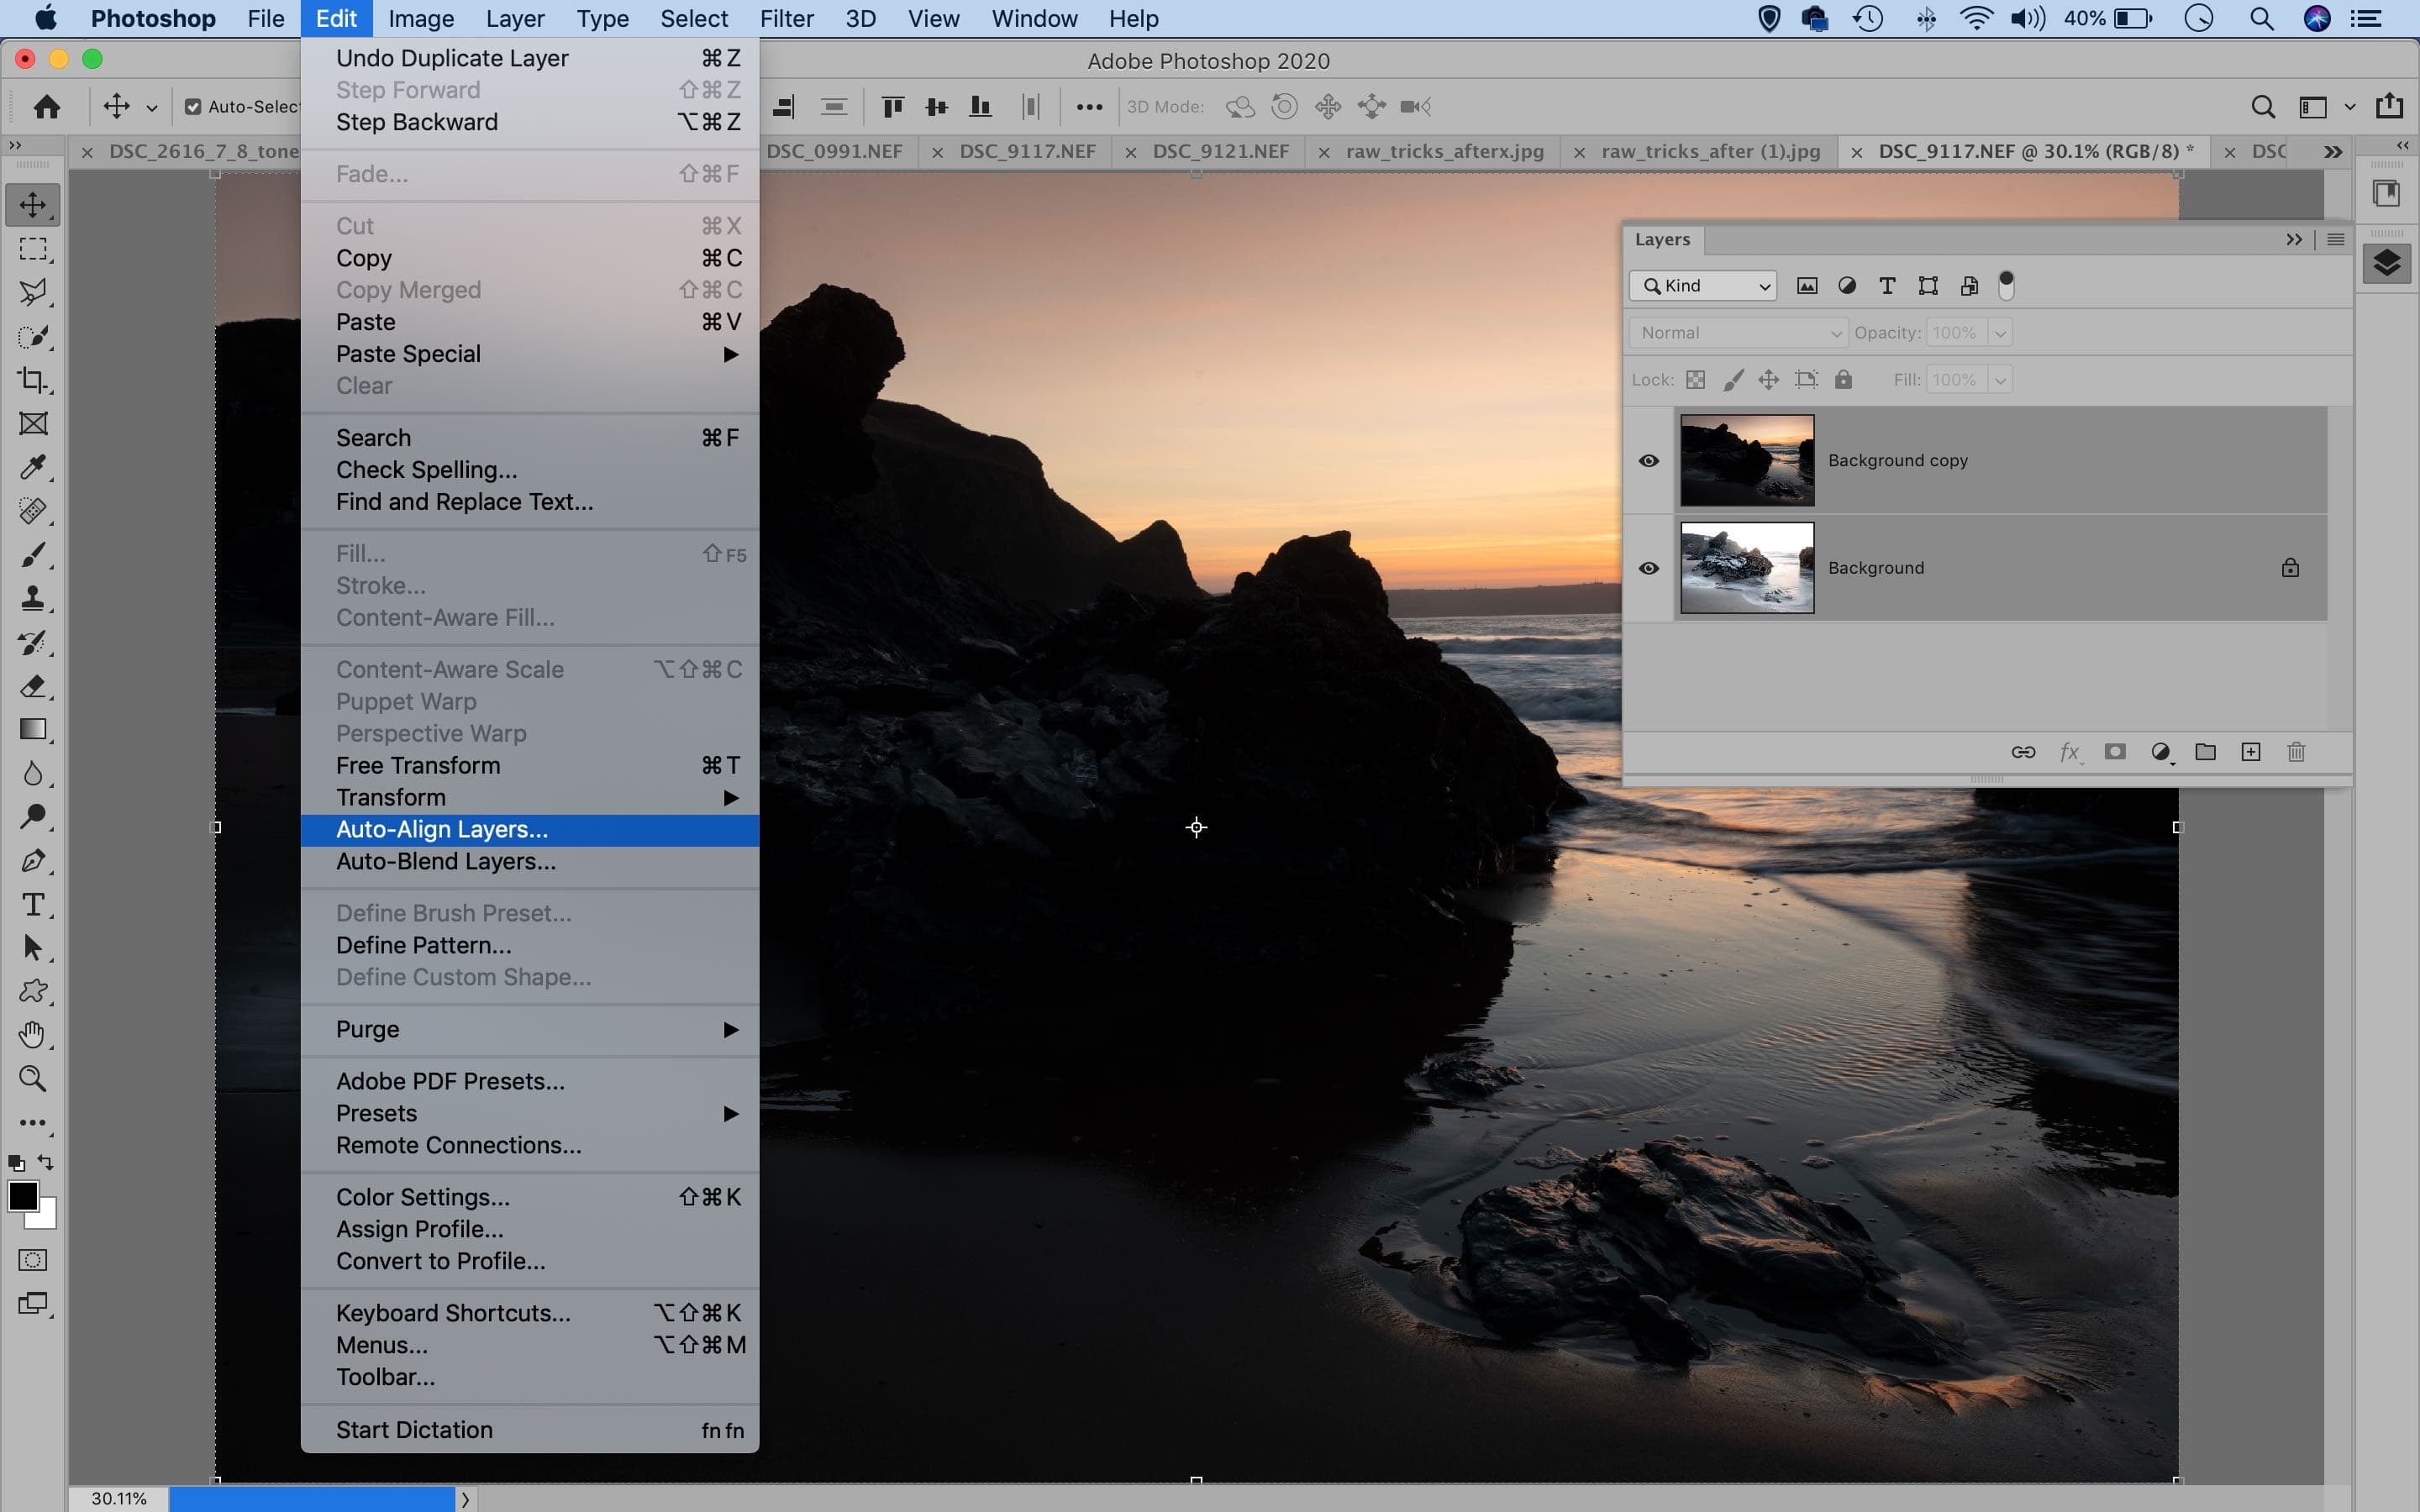
Open, combine and align
After processing both the images the next step is to open them both, then copy one on top of the other. Right-click the background layer in the Layers Panel then choose Duplicate Layer. Go to the Destination dropdown, choose the other image name and hit OK. This ensures the layer is copied over and placed in the same way as the other image. Next we can go to the other image and check that both are perfectly aligned by toggling the visibility of the top layer off and on. If the alignment is slightly off, we can use a handy command to correct things. Hold Cmd/Ctrl and click on both layers to highlight them, then go to Edit > Auto-Align Layers. Choose Auto and hit OK. Now the two images should be perfectly aligned.
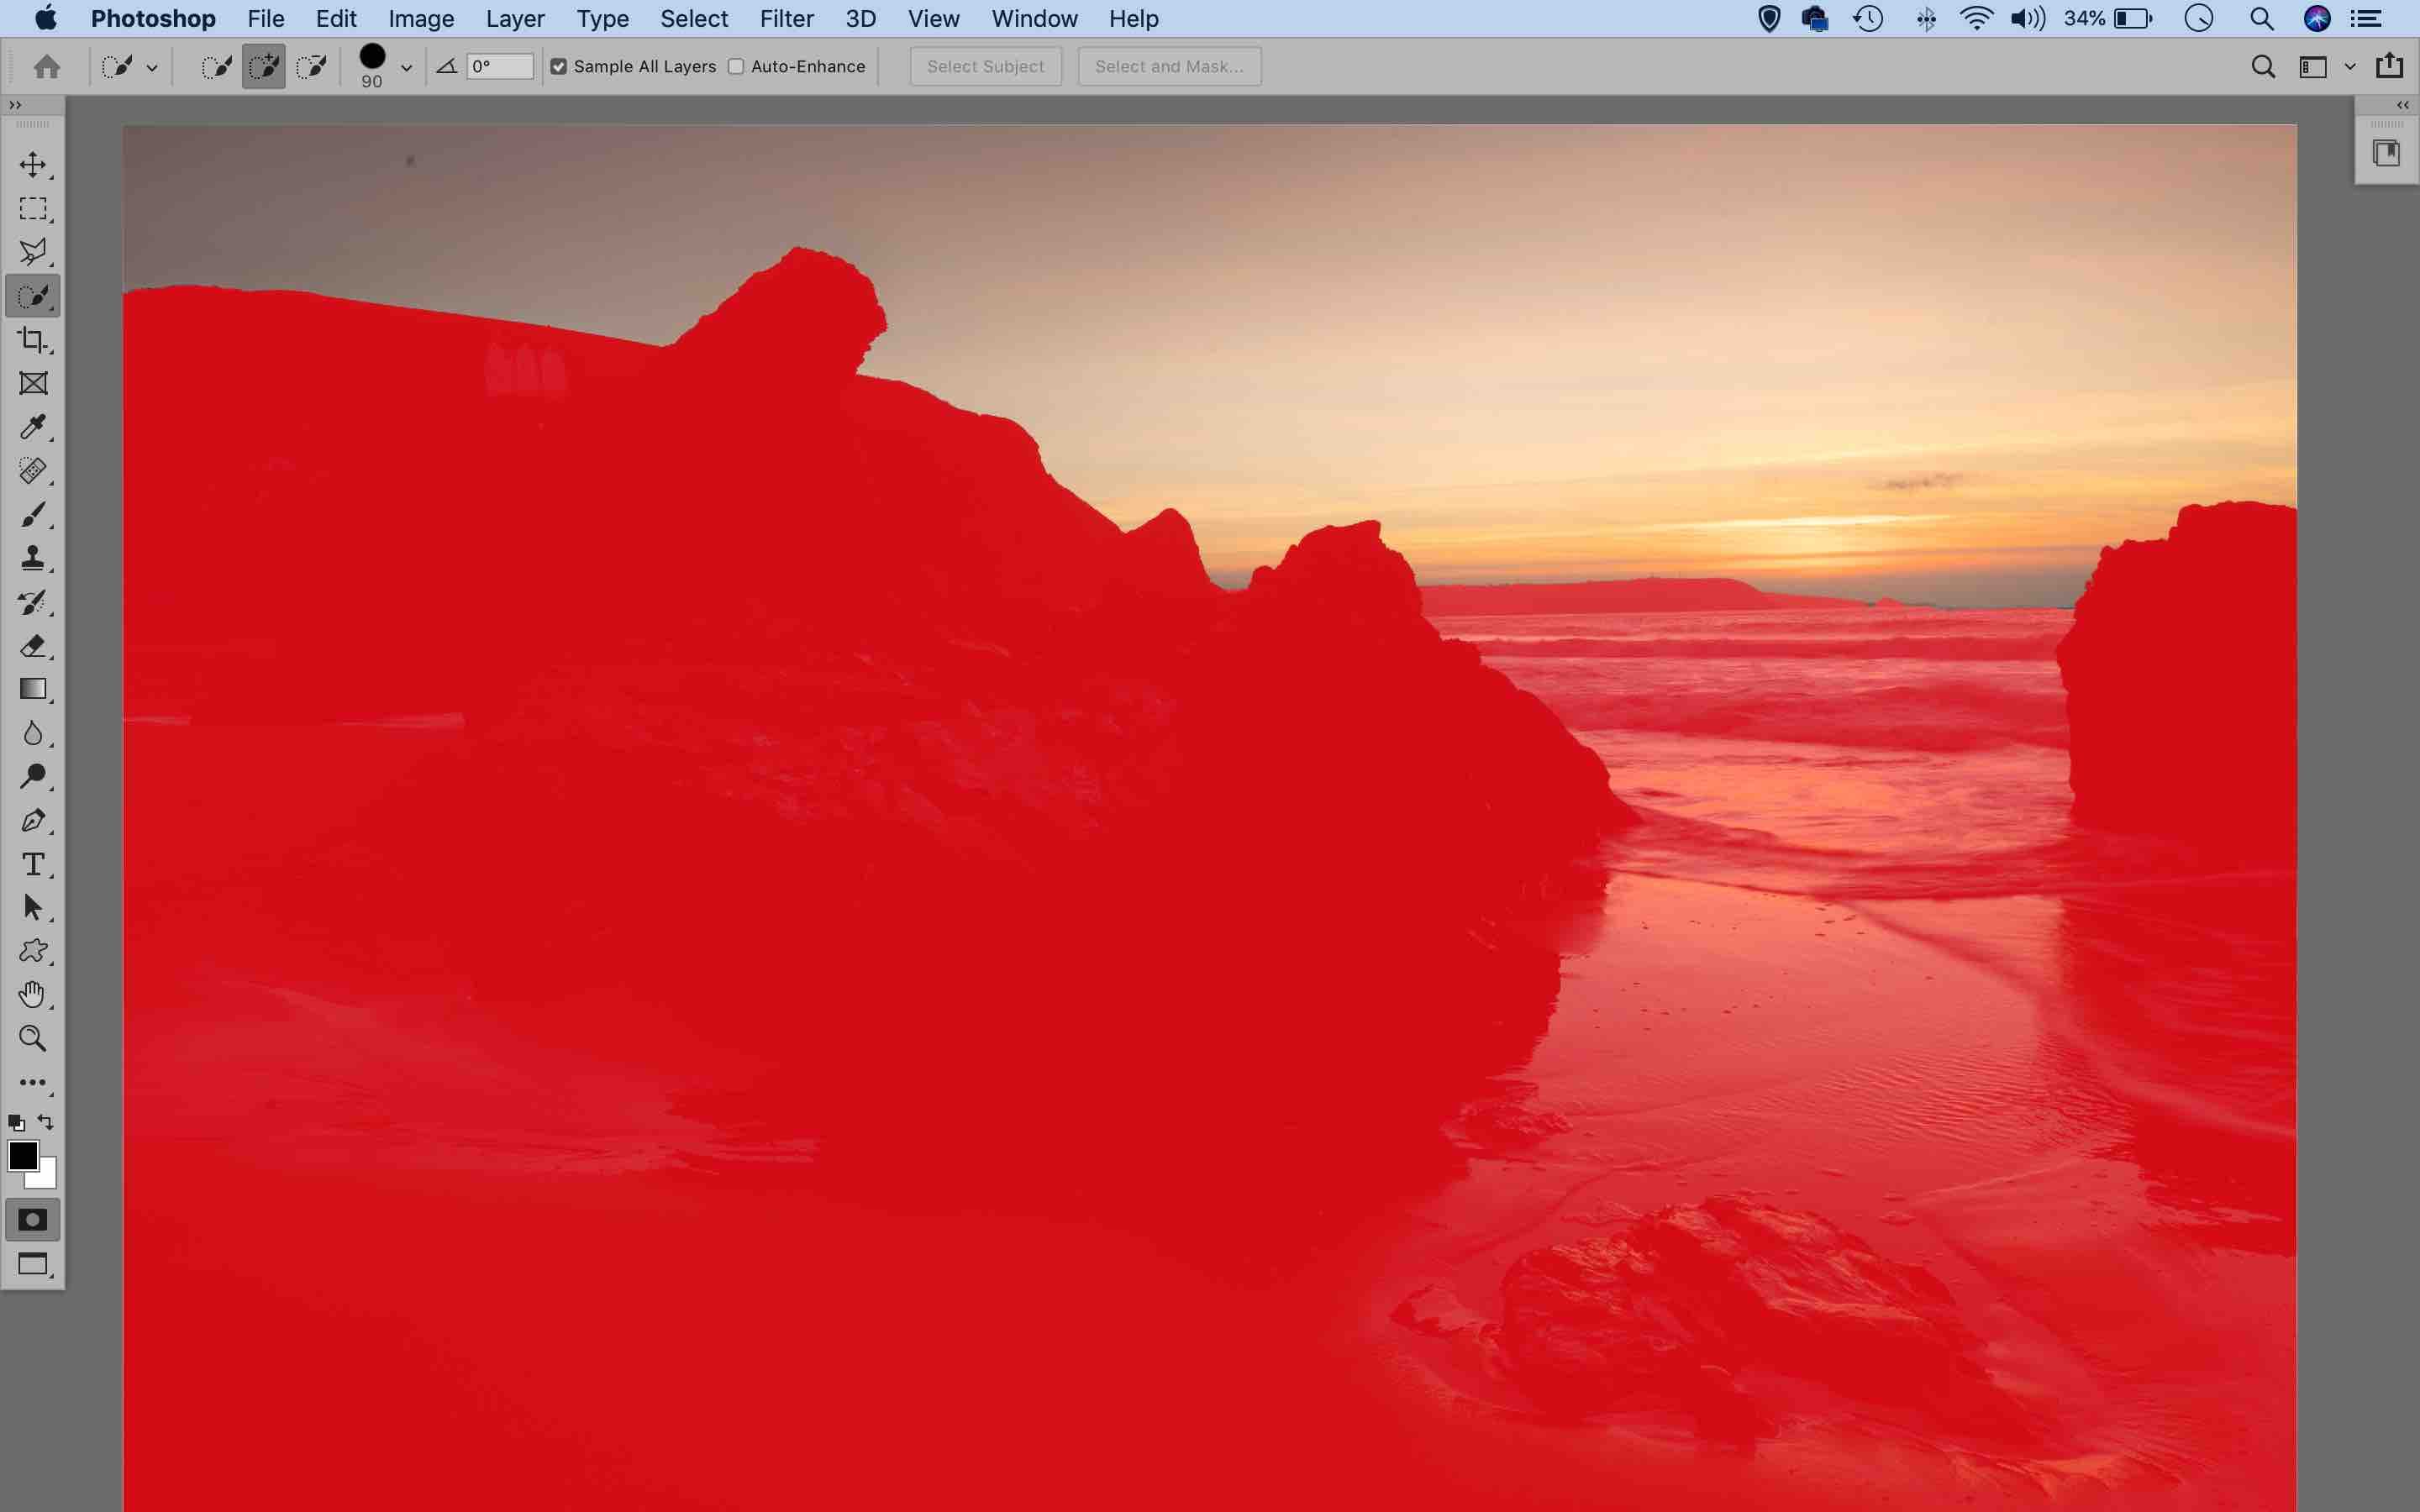
Select the sky
The next step is to isolate the sky. We need to drag the brighter image to the top of the layer stack (so that it sits above the darker image), then make a selection. There are many ways to do this, from the Magic Wand to the Color Range command, Pen tool and even the Object Selection tool. Quick Selection is my go-to tool for most selections of complex shapes. Simply paint over the sky with it and it seeks out edges as we paint. If it snaps onto the wrong thing, hold Alt and paint to subtract from the initial selection. If, like here, the horizon is clearly defined, this should take no more than a few seconds to do. When making a complex selection press Q to toggle the pink Quick Mask overlay on or off, which helps to show the area that’s covered.
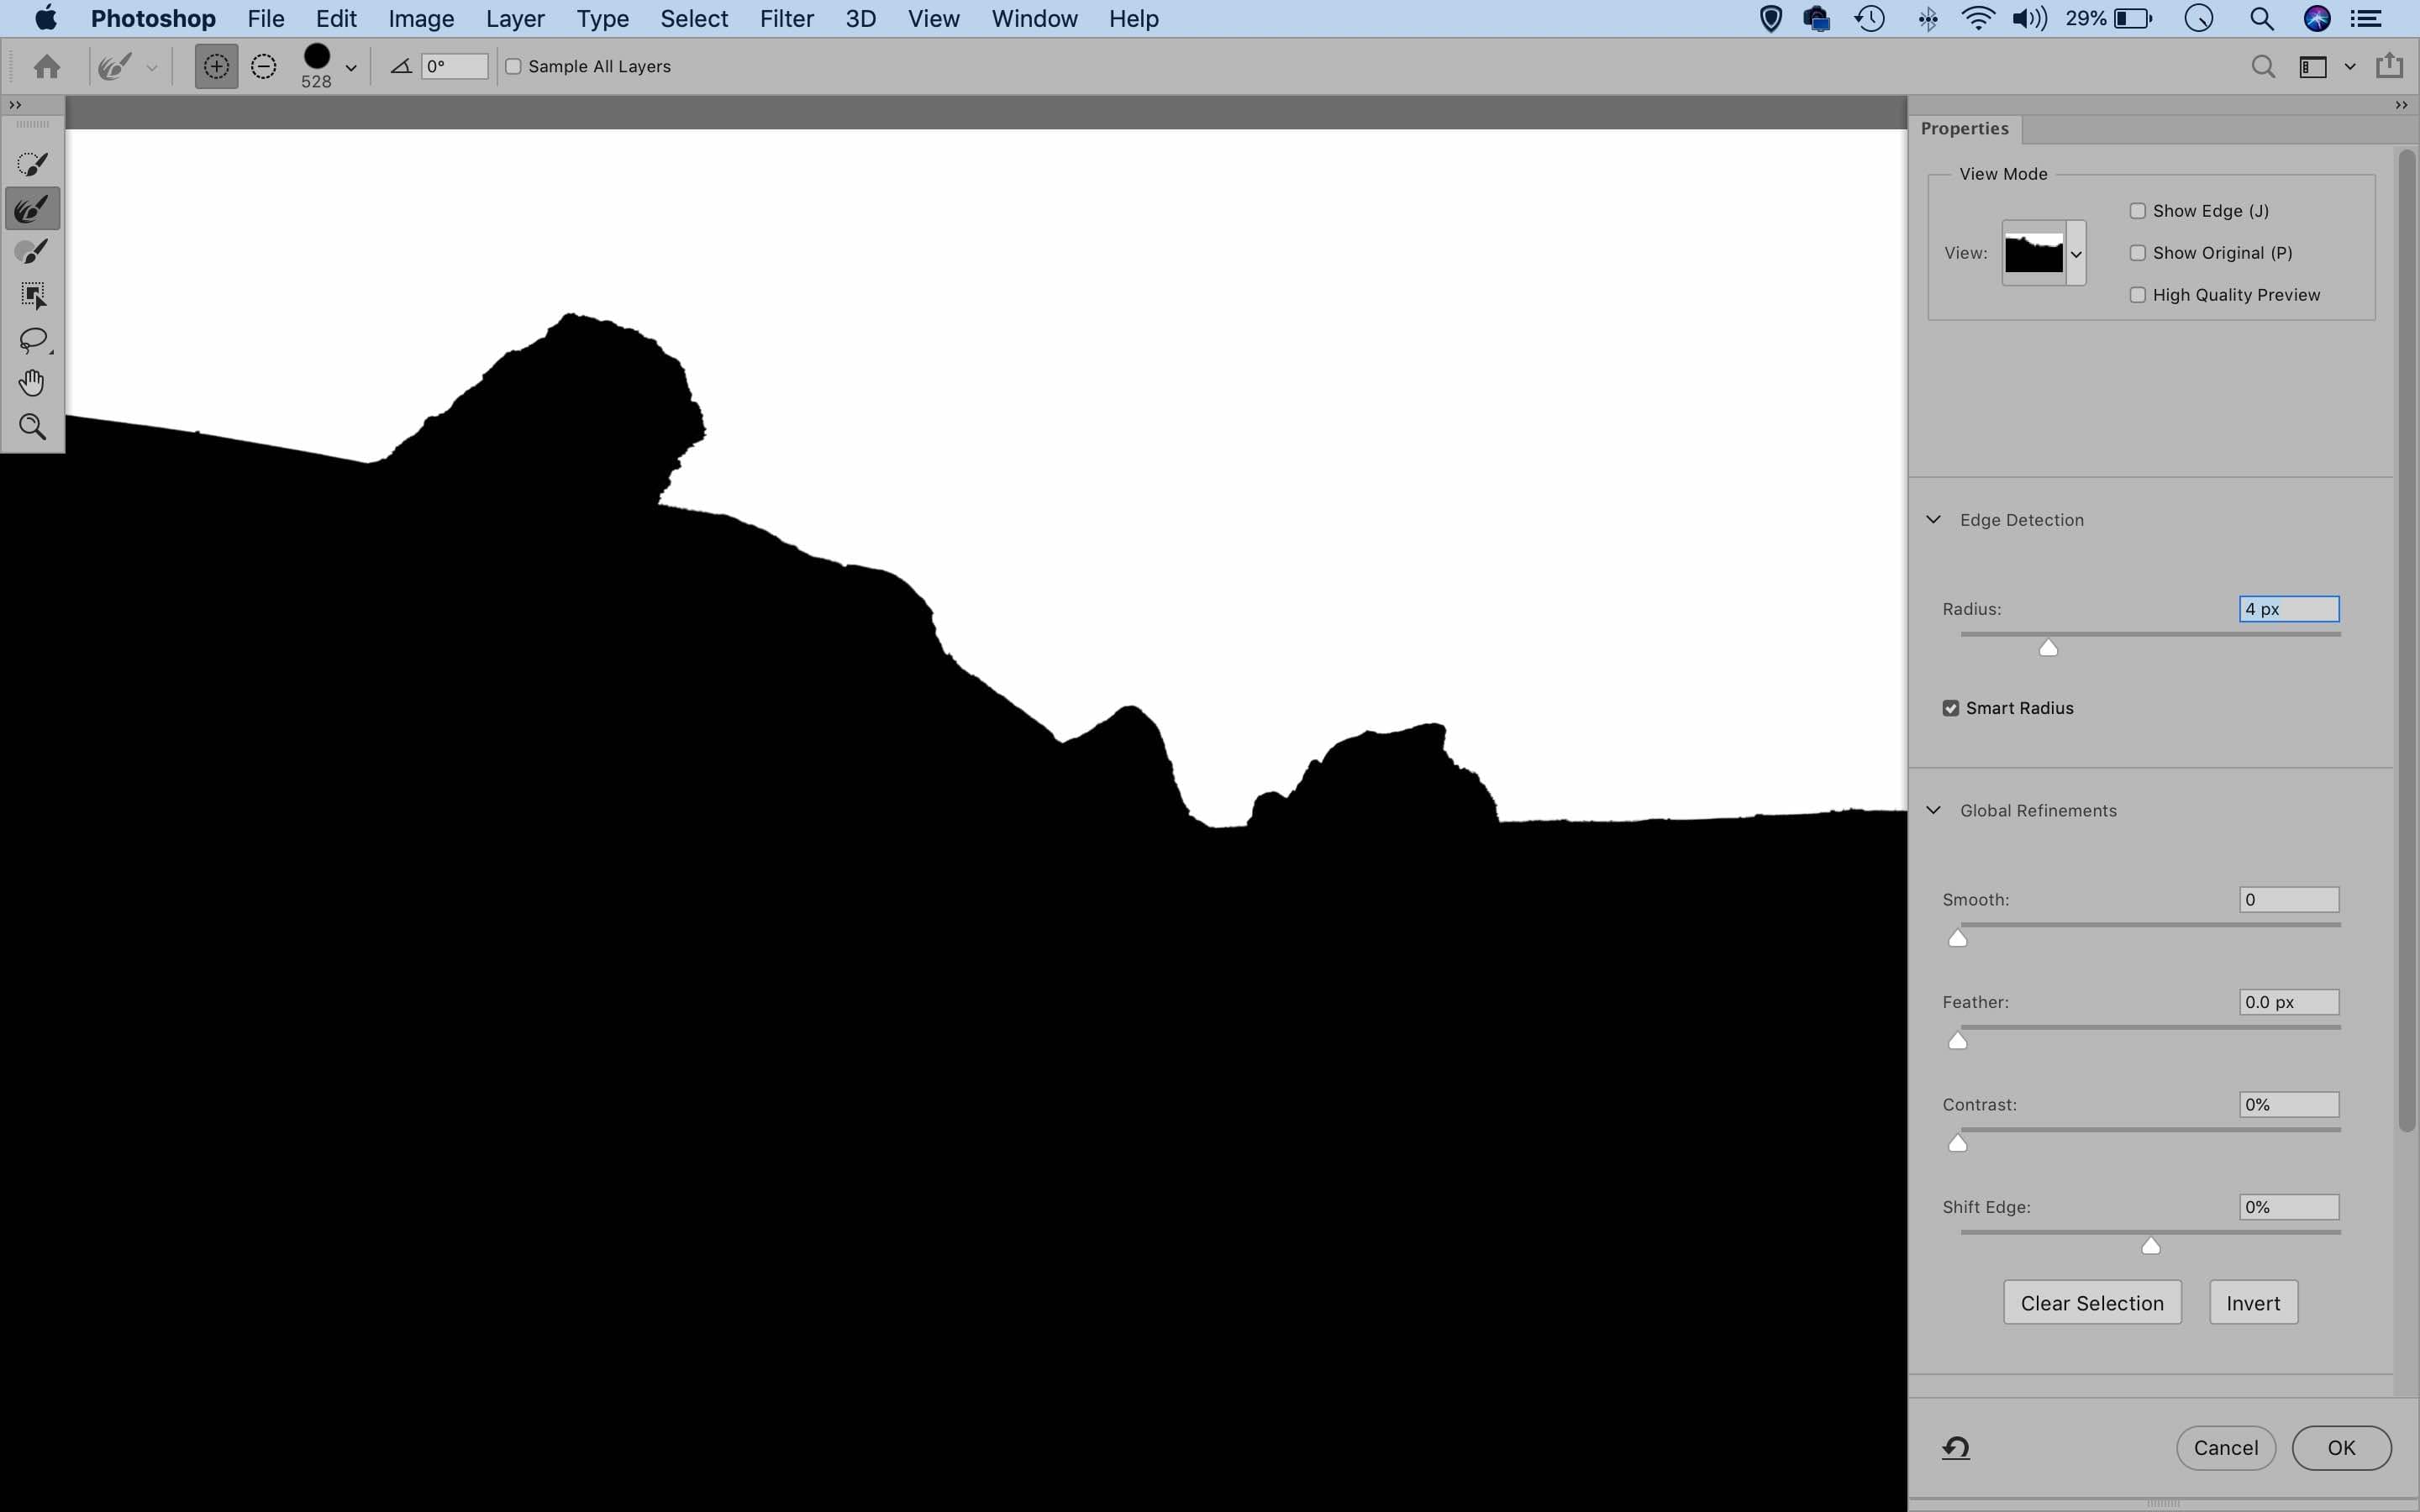
Improve the selection edge
Selections can be jagged and hard-edged, so it’s best to run it through the Select and Mask command in order to improve the edge and pick up all the fine details and tiny gaps along it. Click the Select and Mask button at the top of the screen to enter the command. The Radius slider is the key feature within. By increasing the Radius, we expand the ‘search area’ along the edge, forcing the command to look further afield for similar pixels to include or exclude. As such, it’s supremely useful when the horizon has fiddly details like trees running along it. We can also use the Refine Radius brush tool (found in the toolbar on the left) to paint a radius along the edge, which is helpful if we need to expand it in certain parts of the selection.
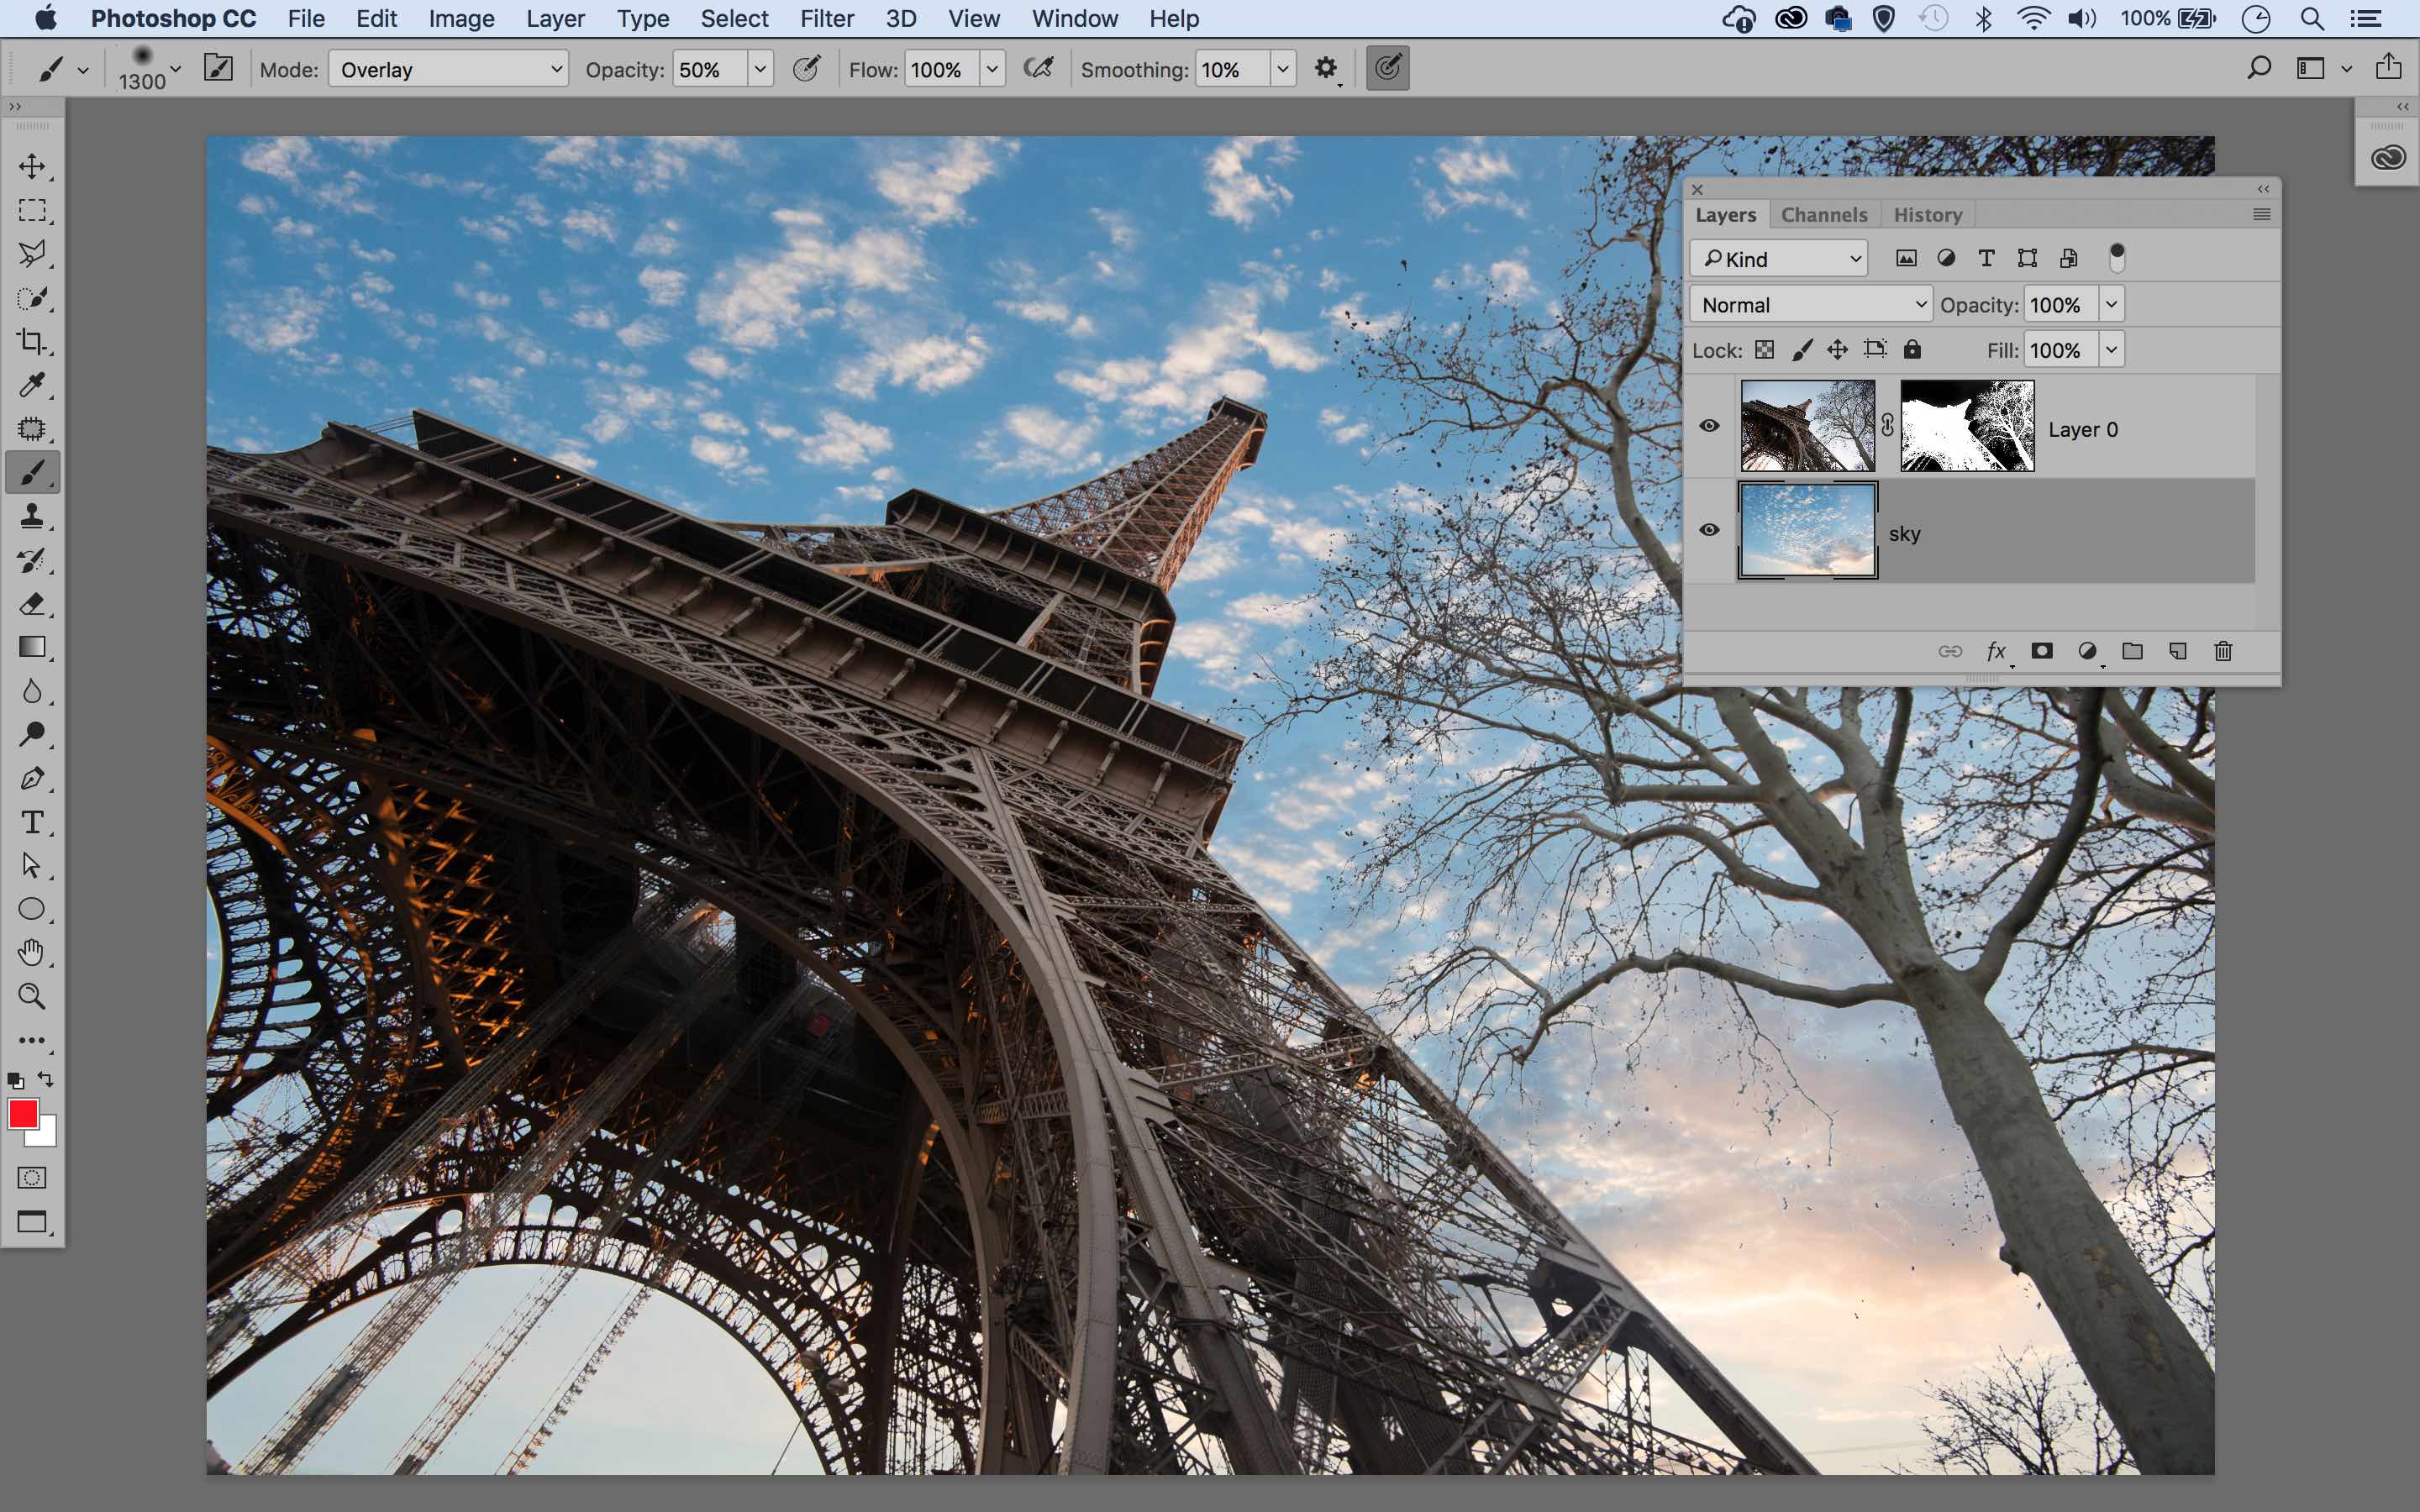
From selection to mask
Now our selection is complete we need to convert it into a Layer Mask. We can do this from within the Select and mask command using the Output dropdown, or if in the main interface we simply click the Add Layer Mask icon in the Layers Panel to convert an active selection to a mask. Everything outside of the selection will be hidden behind a black layer mask (if you find it hides the opposite of what you want, hit Cmd/Ctrl+I to invert the mask). Now the blown-out sky is hidden behind a mask, revealing the better sky on the layer below. However, the transition between the two will usually be too abrupt, so the next step is to make it a more gradual one.

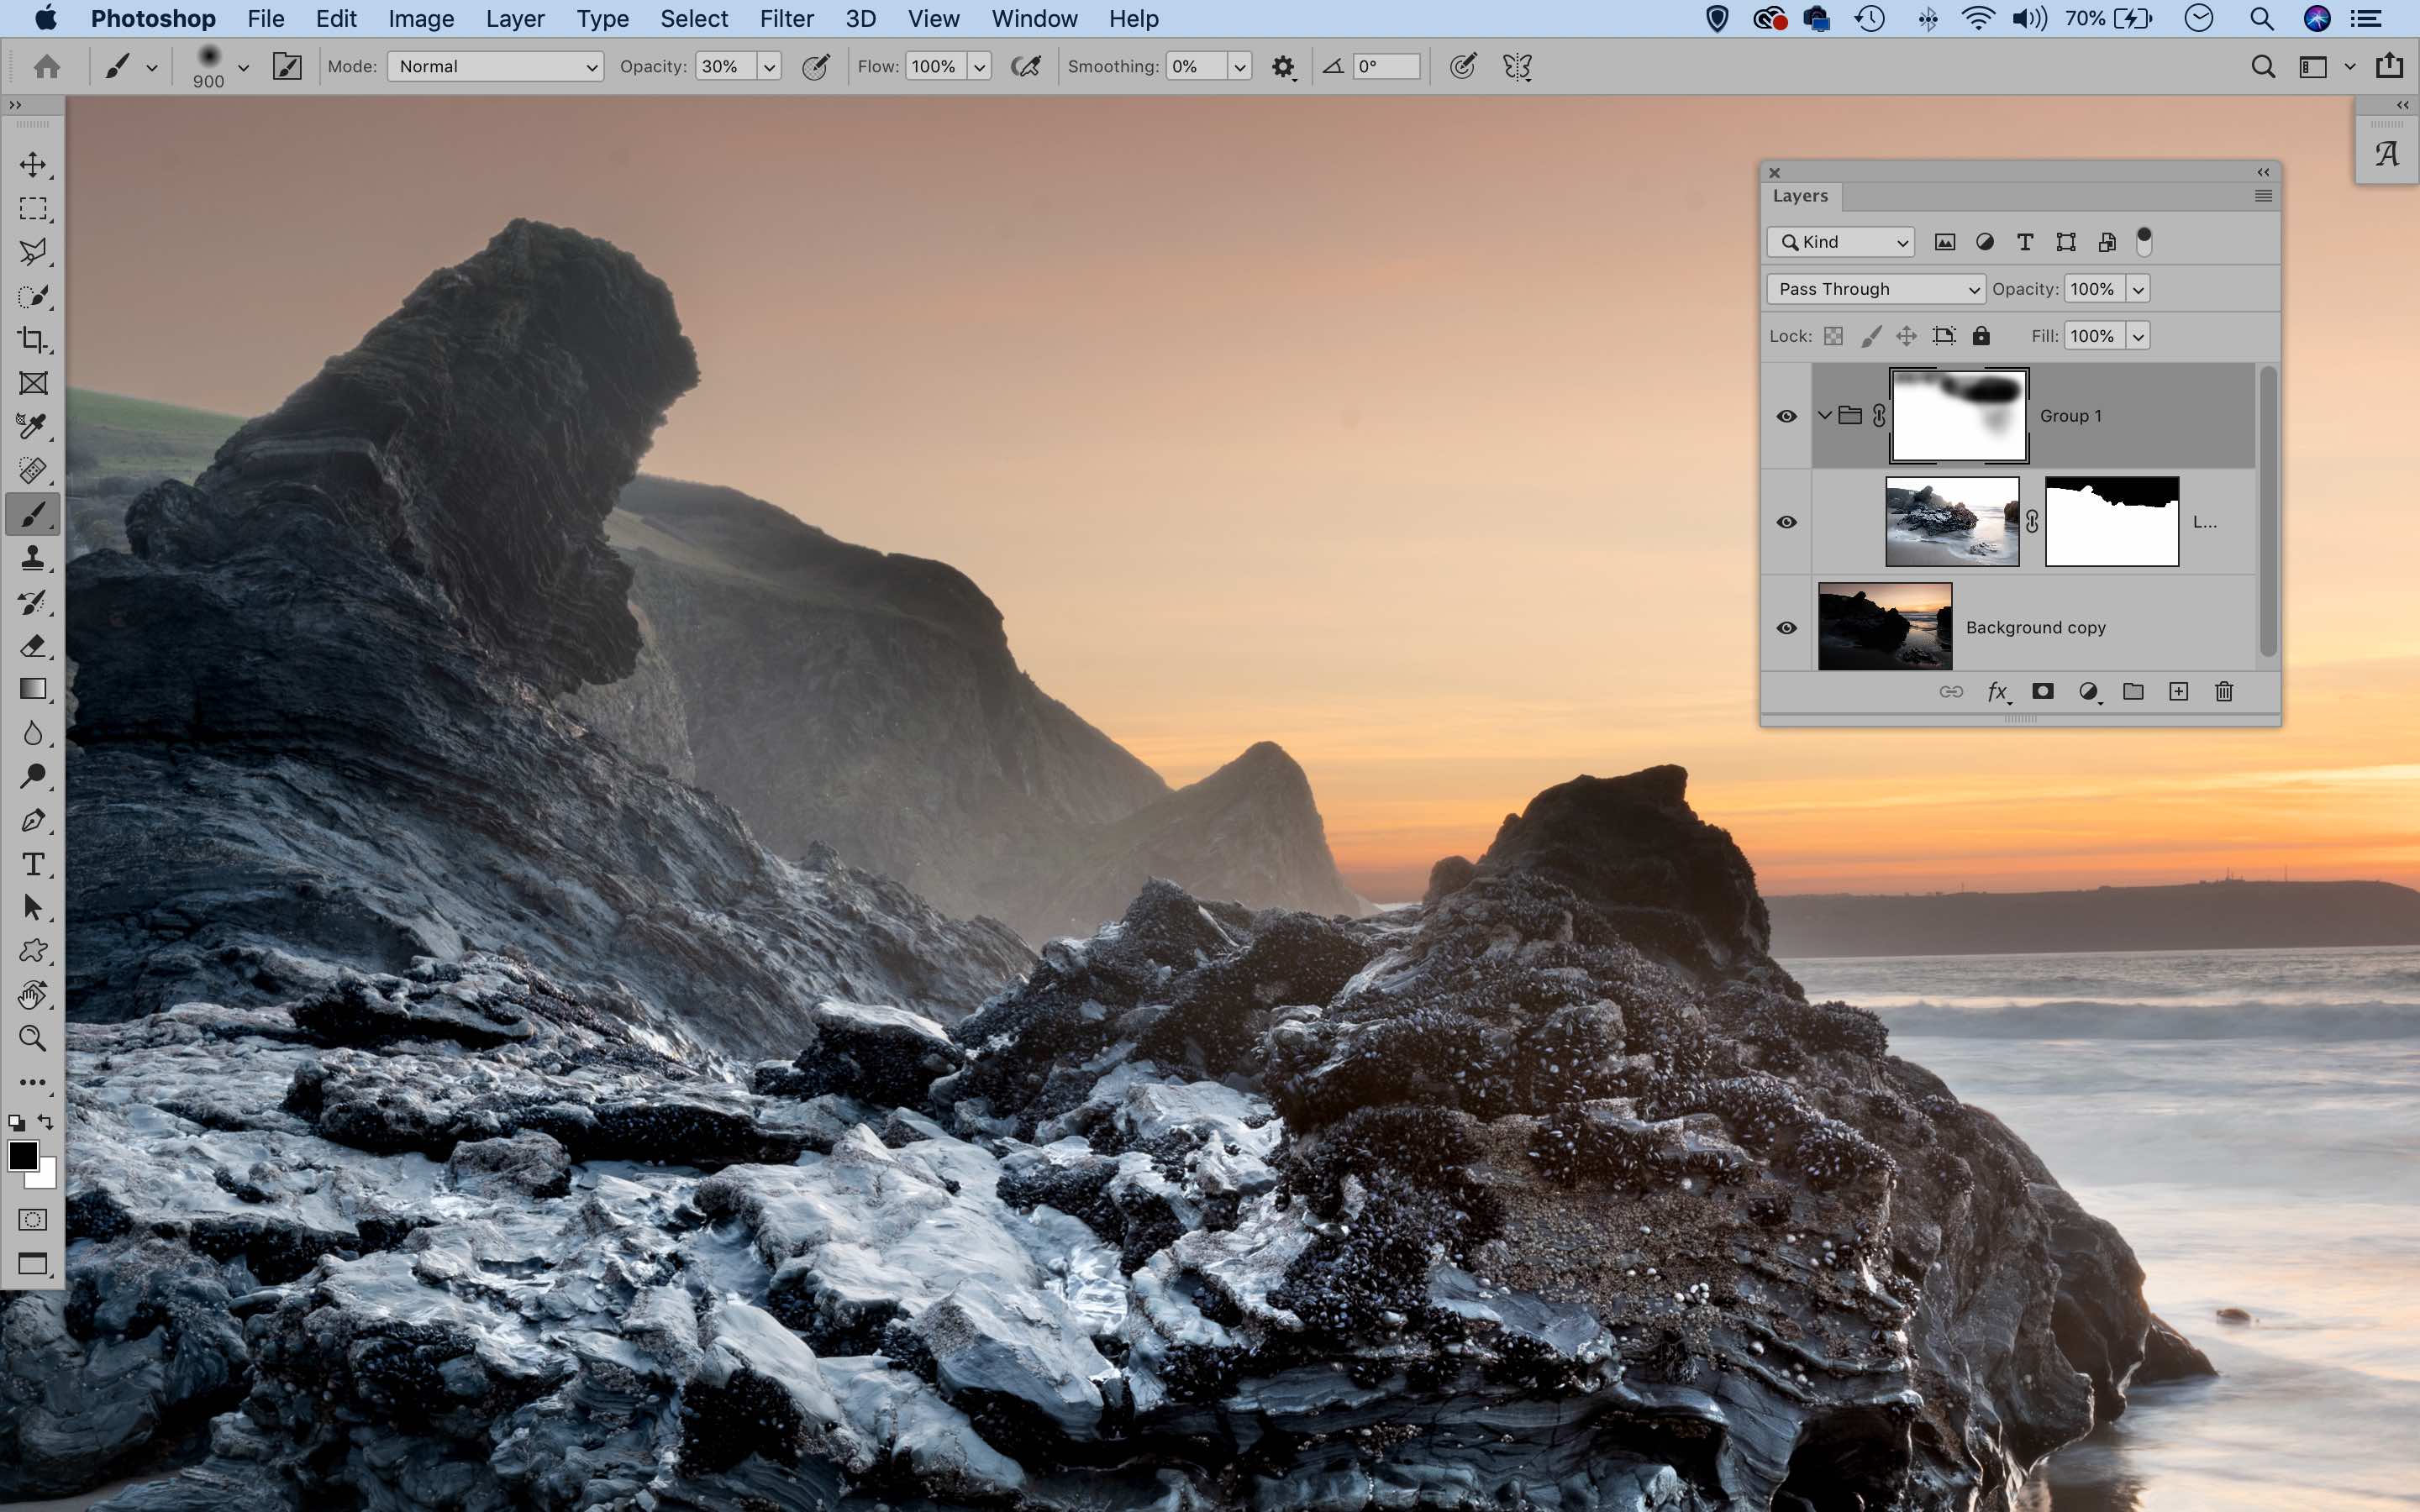
Soften the transition
The great thing about layer masks is that they let us hide parts of a layer to reveal the detail on the layers below. When we add a mask to a layer, a little mask thumbnail appears alongside the image thumbnail. As long as this thumbnail is highlighted, we can paint black over the image with the brush tool to hide the layer and white to reveal it again. What’s more, we can use a low opacity with the Brush tool to make semi-transparent areas, which helps here to create a gradual transition along the horizon line here. To take it further, we can preserve our original layer mask by making a layer group (Cmd/Ctrl+G). Now we can add a mask to the group and paint with black to gradually hide the layer along the edge.
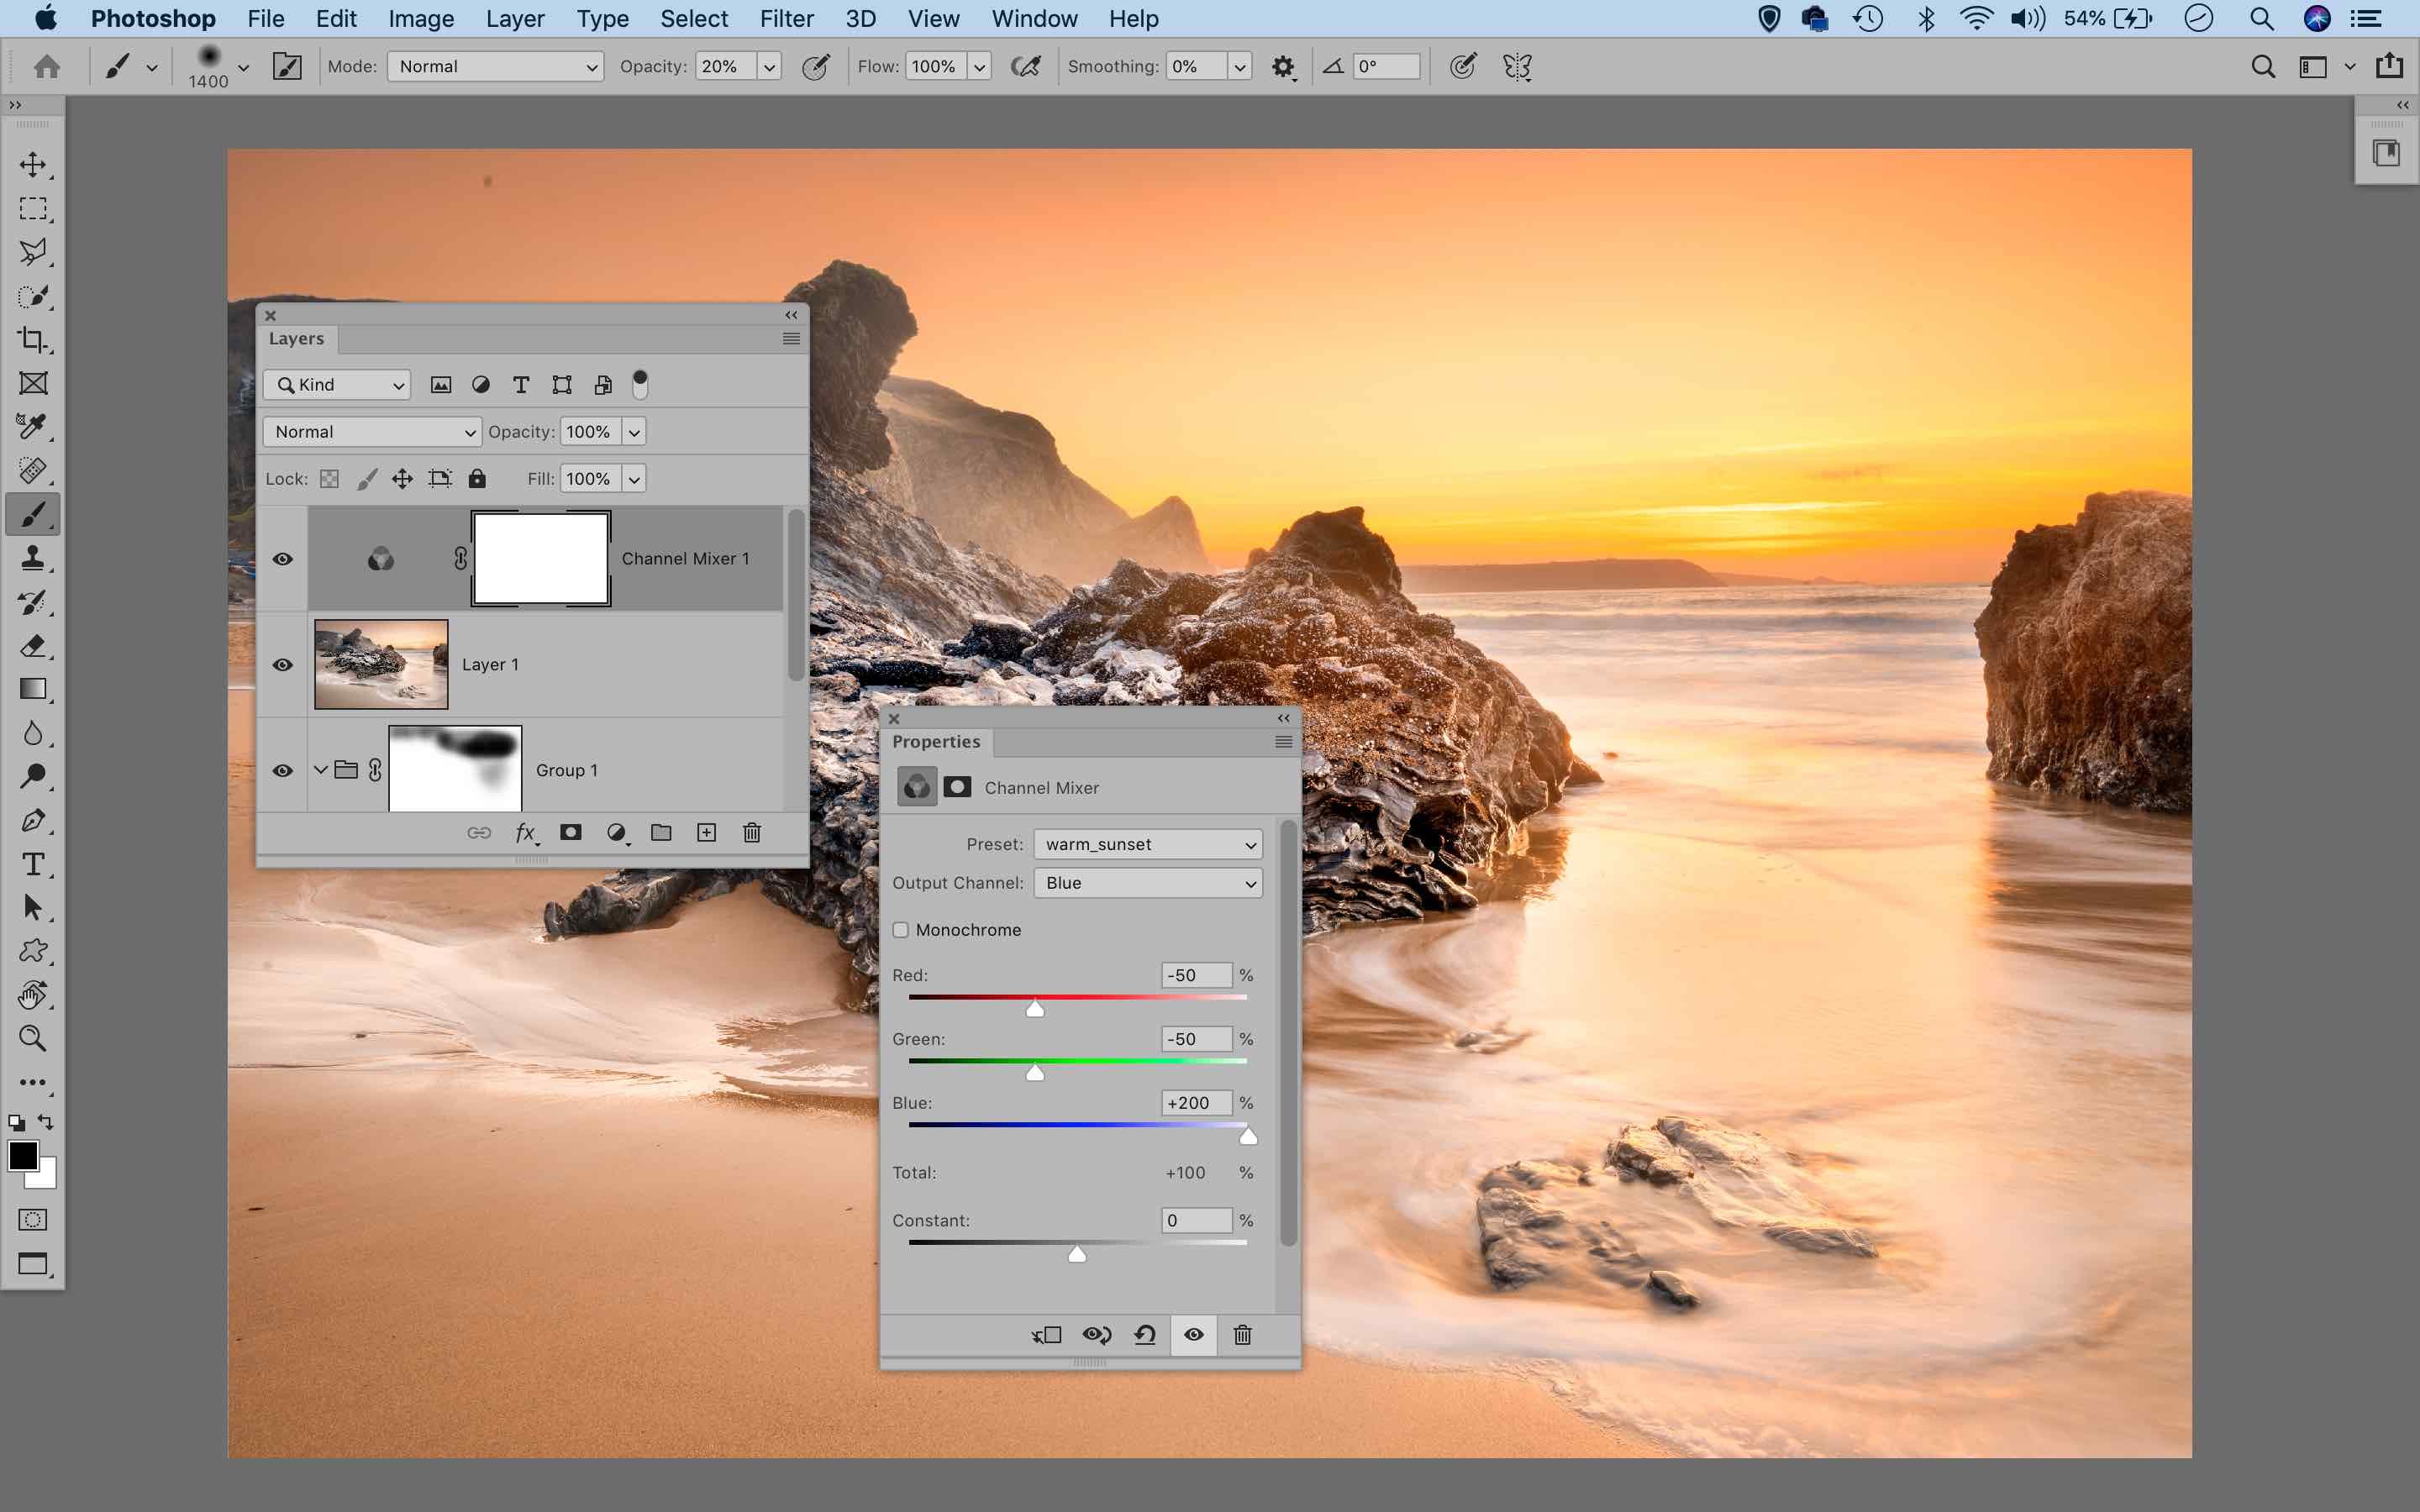
Tone the scene
For the finishing touches add a tonal effect on top of everything. This can help the two images to gel together more convincingly and look as if they belong together. Merge the two layers into a new layer using the keyboard shortcut Cmd/Ctrl+Shift+Alt+E, then go to Filter> Camera Raw Filter to tone the image using the Camera Raw controls. Alternatively, for a sunset image like this we can use a quick trick with the Channel Mixer to enhance the mood. Click the Create Adjustment Layer icon in the Layers panel and choose Channel Mixer. Choose Channel: Red then set Reds +200, Blues -50, Greens -50. Then choose Channel: Blue and set Blues +200, Reds -50, Greens -50. This creates a warm feel. If it’s too strong, simply lower the layer opacity.
Try a new sky
The previous steps in this tutorial have been about blending two exposures of the same scene, but there’s no reason why you can’t use the same technique to add a completely different sky to your landscape if you like. Simply copy in a sky image, drag the layer to the bottom and then select and mask the original sky as shown here to reveal the new sky on the layer below. Of course, you can also experiment with the placement of the new sky by dragging it with the Move tool, or press Cmd/Ctrl+T to transform it if you need to resize, rotate or flip.
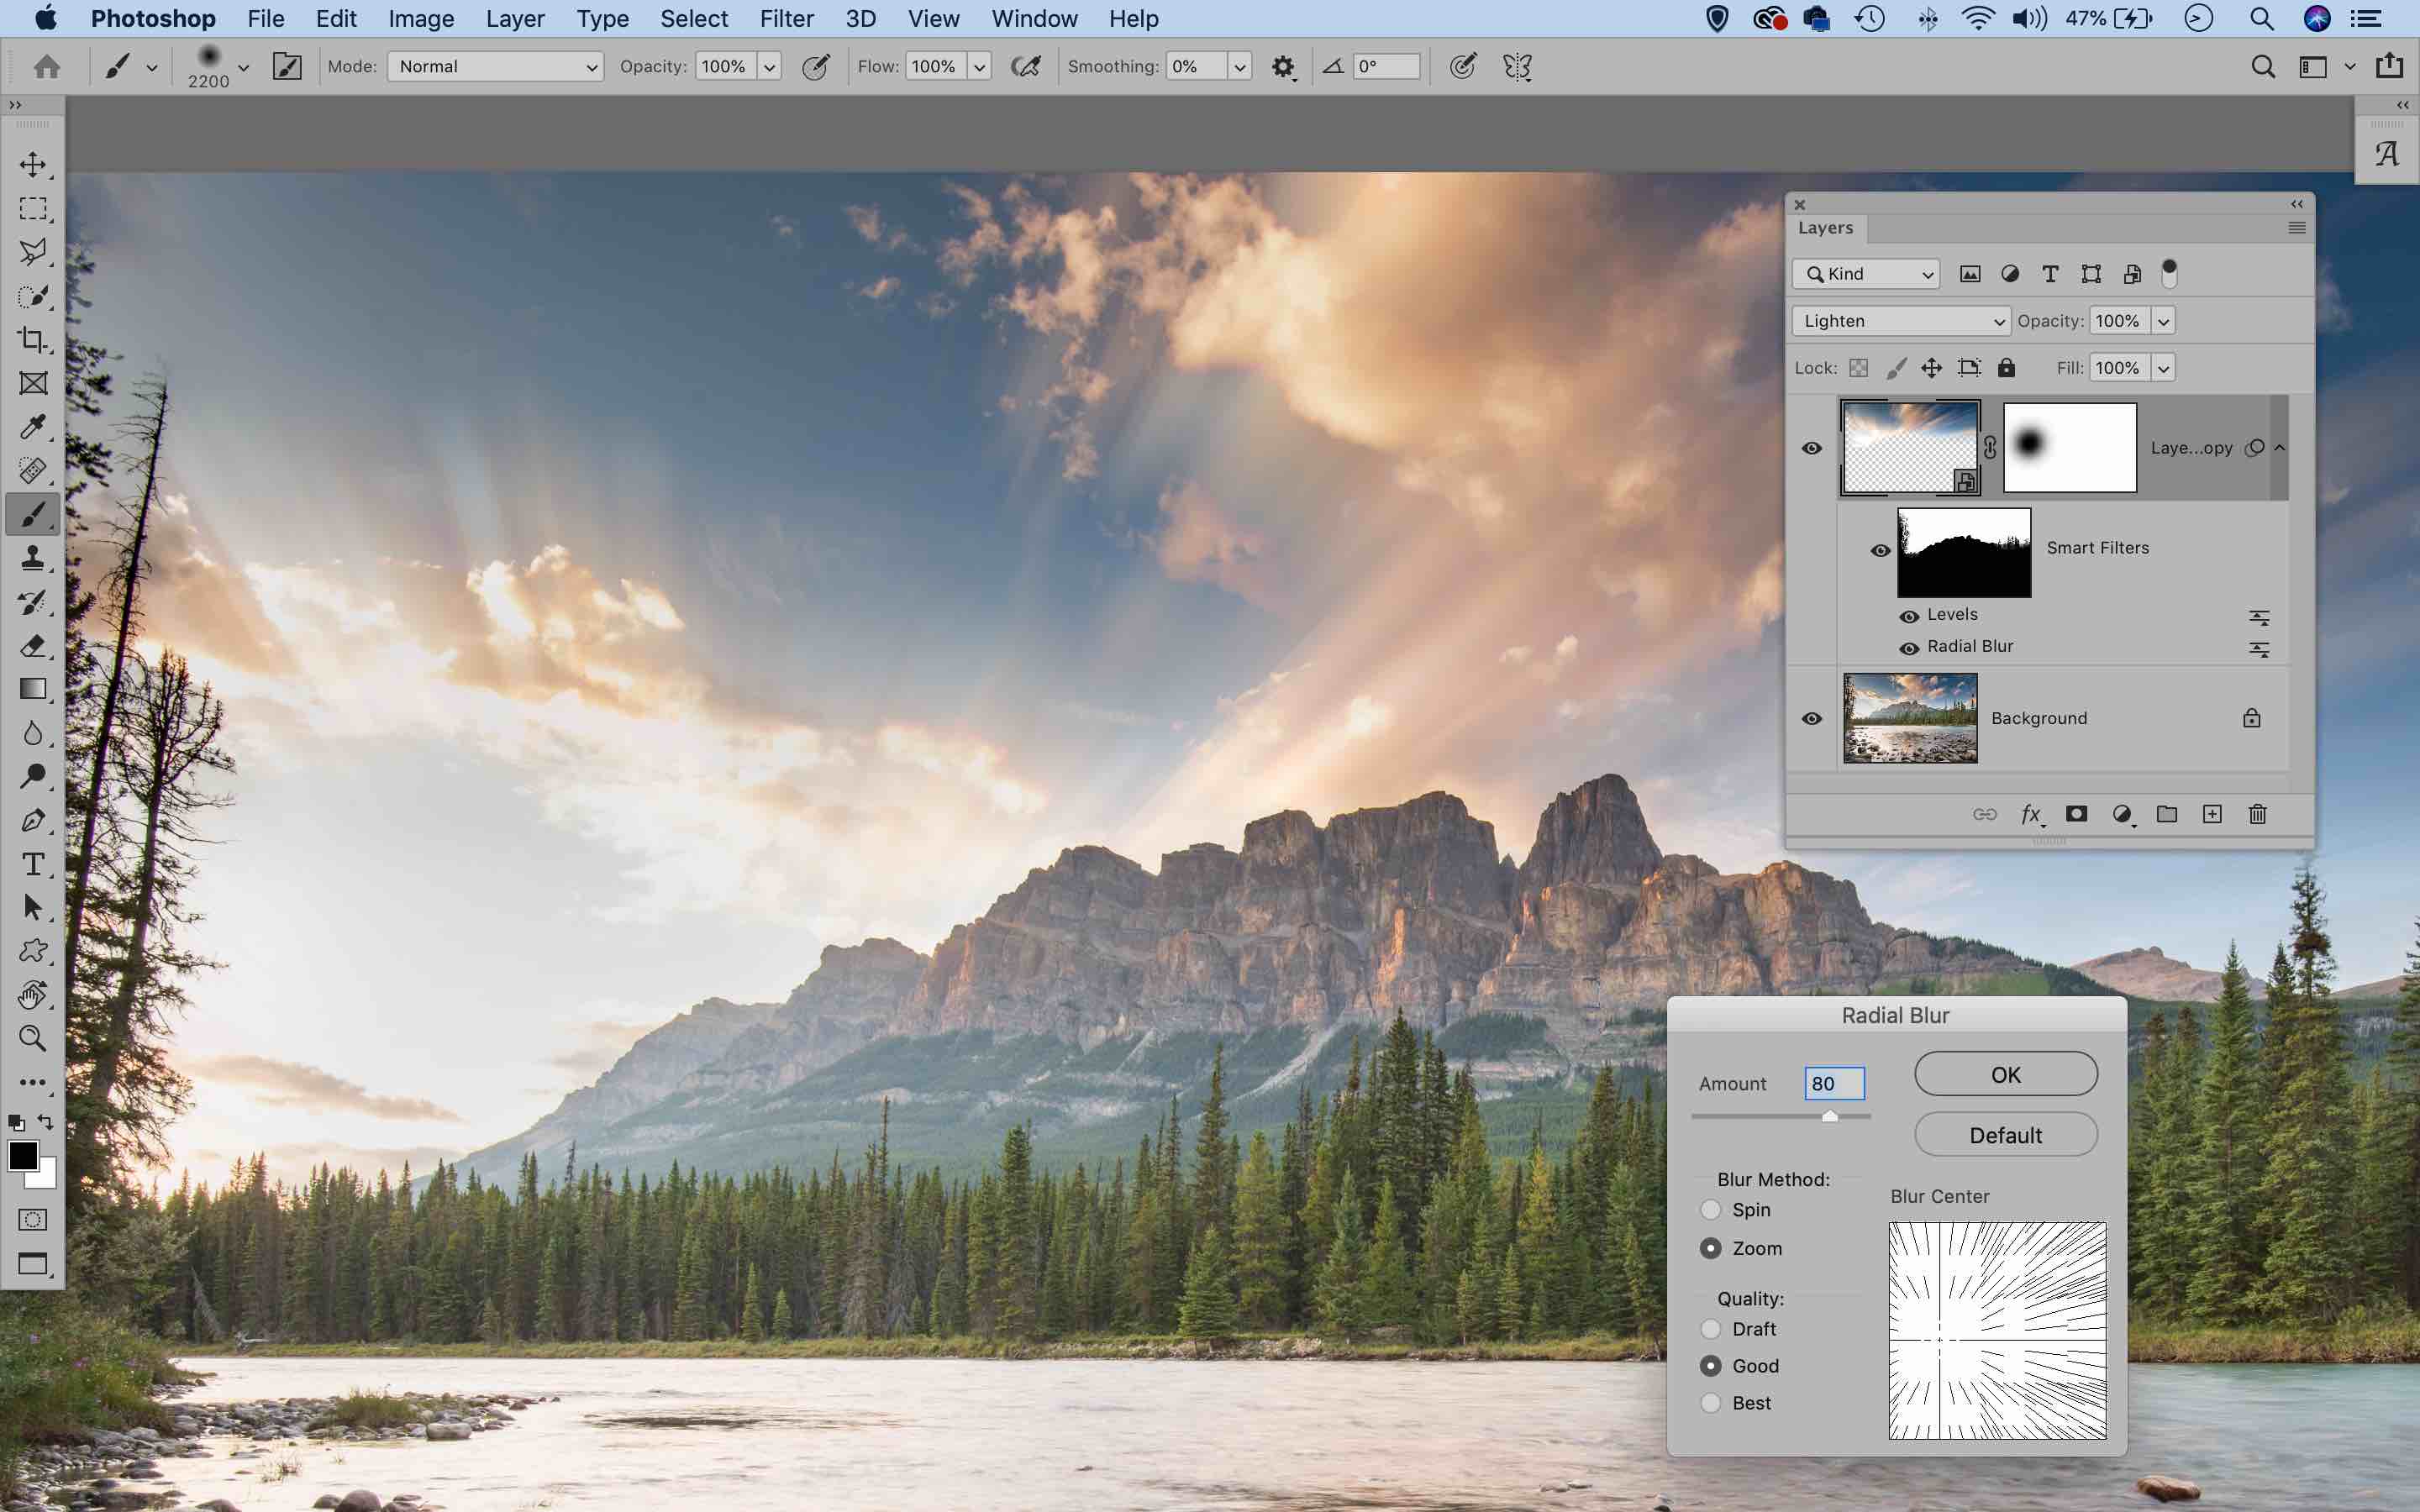
Mimic cloud motion
If you want to give a sky an impression of movement then why not blur the clouds. Of course, the best way to do this is with a strong neutral density filter and an exposure time that runs into minutes, but it’s possible to mimic the effect in Photoshop. Select the sky with the Quick Selection tool and copy it to a new layer with Cmd/Ctrl+J. Right-click the layer and ‘Convert to Smart Object’ then hold Cmd/Ctrl and click on the layer thumbnail to load it as a selection. Next go to Filter > Blur > Radial Blur, set the blur to Zoom and adjust the strength and centre point and hit OK. To tweak the blur settings, double-click the smart filter on the layer to re-enter the Radial Blur command.

Create god rays
The Radial Blur filter can also be used to create atmospheric rays of sunlight, sometimes called ‘god rays’. Follow the same technique (left) to copy and blur the sky, then change the Layer Blend Mode to Lighten. Next press Cmd/Ctrl+L for Levels and drag in the black and white levels to make the effect more pronounced. It’s usually best to keep it subtle, so add a layer mask and paint with black to hide the rays in places where they are too strong. The effect works for part-cloudy skies like this, but if it doesn’t give you strong rays you could try painting a few white blobs with the brush tool (experiment with different brush tips) then blur these instead.