
photo by Alan Wilson
Macro Still Life Masterclass with Paul Hobson
Wildlife photographer Paul Hobson and three AP readers explore the possibilities of studio-based macro still life and show how the simplest of lighting set-ups can produce creative results. Oliver Atwell joins them
The art of still life is a genre that has been with us for centuries. In fact, its first appearance can be traced back to the days of ancient Egypt where it was believed that the items depicted, such as food, would become real and available to the deceased in the afterlife. Many centuries later, through the Renaissance, Caravaggio, van Gogh and Abstract Expressionism, the genre has found its home in perhaps its most iconic form – a Paul Hobson Masterclass!
‘From my perspective I think of still-life imagery as photographing static objects,’ says Paul, ‘That applies to all kinds of objects that you can find in the natural world and take indoors. For example, you may take some autumn leaves from a forest or cut some flowers from your garden and still life allows you to explore them in a completely new way because you’re able to get as close as you want. If the subject were a living creature, then you wouldn’t be able to do that.’
 Photo by Alan Wilson
Wildlife photographer Paul Hobson and three AP readers have set themselves up in the AP studio in order to explore the creative possibilities of studio-based macro photography using the simplest of lighting set-ups. But where much still life is concerned with the whole object, this Masterclass will find the attendees getting in a little closer.
‘We’re going to be using macro lenses to look at various objects, such as flowers and feathers,’ says Paul. ‘Each one of them is composed of many fascinating shapes, textures and details. When you’re in a studio environment you’re able to fully explore those elements and bring them out using composition and light.’
Paul points out that many of the techniques that the attendees will be looking at are ones that can easily be taken away and used in their everyday photography.
‘Still life is an excellent way of ensuring that your day isn’t wasted when the weather has taken a turn for the worse,’ says Paul. ‘All kinds of objects can be brought indoors and photographed in a studio setting. That kind of environment can easily be replicated in your own home. Within ten minutes you can set up your own little studio in your kitchen or living room.’
Paul suggests that anyone wanting to attempt still life needn’t worry about not owning professional lighting equipment – in fact, just using the kinds of lights found around the average home can produce some excellent results.
‘Most people could easily find an everyday desk lamp that they can move around to control the light,’ says Paul. ‘With regards to the backdrop, something as simple as cheap black cloth, velvet or white paper is more than adequate. If you arrange these things on a table, then you’ve got yourself a little photographic studio. It’s that simple.’
Your AP Master…
 Paul Hobson
Paul studied environmental science at Sheffield University and has worked as an environmental sciences lecturer for 25 years. With more than 20 years’ photography experience behind him, Paul was specially commended in the 2008 Wildlife Photographer of the Year competition and two of his images were exhibition finalists in the British Wildlife Photography Awards 2009. Paul regularly lectures on wildlife photography and also runs workshops. www.paulhobson.co.uk
The AP readers…
 Sue Howard
Sue primarily enjoys shooting wildlife. She uses a Nikon D300S with a Sigma 105mm f/2.8 EX DG macro lens. ‘I’ve learned a lot,’ says Sue. ‘It’s always inspiring meeting like-minded people and learning from them.’
 Colin Haygarth
Colin likes to shoot butterflies and wild orchids. He uses a Nikon D300 with a 200mm f/4 macro lens. ‘It’s been great,’ he says. ‘I’ve picked up a great number of tips from Paul. He’s very generous with his knowledge.’
 Alan Wilson
Alan’s interests lie in wildlife photography, particularly in South Africa where he enjoys photographing lions. He uses an Olympus E-5 and 50mm macro lens. ‘It’s been a fantastic day. The whole experience has been friendly and open. I’ve learned a huge amount.’
Objects
There is no end to the kinds of objects that can be explored through still life. The natural world is composed of thousands of patterns and textures to be explored, and the ability to study these in a studio environment offers the possibility of producing some captivating images.
‘You can easily find all kinds of interesting subjects in the countryside or even in your own back garden,’ says Paul. ‘One of the most obvious and easily obtained subjects is leaves. If you photograph sycamore leaves, for example, you have a lot to work with, such as the vivid greens and the vein patterns. A particularly interesting leaf is from the fern
tree. The leaves are lined with sporangium, which are the spore-bearing bodies. They can make for some really interesting shapes and patterns.’
One subject that is particularly interesting, but one that can prove difficult to photograph, is dandelions.
‘If you are able to photograph a dandelion clock in a studio environment then you’re likely to produce some great shots,’ says Paul. ‘But due to their fragile nature they can be difficult to transport. A good tip is to spray them with hairspray, which will firm them up and prevent the seed spores separating from the head. Once you’ve picked them, put them
in some water so they don’t wilt.’
A less obvious object to photograph can be found in supermarkets up and down the country – fish.
 Photo by Alan Wilson
‘You can buy fish anytime,’ says Paul. ‘An interesting and cheap option is mackerel, which is very common around the British Isles. You can photograph the skin to reveal the silvery white colours and fascinating patterns of the body. You’ll need to freeze it and then wait for it to thaw out before you photograph it so that requires you to plan ahead. You’ll also need to skin it so that you can get it as flat as possible. Fish obviously have rounded bodies and that’s likely to cause problems when using a macro lens due to the limited depth of field.’
One subject that Paul suggests is worthy of attention, yet one that some people may find a little gruesome, is bird wings.
‘I have a small collection of bird wings that I like to photograph,’ says Paul. ‘All of them are from roadkill that I’ve come across over the years. They include jay, barn owl, tawny owl, pheasant and mallard. Shooting these in a studio allows us to get some close up details of the feathers, which would be near impossible to achieve in the wild. You could never get that close.’
But, as Paul says, there are thousands of natural objects that can be photographed. Therefore, the possibilities are limitless.
Working with Macro
Macro photography in the studio opens up the possibilities of still life and allows the photographer to close in on details that would otherwise be difficult to capture in the wild.
‘Macro photography takes your work to another level,’ says Paul. ‘It takes you closer to the subject and reveals all the beautiful little details that you wouldn’t otherwise notice using a standard lens.’
It can sometimes be tricky shooting objects that aren’t entirely flat when working with macro photography. The depth of field is incredibly narrow, so surfaces that are even slightly undulated can be thrown out of focus.
‘If you’re looking to produce images of surfaces such as leaves or feathers, you have to ensure that the surface is completely flat,’ says Paul. ‘That’s why it’s important to point your camera straight down onto the surface using a tripod. If your camera is at an angle, even slightly, then the distance from each part of the image to the focus plane is going to be different. Either put the object on a small table or on the floor. If you don’t, you’ll end up with a band of sharpness moving away into a blur.’
Taking the example of feathers, Paul suggests some settings to experiment with. ‘If you look at a bird’s wing or an arrangement of feathers, you can see that they’re not completely flat,’ he says. ‘It’s not extreme, but in macro it makes all the difference. I’d recommend using an aperture of f/5.6 to f/8. That should give you the coverage you need.’
When dealing with more three-dimensional subjects, such as flowers or dandelions, Paul recommends pushing the f-stop up even further.
‘You have to be careful because a dandelion has a round head,’ he explains. ‘That means you’re going to need a larger depth of field, and an aperture such as f/22. That’s going to give you much more coverage and get more of the head in focus to reveal its complex structure.’
Lighting
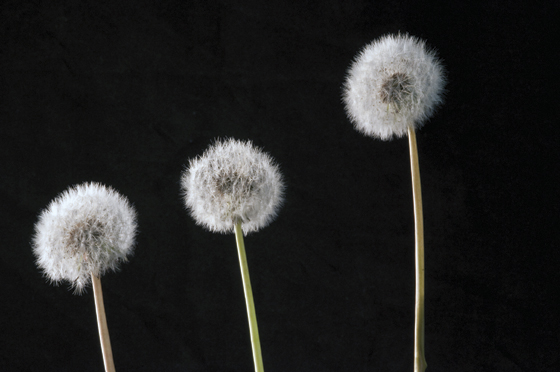 Photo by Sue Howard
Interesting studio-based shots can be achieved using the most basic of set-ups. The kinds of lights that can be found around the home are more than up to the job.
‘Things like professional lights and softboxes look intimidating and expensive, but it’s incredibly easy to put together
your own,’ says Paul. ‘Using an Anglepoise desk lamp is going to give you the same kind of results, particularly when you’re working with macro lenses.’
 Photo by Sue Howard
Paul suggests using a piece of tissue paper to diffuse the light, but be careful. ‘Bulbs can get hot,’ he says, ‘so you need to be cautious about where you position the paper. It’s probably best held slightly away from the bulb using a clamp.’ Alternatively, you can construct a diffuser out of a box with tracing paper over the opening.
‘You need to diffuse the light because lamps used in the home can often give off an intense beam of light that is no good for what you want to do,’ says Paul. ‘The camera will struggle with that intensity and you are likely to end up with lots of burned-out highlights all over your image.

‘The idea of a diffuser is that it will spread the light out, giving you a much more even distribution of light over a wider area,’ he continues. ‘That’s particularly important when working with flat surfaces, as we are with the fish and wings. You can use two lights on either side of the subject or alternatively place a reflector on one side to bounce light back from the lamp opposite into your composition.’
Placing your light at 90° to your subject gives you some effective side lighting that will make your subject appear more three-dimensional.

‘Side lighting gives your subject more light on one side than the other,’ says Paul.
‘It’s a basic modelling light, which gives your subject
depth.’
Movement
When shooting macro images, even the slightest movement in the subject can ruin an otherwise perfectly good shot. But this isn’t a risk that is exclusive to outdoor photography.
‘When you’re out on location the macro photographer’s biggest enemy is the wind,’ says Paul. ‘When you’re indoors there’s still the risk of camera shake or subject movement. You should ensure that your set-up is placed on a firm, flat surface. Make sure that you’re not standing on a surface that is made of
old loose floorboards.’

If you’re working at home then there could still be the issue of camera shake due to using high f-numbers and, consequently, longer shutter speeds. A handy tool to reduce the risk is to use a cable release, which will minimise contact with the camera. But Paul also recommends using a function that is built into many cameras – mirror lock-up.
‘You should check your camera’s settings on how to do this,’ says Paul. ‘Mirror lock-up helps to reduce the risk of your camera shaking when you press the shutter and the mirror flips up. Just remember to press your shutter twice – once for the mirror to go up and once more for the shutter.’
Backlighting, Rim Lighting and Silhouettes
Effective backlighting can be achieved by placing a simple light source behind a semi-translucent piece of material such as Perspex.
 Photo by Sue Howard
‘If you place a leaf on a piece of Perspex and shine a light underneath it, then you will be able to see all of the fascinating segments and venation that make up the leaf,’ says Paul. ‘You’ll have images where it’s not immediately apparent what it is the viewer is looking at because the edges of the leaf have been excluded. You could be forgiven
for seeing the shot as an aerial photograph of some rivers cutting through a landscape.’
A particularly interesting approach to lighting comes in the form of rim lighting. This works especially well
when dealing with a strong subject like teasels.
‘Rim lighting is a great way to create moody images,’ explains Paul. ‘It causes the edges of the subject to glow while the rest remains dark. It’s a very classic way of lighting that will give you some beautiful contrasts of light.’
The light is achieved by moving the light so that it is almost behind the subject, but not so much that the light source appears in the camera’s frame. It also helps if the background is black. One light can be used to illuminate one side of the subject or two can be used to cause every edge of the subject to glow.
 Photo by Colin Haygarth
‘You should underexpose your shot using exposure compensation,’ says Paul. ‘However, you may find that you can’t get your exposure dark enough, even at -3EV compensation. If that happens, then you can look at how dark you were able to go using exposure compensation and then, working from there, manually underexpose your image until you get the desired result.’
 Photo by Colin Haygarth
Given the right subject, it is worth experimenting with silhouettes, which can be achieved by placing your subject in front of the light source.
‘Dandelions are a good subject for this because they are part translucent, part opaque,’ says Paul. ‘The light shines through the seed spores and reveals the intricacies of the weed’s structure. Due to the high contrast of this kind of image it’s worth seeing what the shots will look like in black & white. Shoot it in colour first and then convert it into black & white in post-production.’
Composition
The greatest virtue of shooting natural objects such as leaves, flowers and eggs is in the apparent simplicity of the shots can be produced.
‘If you take something as simple as some quail’s eggs, you can produce a quite classical shot that harkens back to the
kinds of images that the term “still life” evokes in your mind,’ says Paul. ‘Just arranging them in a little pyramid or in a row gives you a really effective image. It’s the simplicity of the arrangement and of the objects themselves that makes them so photogenic.’
Objects such as leaves and feathers are simple to shoot and offer some interesting choices in terms of composition.
 Photo by Alan Wilson
‘Having an item like a leaf to work with is great because you can move it around without changing the position of the camera,’ says Paul. ‘The veins can give you some really pleasing compositions, for example by having the veins running diagonally through the picture from the bottom left to the top right.
‘You should also consider how close you want to get to the leaf,’ he continues. ‘The closer you are, the bigger
the veins and segments of the leaf will appear. That will change your composition dramatically.’
When shooting wings and feathers it’s worth noticing how colours can be used within the composition.
‘If we take the example of using the wing of a blue jay then there are some beautiful colours that can be used,’ says Paul. ‘You have three strong colours to play with: blue, white and black. You should study how the colours interact with each other. How much of each one do you want in your shot?’
An obvious, yet often neglected, element of composition comes in the rule of thirds, a compositional rule of thumb that suggests that you should view your image as a nine-square grid and place your subject(s) along the lines or their intersections.
‘With something like dandelions you can really use this to your advantage,’ says Paul. ‘Having three of them in a row can make for an incredibly interesting image, particularly if you place each one higher than the other. If you have one dandelion then there’s nothing wrong with placing it in the centre of your image, so that it is surrounded by empty space. However, due to the presence of the stalk you may find it beneficial to move your camera to the portrait position so that you can fit everything in. ‘
Ethics
While collecting and shooting natural objects is a straightforward task, the ethical implications are something that must be considered by the photographer.
‘Some people may feel unsure about the fact that we’ve used the wings from dead birds,’ says Paul. ‘But there is nothing illegal about taking roadkill or animals that have died a natural death. Using these subjects allows the photographer to achieve shots that they would not be able to get while the subject is alive. They also allow you to make a beautiful image, which means you can celebrate the life of the bird through a stunning photograph.’
On the opposite end of the scale, Paul points out that it is illegal to collect wild bird’s eggs. ‘I would strongly advise people not to do this,’ says Paul. ‘We worked with quail’s eggs, but these were purchased legally from a breeder on the internet. Quail are bred in captivity for their eggs and meat. The eggs themselves are incredibly attractive and can be brought from some supermarkets or directly from breeders.’
But these issues do not stop at animals – flowers and plants are also subjects that must be respected.
‘I believe that you should never pick wild flowers just to create some photographs for yourself,’ says Paul. ‘For many species it’s just plain illegal but for others it’s a question of ethics. If it’s a flower from your garden that you’re going to cut anyway, then that’s fine. The same applies if it’s a weed. But if it’s a wild specimen, then I’m against any kind of interference.’
White Balance
One of the key things to think about when shooting your images is your motivation for doing so. Are you looking to document your subjects or are you attempting to produce something a little more creative? If the photographer is looking to create something a little more abstract, then the camera’s white balance setting can be employed to alter the colours of the images.
‘When shooting you should think about how you want to represent colours in your images,’ says Paul. ‘If you’re looking to document your subjects in a straightforward way, then you want the colours to be as natural as possible. In that case it is better to leave your camera on auto white balance.’
However, white balance can also be used as a creative tool. Experimenting with different white balance settings can dramatically alter your shot and give your images a colour cast that you wouldn’t normally see in the natural world.
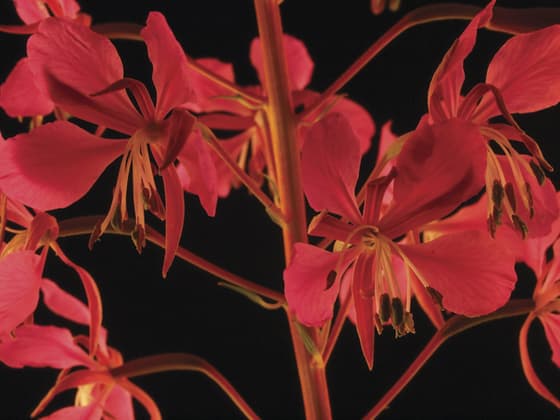
 Photo by Alan Wilson
‘Doing something as simple as setting your camera to cloudy white balance can produce some interesting results,’ says Paul. ‘That setting will push up and saturate the reds.’
An alternative is to set your white balance manually using the numbers rather than symbols (not all cameras are capable of this function and users should check their camera’s manual).
‘I generally leave my camera set to 6000K [Kelvin] all the time,’ says Paul. ‘That’s like the cloudy setting plus a little more. It gives you a quite saturated image. It’s important to understand that the numbers represent colour temperature. Very low numbers such as 3,500-4,000K give you a very blue cast on your image. At the top end you have 6,000K, which will give you a very orange or red cast. You have to experiment.’


