Technique Explained: Finding the best time of day to shoot and how to deal with the weather

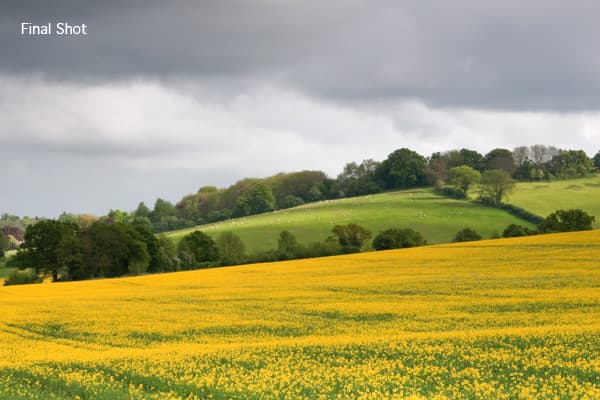
Image: The final shot of my day – The low sun injects life into this stormy scene. A 1.2 ND grad helped hold in the sky, while an aperture of f/22 ensured good front-to-back sharpness
When it comes to landscape photography, you really are at the mercy of the gods. It’s just you, your camera, and Zeus, Thor, Raiden, Jupiter, Helios or whichever custodian of the skies is in charge that day. As photographers all we can do is choose our time and location wisely, and try to capture a few seconds where the gods are smiling on us.
As I found out, being reliant on external forces isn’t always much fun – you can’t just turn on a softbox to add a fill, or use coloured gel when the sunlight has dipped behind a cloud. Instead, careful timing and planning are required, as is a lot of patience.
Living in South London, the rolling hills of Kent are only a few miles away. As the traffic recedes and buildings give way to fields and trees, a host of different photographic opportunities unfold. If you’re driving, it is sometimes tempting to pull over and take a quick picture of the landscape in front of you. Yet very often this image doesn’t really grasp the sense of place and feeling of the scene before you.
I decided to photograph a location I regularly drive past, but where I’ve never stopped. To create an image that was more than a snapshot would mean making a few sacrifices – mainly the amount of sleep I was going to get.
Landscape photography: Planning
Relying on natural light requires a lot of patience, as it is a case of waiting for the right light to fall across a scene. I decided I would spend a day scouting for suitable locations. This basically consisted of driving along country roads and walking along footpaths searching for views of locations that were familiar to me, but looking at them from a different angle.
I wanted to find a scene that didn’t have an oast house, castle or quaint cottage, as I felt the focus of the image should be the land itself. By the end of the day I had found around ten locations that I thought had potential. To mark the location I took a few reference photos and saved the location using my car’s sat nav. I would advise anyone wanting to take landscape photos to record the exact location using a GPS device, such as the Jobo PhotoGPS unit (see AP 11 April), which uses software to add GPS data to an image file. Alternatively, simply save the location using a car or mobile phone sat nav, or mark the spot on a good old fashioned Ordnance Survey map.
Once I had a few possible locations in mind, I had to work out the best time of day to take the photographs.
Landscape photography: Timing and patience
One scene in particular stood out – a hillside field of oilseed rape in Biggin Hill Valley. The bright yellow field of flowers was surrounded by typically English rolling green hills and trees.
We are used to seeing how the sun lights a landscape during the day, but it is the other times that fascinate us – which is why we are amazed by a beautiful sunset. While we may know the scene and the location, when it is seen in a different light – literally – it makes us stop in our tracks.
I opted to photograph the scene at sunrise, which meant an early start. The night before, I checked the weather forecast and sunrise time on the BBC weather website (news.bbc.co.uk/weather). At 5.09am the sun was due to rise and the weather was due to be cloudy with sunny spells. I was hoping that at precisely 5.09 there would be a sunny spell.
Of course, this wasn’t the case. Instead, there was thick, hazy, dull cloud and a light mist. Thankfully, along with my Nikon D300 and Nikkor 18-200mm f/3.5-5.6G IF-ED AF-S VR DX lens, I had an SRB-Griturn 1.2 ND grad filter. Using this filter dramatically darkened an otherwise dull sky, but still left the scene looking lifeless compared to the golden sunrise I had hoped for.
Instead of the sweeping hillside shot I had planned to take, I had to change tack. Breaking landscape conventions, I set my lens to 200mm and switched to portrait orientation. Although the sky was dark it wasn’t very photogenic, so I concentrated on the yellow rapeseed and the tractor tracks made when the seed was sown. In the background of my scene, the misty trees gradually blend in to the soft hillside and eventually the sky to create a series of layers.
I set my tripod as high as possible, causing the camera to look down on the field and therefore making it more dominant. This gave a greater depth to the image than simply taking it at the height of the flowers. In fact, I recommend that you use as tall a tripod as possible when taking such landscapes, and take a small set of steps or a ladder. The extra few feet in height can offer a perspective that is rarely seen, and help remove foreground objects that may get in the way of your shot, such as bushes or hedges.
At this time in the morning there was little light, so I shot on a tripod and at ISO 400. Usually I shoot at a lower sensitivity, but even at this time the occasional car would pass by. With my tripod fully extended, the slight vibrations and air movement caused by the traffic were enough for the camera to move slightly, which had an effect on the sharpness of the images I was taking. If the shot you wish to take means being near a road, try to wait until there is no passing traffic.

Image: My first shot – Given the poor weather, i’m pretty happy with this atmospheric misty-morning shot
With the unfavourable weather, it was important to shoot in raw format. This allowed me some flexibility when it came to adjusting the image on my computer. Again breaking with convention, I chose to crop the overcast foggy morning shot so it was square.
If at first you don’t succeed…
Undeterred by the lack of a glorious sunrise the previous morning, I woke up for the second morning in a row at 4.30am, and again the weather wasn’t great. However, I headed back, hoping the light would look slightly different. Two hours later I was back in bed with almost identical images to the ones I had taken the day before.
As luck would have it, the cloud eventually broke later that day and I rushed back to the spot after work, fearing that the cloud and rain would soon return. Although the sky was overcast at sunset, there was a window of an hour just before the sun set when I managed to get the shots I wanted.
The sun broke from behind the cloud, causing parts of the scene to be illuminated, and then gradually fell into shadow as another cloud passed over. I still used the 1.2 ND graduate filter to darken the sky. This was particularly important, as one of my alternative shots requires me to shoot almost directly into the sun, which had just crept behind a cloud.
 Image: My second shot – Almost there, but there’s no sun on the hills to lift the scene
My final image was taken looking in the same direction as the first one I took on the misty morning. This time, though, I used a shorter focal length to capture more of the hills in the background. The brighter light made this far more picturesque than it had been amid the desaturated colours that the mist had caused.
It can take a lot of patience and good fortune for the light to be exactly where you want it. This is why planning is important. Knowing your location, and where and when the sun rises and sets, is vital in landscape photography. Checking the weather forecast beforehand is also vital, but if you have no other time to take photographs, be prepared to look for alternative viewpoints. You may not get the image you intended, but there are many opportunities within a single vista and you can exploit these when the weather doesn’t go your way.
For those with nine-to-five jobs, one of the great things about the summer is that as the days are longer there is time to take photographs before and after work.


