In this step by step guide we show you how to shoot panoramas and how to use stiching software to knit the images together.
To create the panoramic you will need to overlap your images by about one-third to allow your stitching software to create seamless joins on the final image
How to shoot panoramas: Step One

Set the camera level and do a quick practice pan across the scene.
How to shoot panoramas: Step Two

Take a test shot and check the histogram. If it is OK, set this exposure on manual. Also set the focus manually.
How to shoot panoramas: Step Three

Take a picture of your hand with your fingers pointing in the direction you want to swing the camera. This marks the start of the panoramic and helps later when preparing the images.
How to shoot panoramas: Step Four

Take the first image and then move the camera slightly to the right to take the second image. Repeat this until you have reached the end of the view, remembering to overlap by 30%.
How to shoot panoramas: Step 5

Take a final image of your hand pointing in the other direction to show the end of the sequence.
How to shoot panoramas: Panorama stitching software
The software needed to create panoramics from your images has advanced greatly over the years. Adobe Photoshop CS2 was the first to have a feature built in and the latest CS4 tool is fantastic and allows stitching to be a doddle.
At more than £500, this may seem an expensive option, but other cheaper options including Elements 8 and PTGui are available.

Crosby Beach, Liverpool – The final result from the digital stitching sequence. A stunning panoramic created from eight individual images and stitched in Photoshop CS4. Canon 5D, 17-40mm, ISO 100
Panorama stitching software: Step 1
Prepare your images on the computer. If shooting Raw, batch process the images with identical settings so they all receive the same adjustments and place all the images of the sequence in a new folder.

Panorama stitching software: Step 2
Open Photoshop and go to File > Automate > Photomerge and locate the folder that contains the images. Select the layout style you want (Auto usually works the best) and make sure the Blend Images Together box at the bottom is ticked. Then click OK and let the software do its magic.

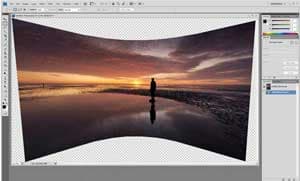
Panorama stitching software: Step 3
Crop the edges to make the image tidy and then flatten the layers (Layer > Flatten Image). Make any necessary adjustments, like cloning, until you are happy with the final image. Finally, save the file as a high-res JPEG or Tiff.

AUTHOR: Craig Roberts