
Richard Sibley explains how to use your camera’s histogram to create perfectly exposed black and white landscapes
Technique Explained: Using your cameras histogram to expose for digital black and white landscapes

It would be difficult to write a feature on metering for black and white landscapes without mentioning Ansel Adams. His methodical way of exposing black and white negative film was designed to allow for a full tonal range to be produced at the printing stage.
The Zone System that Adams and Fred Archer formulated still has a huge influence on landscape photographers today. However, but when it was devised it had as much to do with making sure that every expensive 10x8in plate or negative could be successfully printed as it did with artistic principle.
When shooting on black and white negative film, Adams’ axiom was ‘Expose for the shadows, develop for the highlights’. Adams realised that if only a little light reaches the negative, no detail of that area is recorded and any resulting prints merely show an area of dense black.
Adams’ compromise was to expose the negative so that enough shadow detail could be shown when the image was printed. He could recover highlight detail through selective development and printing of both the negative and print. This allows for a full range of tones to be reproduced, provided the image has been taken with the optimum exposure.
Black and white landscapes: Highlights and shadows
Adams’ system was designed with negative film in mind. However, the principles can be reversed and used for the positive images created by transparency film and digital sensors.
Just as too little exposure creates large black areas when printing from negatives, overexposing digital images can create large white areas with no detail. Therefore, in digital photography, images should be exposed to make sure that little or no highlight areas are completely lost. We need to expose for the highlights and ‘develop’ for the shadows and midtones.
This is particularly important in landscape photography as the contrast in a scene can be high and, unlike in the studio, we have no control over it.
Just as with film, digital cameras have different dynamic ranges. While the dynamic range of digital sensors is gradually improving, the range is still no match for what the human eye can see.
With this in mind, it is important to know exactly when and where your camera’s dynamic range could affect your images. Over time, you should start to develop a feel for the type of scenes and lighting in which your camera will struggle to produce a full range of tones. Thankfully, there are a few in-camera tools that can help.
We are fortunate that, unlike Adams, most of our digital cameras have systems to help us check exposure. Most obvious, perhaps, is the highlight and shadow warnings that are commonly found when images are displayed on a camera’s LCD screen. These ‘blinking’ warnings tell us when shadows are black and highlights are white, allowing us to adjust our exposure to minimise this loss of detail.
Of greater use is a digital camera’s histogram. This shows us the spread of tones across an image, allowing an exposure to be created that captures the maximum amount of detail available in the scene. This may not produce the most flattering image straight from the camera but, critically, it allows more leeway when we later digitally ‘develop’ the image
Black and white landscapes: Making the conversion
 I used the Channel Mixer to convert my image to black and white, using mainly the red and green channels. By not using the blue channel, the sky was kept very dark.
Once in black and white I adjusted the Levels, creating a few more shadow and highlight areas before finally fine-tuning the overall brightness of the image by tweaking the midpoint.
Knowing that nearly a full range of tones is available allows you to maximise the potential of your image, and while you may not be in the darkroom like Ansel Adams, you can still mask, dodge and burn knowing that detail will be revealed in your image.
Black and white landscapes: Tonal areas
It’s important to know how different tones in an image will react to digital processing. Once you know this, it will help you decide how to expose a landscape scene that will later be digitally developed and converted to monochrome.
1. Highlights
It is important to burn out little, if any, highlight detail. Once the brightness hits 255 on the histogram, it is impossible to recover any detail.
Darkening these images will merely render them a shade of grey with no detail, which, unless done with subtlety, will cause blotchy or posterised areas in an image.
2. Midtones
Midtones make up the majority of the image and will cover a wide spread of tones. Ideally, the midtones should be situated in the centre of a histogram.
However, by reducing the exposure to prevent the loss of highlight detail you may find that the midtones become darker and are, in fact, shifted to the left of the histogram.
3. Shadows
To prevent an image looking flat it is important to have both highlights and shadows present. Unfortunately, the dynamic range of most cameras is more compressed in the darker tones.
This often means that there is very little difference between tones in the shadow areas, which can make them difficult to lighten successfully. It is difficult to recover detail once its brightness has gone below about 10 on a 0-255 scale.
Trying to make these dark shadow areas brighter can cause solid blocks of dark grey to appear.
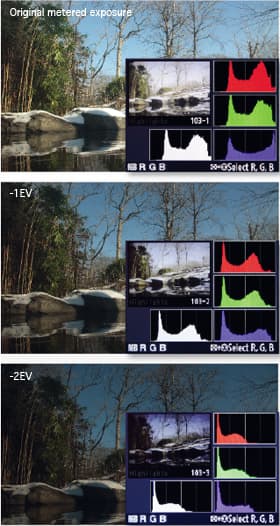
Black and white landscapes: Exposures

There is quite a high level of contrast in this scene due to the strong shadows and bright white snow caused by the early afternoon sun.
Although using the Nikon D300’s sophisticated evaluative metering produced what appears to be a bright, printable JPEG, viewing the histogram shows that some of the snow has been completely burnt out to white.
To help recover some of this detail I made another exposure 1EV darker. The histogram shows that very little, if any, of the snow has been clipped to white. The downside, however, is that the midtones and shadow areas have got darker.
Finally, I exposed the image 2EV darker than the initial image.
While the histogram shows no burnt-out highlights, too much of the shadow areas have now become completely dark and will suffer from posterisationwhen the shadows and midtones are lightened.
In this instance, the second image (-1EV) is the favoured one.
Although the midtones may be slightly too dark, the important thing is that there is enough information within the highlights and shadows that it can be adjusted without affecting the image quality.


