
Street scenes can be extremely busy so we need to try especially hard to make it clear who or what the subject is. Damien Demolder shares some ideas on how to make your subjects, and your street photos, stand out
This is how photography should work: we see something remarkable, we then shoot that remarkable thing/situation, we show someone else the picture we took, they see the remarkable thing/situation that we saw and they think it’s remarkable too. While this is what should happen, as you may possibly know yourself, things don’t always turn out this way. Sometimes what we thought was remarkable actually isn’t, so no one wants to look at it. On other occasions we have witnessed something remarkable but just haven’t done enough to either show how remarkable it is or to make it clear where in the picture the remarkable element is. Either way, our hopes and dreams get dashed and the people just scroll by our pictures without a second glance.
There are obviously more than a few ways to make a subject stand out, but here I’m going to concentrate on the methods I use most often in my street photography. These are principally about making the most of different types of contrast between the subject and its surroundings. We tend to think of contrast in terms of tones, such as a light thing against a dark background, for example. There are many different types of contrast we can employ that create a visual sensation sufficient to make our viewer look – and look in exactly the right place. When we work these contrasts hard we can back-pedal a little on some of the more obvious ways of making a subject stand out, such as making it massive in the frame.
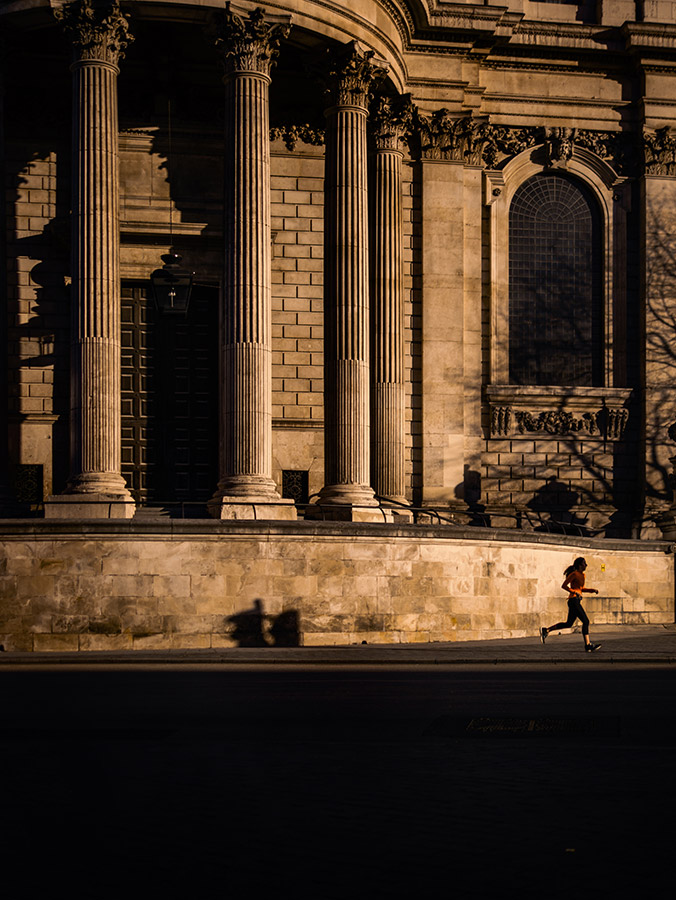
On the Run, St Paul’s, London. 1/8000sec at f/4, ISO 10. Image credit: Damien Demolder
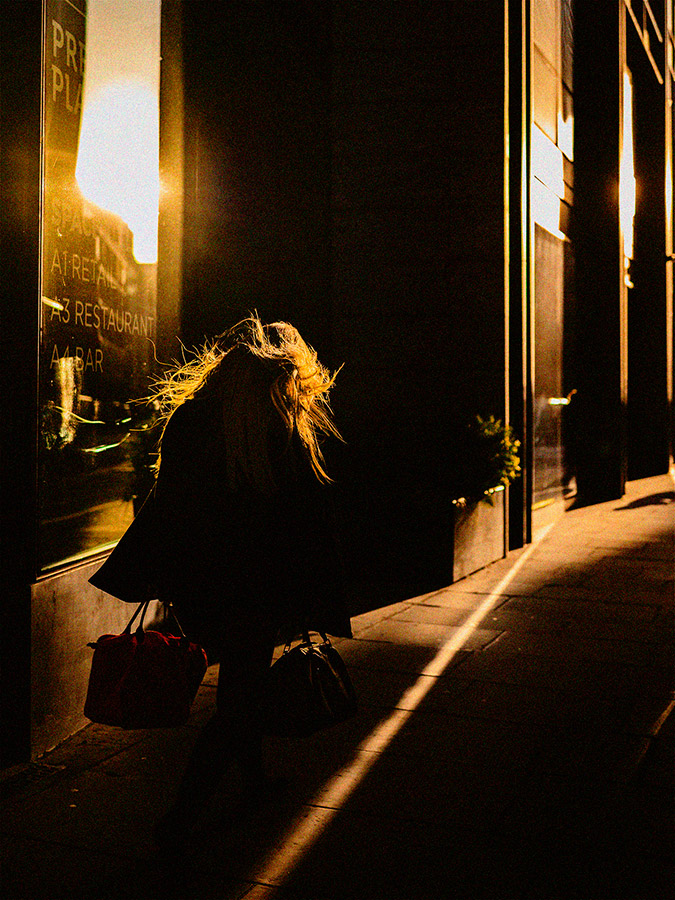
Silhouette time
Silhouettes are exciting. They carry a sense of mystery because they hide so much, while at exactly the same time revealing a great deal we mightn’t otherwise have noticed. When made with care and attention to detail they can be attention-grabbing too as the eye of the viewer will be automatically drawn to the strong contrast between the dark subject and its brightly lit background. You won’t need the silhouette to be black, just very dark, and you really don’t want the background to be bright white – just bright enough to create that contrast.
I like to keep plenty of tonal information in the background and will often keep the exposure low to ensure all the detail is visible and that any colours on show are well saturated. If the background is very bright it will draw the attention of the viewer away from the subject, and we don’t want that to happen. Also, by keeping the exposure on the low side we get a denser silhouette more easily.
For a really effective silhouette we need to ensure the background area around the figure is clean and free of lines or shapes that interfere with the outline of the figure. These create confusion and make it more difficult for the viewer to determine where the subject is and what it is. Keeping the background clean allows the outline of the figure to be clear and obvious – and thus easily identifiable.
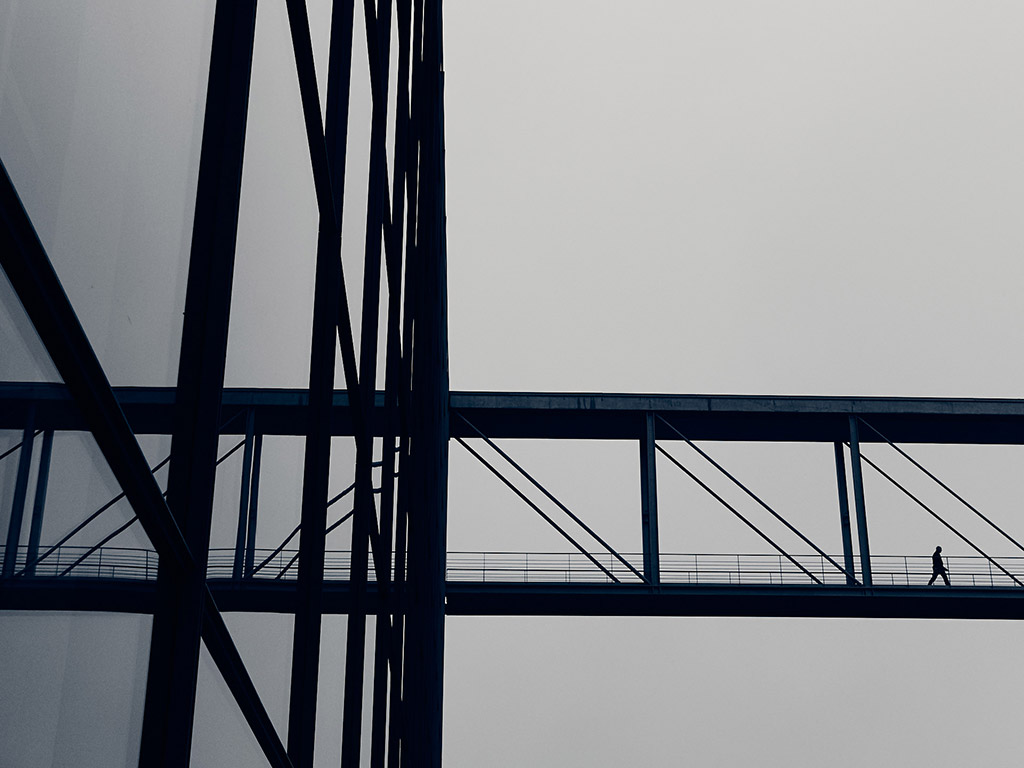
Walking the Plank, Over the Spree, Berlin. 1/400sec at f/5.6, ISO 400. Image credit: Damien Demolder
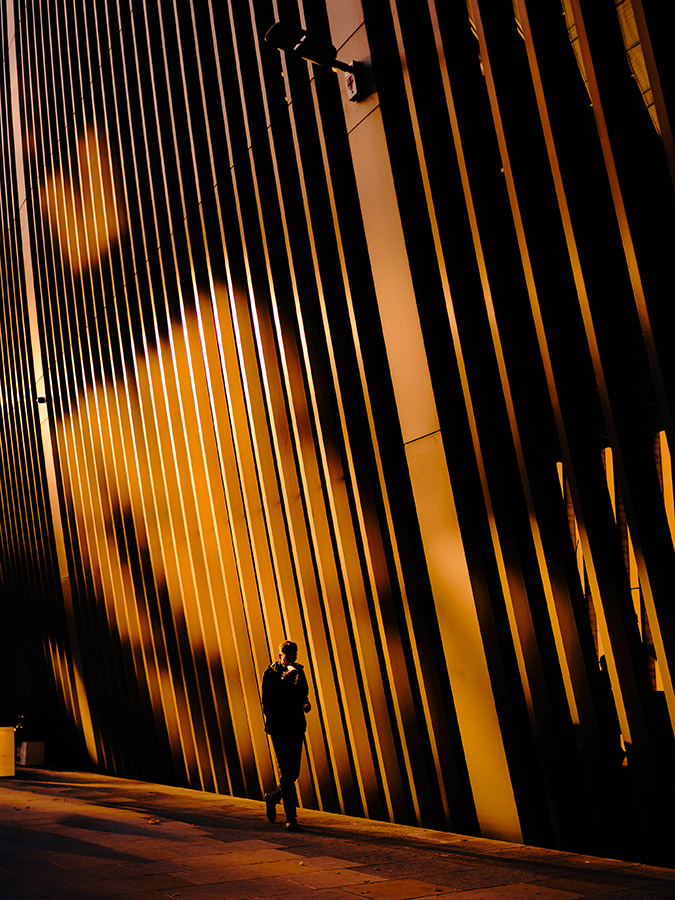
As we won’t have lit-up facial features to draw the eye of the viewer we need clear and recognisable features outlined in the silhouette. Getting a human head in profile allows us to see the nose, eye-sockets, forehead, mouth and chin – which all give us significant clues to what the subject looks like. This can be surprisingly revealing. Otherwise look for distinct shapes – a big hat, a ponytail, big hair, a dramatic gesture or perhaps a flowing coat.
The position of the subject’s body can make or break a picture, so time your shot for a moment when something expressive is happening. A silhouette of someone standing with their arms by their side will rarely look exciting, but a figure striding along with swinging arms is much more likely to convey a feeling your viewer can engage with. Aim for dramatic shapes that will add life and story to the picture.
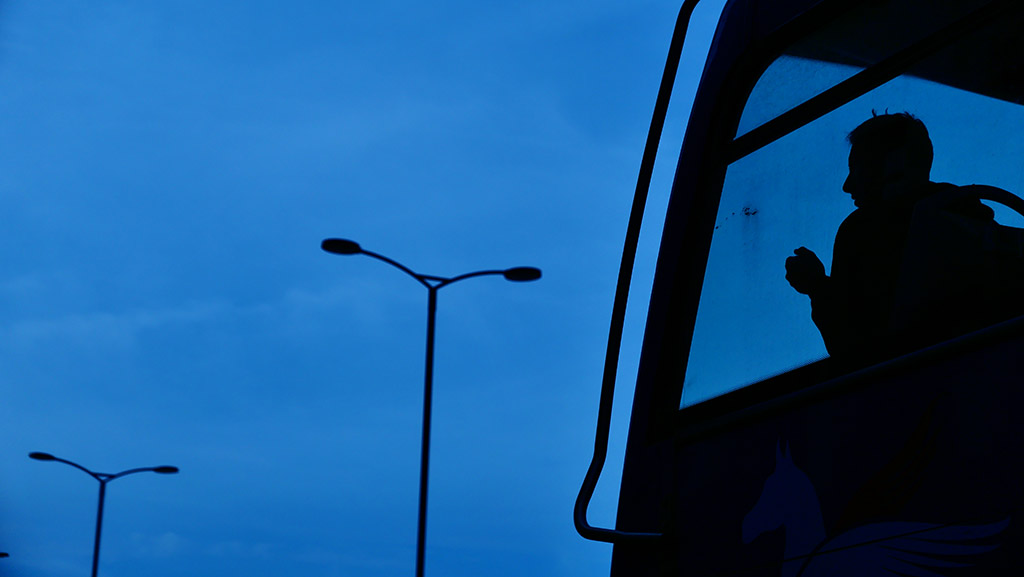
Tour Bus, City Lights, London. 1/12800sec at f/2.8, ISO 200. Image credit: Damien Demolder
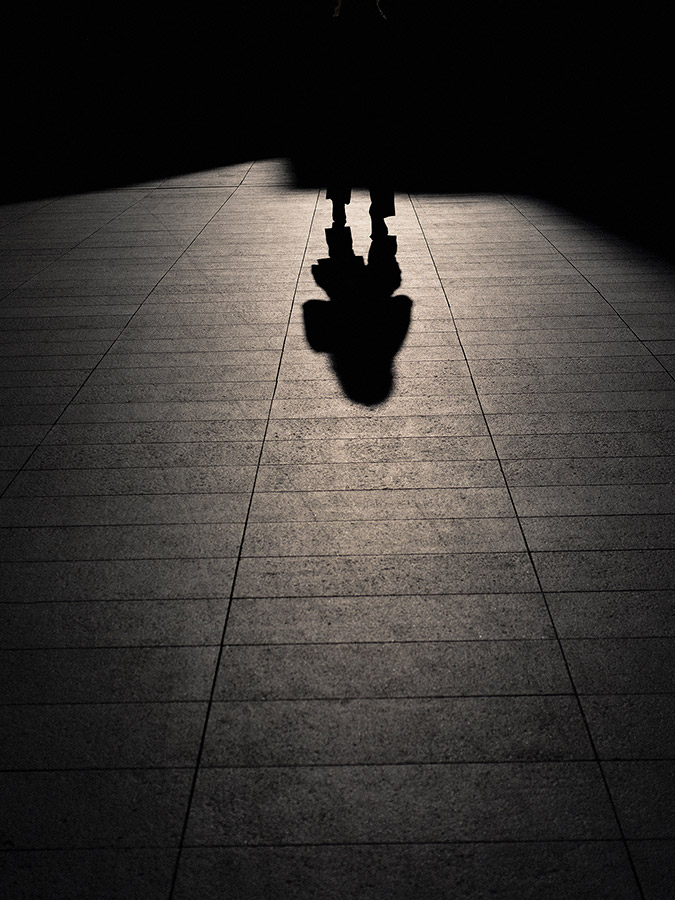
Embrace your shadow
Shadows and silhouettes are closely related, but they are certainly not twins. While they have many things in common – such as being a dark representation of something against a brighter background – what separates them is significant and interesting. While silhouettes are always the same shape and size as the thing that is creating them, shadows can be long or short, are distorted and can go up walls as well as along the floor.
The Watched Watching the Watcher, Southbank, London. 1/1600sec at f/2, ISO 100. Image credit: Damien Demolder
Again it is the contrast between their darkness and the brightness around them that will draw the eye of the viewer. Exposure is a really important element in our success here too, as we want the shadow to be rich and dark while the background is rich and light – so we find a balance that retains detail in both the shadows and the highlights. We also need to appreciate that good shadows only happen when the light falling on the subject is strong and directional. Soft diffused light bouncing all over the place rarely creates enough contrast to catch our eye.
The best and most dramatic shadows are formed, outside at least, at the extremes of the day – first thing in the morning and last thing in the evening when the sun is low in the sky. Long shadows on the ground have tiny feet and gigantic heads, with alien forms that can be funny as well as alarming in their distortions. Shadows on walls can smear off to one side and create oddly wide bodies that somehow we still recognise as bodies.
Journey Home, Spitalfields, London. 1/16000sec at f/3.2, ISO 200. Image credit: Damien Demolder
With shadows too we often have the choice to include or exclude the person that is creating them. A shadow with its human makes immediate sense, but a disembodied shadow can create an abstract feel, or a sense of something impending if it is sticking out around a corner or appearing from a larger shadow. Shadows really are brilliant, but as with silhouettes, they are at their best when the person who is creating the shadow is doing something visually expressive.
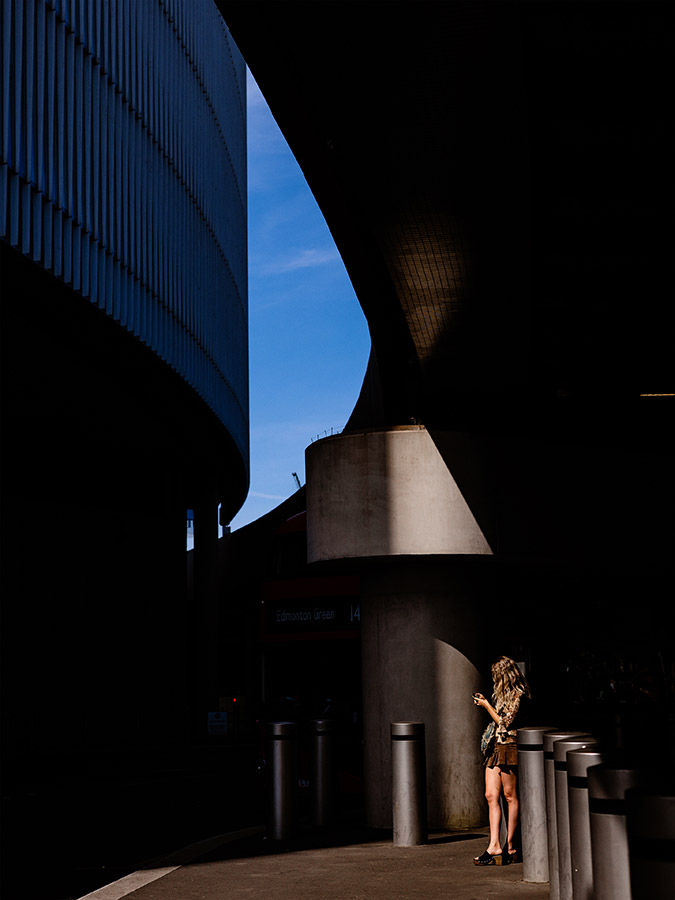
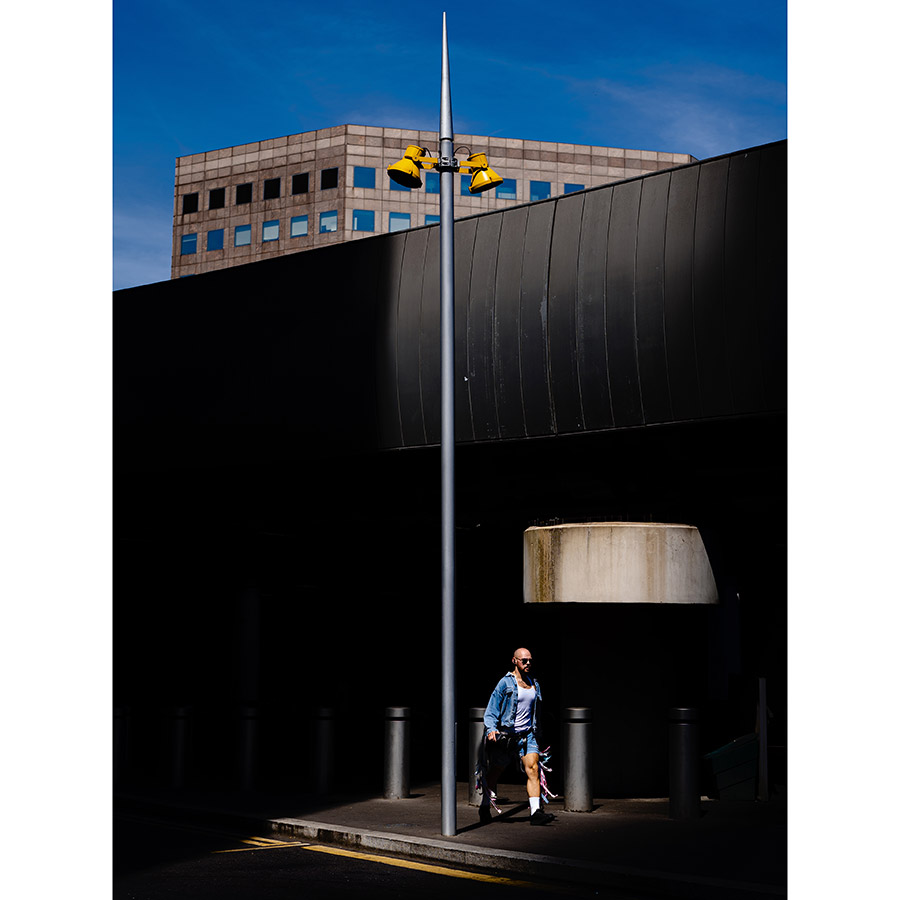
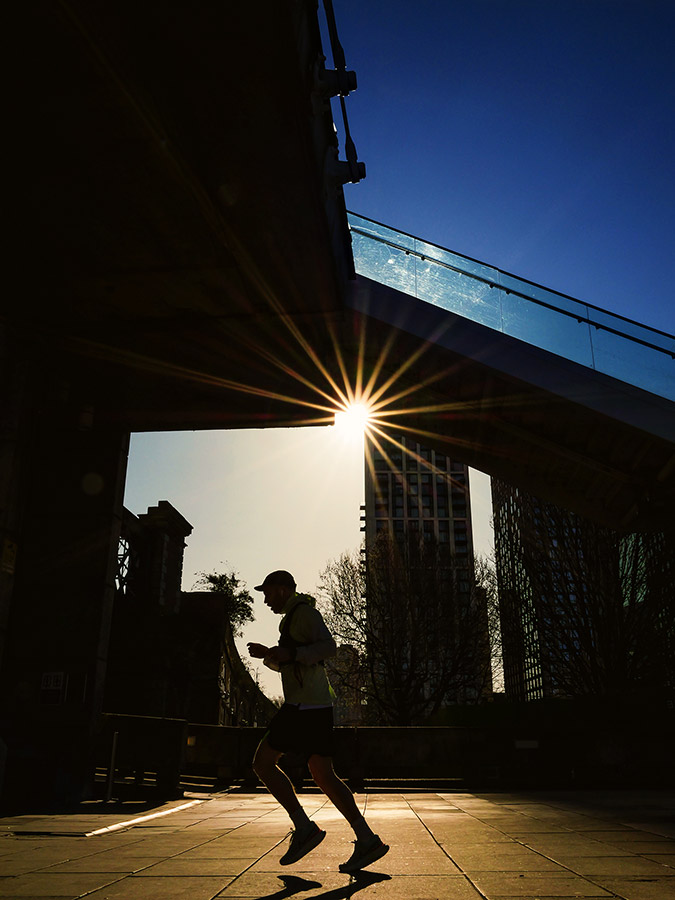
In the spotlight
While shadows and silhouettes rely on the background being lit, the opposite way of looking at the world is to find scenes in which the subject is lit up in a dark environment. A stream of light coming into the scene from a window, an opening in the roof, a gap between two buildings or a street light high above the pavement can create a spotlight effect that can pick out people and throw them at the viewer. When the light is strong and the environment dark this can give us a dramatic spotlight effect that makes the subjects look like actors on a stage.
Under the Blue Crescent, London Bridge. 1/3200sec at f/2.8, ISO 100. Image credit: Damien Demolder
To make this work we need a significant difference in brightness between the lit area and the background to make sure the person really stands out, but at the same time there needs to be enough light in other parts of the scene that we don’t just get a lit person against black. The detail of the background will give the person context and will help to create the story around the shot. Rather than just filling the whole background with very dark tones I quite like using other lit elements in the scene to create some sort of graphic design or atmospheric surroundings to make the story and the construction of the composition stronger.
Two Halves, London Bridge 1/1600sec at f/2.8, ISO 100. Image credit: Damien Demolder
Help your street photos stand out with bold colours
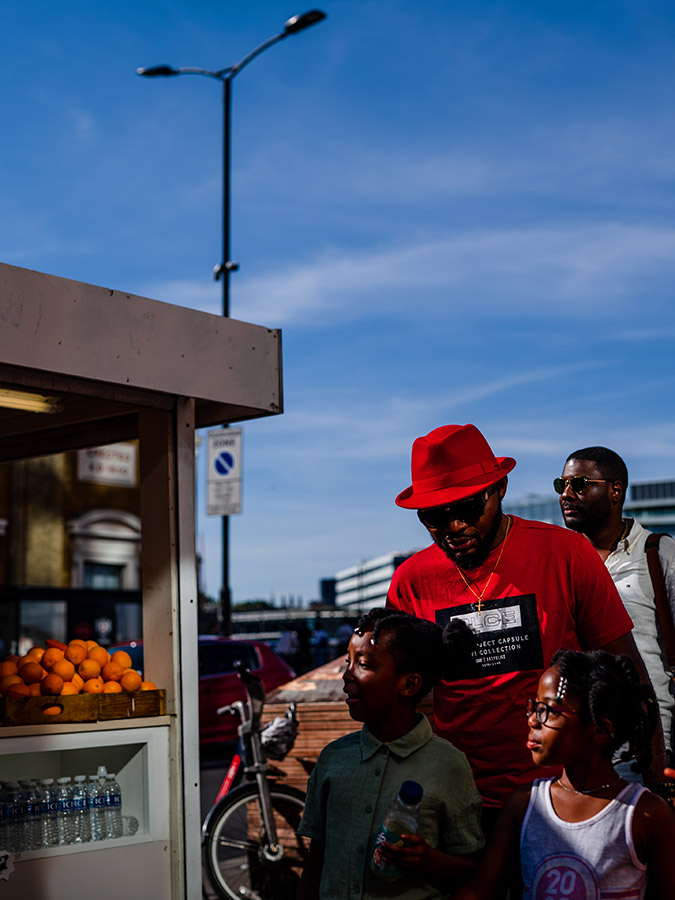
There’s nothing quite like some bold colour to get a viewer’s attention, so when you come across some in the street it pays to make the most of it. We often think of bold colours as being reds and hot shades, but the whole spectrum can work for us so long as the colour is saturated enough. It doesn’t do to rely too much on post-capture saturation enhancement as often colours slip away from a sense of reality. Try to concentrate on finding good saturated colours in life that won’t need much help in post-production. The hoardings around building sites are sometimes remarkably good for this and modern architecture often uses dramatic splashes and patterns of colour to make buildings look more funky. You may also find places lit with coloured lights that you can make the most of with your white balance settings. Coloured lights in shop windows can also be very effective at night.
Morning Glow, Houndsditch, London. 1/2000sec at f/1.8, ISO 200. Image credit: Damien Demolder
An image with one overall bold colour can work very well, but you might sometimes win more eyes if you can find a scene in which you have two or more bold colours that sit well together – either in harmony or clashing together. The contrast between colours can be such that they act as powerfully as light and shade when it comes to pushing your subject forward and drawing attention to it. Understanding the colour wheel and where hues sit in relation to each other will be helpful so you know that pink hair will stand out against a bright green background, and that yellow coats jump out of the frame when shot against a blue sky. That’s all stuff we learnt at primary school, but sometimes we forget to apply it.
Sunrise for the Righteous, Hungerford Bridge, London. 1/1250sec at f/16, ISO 400. Image credit: Damien Demolder
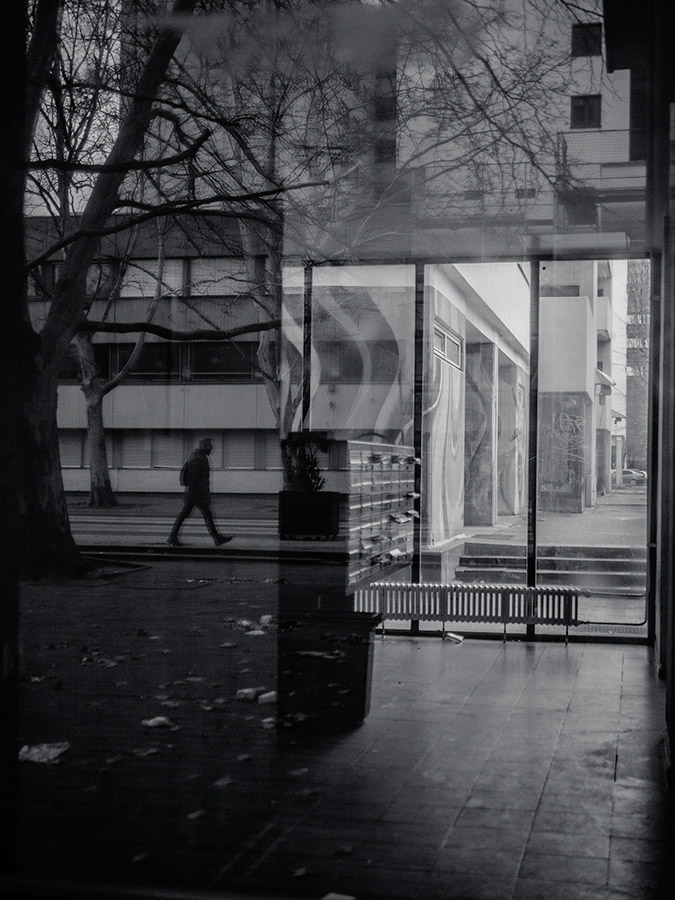
Make your street photos stand out by using frames and depth
When we put a picture in the right kind of frame, that frame draws attention to the image. It also signals to the viewer that we think the picture is worth framing so it must be worth looking at, which encourages others to look too. We can use the same technique in the street by finding elements of the scene or surrounding architecture to make a frame for our subject that not only dresses up the subject but which also lends some visual stimulus for the viewer to look a bit harder.
Lobby And Reflection, Friedrichstraße, Berlin. 1/1000sec at f/1.4, ISO 800. Image credit: Damien Demolder
In the street these can literally be frames such as window frames or door frames that the camera looks through. We can also find other foreground elements to block off parts of the bottom, top and side of the composition to force the viewer to look in to the space in which we want their attention to be. We don’t have to use physical objects to make the edges of our frames as very often shadows and patches of light can do the same thing for us. Anything can work so long as it creates blocked-off areas and a space to look into in which the subject can exist.
Wide-Eyed, Waterloo Bridge, London. Still image taken from video footage. Image credit: Damien Demolder
Turn the camera
When your picture contains a lot of choice of things to look at, it’s much harder to make sure the viewer knows which parts you want them to see first. If you show a picture that has five people in it, it’s obviously harder to let the viewer know who is the more important than it is if you show a picture that contains only one person. Clearing out the ‘wrong’ people from your scenes is a little tricky in person without a cattle prod, but you can reduce the chances of there being lots of people in your frame by turning the camera on its side.
Burning Bush, Houndsditch, London. 1/4000sec at f/1.8, ISO 400. Image credit: Damien Demolder
When we shoot upright there will be less space at street level for distractions and other people in the frame. You will have more height in your picture now, but you can fill that with some neatly designed architecture to tell more of a story about where the picture was taken – or to just create something more interesting. Most photographers hold their camera in landscape orientation for all their pictures unless they are actually shooting a portrait. Shooting your street pictures in the portrait orientation will make yours look different and will make them stand out.
Parting shots
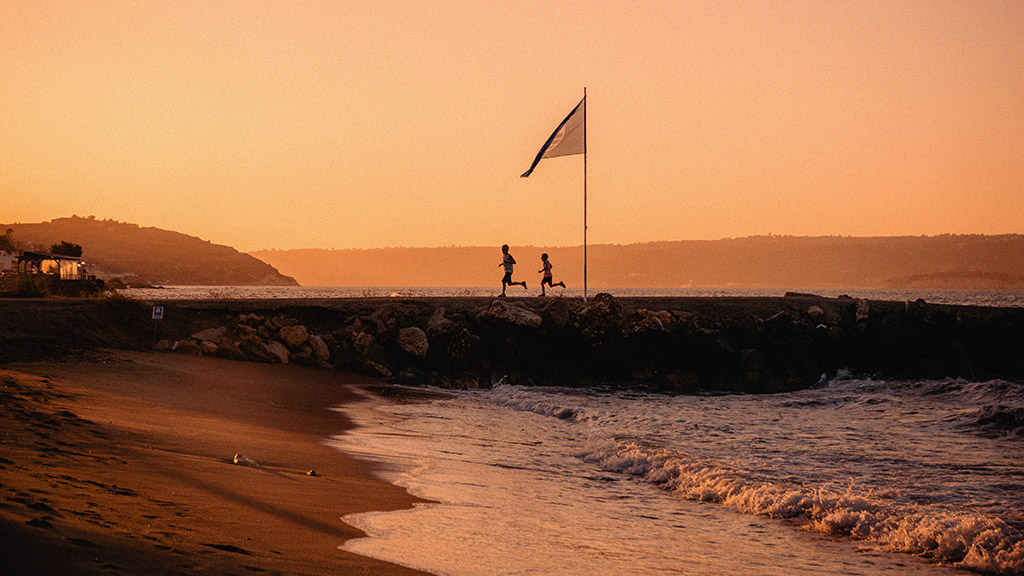
It is vital that our subjects are obvious in our street pictures. Moving yourself, finding good light, and spotting the right conditions are all part of the process of ensuring that when someone looks at your picture they will know immediately which bit you want them to see first.
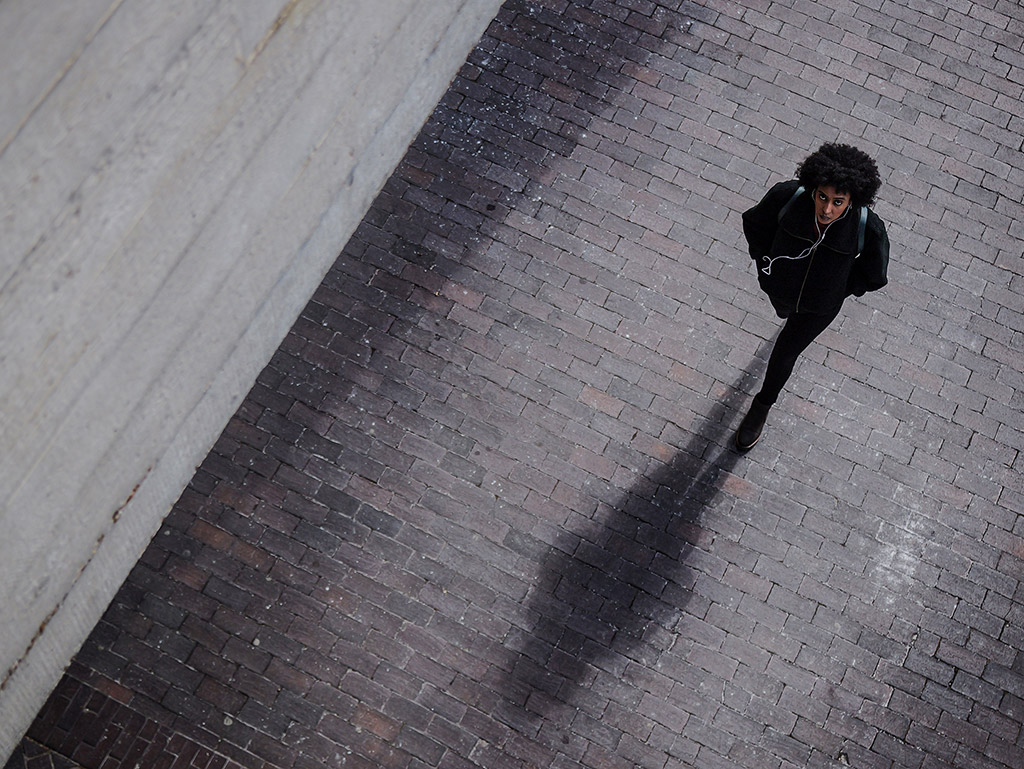
When your eye and head are working hard enough it’s possible to have subjects that appear very small in the frame but which stand out straight away from the bigger picture and which grab the attention of the viewer. This adds an extra element of surprise to the picture – that the subject is so small but yet so powerful. That idea doesn’t apply to all situations or pictures of course, but it is another way of thinking about how you’ll present what is in front of you. Sometimes the subject needs to be big to stand out, sometimes very close, but either way the most important thing in any picture is that the viewer knows what it is you are showing them and that they see that first.
Red Flag, London Bridge. 1/5000sec at f/2.8, ISO 100. Image credit: Damien Demolder
5 tips to make your street photos stand out
Shoot the scene empty
In many cases a good scene will work on its own with no one in it, and I often shoot the view empty to ensure I’m happy with the composition. When the right person enters the scene they just make it better.
Look for light not things
When you are out, look for interesting light rather than interesting things. Interesting light can make even dull places exciting.
Stop walking so far
Street photography sessions should be about looking for pictures not about how many miles you walked. Try to work in a small area and work it a bit harder. It’s often the shots that are hard to find that work best.
Slow down and take notice
Spend more time in one place – really look and notice its characteristics and potential. Slowing down and not rushing around will allow you to see more, and you’ll find pictures you didn’t expect.
Know why the picture is intriguing
It sounds a bit odd, but chat yourself through why the picture you are about to take is interesting. Identify all the key elements in your head and check that the way you are about to shoot it makes the most of those you want the viewer to see.
Before the Flag. 1/3200sec at f/2.8, ISO 200. Image credit: Damien Demolder
Keep kit simple
Don’t take too much kit with you when you go out to take street pictures. I can’t think about what lenses to use at the same time I’m shooting, so I tend to shoot with the same lens for long periods. When I move into a different environment that needs a different lens I’ll change, but I don’t like to keep switching as it changes the way I see. I prefer a nice fast standard lens for most of my work – so a 50mm f/1.4 on full frame, a 32mm on APS-C and a 25mm on Micro Four Thirds. Other people like a 35mm as their primary lens, but I find it’s a bit wider than I see – but we are all different. I like a 24mm for wide scenes, and an 85mm if I want to show someone filling the frame from a distance. I like a wide aperture because a shallow depth of field offers us another way to make sure the subject stands out.
Have a look at the best cameras and best lenses for street photography.
Why not try using smartphones for street photography?
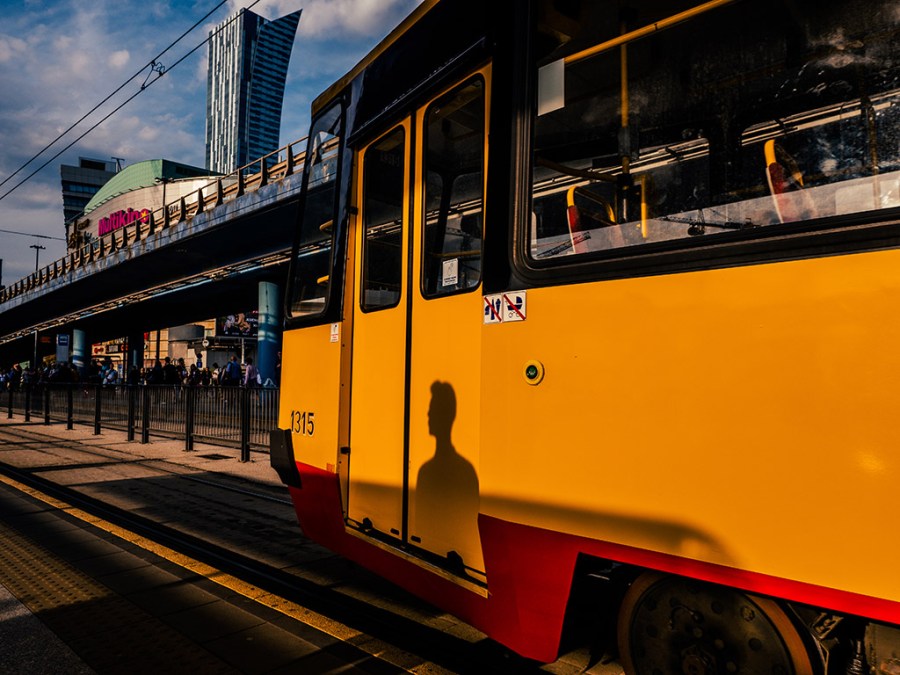
Featured image: Hi Honey I’m on the Train, Warsaw, 1/640sec at f/4, ISO 200. Image: Damien Demolder
See www.damiendemolder.com for details of Damien’s latest street photography workshops.
Be sure to stay up to date with street photography and the law before heading out and remember to stay street smart.
Black and white street photography guide
Follow AP on Facebook, Twitter, Instagram, and YouTube.


