Every family has its history, and every history has its photographs: old colour prints, vintage black & white prints, negatives from both, slides or transparencies. If that sounds like you and your family, isn’t it time you dragged those photographic archives into the 21st century? By digitising them you’ll give them a new lease of life, turning them into digital images that are easy to improve upon, categorise and locate when you need them.
How to scan or photograph old photos and slides
How to digitise photos using your phone
Simply using your phone’s camera to copy an old photograph rarely gives the best result. The image is likely to be distorted because you haven’t held the phone straight and, because old photos are usually glossy, you can end up with unwanted reflections and glare. Using a dedicated scanning app will help to correct both.
PhotoScan by Google Photos is free to download. First, a picture is taken in the normal way. The photo you are copying then appears on the phone’s screen with four large spots and a white circle in the centre superimposed over it. Moving the phone so that the circle covers each of the spots, in turn, causes the camera to make another four exposures, each from a different angle. The software then combines all the versions to remove reflection and glare, while automatically correcting colour casts and distortion. Check out your app store to find other suitable apps.
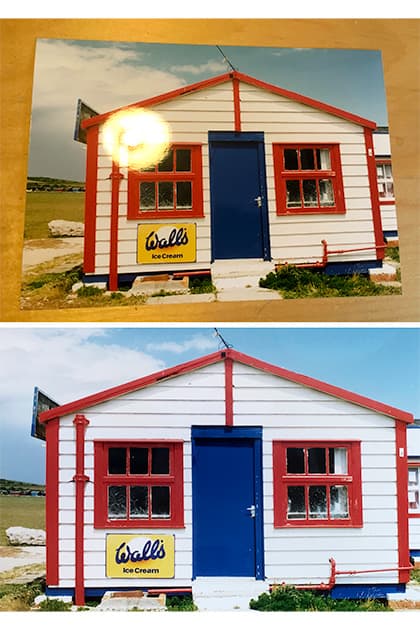
Shot on a table, using an iPhone and lit by a desk lamp, seen reflected in the print (top) and again, under the same conditions, using the PhotoScan app (bottom). Credit: John Wade
Is a scanner or camera better for digitising photos?
One up from holding your phone over a picture is to suspend your camera over it, using a suitable tripod. You’ll need a macro lens to move close enough, and the camera must be kept parallel to the subject. Lighting can be provided by a desk lamp or, better still, two desk lamps, one on each side of the subject. Natural light from a nearby window also works. In this way, colour or black & white prints can be copied. To use the same set-up for slides, the desk lamps can be swapped for some form of light box.
Scanners make a better method of copying old pictures. With a flatbed scanner, a print is placed on a glass table beneath a hood and, using the dedicated software, a preview scan is made. From this, a suitable crop of the image is selected, along with the required resolution and colour depth, then the final scan is made. A scanner with a scanning hood enables a similar process to be used for scanning negatives and transparencies.
A film scanner is used for negatives and transparencies only, usually 35mm, although some models do allow larger sizes. The negatives or slides are fed into the scanner in strips and scans made of each frame in sequence.
How to adjust the colour balance
If you copy an old photograph using artificial light then the resulting image might have a yellow/orange colour cast. This is because your camera will be calibrated for shooting in normal daylight, whereas artificial light is warmer in tone. A camera’s auto white balance setting should correct the cast automatically, but you can optimise the result by setting the white balance manually. Colour temperature is measured in degrees kelvin. Daylight and electronic flash are both 5,000°K.
Incandescent light (normal room lighting) is more like 2,700-3,000°K. So go to the manual white balance setting in your camera’s menu and reset it accordingly.
Another option is to use daylight bulbs, which fit into normal lamp holders, but emit light at 5,000°K. Adobe Lightroom also has a handy option for changing colour temperature of an image after it has been taken.
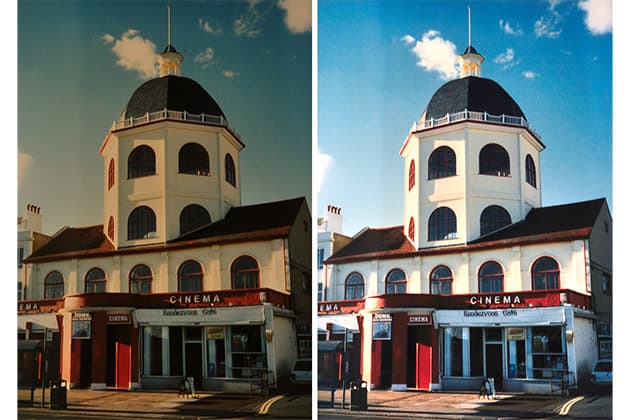
Colour cast induced by copying under incandescent light (left) and corrected by adjusting the camera’s white balance (right). Credit: John Wade
How to scan old photos for the best resolution & colour depth
When using a scanner, the resolution you set in the software depends on the size of the original and the use to which you aim to put the scanned images. The software will measure the resolution in dots per inch (dpi).
If you decide that all you need is a digital image to show on your computer screen or digital projector, its size needs to be no more than around 600×800 pixels. That means scanning a 35mm negative or slide at 600dpi, while a larger A4 size print needs only 72dpi to fulfil a similar pixel count.
If you intend to make quality prints from your scans, then you will need a higher resolution of more like 3,500×2,500 pixels. That equates to scanning a 35mm negative or slide at around 2,500dpi, but only 300dpi when scanning an A4 print.
Scanning software also offers colour depth options such as 16-bit, 24-bit, 32-bit and 48-bit colour. Bit depth refers to the amount of colour information stored in an image. The higher the bit depth, the more colours it can store – which translates as quality and accuracy of colour rendition from the original to the scan. For most practical purposes the 24-bit setting is fine.
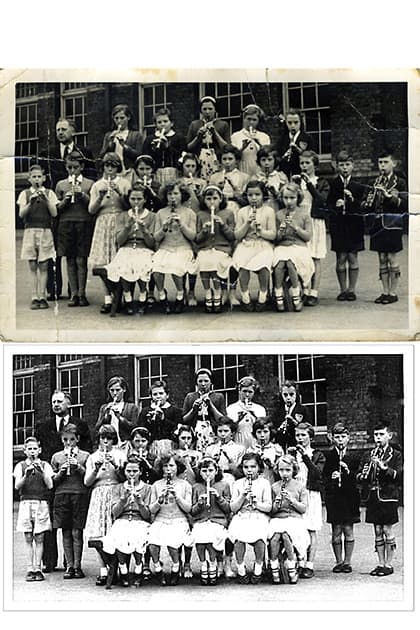
A mono print, scanned in colour, converted to greyscale, sharpened, contrast adjusted and cracks repaired with Photoshop’s healing brush and clone tools. Credit: John Wade
How to retouch digitised photos
There are a few easy-to-master Photoshop techniques that even the newest of newcomers to the software can utilise to make the most of a digitised archive. Sometimes the copying procedure increases contrast too much. Other times, you need to get a decent image out of an old low-contrast print. Either way, the contrast tool (Image> Adjustments> Brightness/Contrast) can be employed to reduce or increase contrast as required.
Old photos from simple cameras are often a little blurred. That can be improved, though not completely corrected, by use of the unsharp mask tool (Filter>Sharpen>Unsharp mask).
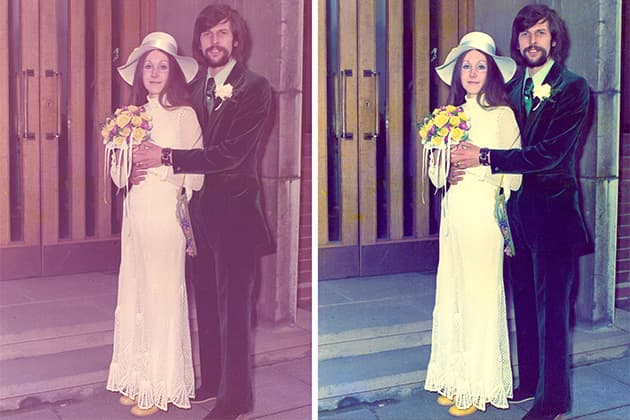
An old and faded 1970s colour print is restored with Photoshop levels and colour balance tools. Credit: John Wade
Fading and colour balance
Ultraviolet in natural daylight affects the chemical make-up of old colour prints, breaking down the chemical bond in their picture dyes. As a result, old colour prints fade with time. Also, because some colour layers are affected more or less than others, old prints take on a colour cast usually with a predominance of magenta. Fading can be adjusted with Levels (Image>Adjustments>Levels) while the colour balance tool (Image>Adjustments>Color balance) can be used to correct colour casts. Simply dial up the colour that is the complementary of the particular colour cast. Green is the complementary of magenta, cyan is the complementary of red, and yellow is the complementary of blue.
If you are digitising an old torn or cracked print, your best friends are the Photoshop clone tool and healing brush. The clone tool allows you to manually copy pixels from one area of the image onto another area. So the pixels immediately next to the tear or crack can be painted over the problem area. The healing brush works by sampling the pixels around the tear or crack and automatically picking what it thinks is the most appropriate for replacing the problem area.
Follow these various techniques and the images in your digitised archives will often be better than the originals ever were.
How to digitise really old images
How far back do your archives go? If photography has been in your family for generations, you might find the odd daguerreotype or ambrotype lurking at the back of a cupboard. Before the days of digital both were notoriously difficult to copy. Ambrotypes were made on glass and so are fairly reflective. Daguerreotypes are worse, made on silver-plated copper with an almost mirror-like surface. Using a camera to shoot a copy of one of these it’s easy to end up with reflections of nearby objects, bright spots around the room, or even your camera lens in the image.
What old-time photographers could never have envisioned, however, was digital technology. Both daguerreotypes and ambrotypes can be copied using a flatbed scanner in the usual way. Scans of daguerreotypes in particular, however, might be a little flat and need their contrast boosted.
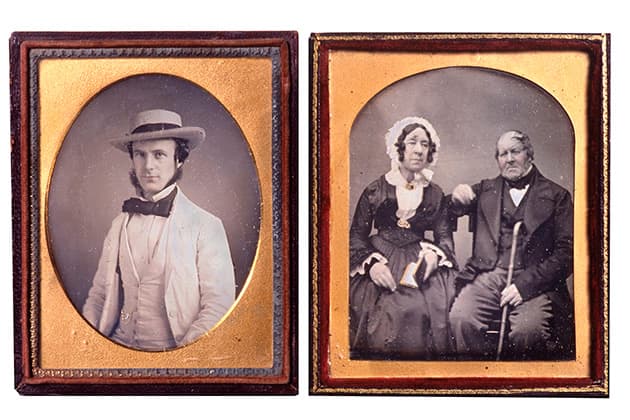
Even ancient daguerreotypes from the late 1800s can be digitised today. Credit: John Wade
Ten tips for better digitising
- Gather your old photos and sort them into categories: family and its different generations, forgotten holidays, creative pictures you shot for camera club contests years ago, pets, kids, cars, days out, etc.
- Sort them into years, people, places or any other category that is appropriate to your particular hoard of memories.
- Separate pictures of good enough quality to be digitised straight from those which are going to need some manipulation to get back contrast, counteract fading, repair damage and other minor faults.
- Decide on your digitising method: camera with 5macro lens or scanner.
- If you have a choice of scanning a print or a neg, go for the negative – there’s likely to be more detail in it.
- Use a scanner whose software incorporates digital Image Correction and Enhancement (ICE) technologies. Following the initial scan this uses infrared to identify scratches, dust and fingerprints. The software then compares the two images and removes the defects.
- If you don’t have a lightbox, invest in a lightpad, used by artists for tracing or stencilling. (Find a selection on Amazon.)
- An iPad or similar tablet equipped with an app such as Lightbox Trace, that provides a pure white screen, can double as a lightbox.
- Scan everything in colour. You can convert black & white images to greyscale later, though it’s often worth retaining the sepia or similar tone of an old monochrome print.
- Carefully remove any dust and hairs from negatives or slides before copying or scanning. Use a soft cloth to clean the table of your scanner to remove dust, hairs and fingerprints.
Kit list
- Tripod One enabling you to extend the camera above the subject or that allows mounting and operation of the camera beneath the legs under which you can put a print or slide on a lightbox.
- Lightbox or similar Find old-fashioned types on eBay, find modern equivalents on Amazon.
- Spirit level Small versions can be found in do-it-yourself stores, used to keep the camera level and parallel with the print or slide being copied.
- Fine-hair brush The type used for cleaning lenses is also useful for removing dust and hairs from negatives and slides before digitising.
- Flatbed scanner Perfect for digitising colour or b&w prints of all sizes, be they small old-time snaps or 10x8in or A4 prints. A scanner with a scanning hood is useful for slides or negs from 35mm up to 6x7cm.
- Dedicated film scanner Mostly for copying 35mm negs and slides and turning them into digital images. Cheap versions produce low-res scans. Pay extra for higher resolution and more faithful colour rendition.
Regular AP contributor John Wade often scans old prints and slides to illustrate magazine articles and books. And yes, that is him in the 1970s wedding picture and playing the recorder, age ten, on the right of the damaged black & white print. Find him these days at www.johnwade.org.


