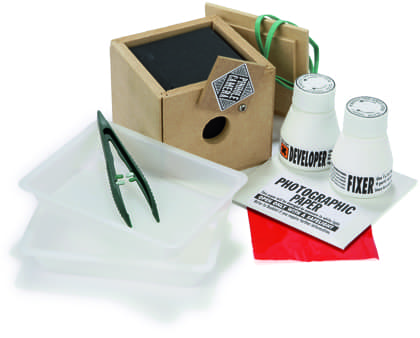
In this age of digital imaging, it can be useful to reacquaint ourselves with older, more humble methods to remind us of the essence of photography – the manipulation of light through an aperture. This is where the Flights of Fancy Pinhole Photography Kit comes in. It comprises everything you need to build your own pinhole camera and develop traditional prints, taking you right back to the medium’s roots.
CONSTRUCTION
Building the pinhole camera is easy. There’s a 24-page booklet that has full instructions, along with a concise history of the technique. The camera is made from six MDF ‘sides’ that slot together and a five-sided black card insert. The box is secured using two strong elastic bands and a pin is supplied to create the aperture. A wooden shutter screwed to the front of the box controls the exposure. In just ten minutes I had a fully functioning pinhole camera.
IN USE
The camera measures 10x10cm, so is ideal for carrying around and placing on small surfaces. A number of approximate exposure times are suggested, depending on lighting conditions. I found them helpfulas a starting point, but experimentation to perfect the exposure obviously makes for a better result. Mindful that the kit supplies only 14 sheets of 3x3in photographic paper, I used half-cut pieces as test sheets to gauge the correct exposure before exposing a full print. Exposures ranged from 15-25secs on an overcast day in June to 15-20mins using a desk lamp with a 100W bulb. With a lightmeter anda bit of maths to work out the f-number, it’s possible to be more accurate when using Multigrade paper, typically with an equivalent ISO of 200.

DEVELOPING
The exposed prints must be developed in a darkroom under a safelight. To create a makeshift safelight, a piece of red Cellophane is included and can be added to a low-watt lamp. Also suggested is the use of a torch, bike light or, as I found, a mobile phone. Trays, gloves and tongs are all provided and the surface area needed for these is very small. Your darkroom could even be a ‘dark-cupboard’.
After developing my first few images, it was clear that the MDF sides were not cut perfectly in the corners so light was entering what should be a sealed chamber. The booklet suggests usinga wood adhesive to secure the camera and eliminate the light leaks. However, I found that using gaffer tape on all edges was just as good and allowed me to easilydeconstruct the camera for storage. The simplicity of the camera lends itself to a wide range of experiments. The kit also offers the opportunity to transform your negative to a positive print, although this isn’t entirely necessary. I scanned the prints and then inverted them in software.

VERDICT
The Flights of Fancy Pinhole Photography Kit costs £21.99 and offers a fantastic introduction to photography and darkroom processes. Using the kit can be a little frustrating, but in some ways that is part of the beauty of practising this most traditional form of photography and processing. The endless possibilities of exposures, along with the ability to modify the pinhole camera, ensures that keen users of the kit will be entertained for as long as they wish to experiment.


