Quality, direction and temperature of light have a profound effect on how a subject appears, says Tracy Calder. Knowing how to analyse light and use it to your advantage will take your close-up photography on to the next level
Your guide: Tracy Calder
Tracy Calder co-founded Close-up Photographer of the Year – a competition celebrating close-up, macro and micro photography – with her husband in 2018. She has written numerous photography books and her work has appeared on the walls of The Photographers’ Gallery and The National Portrait Gallery in London. To find out more visit www.cupoty.com, Instagram: @cupoty and @tracy_calder_photo.
Understanding how light behaves and how to use it to your advantage is as crucial for close-up and macro photography as it is for landscape, portraiture or any other genre. You may well have found a rare beetle performing an elaborate mating ritual in a rainforest, but if the event takes place in dull, flat light, and you fail to address this, it can lead to pictures with no emotional impact or atmosphere.
The quality, direction and temperature of light all have a profound effect on how a subject appears and, ultimately, how we feel about it. Part of our job as photographers is to analyse the light in a scene and then respond to it accordingly.
Natural light
The richness and variability of natural light make this an excellent choice for close-up photography, but before you can use it effectively, you need to assess its quality. Light is often described as hard or soft: hard light tends to come from a single source and direction and creates dense, hard-edged shadows and high contrast.
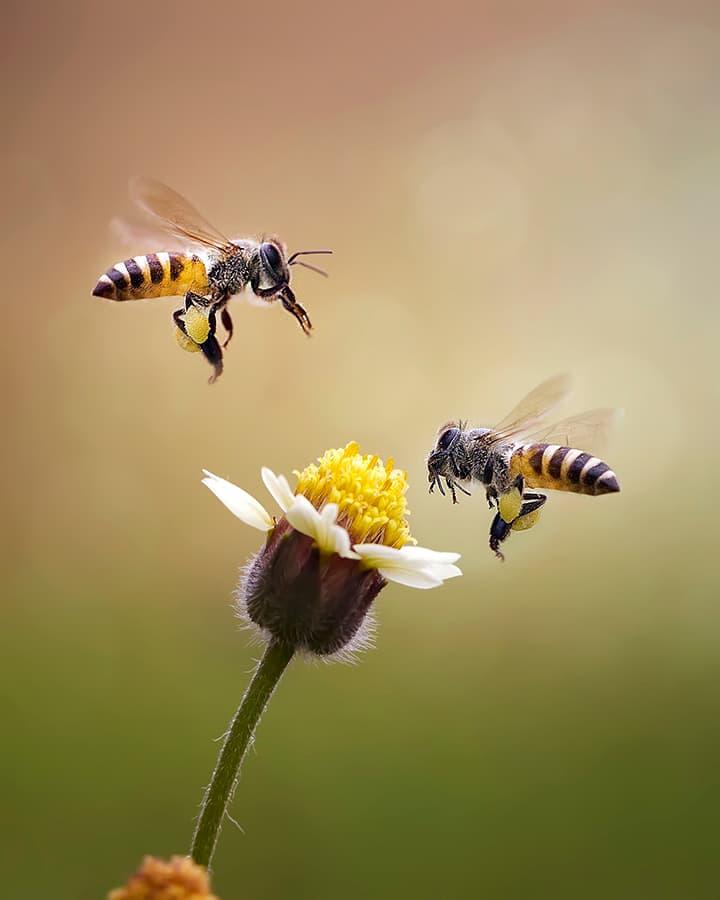
© Getty – Fauzan Maududdin / EyeEm. A burst of flash will allow you to freeze moving subjects and use smaller apertures without whacking up the ISO
This type of light is great for providing a sense of three-dimensionality. Soft light, on the other hand, often comes from multiple sources or directions and produces soft-edged shadows and low contrast. This light is ideal for revealing fine detail.
Once you have assessed the quality of the light it’s important to note the direction it’s coming from. Generally speaking, the direction of light can be divided into four categories: top, front, back or side. When an object is lit from above (top light) it can appear flat and two-dimensional unless the light is modified in some way.
As a result, top light is often best avoided. (Obviously there will be exceptions to this.) When light hits the subject head-on (front light), details become much more noticeable. On the flipside, shadows produced by front light tend to be weak and can make the subject appear flat.
When a light source is positioned behind the subject (back light) it can result in a bold silhouette or, when combined with translucent subjects such as insect wings or leaves, show venation.
When light is allowed to spill over the edges of a backlit subject (rim light) it can be used to highlight fine details such as the hairs on a plant or the serrated edges of a leaf. Finally, when a subject is lit from the side (side light), it emphasises texture and form and gives the image a distinctly three-dimensional feel.
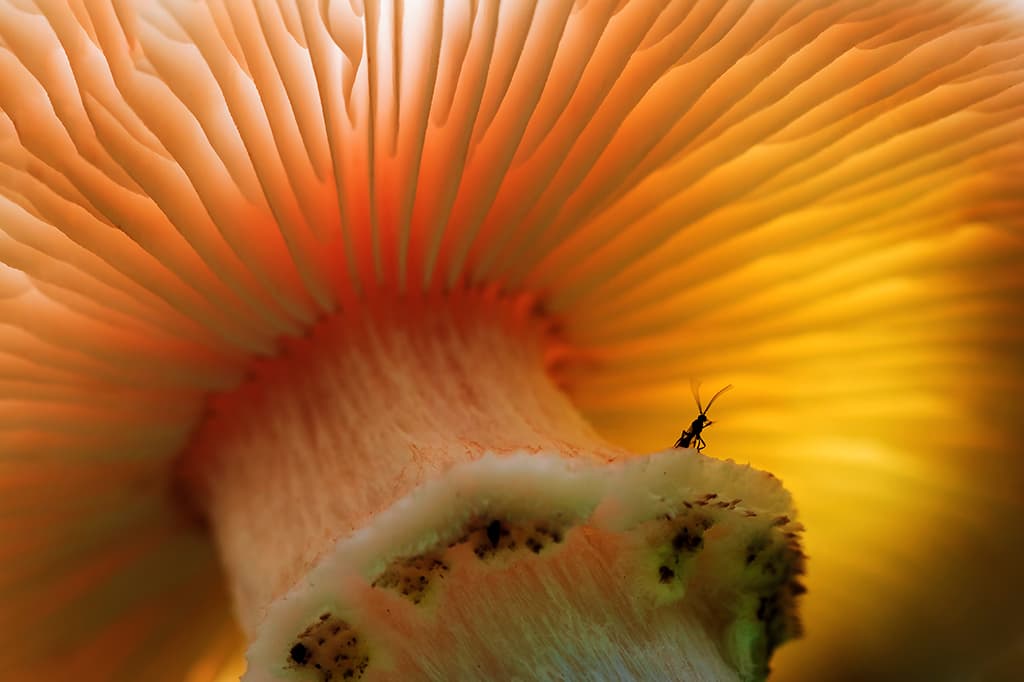
© Getty – Duncan Mcnaught / EyeEm. Continuous lighting is perfect for highlighting details, like mushroom gills, which are normally in deep shadow
It can create visual separation between the subject and the background, which is handy when depth of field is limited. The quality and direction of natural light changes throughout the day, as does colour temperature. At sunrise and sunset, the temperature of light is cooler (which actually gives it a warm look) and the opposite is true as the colour temperature rises.
The white balance presets on your camera will take care of most of the calculations, but there will be times – when you’re shooting fungi in a mix of light and shade, or focus stacking, for example – when you’re better off setting your own custom white balance.
(If you’re shooting raw, obviously you can change the white balance later if you’ve used one of the camera’s presets, but you still won’t get the same level of precision and control you’ll get from creating custom presets.)
Artificial light
When you’re working at high magnifications even the slightest movement of the camera or subject can cause significant blur, which is when flash comes into its own. A burst of flash will also allow you to use small apertures without whacking up the ISO, which is perfect for close-up work where depth of field is seriously shallow.
However, popping up the in-built flash on your camera (if it still has one) is rarely a good solution. The light produced by this flash is hard and can create unflattering shadows. The unit is also fixed into position, which means that the beam cannot be directed easily.
The best solution is to buy an external flash or a system designed specifically for close-up and macro photography. (If you buy an external flash, then effective diffusion is key.)
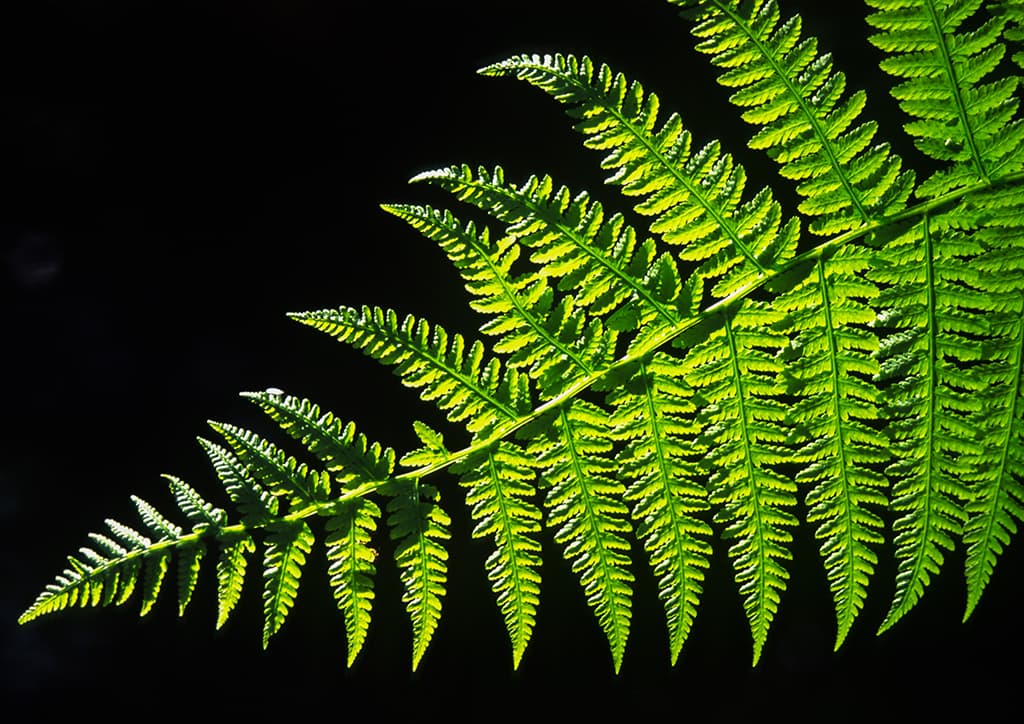
© Tracy Calder. Translucent subjects, such as leaves, can benefit from backlighting as it highlights details and venation
There are two types of dedicated macro flash system: ring flash and twin flash. Popular with medical photographers, ring flash is also useful for close-up photography because it provides even, shadowless lighting. These circular units are designed for short working distances and are mounted on the lens rim with the control unit slipping into the camera hot shoe.
The light produced by a ring flash can be rather flat, so it’s best to look for a model that allows you to adjust the output in some way. Perhaps the most popular lighting set-up for close-up work is twin flash. Here, two flash heads are mounted on a ring around the lens, with the control unit slipping into the hot shoe.
The heads can be fired together or separately, moved around the ring, tilted or, on some high-end models, removed and positioned off-camera. This flexibility comes at a price, but many would argue it’s one worth paying.
Many subjects and situations that appeal to close-up and macro photographers occur in challenging light, but knowing how this light behaves and how it can be diffused, reflected or directed, means you never have to walk away empty-handed.
Top tips for using light in close-up photography
Whether you’re using artificial light or natural light in your close-up photography, the strength and direction of this source can be altered or modified to suit your needs
Look to the sky
Light cloud cover can act as a wonderful natural diffuser, lowering the contrast in a scene and reducing glare on foliage. Check the weather forecast before you head out.
Think big
When you’re purchasing a diffuser for close-up work it’s tempting to buy the smallest you can find – you’re photographing tiny subjects, after all – but the background needs to be diffused too so make sure that your diffuser is big enough to cover both.
Ask for a hand
Holding a diffuser or reflector in place can be tricky – especially if you’re handholding the camera – so consider using an articulated arm, such as the Wimberley Plamp.

© Tracy Calder. Side lighting helps to emphasise texture and form and gives the image a three-dimensional feel
Be aware of colour
If you decide to diffuse light through clothing, or reflect it with a piece of card, be sure that you’re not introducing a colour cast to the scene.
Try some DIY
You can buy flash diffusers online, but there’s a big trend for making them yourself. I’ve seen modifiers made out of crisp tubes, craft foam and paper, for example. (Be sure to research your idea thoroughly before getting out the craft supplies.)
Take time to reflect
The role of a reflector is to reduce or eliminate shadows by reflecting light into dimly lit areas – perfect for flower or fungi photography. Reflectors are usually white, silver or gold. Silver will bring coolness and gold adds a touch of warmth. (You can also experiment with reflecting light using a small hand mirror.)
Hold the roast dinner
You can make a pocketable reflector out of a piece of card and a sheet of aluminium foil. Crumple up the foil, roughly flatten it out and fold the edges over the card. You can use the dull or shiny side depending on the intensity you require.
Lighting kit list for close-up photography
Continuous light
With continuous lighting what you see is what you get – as the light remains on all of the time, you can observe its effect on the subject and make adjustments accordingly.
Customisable set-up
Adaptalux makes customisable and adaptable lighting products that are specifically designed for macro photography. You can build your own lighting environment, selecting from multiple arms, filters and diffusers. The company also recently launched a flash lighting arm.
© Tracy Calder. Side lighting helps to emphasise texture and form and gives the image a three-dimensional feel
Extra illumination
The travel-friendly LED light series from JOBY is intended for vloggers, but neat cubes like the Beamo are ideal for illuminating the inside of flowers or dark patches under mushrooms. The light can even be fitted with a diffuser.
Best of both worlds
If you want the predictability of continuous lighting, but the flexibility of flash, the Rotolight range (in particular the NEO 2) is worth a look – especially if most of your work is studio-based. The NEO 2 can be used on or off camera and has no recycle time.
Powerful pocket tool
Using a daylight-balanced torch (or even the torch on your smartphone) to lift shadows under plants or assist with manual focusing can be useful, but be careful not to distress living subjects.
Further reading
Get amazing images with simple lighting