
Content-Aware Fill has been a core component of Photoshop for many years. Credit: Martin Evening
The Content-Aware Fill feature can be used to fill selected areas by cleverly blending with the surrounding textures. It does this by analysing the colours and textures outside the current selected area, and randomly fills the selection. At the same time it creates a Healing brush-type blend around the selection edges so that the filled area merges seamlessly with its surroundings.
Content-Aware Fill has been a core component of Photoshop’s image processing for many years and used in tools such as the Spot Healing Brush and Patch tool. It is also available as a finishing option when applying a rotated Crop, or when creating a Photomerge panorama, so that it automatically fills the transparent edge pixels. In these situations you can use a Content-Aware Fill to fill in the blank areas and extend the boundary. This in turn gives you more flexibility when cropping such images. The new Content-Aware Fill feature, however, provides you with a complete workspace and is useful for filling areas that are too large to repair using other tools, or where there isn’t a clear area to sample from if using the Patch tool. As a ‘straight fill’ command, a Content-Aware Fill can produce great results, but the new, modal Content-Aware Fill feature for Photoshop CC now provides even greater flexibility with which to fine-tune the content-aware settings and edit the sample area. For example, you can skilfully control which areas to sample textures from and further adjust the settings that control how the sampled textures fill the selected area.
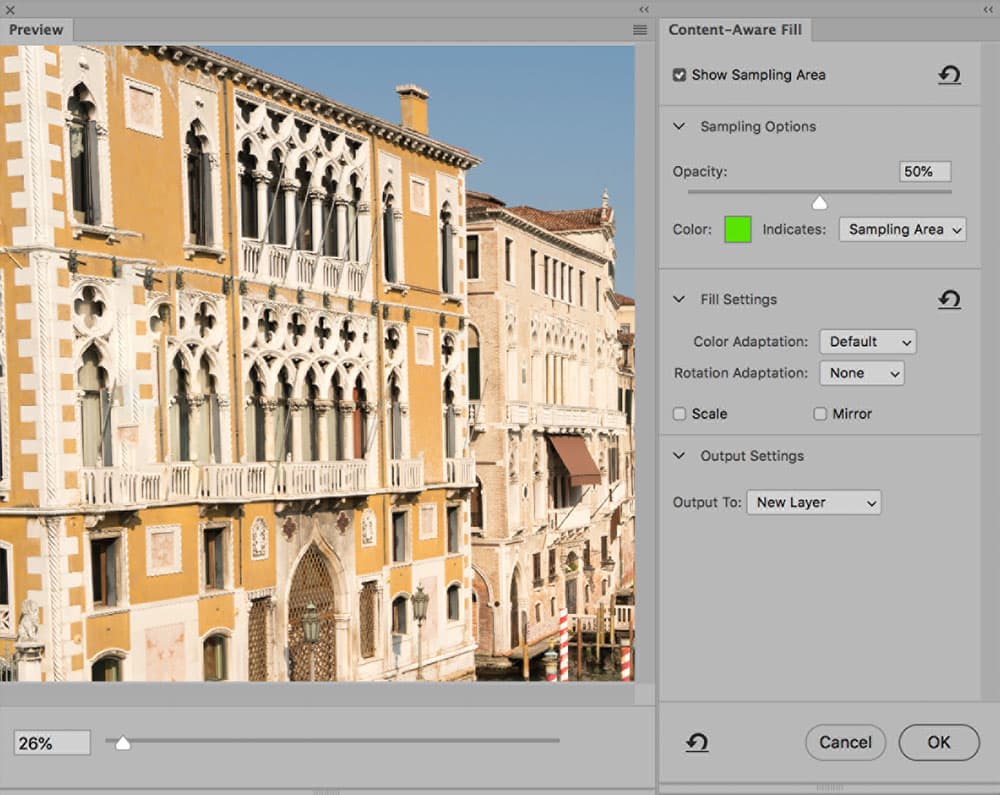
To use, go to the Edit menu and choose Content-Aware Fill. This opens an Options bar, a Tools panel, a live preview window showing the Content-Aware Fill outcome, and a Content-Aware Fill panel. The green shaded area in the preview represents the area the Content-Aware Fill will analyse and sample from. The Tools panel Sampling Brush tool (B) can be used to paint over the working image preview to remove from the sample area.
As you do this, you will notice Photoshop update the Content-Aware Fill preview. Hold down the Option key (Mac), Alt key (PC) to temporarily switch the Sampling Brush tool from the Erase mode to the Add mode. Should you need to, the Lasso and Polygonal Lasso tools (L) can be used to refine the original selection area. You can click and drag to add to the selection, or hold down the Option key (Mac) or Alt key (PC) to subtract and make use of the buttons in the Lasso tool mode Options bar to modify the selection edit behaviour. In the Content-Aware Fill panel Sampling Options section you can adjust the opacity of the shaded area, or change the colour if necessary. By default, the shaded area indicates the Sampling area, but you can set this to indicate the Excluded areas instead. The Fill settings section can then be used to adjust the sampling adaptation method. The Color Adaptation settings allow the colour and contrast to adapt, which can be critical if blending on top of smooth tone areas, such as when removing clouds from a clear blue sky. The Rotation Adaptation determines how much the Content-Aware Fill can flexibly rotate the sampled pixels to create a better match. With higher Rotation Adaptation settings, the Content-Aware Fill will be more randomly rotated. With the Venice scene, I needed to set this to ‘None’, so that the lines of the windows were kept more rigid. Then, under the Output settings you can choose to output to a Duplicate layer, the current layer, or to a new layer, that contains just the Content- Aware Filled pixels.
New Content-Aware Fill Controls

Credit: Martin Evening
Content-Aware Fill
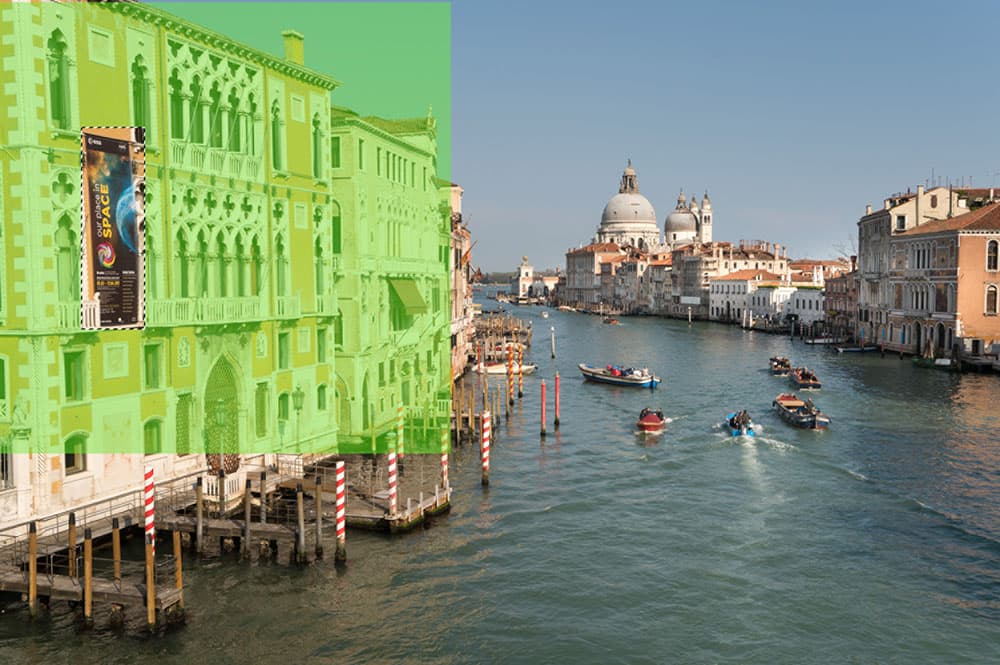
The following steps show how I was able to quickly and simply remove the distracting poster that was hanging outside this museum in Venice. By using the new Content-Aware Fill mode in Photoshop I was able to remove the poster completely and full from the surrounding areas for a clean end result.
Credit: Martin Evening
Make a selection
Select the Rectangular Marquee tool (M) and create a simple selection of the poster. Go to Edit > Content-Aware Fill. Here, you can see the selected area in the document window surrounded by a green overlay that represents the area the Content-Aware Fill was sampling from to fill in the selection.
Credit: Martin Evening
Fill Preview panel
This screen shot shows the Content-Aware Fill panel controls alongside the Content-Aware Fill Preview panel. The initial fill using the default settings was not too bad, but the window detail in the selection area was somewhat distorted. This could be improved by editing the Fill Settings and the sample area.

Credit: Martin Evening
Refine area
To refine the sample area select the Sampling Brush tool (B) from the Content-Aware Fill Tools panel and paint over the green overlay to delete from the sampled area. Leave the Color Adaptation and Rotation Adaptation settings as they are, but experiment with the Enable the Scale option to see what gives the best result.
Credit: Martin Evening
Output settings
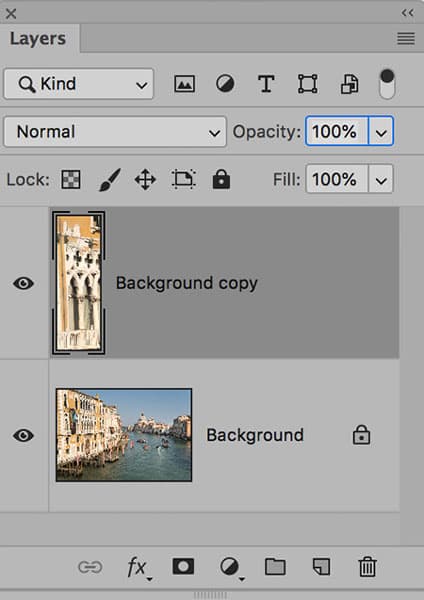
In the Content-Aware Fill panel Output Settings section, set the Output to New Layer and click OK. This will apply the Content-Aware Fill to the selected area, which will be output to a separate new layer in the Layers panel, preserving the original image on the Background layer.
Basic Content-Aware Filling
Before (left) and after (right). Credit: Martin Evening
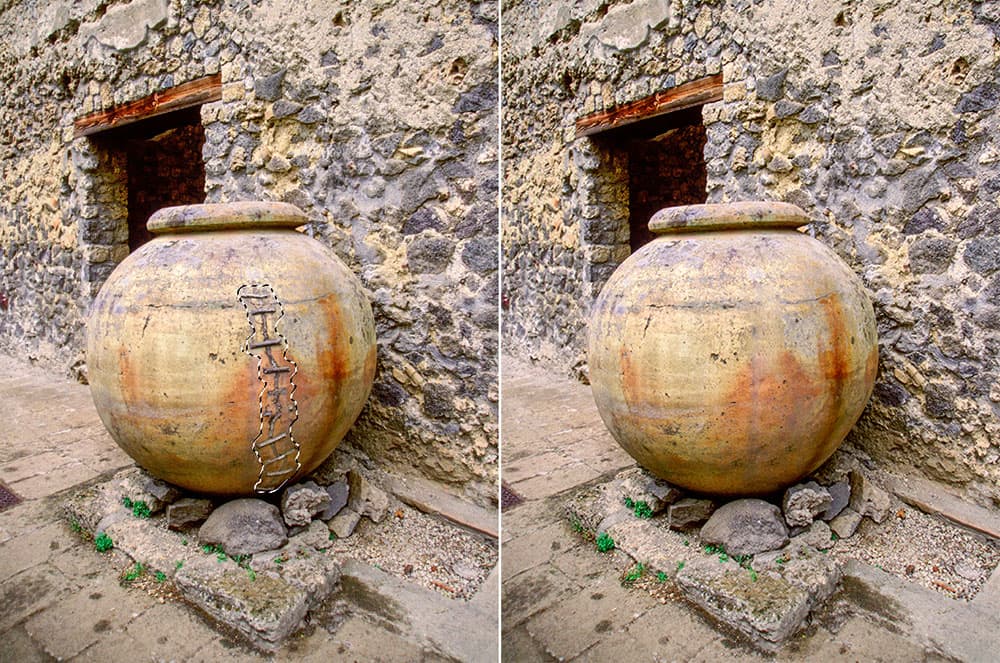
The easiest way to apply a Content-Aware Fill, is via the Fill dialog. Make a selection, choose Edit>Fill and apply using the Content-Aware Fill mode. A basic Content-Aware Fill such as this can’t be modified in any way, but may well produce an acceptable ‘instant’ result. In this example I used the Lasso tool to create a selection that defined the outline of the staples that were keeping the giant pot together. With a regular Content-Aware Fill feature you have no control over how the fill is applied. After applying the Content-Aware Fill and hiding the original selection, you can see that the Content-Aware Fill did a good job. However, the edges around the original selection border could be further improved by working with the Spot Healing Brush tool to disguise them better.
Using Content-Aware Fill on the edges of a panorama
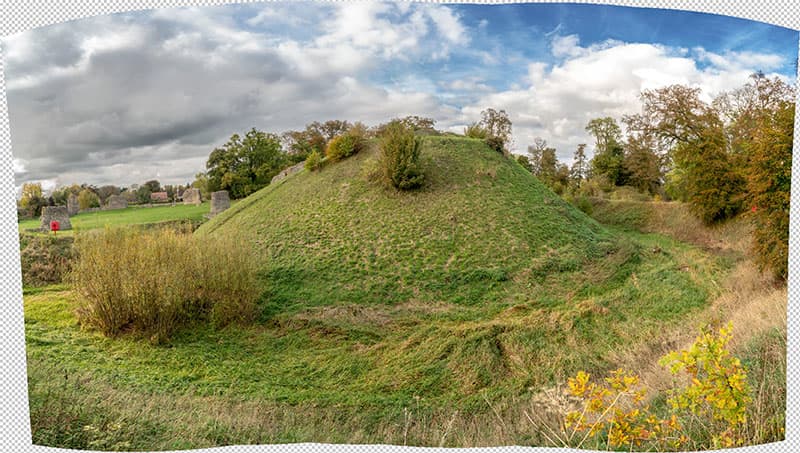
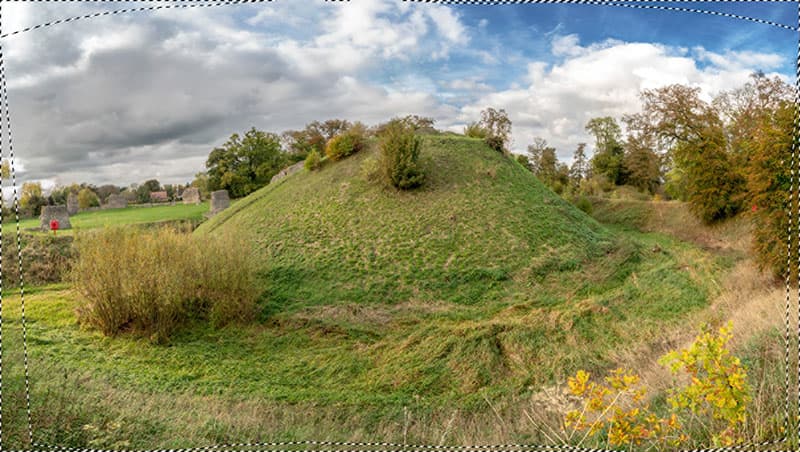
Before (top) and after (bottom). Credit: Martin Evening
When you use the Photoshop Photomerge command to create a merged panorama stitch from a series of photographs you will end up with transparent edges around the border of the final composite image. In the example above, I used Photomerge to create a stitched panorama from a series of photos. With a standard Photomerge there is no option but to crop the photo to remove the transparent pixels. You can of course make a selection of the transparent pixels and use the Content-Aware Fill method described above to fill the outer border. Alternatively, while the Photomerge dialog is open, you can click to select the Content-Aware Fill Transparent Areas option. This automatically includes a Content-Aware Fill step at the very end of the Photomerge image processing.
Additional Content-Aware features
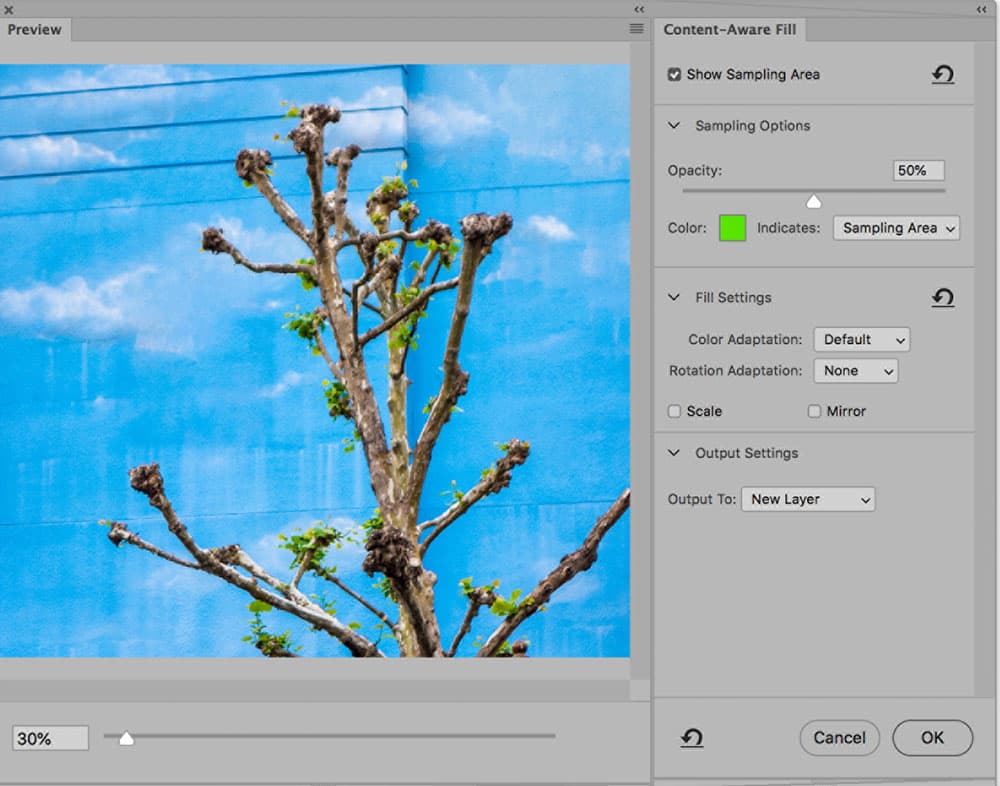
Fine-tune the area you wish to fill in the Content-Aware Fill preview panel. Credit: Martin Evening
Extending a selection
To get better blend edges it will, in some instances, be necessary to extend the boundary of a pixel selection, which will provide a suitable overlap for the Content-Aware Fill to work with. For example, if the starting point is a selection that precisely defines the outline of an object you wish to remove, you’ll need the Content-Aware Fill selection to be slightly wider than that. Therefore, with the original selection active, go to the Select menu and choose Modify>Expand, enter a pixel value to extend the selection by and click OK.
Spot Healing brush
The Spot Healing brush work can also be applied using the content-aware mode, instead of the Proximity Match or Create texture modes. In fact, I would recommend this as the default mode to use for most Spot Healing brush work, whether you are repairing small or large areas.
Patch tool
Using the Patch tool in content- aware mode is similar to working in Normal mode, except after dragging the selection to define the area you wish to replace from, you have additional slider options with which to adjust the Color blending or Structure. The Color slider control works the same as the Color Adaptation options in the new Content-Aware Fill dialog. The Structure slider determines how loose or rigid the Content-Aware Fill will be. At a high setting, Photoshop uses a rigid sampling from the surrounding area, while a low setting tends to jumble things up more.
Content-Aware Move tool
When working on your image with the Move and Extend modes for the Content-Aware Move tool in Photoshop, you can choose to either move the selected pixels and fill the original selection with a Content-Aware Fill, or move and copy the selected area. When moving or extending, the Structure and Color sliders can be used to control the blending for the copied pixels.
Martin Evening is a photographer with a commercial background in beauty photography. He is known for his in-depth knowledge of Photoshop and Lightroom and as an author on digital imaging. His recent books include Photoshop CC 2018 for Photographers and The Adobe Photoshop Lightroom Classic CC Book.


