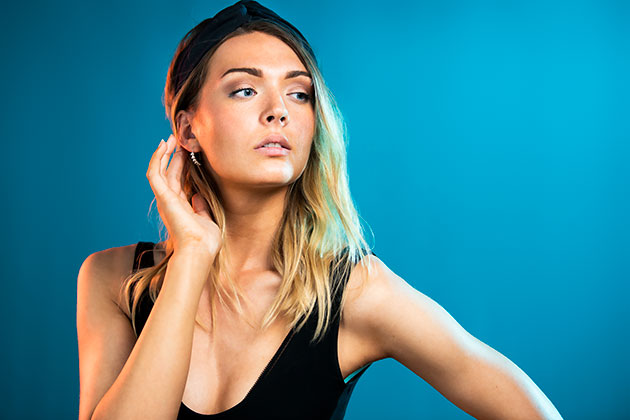
Portrait retouching has come a long way in recent times. Thankfully, many of the trends that plagued the early years of digital imaging now look outdated. These days we can all spot an overly processed portrait – the blindingly white eyes, the plastic skin, the hyperreal tones – so now there’s more of an emphasis on natural- looking retouching.
Of course, the flip side of this is that – with enough skills – it’s easier than ever to completely change the way a person looks, but in a way that looks almost entirely natural. We can reshape bodies, change hair colour, enlarge eyes, eradicate wrinkles, swap heads, comp in muscles and more. But just because we can, it doesn’t mean we should. There is a fine line between subtle augmentation and excessive manipulation.
Those of us who use Photoshop regularly know the huge depth and potential it offers, but to the layman, its name is synonymous with one thing: artificial portrait enhancements. As such, retouching is often seen as a negative, but ask almost any person if they want that zit removed before you print the photo, and there will only be one answer. As such, the job of the responsible retoucher should be about making a person appear at their very best without looking fake or unnatural. The techniques explored can all help you achieve this…
Credit: James Paterson
Enhancing eyes
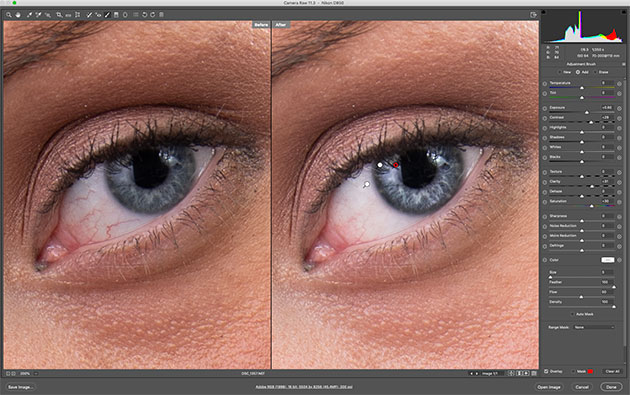
One of the best tools for boosting eyes is the Adjustment Brush. Found in Camera Raw and Lightroom (or via the Camera Raw filter in Photoshop), the tool lets you apply several tonal changes at once. So with an iris, we might want to load the tool with positive Saturation, Clarity, Exposure and Contrast, then paint precisely over the iris (making sure not to go over the pupil). The iris can be enhanced further by darkening the rim – again we can use the Adjustment Brush, hit N for a new adjustment, then load the brush with negative Exposure and paint around the edge of the iris to darken it slightly. The whites of the eyes can also benefit from a subtle lift to exposure, which is easily done by adding a third pin. Finally, the Spot Removal tool can be used to heal any blood vessels that stand out.
Credit: James Paterson
The Texture command
As the name suggests, the Texture command – which was recently introduced to Lightroom and Camera Raw – is a tool that is used for enhancing textures and details in your photos.
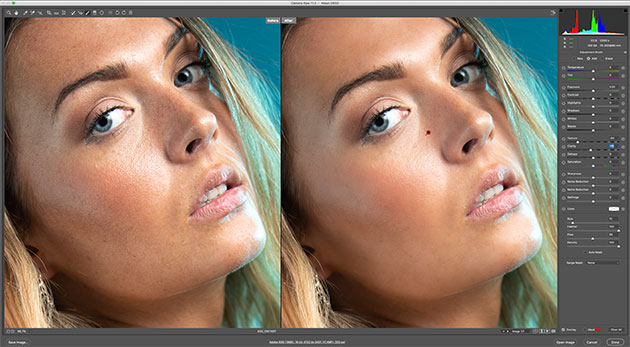
Interestingly, it was originally designed to do exactly the opposite. As such, it can be very effective for smoothing skin. To do so, grab the Adjustment Brush, load it with negative Texture (start at -50), then paint over the skin to smooth out the tones. Once done, turn on the mask overlay to check that the effect doesn’t cover important detail like the eyes and lips (if so, Alt-paint to erase). Then fine-tune the Texture setting until you hit upon the right strength (a touch of negative Clarity can work too).
The Texture command works over mid-range frequencies in the image, so it ignores the finer frequencies that include skin textures and pores.
There are other, more-refined skin smoothing techniques such as High Pass and Frequency Separation that are superior, but these can take time. If you want a quick effect then negative Texture can do a job for you.
Credit: James Paterson
Liquify faces
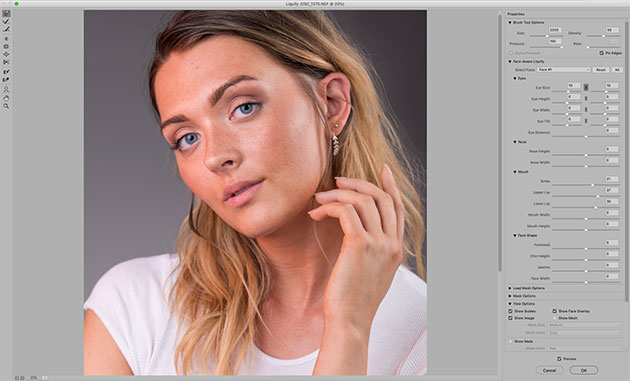
The Liquify command lets you push and pull pixels into different shapes, so it can be used for body shaping – perhaps to subtly shrink a double chin, or to rein in bouffant hair. Begin by making a merged copy of all your layers with Cmd/Ctrl+Shift+Alt+E, then right-click the layer and ‘Convert to Smart Object’ (this keeps the filter non-destructive and editable). Then go to Filter>Liquify to enter the command. Found at the top left of the dialog, the Forward Warp tool is usually the most effective for reshaping objects. It’s best to use a fairly large brush tip and make short movements with the tool to gradually push pixels into new shapes.
Another interesting feature of the Liquify command is the Face-aware controls. This employs artificial intelligence to analyse your portrait and target different parts of the face. If there are several faces, they are each assigned a number so you can edit them individually (use the Select Face dropdown to switch between faces).
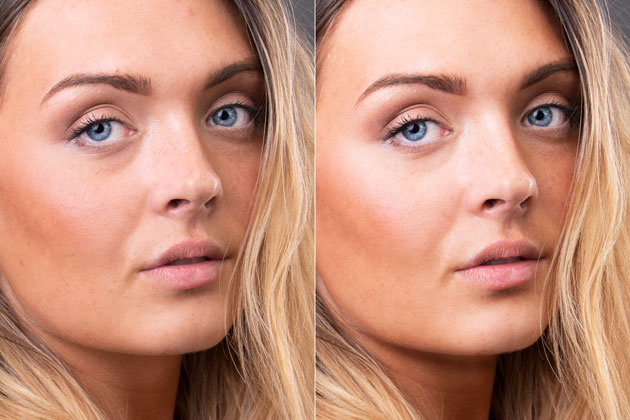
Credit: James Paterson
Dodge and burn faces to enhance expressions
Make a duplicate of your original layer. The Dodge and Burn tools can sometimes have an adverse effect on colours, so to combat this we can change the Blend Mode of the duplicate layer to Luminosity. This way, any changes to this layer will have no effect on the original colours, just on the brightness of the pixels. As for using the Dodge and Burn tools, this is best done with a low Exposure of around 10% (set this in the tool options at the top). The Dodge tool is typically best with Range set to either Highlights or Midtones, while the Burn tool most often should be set to Midtones or Shadows.
More important than knowing how to dodge and burn, is judging where to do it, and how much. With faces, the aim is to enhance the shape of the face. So we usually lighten the forehead, tops of the cheeks, lips, nose and chin, and darken the underside of the cheekbones, the jawline, the inside of the mouth. If the subject has an interesting expression, we could also Dodge and Burn to emphasise it, perhaps by darkening smile lines or lifting the ridges in a furrowed brow.
10 quick portrait tips
- Zoom quickly Scrubby zooming can save you lots of time when retouching – hold Cmd/ Ctrl and Space then drag right to zoom in and left to zoom out.
- Brush controls All brush-based tools in Photoshop – including the retouching tools described here – use the same ] and [ shortcut for resizing the tip.
- Non- destructive cloning When healing or cloning, make a new empty layer then set the tools to ‘Sample All Layers’ to keep the edits non-destructive.
- Use Opacity By keeping your retouching on separate layers, you can tone down an edit at any time simply by reducing the layer opacity.
- Smooth skin with High Pass Duplicate a layer and use the High Pass Filter, then invert it, set the Blend Mode to Overlay and add a mask to confine the softening effect to the skin.
- Fix stray hairs When retouching stray hairs, trim them off at the root with the Clone tool then use the healing tool to remove the rest.
- Sharpen the details The Sharpen tool can be very useful for selectively sharpening parts of a portrait like the lashes or lips.
- Add punch to portraits Portraits will often benefit from a quick boost in contrast and colour – add a Curves Adjustment Layer and plot an S-shaped curve line.
- Swiftly select skin If you want to quickly select skin, go to Select>Color Range and you’ll find a ‘Skin Tones’ preset in the Select dropdown within the command.
- Enhance hair texture Hair can be enhanced with the Oil Paint filter (Filter>Stylise >Oil Paint). Once applied, use a mask to restrict the effect to hair.
Pro skin smoothing with frequency separation
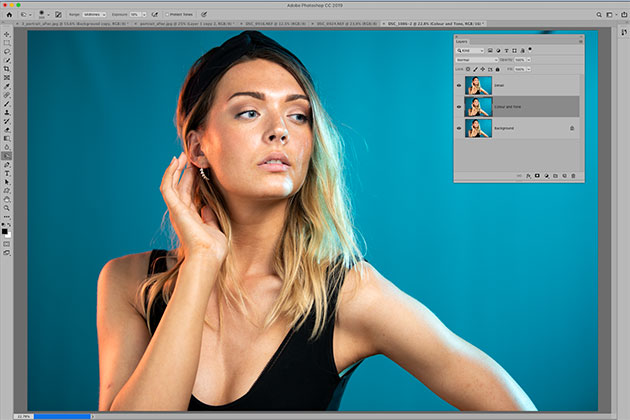
Credit: James Paterson
1. Make two layers
This high-end skin technique lets us create two versions of our image – a high-frequency version that contains all of the fine detail and texture, and a low-frequency version that holds colour and skin tone. Each can be retouched individually for natural results. First make two duplicate layers by pressing Cmd/Ctrl+J twice.
Credit: James Paterson
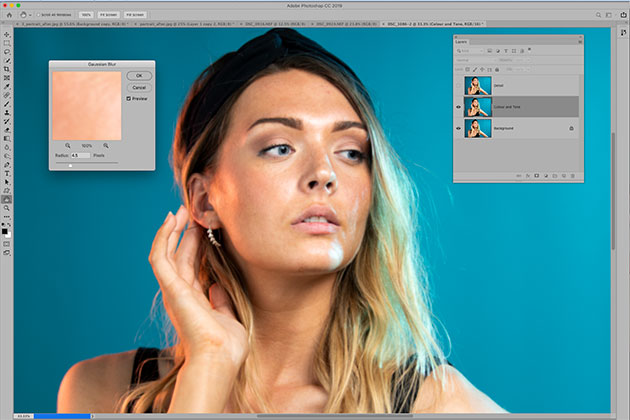
2. Blur the details
Name the top layer Detail then hide it. Name the one below Colour and Tone. We need to blur this layer to remove the fine detail. Go to Filter>Blur>Gaussian Blur. Set the radius to an amount that only just blurs the texture and detail in the skin. In this example here, 4.5 pixels works for us.
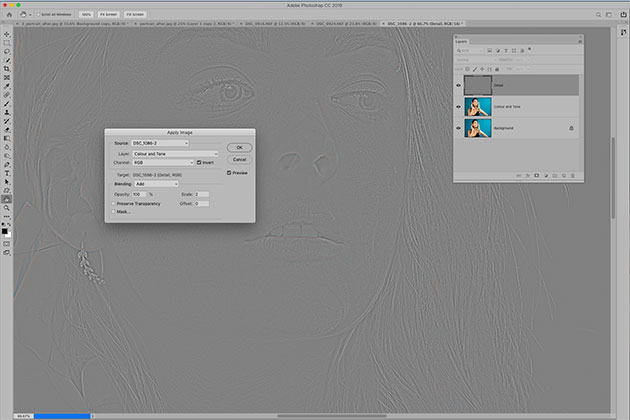
3. Use Apply Image
Highlight and reveal the top layer then go to Image>Apply Image. Set Layer: Colour and Tone, then for an 8-bit image use Blending: Subtract, Scale 2, Offset 128. For a 16-bit image use Blending: Add, Scale 2, Offset 0 and check Invert. Hit OK, then change the Blend Mode of the layer to Linear Light.
Credit: James Paterson
4. Apply surface blur
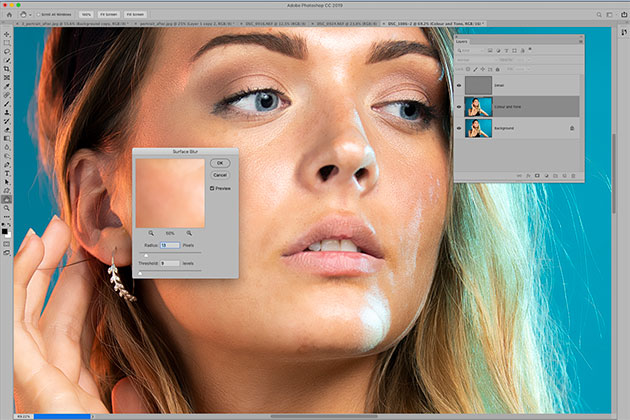
Now our two layers are set up, we can retouch each individually. First highlight the Colour and Tone layer. We can use the Surface Blur filter to correct inconsistencies between skin tones. Go to Filter>Blur>Surface Blur. Choose a Radius and Threshold that just removes any blotchiness – here 13 and 9 works for us.
Credit: James Paterson
5. Clone away blotchiness
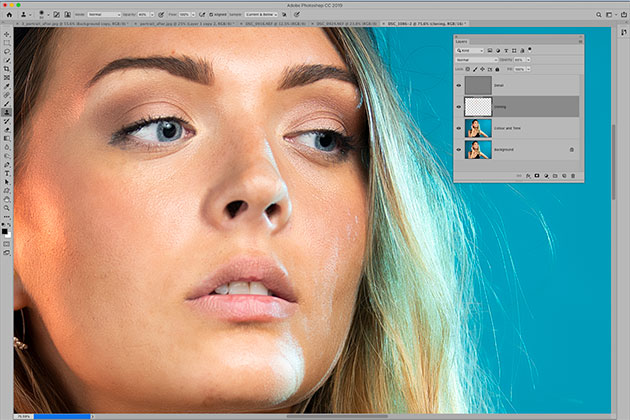
Make a new empty layer then grab the Clone tool and set it to Sample: Current and Below. Hit 2 for 20% tool opacity, then Alt-click to sample clean areas of skin and paint to tone down blotchiness, rough patches of tone, and hot spots around the face. We’ve also improved the background here.
Credit: James Paterson
6. Retouch tiny details
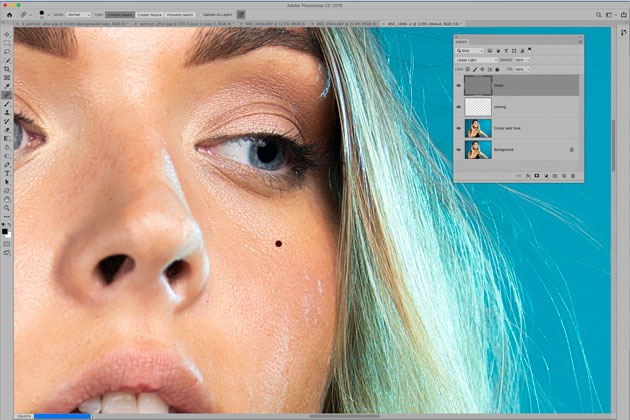
While the Colour and Tone layer is used to fix unsightly tonal issues like eye bags and blotchy skin, the Detail layer is for fixing small pimples and lines around the face. Highlight it next then grab the Spot Healing Brush tool. Make sure ‘Sample All Layers’ is unchecked, then paint to remove these small imperfections.
5 top retouching tools
 1. Spot Healing Brush
Use this to remove small blemishes on skin, stray hairs and other imperfections around the face. It works like a brush, so use the ] and [ keys to resize until it’s slightly larger than the spot, then paint to remove it. It’s the simplest of all the tools here, but it’s automated nature means it occasionally slips up.
 2. Clone tool
This copies pixels from one place to another. Sample a clean area nearby by alt-clicking then paint to clone over any unwanted details.
The tool is often best used at a low opacity around 20% for a more gradual change in tones. The Lighten Brush mode can also be effective when fixing details such as eye bags.
 3. Patch tool
Similar to the Healing Brush, this allows you to sample a clean area nearby when removing imperfections. We begin by making a loose selection over the problem area, then drag the selection to a suitable sample area. It’s useful for toning down wrinkles and lines, stray hairs and scratches.
 4. Healing Brush
Like the Clone tool, the Healing Brush requires you to Alt-click to target a point in the image before painting to remove a messy area. It’s best to target somewhere similar in tone and detail. It can be useful to switch to the Healing Brush when the Spot Healing Brush slips up.
 5. Spot Removal
Found in Camera Raw and Lightroom, this isn’t quite as practical as the retouching tools in Photoshop, but is useful for removing the odd pimple! Grab the tool from the toolbar then paint over a mark and you’ll see a green and red pin appear. If necessary, drag the red pin to sample a clean area nearby.

