In his first column for AP, award-winning nature photographer Marsel van Oosten explains the art of pre-visualisation
Marsel van Oosten
Marsel van Oosten was born in The Netherlands and worked as an art director for 15 years. He switched careers to become a photographer and has since won Wildlife Photographer of the Year and Travel Photographer of the Year. He’s a regular contributor to National Geographic and runs nature photography tours around the world. Visit www.squiver.com. In this article, he explains how to pre-visualise a photograph before taking it.
Pre-visualisation is visualising an image before it is made. Instead of merely capturing what you see in front of you, you first create the image in your head and then try to capture it. This is the most important creative technique that I use and know. Nothing else comes close.
There are two kinds of ‘pre-vis’: when I’m still at home and have come up with an idea or I am at the location and see something that triggers my imagination. The first example is the ultimate form of pre-vis, the second one is more common and it’s the one that I used for this image. You can use pre-visualisation for any kind of photography but, naturally, I will give a wildlife photography example.
There are two ways to photograph wildlife: either reactively or proactively. The vast majority of wildlife photography is reactive – the wildlife does something and the photographer reacts to it.
On safaris, photographers often follow the wildlife and, once they have found it, stick with it. While this is efficient, the wildlife is in charge of your creative results as you are merely following it. While it’s possible to get good photos with a reactive approach, you aren’t working towards a goal.
Turning it around is less efficient and less productive but, when something happens, I’m actually there, I’m already in the perfect angle, the perfect position and I’m totally prepared, so I won’t miss that opportunity… and the result will be something that I actually wanted.
In practice, this means that I often do the opposite of what most of my colleagues do: instead of going where the animal is, I go to where I want the animal to be. Clearly my strategy is a lot less effective than the first one but, when it works, I get exactly what I wanted.
If I go on a project – especially if it’s a place I haven’t been to before – I spend a lot of time figuring out what I can expect. The most obvious way is to Google the destination or the subject.
Location photographs are really helpful because then I can see what the landscape looks like, what the habitat is, where the most beautiful trees are and what kind of clouds I can expect. I also figure out what the weather and the temperature is going to be like, and then I know what the animal’s behaviour might be.

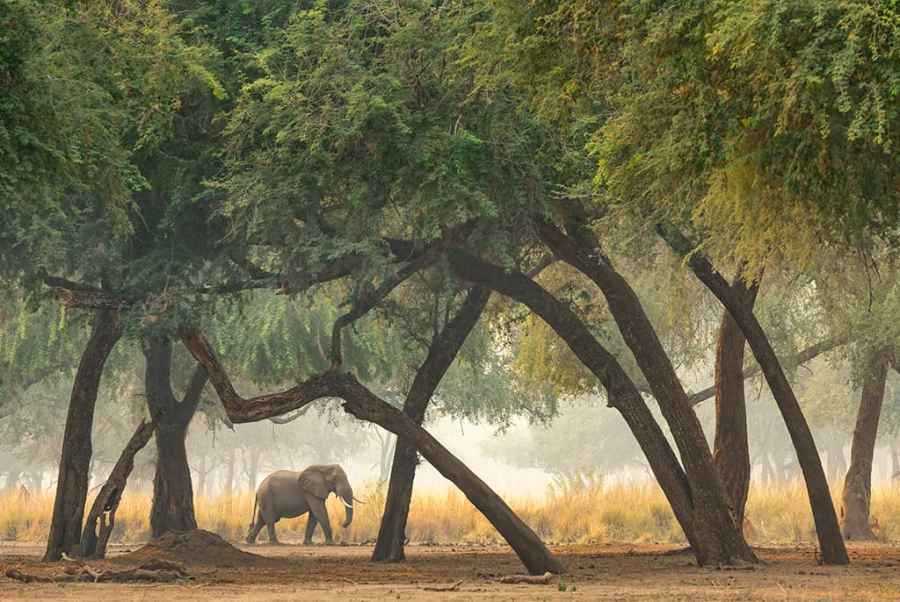
Framing an elephant, Zambia. Nikon D850, 180-400mm f/4 lens, 1/250sec at f/8, ISO 800
I get as much information as possible and then I look at the photographs that have already been made of the subject I’m going to photograph. As a professional photographer I have to be able to stand out and sell my images, so it makes no sense for me to photograph something in a way that’s been done dozens of times before.
Obviously this all has to connect with my own visual preferences and my photographic style. That’s how it works. It’s like a little puzzle and then, in the end, I just come up with a solution to the challenge. I have loads and loads of images that are the result of that kind of thinking. I was never there, yet I already know the moment I set foot there what I’m going to do and how I’m going to do it.
I have a very clear vision as to what I want in my wildlife photography. My favourite wildlife images are always beautiful landscapes with an animal in it as a bonus. The habitat is just as important as the main subject – or often, more important. In my work, I like to create order from chaos by creating a visual hierarchy inside the frame. I also like my images clean and uncluttered.
I focus on strong shapes and graphic lines, and maximum separation between them. These criteria steer my creative thoughts in a certain direction, which is very helpful for me. It’s nice to have a goal, rather than move around like a headless chicken and hope for the best.
In this case I was on a photo safari with guests in Zambia when I saw this beautiful constellation of winter thorn trees. I was immediately in love with the graphic qualities of the scene and tried to visualise what this could turn into.
After moving our vehicle back and forth to get the best angle, I suggested we waited for an animal to walk into that natural frame on the left because that would bring the scene to life and give a great sense of scale. I didn’t really care what kind of animal it would be – a zebra, an impala or a hippo. We waited for less than an hour and got rewarded when a large elephant walked into our frame.
It’s important to remember that this strategy is the opposite from what most do, and that this image is the direct result of pre-visualisation. Had I just followed this elephant around I may never have seen the potential of this scene and, if I had, I wouldn’t have had enough time to get into the right distance and angle to get the perfect composition.
We knew there was plenty of wildlife in the area. Obviously that’s an easy thing to check – you do a quick look around and see if there’s anything in the area that might be moving into that direction and, if there is, it makes total sense to wait and see if you get lucky.
As told to Steve Fairclough
Further reading
Photo Insight with Marsel van Oosten – Sahara Desert