

 Andrew Mason’s top tips
About Andrew Mason
Andrew Mason is a full-time professional nature photographer. His work is widely published and has been used in books and magazines, and by corporate and government clients.
www.andrewmasonphotography.co.uk
1. Don’t get starstruck

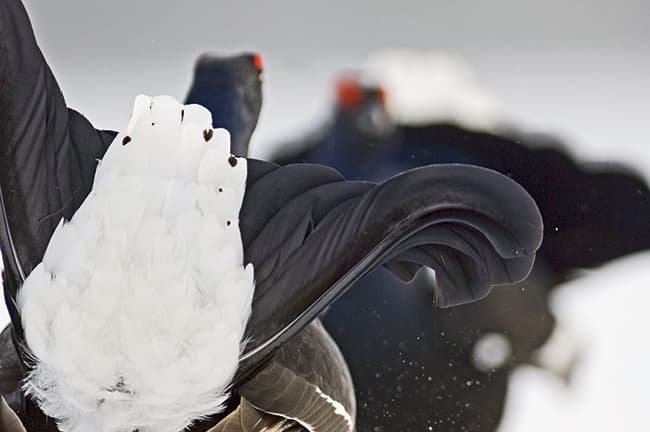
Less glamorous animals, such as these fighting blackbirds, shouldn’t be overlooked, as there can be a striking shot to be had. It can also help improve your skills for the future
It’s human nature to get a little starstruck now and again, as I did when I realised that I was sitting next to actress Keira Knightley in a restaurant! It is understandable that most wildlife photographers will have certain animals, such as lions, tigers and bears, high on their wish list of subjects. However, there are not many photographers who are fortunate enough to be able to spend a great amount of time working with such animals. For most, the opportunity to photograph them will probably be a once-in-a-lifetime experience.
While these star animals make great subjects to photograph, less glamorous animals should not be overlooked. Wildlife photography is the product of many factors, principally content and light. A star animal in the viewfinder does not guarantee a great image – a bad image of a lion is still a bad image. Many animals that are frequently overlooked are easy to access for little or no cost. For example, blackbirds are photographically an unremarkable little bird and are frequently ignored in preference to other, more colourful birds, such as kingfishers. A few winters ago, during a period of prolonged cold weather, food became scarce for many of the animals in the area where I live. This resulted in a larger than usual number of animals, including blackbirds, congregating at a feeding station near my home.
With the access road to the feeding station closed, the number of visitors putting food out was limited and as soon as any feed was put out for the birds, the blackbirds would descend on it. Desperate for food, fights would frequently break out between the blackbirds (see image above). This action, coupled with the wintry conditions, elevated these unremarkable birds to A-list status.
2. Look after your gear
When shooting in harsh conditions, make sure you protect your gear. After each day’s photography, check and clean it, removing dust and dirt
Shooting in harsh environments places great demands on equipment. Having your camera kit fail for whatever reason can result in lost images from encounters that may never be repeated. Even if the problem occurs in the UK it will take days, if not weeks, for repairs to be completed. Simple precautions and maintenance can go a long way to prevent avoidable problems and allow you to keep shooting. A second backup body and doubling up on key focal lengths (teleconverters and a cropped-sensor/high-resolution DSLR on shorter telephoto lenses can replicate longer focal lengths) can be used if the primary camera and lens fail.
Carrying a DSLR with a super-telephoto lens attached to a heavy tripod on your shoulder for anything other than short distances, and especially off the beaten track, is not only uncomfortable, but also risks damaging your gear and injuring you. A small maintenance and repair kit with a multi-tool, Allen keys, gaffer tape and superglue will fix most minor issues.
Protect equipment when photographing in harsh environments, such as prolonged exposure to rain, snow, salt water and dust. Avoid changing lenses or teleconverters in these conditions. Doing so can result in expensive professional cleaning, at the very least. Water that penetrates and then freezes can jam camera and lens controls – and tripod legs. Rain and dust covers are a simple and relatively cheap way to protect equipment in these conditions, and some manufacturers make insulated versions for extreme cold weather. Plastic bags and old pillowcases are cheaper alternatives.
Be careful when taking equipment between areas of contrasting temperatures and humidity – acclimatise equipment inside a sealed camera or plastic bag to prevent condensation from developing inside camera gear.
3. Watch the background
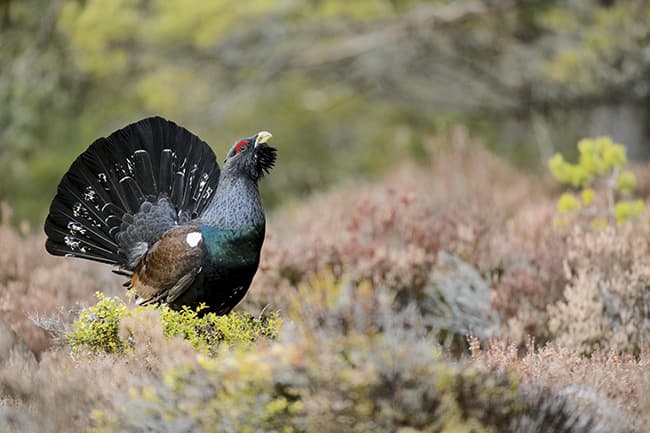
When composing an image, such as this shot of a capercaillie, avoid distracting elements and think about your positioning
The background in a wildlife image is just as important as the subject you focus on. The colour and brightness of the background and how much of it is in focus relative to the subject will affect the image. These factors can be used to create harmony or tension within an image, and can also be used to isolate or include an animal in its environment. The focal length of the lens used, aperture selected and the relative distances between the photographer, subject and background all affect how the background is rendered in a photograph.
Distracting elements can ruin an otherwise good image, as the eye will be drawn away from the subject. To avoid this, scan the viewfinder for any distracting elements when composing a shot, especially the edges. Pay particular attention to any spots of conflicting colour and any vegetation that appears to grow out of the subject’s head or any other part of its body!
When composing an image, where possible and safe to do so, do not simply choose the first spot you see and stand still. Try moving position relative to the subject and the background. Small changes in position can make critical improvements in the composition of an image and eliminate any distractions. When using a long focal length, by lowering your position relative to the subject, the in-focus area immediately behind the subject will be hidden and the background will instead be an area that is further away and out of focus. As well as changing position, try different focal lengths and apertures. When evaluating changes, use the depth of field preview function when looking though the viewfinder or make a test image and review it using the camera’s live-view function.
 Richard Peters’ top tips
About Richard Peters
Richard Peters is a UK-based wildlife photographer whose passion stems from watching natural history documentaries in his youth. Now his photographs and articles are published regularly, and his images have won numerous awards.
4. Work the light
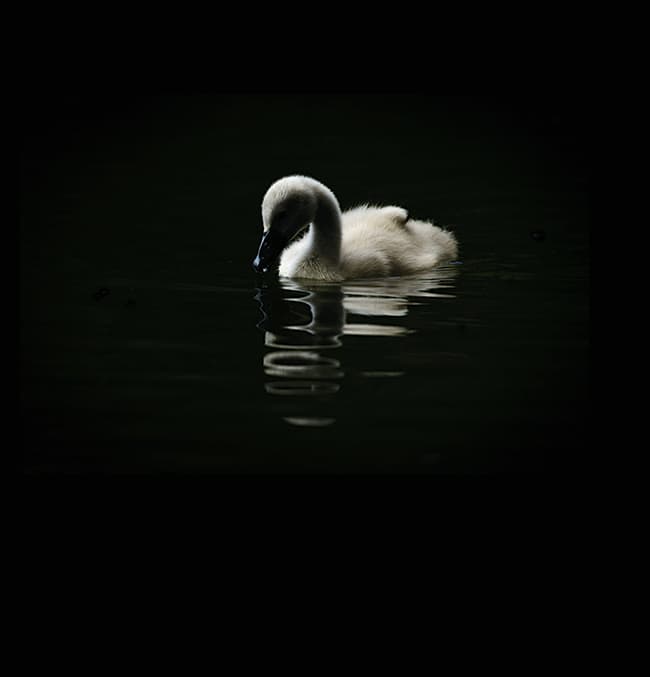
A very bright day is perfect for photographing light-coloured subjects. Exposing for the feathers of this cygnet has naturally underexposed the water, providing a dark backdrop
Bright, warm light is what most people think of when you say ‘good light’. But the truth is, there is no such thing as bad light – bad light to obtain a specific style of photo, yes, but bad light in general, no. By learning what can be achieved with varying lighting conditions, you will improve your chances of coming away from a shoot without a completely empty memory card.
When the light is bright and warm, such as sunrise or sunset, try placing yourself between the sun and the subject for a nice evenly lit scene, or place the subject between you and the sun for some creative backlighting.
However, much more fun can be had when the light is not as bright. Overcast conditions are good for picking out feather and fur detail that would otherwise be lost in more contrasty conditions. This applies to both light and dark- coloured subjects, but be sure to keep an eye on your exposure, as the camera will want to brighten the scene to compensate for the lower light levels. Some underexposure may have to be dialled in manually to achieve the desired results. Very low light can also lend itself well to the use of flash, where you can intentionally underexposure the image, then use a flash gun to light up the subject. This gives a very dramatic feel to the final picture. If you don’t have a flashgun, try stopping down your aperture, lowering your ISO and reducing your shutter speed to capture motion in your image.
5. Add perspective
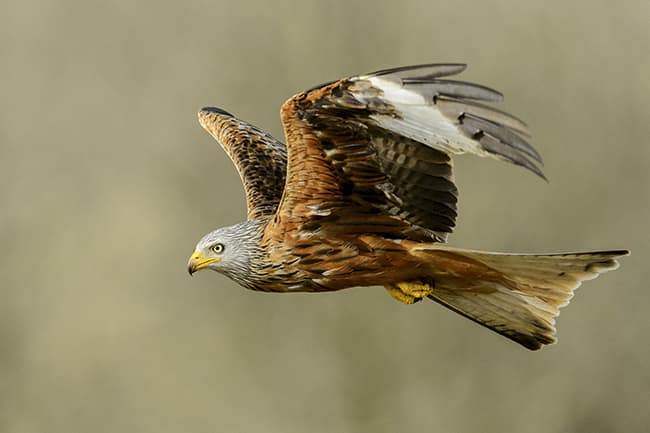
By sitting on a hillside, I was able to shoot across at eye level to this red kite, using the distant countryside fields and trees to provide a complementary background colour, rather than a typical blue sky
One of the best ways to draw a viewer into a photograph is to get your camera at eye-level with the subject. Of course, this may mean getting dirty, as a lot of animals are very small and most often found at ground level, but your images will take on an entirely new look if you do.
You can expand on this viewpoint by using close foreground and distant background elements to surround the subject in a completely out-of-focus palette of colour, or have the ground beneath the subject sharp and in focus, just leaving the background diffused.
But eye level is not all about getting down low to the ground – it’s simply a case of getting the right angle on a subject. Often with birds in flight, for example, the easiest image is obtained by looking straight up into the sky at them, but this can produce very unflattering images that lack impact. At best, you’ll see the underside of the bird set against a plain blue sky, and at worst, an underexposed silhouette against a plain white, cloudy sky.
Avoid the temptation to photograph birds until they are lower in the air, and all the better if you can get yourself up to a higher vantage point.
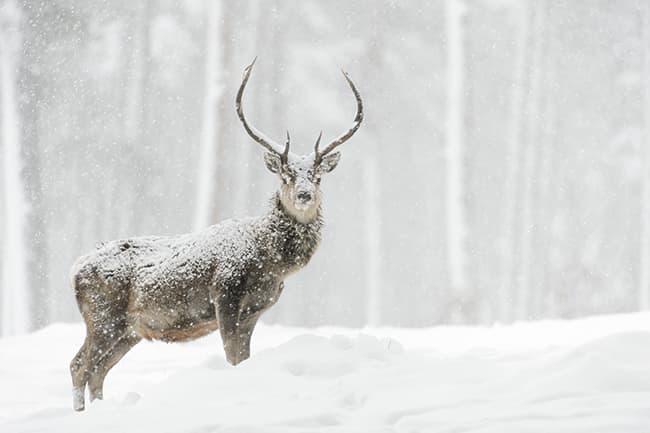
6. Be ethical
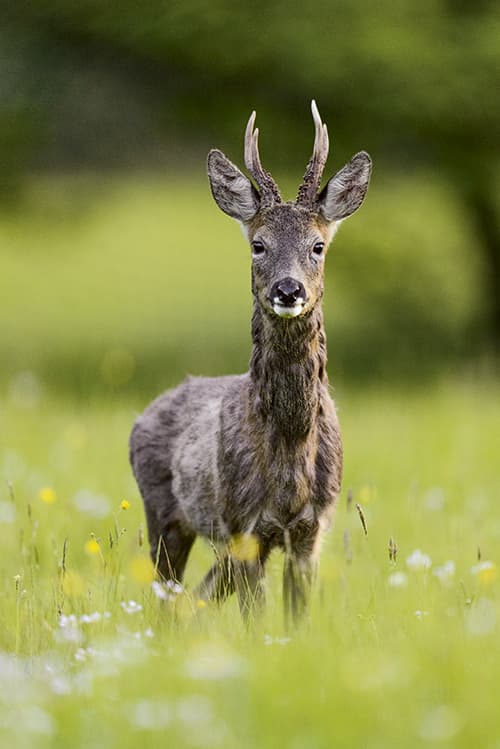
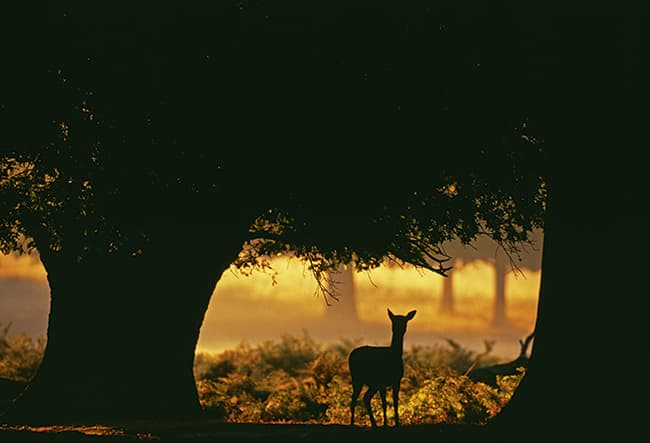
Roe deer are notoriously tricky to photograph. Most images, such as this one, show that the circle of fear has been breeched, even though a 600mm lens was used to keep a distance
Wildlife should always be respected. It goes without saying that if obtaining an image results in distress to the subject, the image should not be taken.
All animals have a ‘circle of fear’, and once you are within that, at the very least you will start to affect their natural behaviour and, at worst, disturb them to the point of making them move away. There are also a variety of animals in the UK protected by the Wildlife and Countryside Act 1981, which should be strictly adhered to, especially any subject falling under Schedule 1. If in any doubt, consult the Act to make sure capturing that prized image isn’t putting you on the wrong side of the law.
The biggest subject that divides opinion is that of baiting. To an extent, each photographer will have his or her own opinion. Should one animal be sacrificed to another in order to obtain an image? Most would say no, but then others will say it depends on the circumstances, the subject being photographed and the bait being used, and indeed many images out there will confirm those divisions in opinion.
Even baiting with food such as seeds and nuts is seen as unacceptable by some, as you are making an animal move to a place of your choosing that it otherwise may not have gone to, in order to photograph it. Again, opinion is divided, but it is important to ensure that any food put out is not bad for the animal and that you do not overfeed, making the animal reliant on your food source.
 David Tipling’s top tips
About David Tipling
David Tipling is one of the most widely published wildlife photographers in the world. His pictures have appeared on hundreds of book and magazine covers, and have been used in various ways – from wine labels to projections
in New York’s Times Square.
7. Observe the three Ps
Follow the three Ps of perseverance, patience and planning to avoid leaving anything to chance
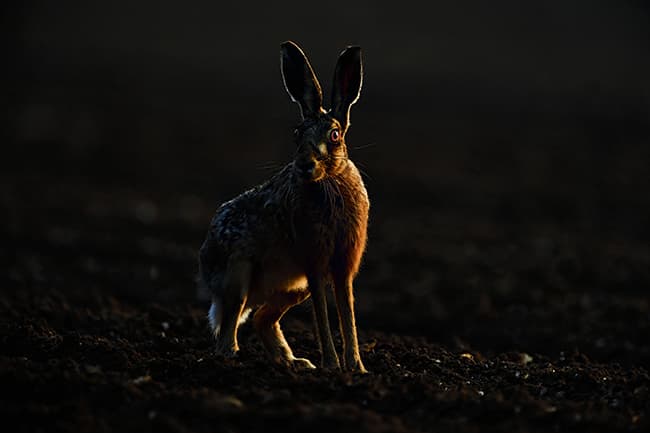
I believe the key to success for a wildlife photographer is the three Ps: perseverance, patience and planning. Unless you get lucky, perseverance will always win out. The more you persevere, the luckier you’ll get. I tend to work on one subject at a time and maximise my time in the field. Most recently, I have been focusing on brown hares and each trip I make into hare habitat has the promise of producing new images.
To persevere means you will also have to be patient. You may need to wait long periods between bouts of action, but you must always be ready to react. If you take your eye off the ball you could miss the fleeting opportunity you were waiting for. For example, I have sat patiently, hour after hour, waiting for a dive from a fishing osprey in specifically placed hides. At times the action might be fast and furious, but then hours might go by without a visit. It is imperative to be always peering skywards through the hide, otherwise you might miss a dive that’s all over in seconds.
Perseverance and patience can be rewarded by planning. Researching your subject, working out the direction of light, the best time of day and locations will all save time and get you one step closer to capturing those dream images. By planning where to locate yourself for the best light and potential for action, you will help avoid leaving anything to chance.
8. Learn your subject’s behaviour
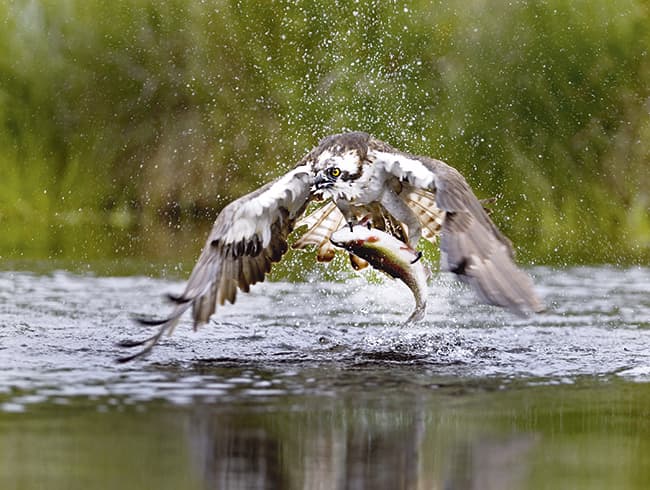
Many species exhibit signals that, once learned, are invaluable in capturing eye-catching shots. This shot of an osprey with a trout was taken in Scotland
Knowing what your subject may do at a given time will allow you to react and be in the right place at the right time. This is partly planning but there is no substitute for being out in the field, watching and learning.
I cut my teeth as a birdwatcher in the Medway Valley in Kent, and as a teenager I spent hours observing in the field. This has given me a feel for my subjects – an asset I believe has been invaluable in my career.
Read as much as you can, and if you have come to wildlife photography through photography then embrace being out in the field.
Animals give vital signs as to what they might do next. It’s clearly an asset if you know you are getting too close and in imminent danger of having your subject turn tail and run or fly. Equally, you will be prepared if a subject is about to do something worthy of a good shot. Ducks and swans provide vital clues when they are about to take off – they bob and shake their heads and face into the wind. Similarly, a bird of prey will normally ruffle its feathers before taking to the air.
Birds and mammals have what is commonly referred to as a ‘circle of fear’. If you cross a certain distance around them, they will look to flee or simply run or fly away. This can be the difference between a good portrait and a shot of a disappearing rear end. For example, a grazing deer may stop and look your way as you approach, and if it resumes feeding after a pause you might be able to move closer. However, if the deer moves position and keeps staring, chances are it is on the verge of fleeing. Being able to read these subtle nuances in behaviour comes with experience.
9. Never be afraid to experiment
‘The judges won’t like that’. I have heard this said on numerous occasions referring to camera club competitions, when I’ve suggested to a client on a workshop to shoot a subject in an abstract way. It seems that many photographers are afraid to experiment, but it’s often these images that remain in viewers’ minds, so never be afraid to try something different. It is tempting to go for the safe, well-lit, sharp portrait or super-sharp action image, but sometimes shooting motion-blur images or taking part of a subject may result in a more artistic picture.
A few years ago I sat in a hide photographing black grouse lekking (engaging in a mating display). As I peered out at all the males strutting their stuff, I was aware I was creating images that were similar to many I had made before. So I set out to shoot an abstract that would still tell the story of conflict but would be a more artistic interpretation. The result was an image that was Specially Commended in the Wildlife Photographer of the Year competition (left).
10. Be ready for the unexpected
I am always ready for action whenever I am out in the field. My camera is switched on and the correct exposure dialled in so I am able to grab the camera and shoot within a second or two. You never know when an interesting bird or other subject might suddenly appear.
Wildlife subjects can sometimes do the most unexpected things, so it’s vital to be alert and ready. I have seen many other photographers, as well as myself, miss plenty of shots through doing too much reviewing of images on the back of the camera (chimping) when we should be alert for action.
I like nothing more than being out with my big lens mounted on its tripod over my shoulder ready for anything. I never know what I might end up photographing on any given day, but being ready may mean bagging the potential best shot of the day, as opposed to fumbling around and enduring an agonising missed opportunity.


