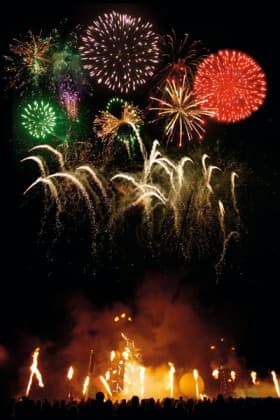
Firework displays are challenging subjects, but you can rescue a disappointing set of pictures by combining them in software. Barney Britton shows you how.
Technique Explained: Create the perfect firework display
Requirements:
Software: Adobe Photoshop CS/2/3/4 or similar (layers support essential)
System requirements: Windows PC or Mac
Skill required:Moderate
Time to complete: 30 minutes

Firework shows are great fun, but they’re tricky to photograph.
With the exception of the biggest events, there aren’t normally that many fireworks exploding in the air at any given time.
It’s easy to get a series of acceptable images, but very difficult to get a single shot that captures the grandeur of the entire show. Also, exposure is complicated: should you expose for, the crowd in the foreground or for the fireworks?
Ideally, you would capture both elements on a single frame, but this is easier said than done.
I shot a fireworks show last year, and although I got decent images of the fireworks themselves and the crowd in the foreground, I didn’t manage to get the shot I wanted, with everything in it.
However, all is not lost, as on these pages I’ll show you how to combine several separate images, of both fireworks and a foreground element, to create a single dramatic image.
Step 1.

Shoot the images.
Here, I’ve taken a shot of the crowd and several shots of individual fireworks exploding in the sky.
A tripod is essential for all these images.
For the fireworks, a bulb exposure from the moment of the firework being released to the moment it explodes should give you good results with a little experimentation.
Shoot wide to make sure you get the entire burst in the frame as you can always crop later.
Step 2.

Once you’re back inside in the warm with your pictures, you need to prepare them.
First, crop the fireworks shots to get rid of any extra background.
Next, open the Levels tool (Ctrl+L).
Pull in the left-hand slider while holding down the Alt key to make sure that the remaining background to all the fireworks pictures is pure black.
Step 3.

My crowd scene is in the landscape format, so I’ve added extra ‘sky’ (Image>Canvas Size) at the top of the picture by extending the image vertically using a background colour of black.
Step 4.

Now we’re ready to overlay the firework bursts onto the background.
All you need to do is drag each image of fireworks onto the background layer using the Move tool (shortcut key: V).
For each image you drag onto the background, a new layer will be created.
Don’t worry about positioning the images yet.
Step 5.

You’ll notice that with the Layers blending mode set to Normal, your fireworks images overlap one another.
This is easily fixed.
Change the Blending Mode on each layer to Lighten and the black sky behind the fireworks will effectively become transparent, allowing each of the layers to show through.
Once this is done, you can manipulate each layer individually without masking any of the others.
Step 6.

Arrange the bursts of fireworks in the pattern that you want, and when you’ve finished flatten the image (Layer>Flatten Image) to get rid of all the separate layers.
Save the image, and then sit back and admire the results of your hard work.


