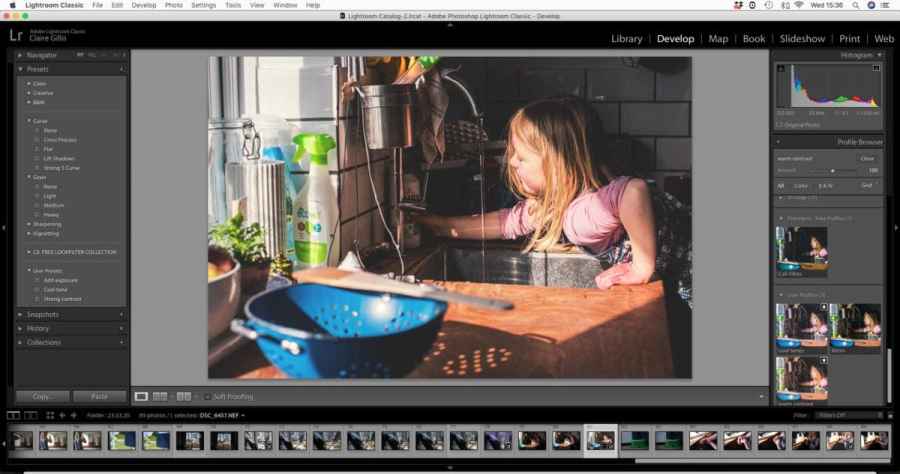
For the photographer on the go, Adobe Lightroom presets and profiles are an easy and fast way to stylise an image. Essentially, they are a prearranged set of adjustments that
can alter anything from the overall tone of your image to adding grain, or increasing or decreasing the level of contrast. Each profile and preset will perform different tasks depending on what it has been designed to do. Some will adjust a large variety of image editing settings, whereas others just one or two aspects. There are differences between profiles and presets, and reasons as to why you would use one over the other – things which we will cover over the next few pages.

This image has been altered with a bespoke profile setting in Lightroom that was designed to warm up the tone of the image and create a stylised effect
We’ve used Adobe Lightroom Classic for this feature, but if you prefer to use Adobe Lightroom CC then the same principles apply. The menu systems are laid out slightly differently (some features are unavailable) so you will need to take this into account.
What is a Lightroom preset?
A Lightroom preset is the quickest way to apply a prearranged set of image-editing adjustments to your photo. You’ll find the presets settings in the ‘Develop’ Module on the left hand side of the menu system under the tab ‘Presets’. The default presets have been split into groups and range from colour adjustments to black & white imaging effects. Below the default presets, you can import presets and create your own (see tips 3 and 4). By hovering the mouse over a preset, Lightroom will preview the effect on your main image. To select the effect, simply click on the preset and it will be applied. You’ll notice the sliders for whatever settings it changes moving on the opposite side of the workspace. You can make further adjustments to these after you’ve applied the preset effect if you so wish.

What is a Lightroom profile?
Lightroom profiles are processes to convert your camera’s raw information to the colours and tones we see when we open the image file. Think of it as a base layer. You will find all of your profiles under the ‘Basic’ tab in the ‘Develop’ module. Click on the desired effect to apply. Adding a profile doesn’t shift any of the image adjustment tools in your software in the way a regular preset does. This means you have full control over the adjustment settings to their maximum capacity. Another plus for using a profile is being able to control the amount of the effect added to your image using the Amount slider (note this slider does not work on the default Adobe Raw and Color Matching profile settings).

How to install a Lightroom profile and preset
You can download Lightroom presets and profiles (sometimes for free depending where you source them from). The file type will most likely be an .xmp (Extensible Metadata Platform) file. To import a preset, go to the plus sign next to the Preset menu tab. Select Import Presets, and navigate to the .xmp file/s you have downloaded. It will be added to your Preset menu towards the bottom of the stack. To import a profile open the ‘Profile Browser’ instead, and click on the + sign next to ‘Profile Browser’ then go to ‘Import Profiles’ and select your downloaded profile .xmp file.

How to create your own Lightroom presets
If you want to create your own Lightroom presets, it is very simple and easy to do. Start by making any desired adjustments to an image. Once you’re happy with them, go to the + sign next to the ‘Preset’ menu and click ‘Create Preset’. A pop-out menu will appear. Here, you can name your Lightroom preset and then save out as it is, or you have the option at this stage to select or deselect parts you want to keep or remove.
For example, if you feel you only want your preset to adjust the grain and tones in your images but not the contrast or exposure, make sure contrast and exposure are unchecked but any grain and colour settings are checked (they will be checked by default). By right clicking on your preset in the main menu, you can also make adjustments to it at a later date by selecting the ‘Update with Current’ settings option and again selecting the parts or de-selecting parts of the adjustment you want to update. To delete any of your imported or made presets (this also applies to profiles) right click on the preset and select ‘Delete’.
How to create a profile in Adobe Camera Raw
Unfortunately, you cannot create a Lightroom profile as easily as you can a preset, but it is still possible to do using Adobe Camera Raw and Photoshop. In ACR, open your starting image and make the adjustments. Then navigate to the ‘Presets’ icon, which is eighth along from the ‘Basic’ tab. Go down to the ‘New Preset’ icon at the bottom, hold Alt on your keyboard and click. A ‘New Profile’ boxout will appear (if you don’t press Alt, a ‘Preset’ boxout will appear instead). Name the new profile and click ‘OK’. Now you can press ‘Cancel’ on your image in ACR and restart Lightroom. Once you have restarted LR your new profile will be at the bottom of the profile menu under ‘User Profiles’. In Photoshop, make any adjustments to the image using adjustment layers. Group these together and make sure that group is highlighted. Then go to File>Export>Color Lookup Tables. Save the ‘Grid Points’ as ‘High’ and ‘Format’ as ‘CUBE’. Press ‘OK’
then ‘Save’ your profile out onto your computer. Now open ACR and do the same steps as before. However, once you’ve brought up your ‘New Profile’ menu, check ‘Color Lookup Table’ and navigate to your saved .CUBE file. Name the file and press OK. Now you can ‘Cancel’ ACR and restart Lightroom.
How to batch edit with Lightroom presets and profiles
In Lightroom Classic (you cannot do this in Lightroom CC) it is possible to batch edit all of your images with the same Lightroom preset or profile. To do this, select all the images you want to alter (hold shift as you select). Apply the preset or profile to the lead image on display then select ‘Sync…’, which can be found on the bottom right hand side of the screen. A pop out box will appear. Press ‘Synchronize’ and the preset will be applied to all the selected images.

Can you stack Lightroom presets?
Although it’s not really what they were designed for, in theory you can stack presets… well, kind of! Basically, a new preset will override the preset applied before, but only on the same settings. For example if you use a preset that has an exposure setting of +1 and then you apply a new one that has an exposure setting of +2 your image will change to +2 (not plus +3 as it does not add them together). When designing your own presets, it’s best to keep the arrangements of settings separate. For example, you could create one preset that only alters the ‘Tone Curve’ and then create another that adjusts the clarity and texture in the image. That way you can stack them on top of each other to create more effective results.

Useful controls
You may want to consider what image layout options you have when it comes to viewing your presets and profiles effects. Find all layout options below the image, in the bottom left hand corner. We prefer a simple before (image on the left), and after (image on the right), which is under the ‘YY’ setting. However, there are more options. For example, with ‘RA’, you can drag a reference image into the opposing side so you can match and edit your active image to the same style. Experiment to see what works for you.
Another crucial setting is the ‘Reset’ button (bottom right-hand side of the screen). If it all goes wrong, reset and start again!


