
Although I have grown up with digital imaging, that doesn’t mean I intend to forget about traditional film processing and printing.
I had wanted to set up my own darkroom since finishing a black & white photography course two years ago.
There was something hugely satisfying about processing my own negatives and making prints from them, but without regular access to a darkroom I found my attention turning to digital imaging instead. It was more convenient, less time-consuming and much cheaper than wet printing.
But while I was enjoying the new challenges of digital photography, I felt I had lost touch with my film roots. I kept wondering, ‘How difficult would it be to set up my own black & white darkroom?’
My opportunity came when I moved into my new house. There was a small, unused office with a good-sized workbench and ample storage space. I drew up a list of equipment I would need and set myself a challenge: to find everything I needed to set up a temporary darkroom for as little money as possible.
In this digital age, was setting up a darkroom a step backwards? Perhaps I would be taking my eye off the digital ball – how could building a darkroom help me progress with my digital photography? I wasn’t even sure where to start looking for the equipment, or how much it was going to cost.
Despite these concerns, my mind was made up. I wanted to build a darkroom to see if I could do it and secondly, to reacquaint myself with traditional film processing and printing.
I could also try scanning my negatives and explore ways of combining traditional darkroom techniques with the innovations of digital photography.
One thing was certain: building a darkroom wasn’t going to hinder my learning process; it might even help me on my digital journey.
This is not a definitive guide on ‘how to set up a darkroom,’ but a diary of my experiences and an insight into what I learnt.
How to Set Up Your Own Darkroom – Step by Step
Getting started
I was on a tight budget so I had to beg, borrow or steal everything I needed (I promise I didn’t steal anything).
In general, darkroom equipment is much less expensive and more widely available than it used to be because many people are selling their enlargers and various darkroom paraphernalia as they process their images digitally.
Paper and chemicals obviously must be bought new, but you can save money by buying second-hand equipment.
Camera fairs and car boot sales are a good place to start looking, as are the adverts at the back of AP. I found it was worth searching eBay or Freecycle for potential bargains and talking to other photographers in the AP Forum is also helpful.
In truth, there is actually relatively little equipment you need to set up a basic darkroom (see box below on necessary, desirable and luxury equipment). The most important piece of darkroom equipment (and the most expensive) is the enlarger.
While it is possible to pick up a second-hand enlarger for as little as £50, it is worth scouting around and comparing different makes and prices. De Vere, Kaiser and Durst enlargers still command a premium price, but an enlarger such as a Meopta Opemus 6 Colour Enlarger is good value for money.
How much you spend depends on how serious you are about your printing. It is important to decide a budget before you start.
Fortunately, I knew someone who was giving away his Jobo C6600 colour enlarger, but if you are unable to persuade a friend to donate theirs, Second-hand Darkroom Supplies and Nova Darkroom both sell reasonably priced used enlargers. Bear in mind you may need to purchase a lens for your enlarger separately, so factor this into your budget.
Both suppliers offer a range of affordable darkroom equipment. I got my enlarger timer, safelight, trays, darkroom clock and thermometer from Second-hand Darkroom Supplies and a darkroom blind from Nova Darkroom. The blind attaches to the window with strips of Velcro that are adhesive on one side. Nova also sells hook and loop blackout material from £3.87 per metre. There is a comprehensive list of equipment on the Nova website, which I used as the basis for my search.
The company also sells starter darkroom kits and offers a service helping people to set up their own darkroom.
Other suppliers worth trying are RK Photographic and MrCad, both of which sell new and used darkroom accessories.
The chemicals, photographic paper and multi-grade filters I used were from Ilford. Always make sure any equipment is in a usable condition before you buy.
Setting up the darkroom
If film and photographic paper are exposed to normal light they become fogged and unusable, so once I had the necessary equipment, my priority was to make sure the room was 100% light proof.
Standing inside the office space, I closed the door to check how dark it was inside. The door was a snug fit and there were no chinks of light around the edges so I didn’t need a blackout blind.
I was doubly covered because I would only be using the darkroom at night. The only other light source was the window, so I carefully attached the darkroom blind to the frame and again closed the door to make sure the room was completely dark.
I closed my eyes and counted to 20 so I could get my brain used to extreme darkness, and then opened them to check for light leaks.
You can get away with minor light leaks with photographic paper but not with film, so changing bag can be a useful accessory.
Wet and dry areas
Every darkroom has a wet and dry area.
It is vital these areas are separate to avoid damaging film or prints with chemical or water splashes. Also it is essential to keep a good distance between liquid and electricity.
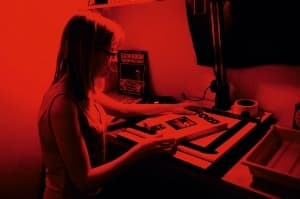
In the dry area I set up my enlarger with a lens and multi-grade filters, which either fit into a filter tray below the enlarger lamp or in a carrier below the lens.
Multi-grade filters are used to control the contrast in a print if you are using variable-contrast paper. Although I was using a colour enlarger, which doesn’t require additional contrast filters as it has colour filters built into the head, I found it quicker to use ready made grades than setting the colours in the enlarger.
I connected an enlarger timer to my enlarger and positioned the paper easel on the enlarger base. I also prepared myself with scissors to cut film, a notebook and
pen to record the settings and exposure times and, of course, my negatives and photographic paper to make the prints.
The office doesn’t have running water, but this isn’t absolutely necessary. Instead, I filled a bucket with water for washing my prints. In the wet area I set up three trays, which I filled with developer, stop and fixer chemicals.
It is important to place the trays in order so you can take a print from the developer to the stop and then on to the fix without dripping one chemical into the others.
Also, while you can buy second-hand trays, film tanks and measuring cylinders, make sure they are in good condition and completely clean before you use them as photo chemicals – developer especially – are easily contaminated, at which point they become useless.
Follow the manufacturer’s instructions carefully when mixing and diluting photographic chemicals.
Crunch time
Now my darkroom is set up there is only one thing left to do – develop a film and then make a print. I’ll certainly need some practice, but I’m looking forward to sharing my first efforts, and mistakes, with you.
Equipment
To develop your own negatives and make prints you will need the following:
Necessary
- Developing tank and spiral (£5),
- Standard enlarger and lens (from £150),
- Easel (£15),
- Enlarger timer (from £40),
- Multi-grade filters for enlarger (from £20),
- Safelight (£5) and blackout material or blind,
- Darkroom clock (£5),
- Measuring cylinders (3x600ml containers) (£15),
- Chemicals (developer, stop, fixer) (approx £30 for film and paper chemicals),
- Three shallow trays (£10),
- Two pairs of tongs (£3),
- Large plastic bowl for water bath (or bucket),
- Thermometer (£5),
- Scissors,
- Photographic paper (100 sheets of 5x7in for £15).
It is also a good idea to have an extractor fan if possible, but regularly opening the door to air the room is also fine
Desirable
- Running water source,
- Focus finder (£10),
- Test strip printer (£15),
- Pegs for hanging prints up to dry,
- Film clips for hanging film up to dry,
- Changing bag (£10),
- Squeegee
Luxury
- Print dryer (from £60),
- Colour enlarger (from £200)


