
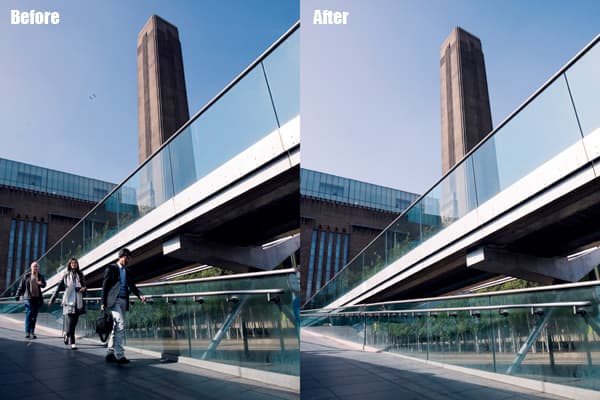

There’s a reason why tourist attractions are called tourist attractions: they are inevitably surrounded by, or filled with, holiday-makers. While the mêlée of brightly dressed sightseers enjoying their visit makes for a very convivial environment as you sample the local ice cream, tourists have a habit of wandering into your carefully composed holiday shots. Although a few pictures with the occasional tourist can help convey the atmosphere of the location, it’s nice to have a few people-free shots with a clear view of the venue.
Even the most dedicated holidaying photographer, who is prepared to get up early or stay out late, can be thwarted because some locations seem to be busy all the time – even at night. However, there’s no need to settle for the offerings at the nearest postcard shop for a photographic record of your visit. Creating an image that is free of people isn’t as hard as you might imagine.
Producing tourist-free images is actually quite simple and relies on the fact that people do exactly what you want them to do – move. Tempting though it may be to blow a whistle and wave a flag to get them to shift out of sight, it is very unlikely that you will be able to herd them all in the right direction at once. Yet the fact that tourists often mill around randomly means that the view through the viewfinder constantly changes and different parts of the scene are revealed from minute to minute or even second to second. This gives us two options for getting people-free photos. We can either record several shots and create a composite image that is free of tourists, or we can take one photograph with an exposure that is long enough to prevent the moving figures from registering on the film or sensor.
How to Remove People From Images – Step by Step
Getting the shots
Whether you opt for the single- or multiple-exposure technique, the camera needs to be stationary to get decent results and the best way of achieving this is to support it on a tripod. Unfortunately, not all tourist attractions are tripod-friendly, so if necessary look for a convenient wall, ledge or bench to use instead. A mini-tripod or a Gorillapod can be handy on these occasions as they attract less attention and are often deemed less ‘serious’ than a standard model.
A remote release is also useful, especially when shooting from an awkward angle, as you can fire the camera without having to lean over and press the shutter release. A wireless trigger like the Hähnel Giga T Pro, which costs £79.99, is a good choice as it is less obvious than a cable release, and it can be used as a bulb exposure timer or intervalometer.
Once you are happy with the composition, focus the lens and then switch to manual focus so that if someone moves where the active AF point is positioned, the focus won’t alter. Take a sequence of shots several seconds or even minutes apart to allow time for the people within the scene to change position. For the multiple-exposure technique to be successful, every part of the subject needs to be visible at some point in the sequence of images. If someone is sitting on a bench you either have to wait for them to move and then shoot the bench, or accept their presence in the final image.
Keep an eye on the movement of the clouds and try to take each image in the same light. It doesn’t matter if the clouds move between shots as you can select which sky image to use later, but avoid shooting half the images in full sun and the rest when it is behind cloud.
Long exposures

This image was made using a 5min exposure. As well as removing the hordes of tourists that were traipsing across the bridge, the long exposure has given the water an attractive sheen
Taking images with very long exposures that prevent moving people from being recorded in daylight usually demands an intense neutral density (ND) filter such as Hoya’s ND X400 or Lee Filters’ Big Stopper over the lens (see How to… Get creative with blur, AP 5 June). These filters reduce the amount of light that reaches the film or sensor by 9EV and 10EV respectively.
Unless the ambient light is very bright, it is usually necessary to compose and focus the image and then take a meter reading before attaching a dense filter to the lens. Once the filter is attached, the exposure time must be increased by 9 stops with the Hoya ND X400 and 10 stops with the Big Stopper. Hence, an exposure of 1/30sec without a filter becomes 15secs or 30secs respectively. The exposure time can be further extended by decreasing the aperture size or, in very bright conditions, by adding an extra filter such as an 0.9ND to cut out a further 3EV.
Most cameras must be used in bulb mode, with the photographer controlling the length of time the shutter is open once the exposure goes beyond 30secs. The longer the exposure, the greater the chance of the people within the scene moving and therefore not being recorded in the final image, so if possible keep the shutter open for several minutes.
This technique works best when the tourists move across the frame so the main subject is visible for the majority of the exposure. It is less successful when people move continually towards the camera and obscure parts of the scene for a long time.
Combining images
There are several ways to combine images to remove tourists from your pictures. We’ve used Adobe’s Photomerge Scene Cleaner
Images may be combined to remove tourists using a variety of image-editing software packages by copying sections or merging parts of images as layers. The simplest way is to copy one image onto another to create a layer. Then use the Eraser tool to remove areas where tourists are visible so the layer beneath shows through. Once you have done this, copy another image and repeat the process. When the image is tourist-free, select Layer>Flatten Image to merge the layers into one picture. Use the image that contains the most people as the background so there is less erasing to do as the layers are built up.
Adobe Photomerge Scene Cleaner, introduced with Adobe Photoshop Elements 7 and continued into Elements 8, makes life even easier. Just follow the step-by-step guide below.

Step 1. Open the images so they appear in the Project Bin. Select all the images you wish to use and choose File>New>Photomerge Scene Cleaner. One image will now be visible as the Source on the left, while the right side of the screen, labelled Final, is blank.

- Step 2. Drag and drop another image from the Project Bin into the Final box on the right. Elements can align images automatically if they don’t quite match up perfectly. The colour-coded surroundings of the images in the Project Bin and on the Source and Final screens make it easier to keep track of which image is being used.

Step 3. On the Source image, highlight the area that you want to use in the Final image to replace the tourist. A coloured patch that matches the shade of the Source image surround indicates what is being transferred. If necessary, adjust the size of the Pencil and use the Eraser tool to correct any errors.

Step 4. If necessary, zoom in on an area that has a tourist spoiling the Final image. Scene Cleaner copies across sections of the image, so there’s no need to be very precise with your selection at first. However, if an unwanted section is copied across, use the Pencil tool on the Final image followed by the Eraser on the Source image.

- Step 5. When all the useful material has been copied from the first Source image, double-click on another in the Project bin and use that to cover over more tourists in the Final image.
It can be helpful to select the Show Regions view using the check box in the panel on the right, to see where sections are copied from.

Step 6. Repeat steps 3 to 5 until you are happy with the Final image and zoom in to check the replaced areas. If necessary, click in the Pixel Blending box in the Advanced options section in the panel on the right to help the images merge into the composite picture. Then select Done and save the image.


