Some Facebook users have been granted the ability to use a GIF as their Facebook profile picture. This means that you can finally, finally, have a moving image as your profile picture.
Of course, the internet is prolific with GIFs from the world of popular culture, but for your own profile picture you’d probably prefer to have a moving image of yourself. Luckily, with Photoshop, it’s easy to make a gif for Facebook – just follow this guide.
First of all, you’ll need to decide what kind of GIF you want to create. Is it a fluid, moving image, perhaps captured from a movie, or is it made up of several different still images to give a slideshow effect.
How to make a gif from a video in Photoshop CS
-
Import your video

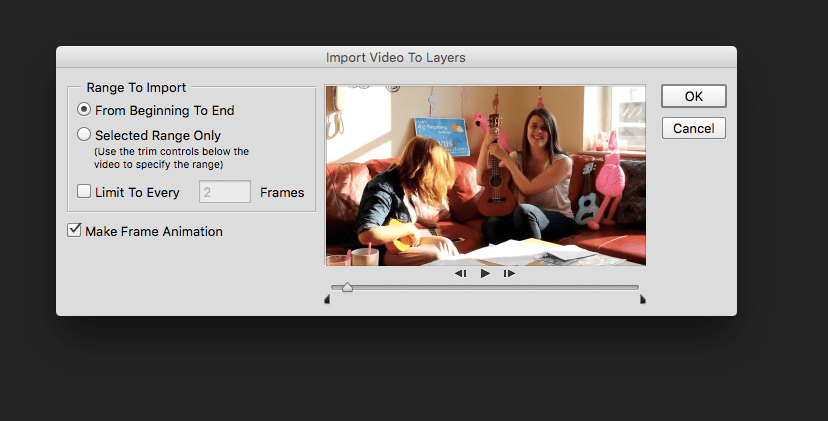
First of all you need to grab the video you’re going to be working with. Perhaps you have something you’ve captured on your phone or camera saved to your computer. Click File > Import > Video Frames to Layers.
Choose the video you want to work with and click Open. You can either choose to import the video from beginning to end, which is useful if it’s a short video, or you can trim the video down to just a few seconds.
Handily you can play, fast forward and rewind so that you get the exact parts that you want.
2. Check your layers
Once you’ve pressed OK you’ll see that all the frames from your video have been separated into layers. Go to Window > Timeline to see a complete timeline displayed at the bottom of the screen. You might find random blank frames have appeared – delete any of these to get rid of a “flashing” effect in your final GIF.
You can check that the start and end frame are the ones you want, deleting any that are surplus at the beginning or end. You can also remove frames for a different, jerkier effect, if you wish.
3. Add text

If you want to add some text, you can do so. You’ll need to place it on each layer if you want it to remain throughout the whole animation. To do this, place the text layer above the last layer frame in the sequence.
If you only want the text to appear for part of the animation, place the text layer above the last frame you want it to be seen in.
4. Export

When you’re ready, it’s time to export the GIF ready for use. Click File > Export > Save for Web.
It should already be set to GIF, but just in case it isn’t, change it now. There are several options on this dialogue screen which you can change, such as the dimensions of the GIF. Choose the Looping Options – you’ve got Forever (it will continuously loop), once, or you can choose the amount of times it loops.
To make sure that you’ve got the GIF as you want it, click Preview and the GIF will open in a web browser to show you how it will look.

When you’re satisfied, click Save and choose a place to keep your file.
How to make a gif from stills in Photoshop CS
Alternatively, you may have a bunch of still photos that you want to use. Luckily, that’s also pretty simple.
-
Create a new canvas

Go to File > New to create a new canvas. You don’t need to make the canvas very large if you’re planning on using the GIF for your Facebook profile picture. Click OK.
2. Prepare the canvas

You’ll need to make the canvas ready to accept the pictures you’re going to use in the GIF. Let’s assume you’re going to use three photos in the GIF. Make sure that you have the Timeline view showing (Window > Timeline). In the Timeline, create three new frames.
3. Place your photos

Next you need to find the photos you want to make up your GIF. You can choose images in a sequence if you want an animated style effect, or you can choose a number of completely random images.
Click File > Place Embedded. Choose the first image you want to use, and click Place. Drag the image to fit the size of your canvas and once you’re happy, click the tick mark.
4. Choose the order.

Repeat Step 3 for as many photos as you want to place it. In the Timeline at the bottom, you should see all three frames are whichever photo you added last. To get them all to show something different, click the first frame and switch off visibility (the eye icon) for all layers except the first image you want to display. Go to the second frame and repeat this step, then repeat it for all frames.
5. Choose animation length

Next you’ll want to change the length each photo is displayed for. By default, it’s a very quick transition that doesn’t generally work too well for GIFs unless each photo is part of a sequence. As an example, here we’ve changed the transition to one second. Repeat this for all frames.
6. Save your GIF

Once you’re happy with the order of your photos, and the timings, it’s time to save the photo. Once again you’ll go to File > Export > Save for Web. Here again you’ll see a number of options, including how many times you want the GIF to loop, the image size and so on. Make all your final checks and click Save.
You’re now prepped to upload a GIF to your Facebook profile!


