

 Martin Evening is a London-based advertising photographer and noted expert in both photography and digital imaging. As a successful photographer, Martin is well known in London for his fashion and beauty work, for which he has won several awards. In 2008, he was inducted into the NAPP Photoshop Hall of Fame.
Martin has worked with the Adobe Photoshop and Adobe Lightroom engineering teams over many years and is one of the founding members of Pixel Genius, a software design company producing automated production and creative plug-ins for Photoshop.
His recent books include The Adobe Photoshop Lightroom 4 Book, Adobe Photoshop CS6 for Photographers, as well as the Adobe Photoshop for Photographers: The Ultimate Workshop series, which he co-wrote with Jeff Schewe.
The Photomerge feature in Photoshop has evolved over the years to provide high-quality image stitches. The key to getting good results using the technique described here is to shoot with at least a 25%
overlap between each exposure. When using wideangle lenses, an even bigger
overlap will be necessary. If possible, it is a good idea to shoot using the
same exposure setting for all the exposures. However, with some subjects it may
be necessary to compensate for exposure differences between the ground and the
sky. It is best to not have the exposure vary too much between exposures,
though, as this may make it tricky to get the auto-blend step to work
successfully.

One of the hardest things when using Photomerge is to predict what the outcome will
be, in terms of the composite image shape. This depends mainly on which
projection method you choose. In many cases, the Auto option will be best, but
as I mention here, with elongated panorama photomerges I recommend you select
the Cylindrical projection method because this will ensure that the horizon
line remains straight. Even so, there are still likely to be some gaps in the
resulting panorama. In the old days there wasn’t much you could do except crop
to remove the transparent areas. Now, with the ability to fill using the content-aware
mode in the Fill dialogue, it is possible to get Photoshop to auto-fill these
areas convincingly by letting the software auto-sample from the composite
image.
How to Create a Panoramic Image – Step by Step
1. Making Initial Adjustments
 |
 This shows a single-image view This shows a single-image viewtaken from a series of panorama stitch shots. I applied some Basic panel adjustments in Lightroom to correct the tone and colour in this first image. |
2. Synchronise Settings to All Exposures
 I shot 12 exposures in total: four photos from left to right centred on the horizon; four to include more of the field; and four to include more of the sky. I then synchronised the settings I applied in step 1 to all the images I shot 12 exposures in total: four photos from left to right centred on the horizon; four to include more of the field; and four to include more of the sky. I then synchronised the settings I applied in step 1 to all the images |
3. Open As Layers
 |
 With the 12 photographs selected in the Lightroom With the 12 photographs selected in the LightroomLibrary module, I chose Photo>Edit in>Open as layers in Photoshop. This opened each of the selected photos in Photoshop to create a single layered image. I then used the Cmd/Ctrl+Alt+A shortcut to select all the layers |
4. Auto-Align Layers
 In Photoshop, I then went to the Edit menu and chose Auto-Align Layers. This opened the dialogue shown here. Very often the Auto option is the best one to choose, but because I was Photomerging a wide panorama I selected the Cylindrical projection method. In Photoshop, I then went to the Edit menu and chose Auto-Align Layers. This opened the dialogue shown here. Very often the Auto option is the best one to choose, but because I was Photomerging a wide panorama I selected the Cylindrical projection method. |
5. View Results So Far
 |
Here you can see the outcome of the auto-align processing. The horizon line was kept nice and straight, and all the layers merged together successfully.
6. Auto-Blend Layers

 Next, I went to the Edit menu again and this time Next, I went to the Edit menu again and this timechose Auto-Blend Layers, where I selected the Panorama option. This process blended the individual layers together and added masks to the layers. |
7. Erase Overhang

 Here you can see how the panorama looked after blending the layers and merging them into a single Background layer. I now needed to erase the overhanging roof section. After doing this, I selected the Magic Wand tool, clicked to select the transparent areas, and chose Select>Modify>Expand, entering a value of 8 pixels.
8. Content-Aware Fill

 At this stage, the modified selection encroached
slightly on the panorama image. I then went to the Edit menu and chose Fill, selected the Content-Aware mode and clicked OK
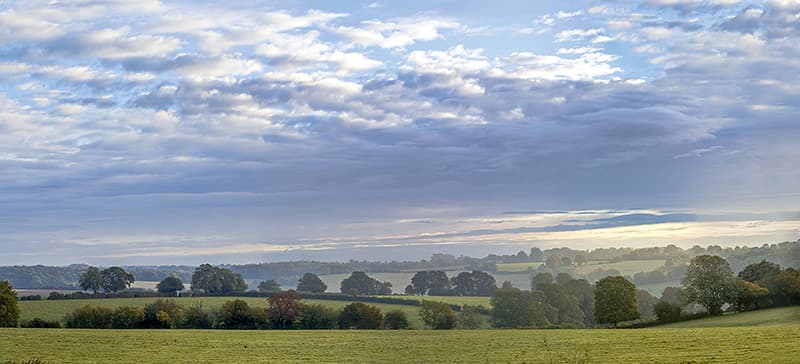
9. The End Result

Here you can see the final image in which the content-aware fill had filled in the transparent areas, auto-sampling from the pixels in the panorama image to create a convincing fill in the sky area.
Visit Martin’s website https://www.martinevening.com/


