

 Martin Evening is a London-based advertising photographer and noted expert in both photography and digital imaging. As a successful photographer, Martin is well known in London for his fashion and beauty work, for which he has won several awards. In 2008, he was inducted into the NAPP Photoshop Hall of Fame.
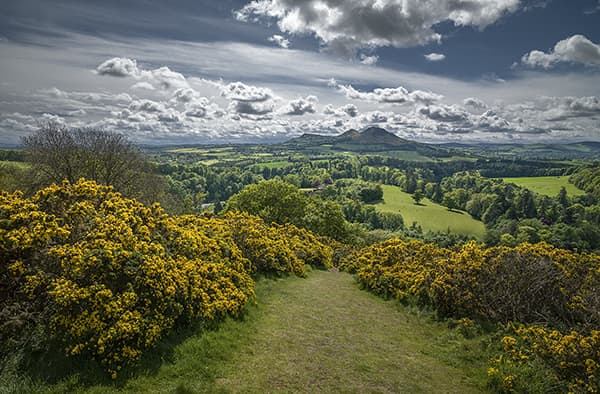
With landscape photography, it can often be tricky to capture a scene where you need to balance the exposure required for the ground with that for the sky. When our eyes see a scene like the one shown here, they naturally adjust as we look from the ground up to the clouds in the sky and we don’t really perceive the difference in relative luminance that actually exists.
 ‘Before Photo’ by Martin Evening
One way to photograph a scene like this is to place a graduated filter over the lens to darken the sky at the time of capture. In this example, I used a neutral grad filter, but it wasn’t strong enough to balance the sky exposure with the ground. However, there was still enough information captured in the raw image so I could refine the exposure balance using Camera Raw.
The following steps show a number of tricks that can be used to do this. The Highlights slider can be fairly effective at revealing highlight detail. The HSL sliders can be adjusted to selectively darken specific colours, such as the blues in the sky. You can use the graduated filter to apply a post-processing grad effect. Finally, there is the Tone Curve, which can be used to selectively darken and apply a targeted contrast adjustment. The steps on the opposite page show how I balanced all these.
How to Balance Exposure in Camera Raw – Step by Step
1. The original raw image
| Here you can see the raw image as it looked with zeroed settings. This photograph was shot using a Hasselblad H4D. When photographing with a medium-format camera such as this, I find getting the exposure correct is critical so I don’t blow out the highlights. This image required no further exposure compensation, but I did need to use the Camera Raw controls to recover the highlight detail. |
2. Use the Shadows Slider
 |
 In this step, I adjusted the Shadows slider to lighten the dark to midtone areas. I applied a +68 setting to lift the shadow regions, especially in areas like the lower left corner. In this step, I adjusted the Shadows slider to lighten the dark to midtone areas. I applied a +68 setting to lift the shadow regions, especially in areas like the lower left corner.
|
3. Use the Highlights Slider
 |
 With the latest Process 2012, the Highlights slider can be used to recover highlight detail and darken the midtone to highlight areas. In this step, I set the Highlights slider to -100, which produced a pronounced darkening in the sky. With the latest Process 2012, the Highlights slider can be used to recover highlight detail and darken the midtone to highlight areas. In this step, I set the Highlights slider to -100, which produced a pronounced darkening in the sky.
|
4. Negative Highlights Adjustment
 |
 Although a strong negative Highlights adjustment can be quite effective on a photograph like this, I decided to ease off on this setting and, instead, applied a more moderate -50 Highlights adjustment. Although a strong negative Highlights adjustment can be quite effective on a photograph like this, I decided to ease off on this setting and, instead, applied a more moderate -50 Highlights adjustment.
|
5. Targeted Adjustment
 |
 Over in the HSL panel, I selected the Luminance tab and clicked to select the Targeted Adjustment tool. I then clicked on the preview in the sky area and dragged downwards to darken the targeted blue colours. I applied a -100 Blues adjustment. Over in the HSL panel, I selected the Luminance tab and clicked to select the Targeted Adjustment tool. I then clicked on the preview in the sky area and dragged downwards to darken the targeted blue colours. I applied a -100 Blues adjustment.
|
6. More Targeted Adjustment
 |
 The -100 Blues setting was too extreme and made the blue sky look unnaturally dark, so I clicked again (with the Targeted Adjustment The -100 Blues setting was too extreme and made the blue sky look unnaturally dark, so I clicked again (with the Targeted Adjustmenttool active) and this time dragged upwards to set this to -50. |
7. Gradient Filter Tool
 |
 I then selected the Gradient Filter tool and, using the settings shown here, selected a darkening Exposure combined with a I then selected the Gradient Filter tool and, using the settings shown here, selected a darkening Exposure combined with anegative Saturation setting and applied this to darken the top third of the image, but without increasing the saturation. |
8. Apply Highlights Adjustments
 |
 I then went to the Tone Curve panel and applied a positive Highlights adjustment. I also edited the Highlights zone slider, dragging this all the way over to the right. This had the effect of concentrating the Highlights adjustment to the brightest regions only. I then went to the Tone Curve panel and applied a positive Highlights adjustment. I also edited the Highlights zone slider, dragging this all the way over to the right. This had the effect of concentrating the Highlights adjustment to the brightest regions only.
|
9. Final Adjustments and the End Result
 |
 Here is the final version, in which I carried out further refinements. I selected the Adjustment brush and selectively applied a positive Shadows setting to the distant hills and fields. I also added a darkening post-crop vignette, while in the Basic panel I applied a positive Clarity adjustment. Here is the final version, in which I carried out further refinements. I selected the Adjustment brush and selectively applied a positive Shadows setting to the distant hills and fields. I also added a darkening post-crop vignette, while in the Basic panel I applied a positive Clarity adjustment.
|
Visit Martin’s website https://www.martinevening.com/


