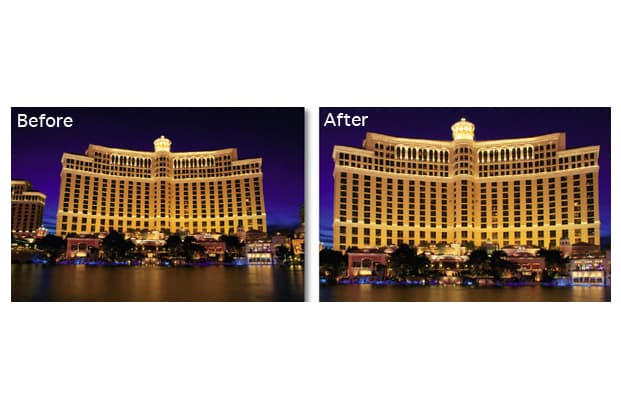
Technique Explained: How to Adjust Photo Perspective in Photoshop
Adjusting perspective is easily done in software, and it is far cheaper than a dedicated tilt-and-shift lens.
It works by modifying an image so that certain parts are expanded or contracted, making images appear as though they were taken from a viewpoint different from that used at the time of shooting.
It is important, however, to make sure most things are correct when you are shooting, as any kind of manipulation has its limitations. After all, to adjust perspective, the software program needs to stretch a certain amount of information over a larger area, which means the detail in that area will suffer.
As an image is stretched further, this effect will become more apparent and lead to pixelation. This is particularly problematic in architectural photography, as smooth lines can appear to take on a jagged texture.
The resolution of your camera and lens will also be a deciding factor in how far you are able to manipulate an image, as the more detail your image has to begin with, the better it will hold up to post-processing. You may find, however, that some images benefit from only moderate correction, as they can appear unnatural when ‘fully’ corrected. Again, this is more noticeable in images requiring considerable correction.
Given the suitability of wideangle lenses for shooting such subjects, attention needs to be paid to any distortions that can be apparent in images with a lot of linear detail.
This can be rectified using software, although if using a zoom lens you may find that zooming into your image a little (if possible) will minimise this effect. Horizontal correction, which is offered alongside vertical correction in many programs, may also need to be applied if your image has been captured slightly to one side.

Correcting verticals in Photoshop CS4
| Step 1. Open up your image in the main workspace and select the Lens Correction tool (Filter>Distort>Lens Correction).Your image should open up in a new window with correction options available to the right. |  |
| Step 2. Tick the Preview and Show Grid boxes below the image.Adjust the size of the grid so that its lines match up with the verticals in your scene, and change its colour if needed.
You can use the Move Grid tool (in the top left palette) to drag the grid around the scene in order to line it up with the details in the image, or you can move the image using the Hand tool. |
 |
| Step 3. If your image requires correction for distortion, chromatic aberration and/or vignetting, adjust these using the first five sliders.Then begin to adjust the perspective.
The first slider works along the vertical axis; images of architecture will have typically been taken from below, so they will require the first of these sliders to be shifted to the left. |
 |
| Step 4. It may be necessary to adjust the horizontal perspective, which is done by the next slider down.If you can see that the image has been taken to one side, with a slight unevenness to one edge of the subject, adjust this slider until it looks correct. |  |
| Step 5. If the image needs rotating, use the dial underneath the two sliders, or input a numerical value next to this and use the up and down keys to make fine adjustments.Alternatively, use the Straighten tool to draw a line along an edge that should be level. |  |
| Step 6. The Edge options specify how blank areas are filled, either by cloning the edges of the image, or by filling it with a specific colour.By setting this option to transparency, you can fill the blank areas by adjusting the image’s scale, using the slider.
This is useful with small areas. Click OK. |
 |
| Step 7. You may now wish to crop your image so the subject is centred.Select the Crop tool from the toolbar on the left-hand side and crop your image as desired. |  |
| Step 8. As part of the image has been stretched, it’s likely to need sharpening.Select one of the sharpening options from the Filter>Sharpen menu and adjust the sharpness to taste. |  |
| Step 9. When you have finished, click OK.If you do not know the exact dimensions at which you’ll be using your image, you may wish to skip Step 8 and leave it unsharpened, as it is best to do this after resizing. |  |
Other software packages
Photoshop may be the most commonly used software application for a number of image-editing purposes, but alternatives do exist – and some are specifically designed for controlling lens aberrations and perspective.
PTLens is one such package. It has a straightforward interface and a number of sliders for the adjustment of perspective, together with tools for controlling fisheye, vignetting and distortions. The software recognises metadata, and has a number of camera and lenses profiled, meaning images may be automatically corrected for any aberrations known to a particular lens or camera/lens combination. Although it is available as a standalone program, it offers no control over sharpening and so is best used as a plug-in with Photoshop, where such adjustments may be applied.
ShiftN is a little more basic in terms of its functionality and a little less refined, but its automated corrections are surprisingly good, and the batch-processing facility is useful for processing a number of images in a hurry.
Another package that uses camera and lens profiles on which to base corrections is DxO Optics Pro. Although it offers a more comprehensive level of control over many aspects of image editing, as its name suggests it is skewed towards optical corrections. In terms of perspective control, it works on the similar principle of slider controls with numeric fields for more precise adjustment, although its support for raw files makes it a more useful all-purpose program to use for image editing.
The free program GIMP may feature a less refined workspace than other programs, although it too offers basic control over adjusting perspective.
Correcting verticals in Elements 7
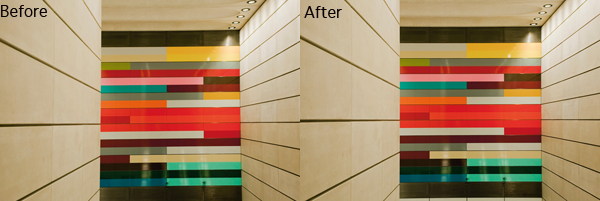
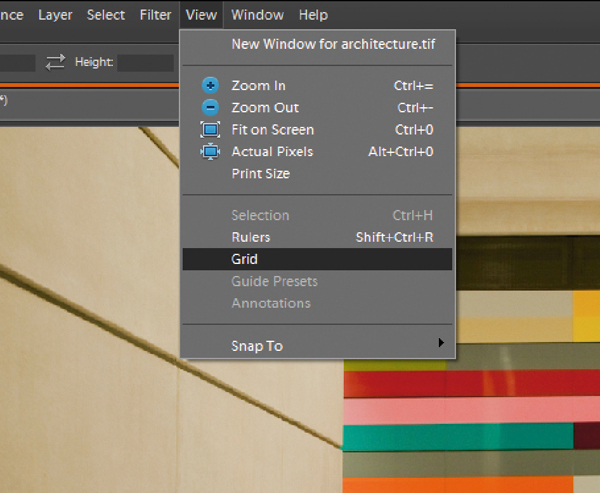
Step 1. Open up your image in the main workspace and select the Grid tool (View>Grid). If the spacing of its lines is too large or small, select Edit>Preferences>Grid and adjust the numerical values until it looks right. Click OK.
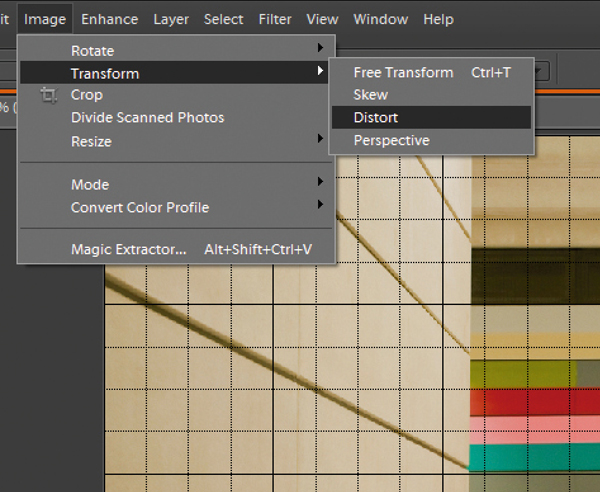
Step 2. Select the Distort tool (Image>Transform>Distort). A box should appear asking you to make these adjustments on a new layer. Click OK and rename it ‘Perspective’.
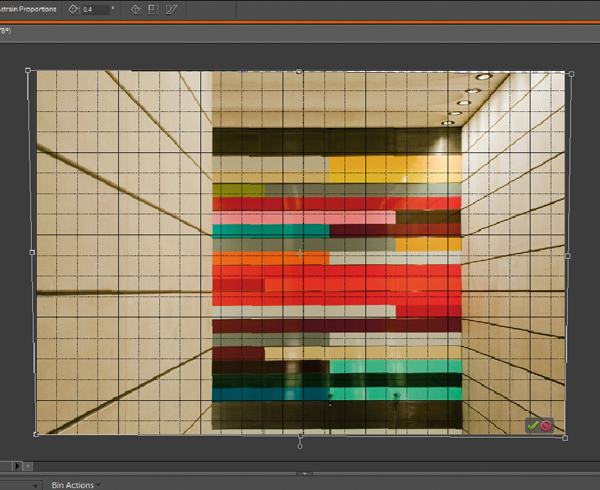
Step 3. The contents of your image should now be selected, and be surrounded by eight markers around its edges. Zoom out a little (Ctrl+‘-‘) until there is a comfortable border around your image, and taking the top right marker drag it to the right until the subject you are correcting is straight. Repeat with the other side so that your corrections are matched. To adjust vertical perspective, hold down Ctrl+Alt+Shift and drag the top left and right sliders in turn until the building appears to be neither leaning forwards nor backwards.
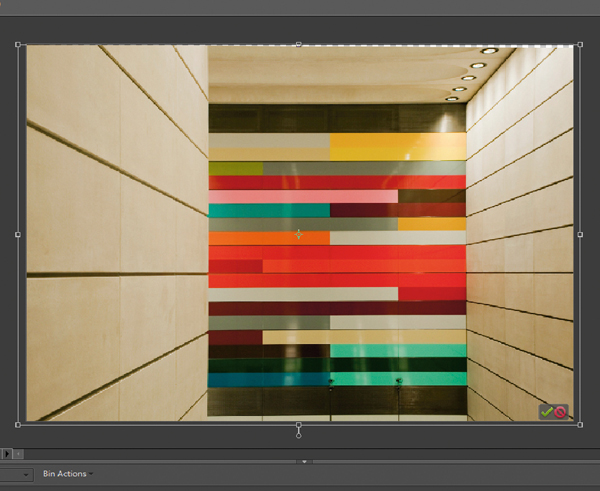
Step 4. Now check your image to see what further corrections need to be made. It may be helpful to disable the grid at this point (View>Grid). By pulling the image out towards the sides you will have stretched it slightly; it is now likely that your image will need to be stretched vertically to make the proportions seem natural. Click on the central marker at the top of the image and drag it upwards as necessary.
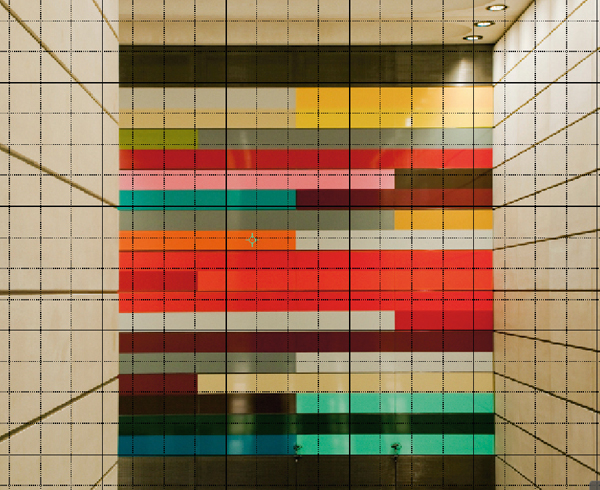
Step 5. At this point you can turn the grid back on to check if everything lines up, and whether any final corrections need to be made. When you are happy with your image, click on the tick in the bottom right-hand corner of the image.
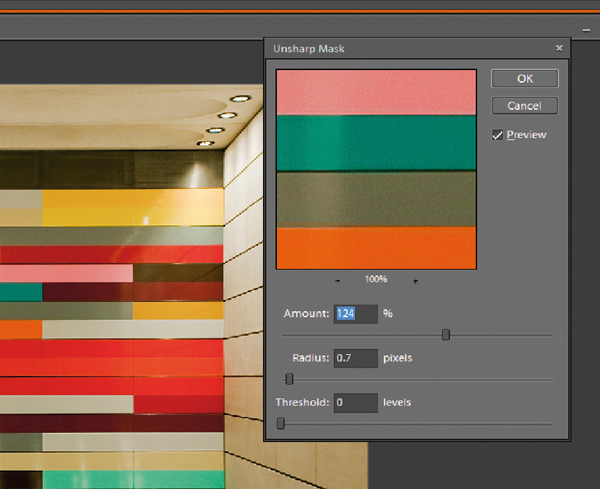
Step 6. As you have stretched the detail within the image, it will now need sharpening. Select the Unsharp Mask option (Enhance>Unsharp Mask) and adjust the Amount, Radius and Threshold until the image appears suitably sharpened. Alternatively, you can use the Adjust Sharpness option. When finished, click OK. Here’s a tip. There are four tools in the Image>Transform menu: Skew, Distort, Perspective and Free Transform. The Perspective option is a quicker way to achieve the same aim, although it is slightly less flexible than Distort.

