

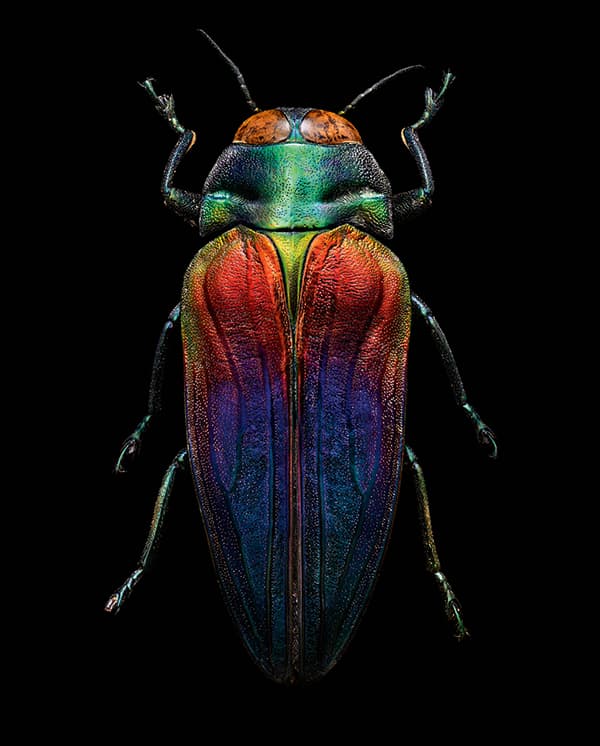
Jewel longhorn beetle (Coleoptera, Cerambycidae)
A ‘normal’ working day for Levon Biss would usually see this talented photographer shooting portraits of actors or a commercial campaign for a sports-clothing manufacturer – but he hasn’t had too many normal days recently. The reason for this is his current obsession with shooting microscopic portraits of insects in his home studio, a project that sits nicely under the banner ‘Microsculptures’.
‘Outside of my commercial work I’ve always got personal projects on the go, but I don’t put those out there,’ says Levon. ‘It’s a tricky one, because you get pigeonholed – my pigeonholes are sports, portraits and celebrity. If you throw work out there that is off at a completely different angle, it just confuses clients, because people come to me for a specific type of image.’
This personal venture began when Levon was dabbling around with macro, and then his son found a little ground beetle in the garden. Levon took the specimen up to his studio to have a look at it. Once he put it under his microscope and started studying it, it suddenly dawned on him how beautiful these creatures are up close.
‘Insects are around us all the time, but you don’t really notice or think what they would look like if they were our size,’ says Levon. ‘So I decided to photograph it for my boy really. That was the first one and after that it was “insects only” for me.’
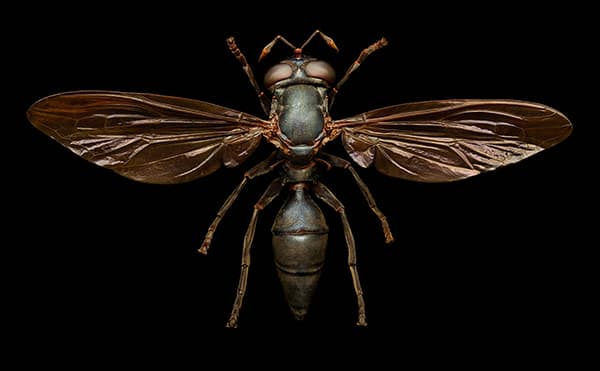
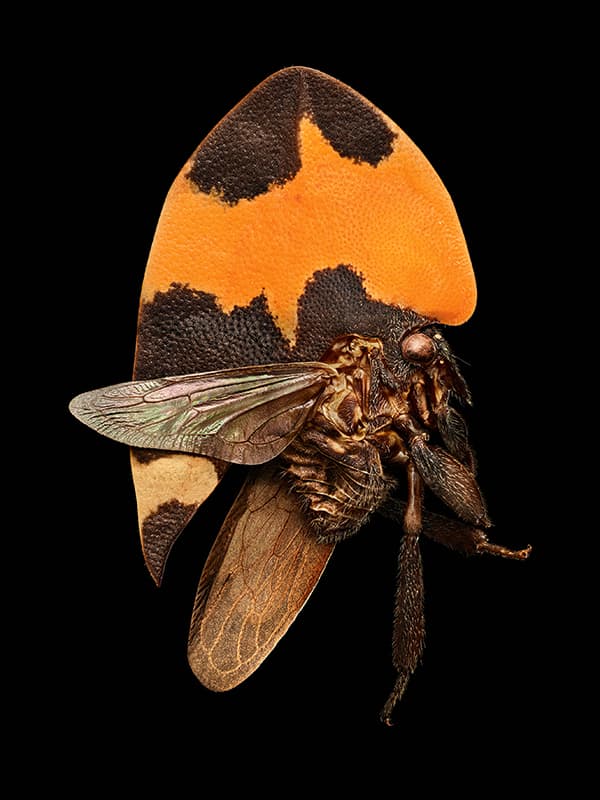
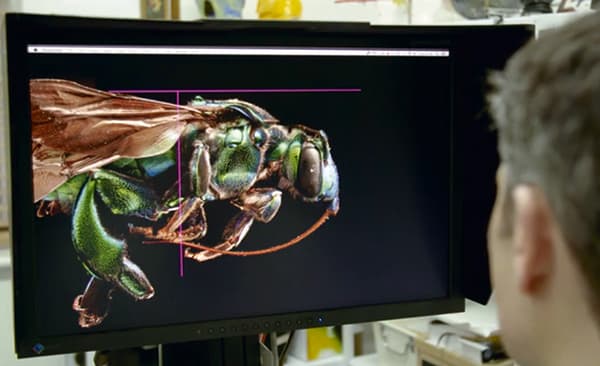
Wasp mimic hoverfly (Diptera, Syrphidae)
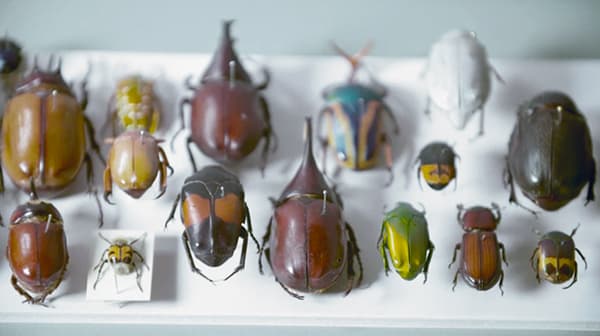
Insect collection
Levon kept on shooting insects he found in his garden and refining his techniques – then he decided to set up a meeting at the Oxford University Museum of Natural History to see if it might allow him to source specimens from its extensive insect collection. As Levon explains, ‘I showed Scott Billings [the Museum’s communications expert] some of the images on my computer – he liked them but I kept on zooming in further and further to the images and he went a little bit quiet. I don’t think they’d seen anything like it before. At the time I wasn’t really that aware if I was shooting anything special or not, as it was just something I’d done as my work.’
It turns out Levon’s project was something that hadn’t been done on this scale before. As soon as Levon presented his project, the museum allowed him open access to their collection. Scott Billings introduced Levon to an entomologist called Dr James Hogan, and the two joined forces to develop and expand the project.
‘That’s essentially where “Microsculpture” – the brand or title – came about,’ Levon continues. ‘Microsculpture is really a technical term that is used by entomologists to describe the shape and structure of insects and the way they adapt to their environment.
‘In a lot of ways, the project was a way of encapsulating art and science, as Dr Hogan would source insects that he thought were scientifically valid and had a story behind them. I’d come at it from an artistic and creative point of view as to how these things looked, and how I could work with them with my lighting techniques. We sort of met in the middle – we’d get a wider range of specimens and cull them down to the ones that we thought would work, and that’s how it went on.’
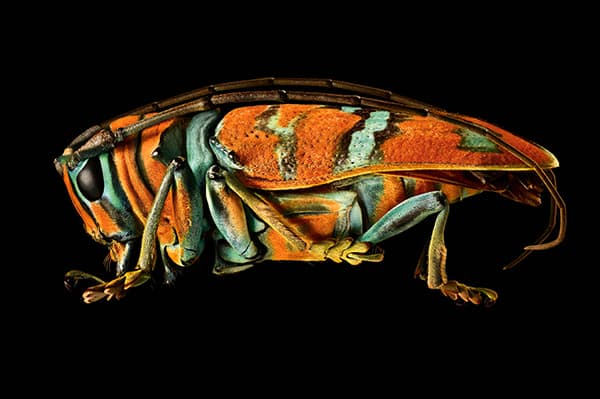
Tricoloured jewel beetle (Coleoptera, Buprestidae)
Set-up and workflow
With the museum’s entomology experts on board, it was then a case of arranging regular pick-ups of insects and embarking on the labour-intensive shoots. ‘In reality I wouldn’t say there’s anything technically special that I do,’ says Levon. ‘It’s one of those things where people think that there’s a magic tool I use or there’s a certain piece of equipment that makes this happen, but I taught myself all these procedures and anyone could do it really. It’s just a matter of application, time and perseverance.’
In his home, Levon set up a desktop studio arrangement where he could shoot pinned insects using a DSLR, a prime lens to go between a microscopic lens and the camera’s sensor, and a digital, automated rail system to move focus backwards and forwards in increments as small as one micron (that’s just 0.001mm).
‘The way I work is that I’ll take an insect but I’ll break it down into somewhere between 20 and 30 sections,’ says Levon. ‘I’ll treat each one of those sections like a small still life. If you think about the eye of an insect, it’s very dome-shaped, it’s quite smooth and there are lots of different sections to it. So you treat it with an appropriate lighting style to make that one section look as good as it can. If you’re photographing a hairy leg, or something like that, the same lighting set-up wouldn’t work because it’s a different shape, texture and colour, so you change the lighting set-up completely just to suit that one area. You do that over the entire body and you break down the body into different shapes, sections and textures and then change your lighting set-up for each little bit.’
Levon’s lens goes in fairly close to the insects, as some of them are only 10mm long. This means each one of those sections is probably no more than a fifth of a millimetre high. However, each subject has its own bespoke lighting set-up, so that Levon can make that single section look as good as it possibly can. Then he brings all those sections together afterwards in post-production to form one image and, as he says, ‘That’s what makes these images “pop” a little bit more.’
Microscopic lenses
Arguably the key to the set-up is the microscopic lenses. ‘Certain microscope lenses are called “infinity lenses” – for non-infinity lenses you need a bellows system to focus, so there are all those intricacies in this work,’ Levon explains. ‘The actual lens that goes between the microscope lens and the sensor doesn’t have to be that special – I’ve bought some of them for £40 from eBay, 40-year-old 200mm prime lenses that have no other real purpose than moving the microscope lens away from the sensor. You’re not really using the optics inside that prime lens – it’s just a vehicle to position the microscope lens.’
So how does Levon shoot each insect? ‘You just work your way across. For example, you’re on the eye – each section is the best part of 600 to 700 images. The camera moves forwards in around 10 micron increments between shots. You can sort of gauge your light and how it’s looking, but when you’re looking through a microscope lens your depth-of-field is so shallow, a lot of the time you’re lighting the shot fairly blind, so it comes from experience.
‘Sometimes you might get to day four or five, when you start processing all this information and start flattening down all the files. Then you get one file that is fully focused front to back. [There were a] number of insects I’ve done five days work on, realised it’s not really working, and then had to scrap it. It’s a lot of work to bin, but that’s just the nature of the process.’
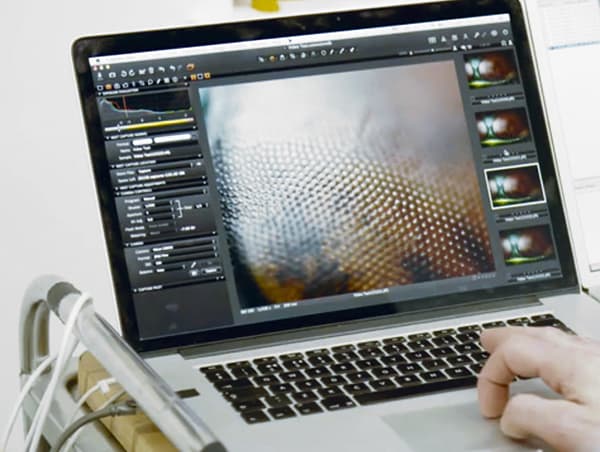
On average, Levon spends about three days shooting each insect. He estimates that to get to a finished, edited file – usually between two and six gigabytes – can take around two weeks per picture. ‘You end up with 20 to 30 different sections of the insect all flattened down and then you’ve probably got another week of post-production. Photoshop is the main tool to bring it all together and you’ve got different focus stacking software such as Helicon or Zerene Stacker. To capture the actual images I run it all through Capture One.’
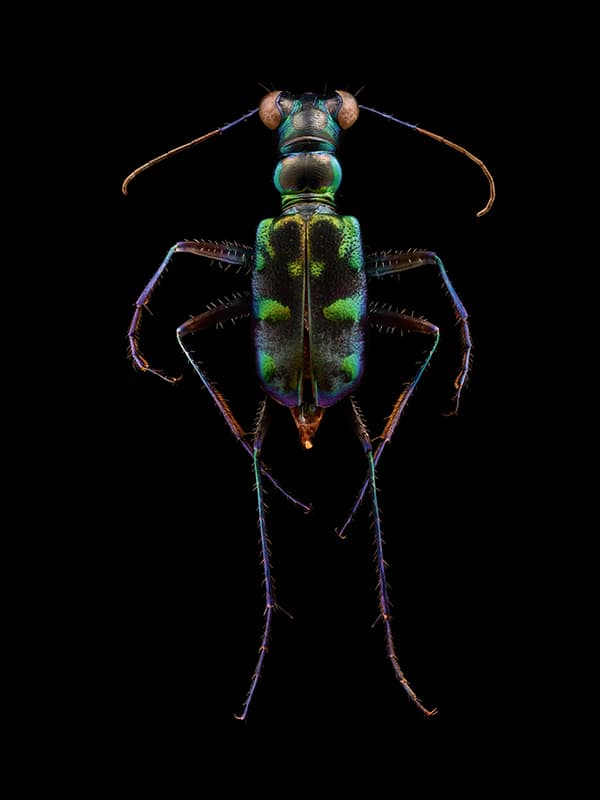
Tiger beetle (Coleoptera, Carabidae)
The printing process
When it was decided to hold an exhibition of the results at Oxford University’s Museum of Natural History, Levon turned to his favourite printing house, Genesis Imaging, to produce the large-scale prints for it. ‘I’ve known Genesis for the best part of 15 years. I like them because they put as much attention and detail into their prints as I do into my photography. The printing stage is one of the end results and you need to find somebody who’s going to care about your work. A lot of blood, sweat and tears goes into these images and you’re not going to hand it to somebody who doesn’t show it the same sort of respect.’
According to Levon, the printing went smoothly, ‘It’s quite a rare scenario but the images that were printed are straight images from the file – we didn’t balance them or adjust them in any way in the printing stage. Usually you’ll make some tweaks here and there but it all comes down to the fact that as a photographer you’ve got to supply the printer with the file at the best quality you can get – you shouldn’t rely on the printer to make it look good afterwards.’
Outcome and next steps
The result of his first two years of work on this project is the exhibition showing at the Oxford University Museum of Natural History until 30 October 2016. Levon also has plans for an accompanying book in 2017 and possibly a touring exhibition. ‘Probably the most satisfying thing is seeing people’s reactions to it,’ he says. ‘Recently, I was picking the kids up from school and a couple of mums came bundling over to me across the playground all childlike and excited – they’d just had a ladies’ day out to Oxford to go and see the exhibition, and had come straight from the museum. They were so excited, positive and enthused by it all; it’s things like that that make it work for me.
‘One of the main things I realised is that the insects didn’t look scary. I think we are hardwired in some strange way to think that insects are scary – one of the main objectives I wanted to achieve at the start of this project was to not have that cliché attached. These insects and prints should be beautiful, and I think that’s worked. Even at three metres wide they’re not scary; they’re stunning and hopefully people can come away with a bit more respect for the creatures. Maybe the next time you get a creepy crawly on your kitchen floor you’ll scoop it up with a piece of paper and put it outside rather than stamp on it – that’d be nice.’
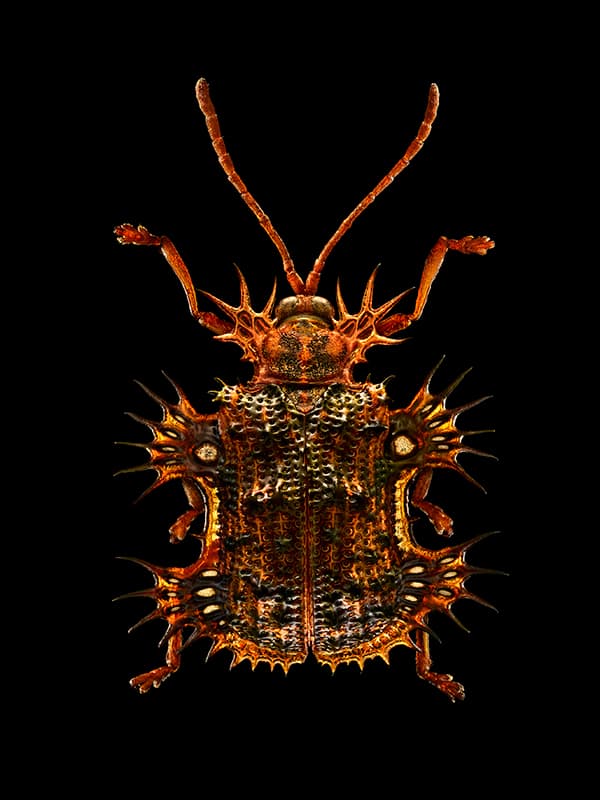
Treehopper (Hemiptera, Membracidae)
How Levon Biss created his microsculpture pictures
1. Sourcing insects
Thanks to his ongoing relationship with the entomologists at the Oxford University Museum of Natural History, Levon makes a choice of subjects based on a combination of the scientific significance of an insect and his more artistic, creative viewpoint as to how the subjects look and how they will photograph.
2. Pinning

Levon asks the scientists to pin the insects in a specific way. ‘Usually a pin would go straight through the body,’ he explains. ‘Sometimes it was actually hidden within the body. Then I attach that to another pin on a right angle, which goes on putty and hangs the insect in front of my camera.’
3. Studio set-up
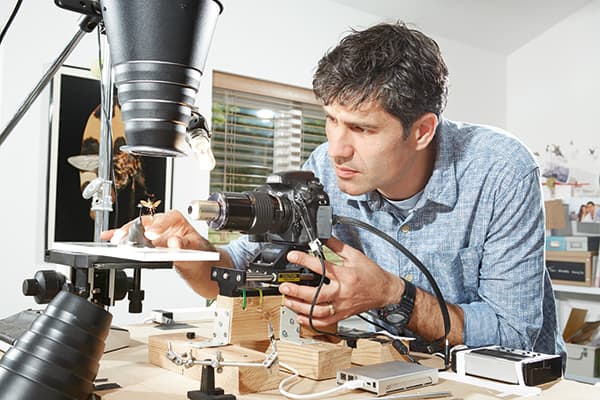
Levon has a tabletop set-up that is lit depending on the insect being shot and the part of that insect being shot. ‘The lights you’re shooting with have to have quite a fast flash duration. Obviously everything has to be stable – there can’t be any vibration, so I generally shoot a lot of my images with a shutter delay.’
4. Equipment

Levon shoots with a Nikon D800 DSLR fitted with a prime lens, usually between 160-200mm, and then a microscopic ‘infinity’ lens is fitted to the front of the prime optic. A digitally controlled automated rail system lets him adjust the lens-to-subject distance in one-micron (0.001mm) increments.
5. Shooting sections

Levon divides every insect into small sections – each no more than 1/5mm high – that are lit specifically. He shoots around 20-30 different sections for each insect and estimates that around 600-700 images are in each section. His final images tend to comprise between 8,000 and 10,000 images.
6. Checking results
Once Levon has shot all the sections of an insect he checks the results to ensure focus and lighting is correct across the whole body. Because of the nature of the microscopic work, this can sometimes result in reshooting a part, or parts, of an insect in order to get a more uniform, accurately focused result.
7. Post-production
Levon flattens his images to check all technical aspects and then, using Photoshop and focus stacking software, he creates final image files. He adds, ‘I don’t really believe in sharpening too much – if you haven’t got it sharp in-camera, then don’t bother.’ His final image files range in size from 2GB up to 6GB.
8. Test prints
Once Levon is happy with his final images he takes them to his long-time favourite printing house, Genesis Imaging. ‘We do a lot of tests on different, smaller sections beforehand – maybe 20x20in tests – and then once you’re happy that all the different elements are working, you go for the big thing.’
9. Final prints
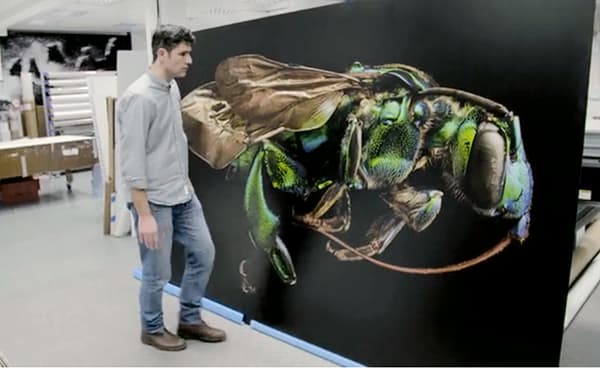
When Levon and the team at Genesis are happy with the test prints, a final print is produced. These can often be approximately 3x2m and take around 45-50 minutes to print. More than 20 of the final prints are being exhibited at the Oxford University Museum of Natural History until 30 October 2016.


