

How to Take Macro Photos – Getting Close Enough
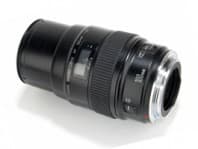
100mm lens
Alan uses a Canon EOS 1DS fitted with the Canon 100mm f/2.8 macro lens.
As the camera has a full-frame digital sensor there is no magnification factor, but with APS or DX-sized sensors this lens would provide a field of view equivalent to around 150mm.
While this enables you to shoot from further away, so you’re less likely to frighten off your intended target, a 50mm or 60mm macro lens would give you the equivalent of about 75-90mm, which is sufficient.
How to Take Macro Photos – The Flash Setup
Using flash proves a double benefit: it freezes subject movement, and allows you to use very small apertures for maximum depth of field.
Ringflash is designed for this purpose but it is expensive, unlike Alan’s system which costs very little.
Using Blu Tack, stick a small portable flashgun onto the end of the lens and angle it downwards slightly. A rubber band will provide extra support. Plug the lead into the sync socket, or the hotshoe (via an adaptor).
How to Take Macro Photos – Camera Settings
At very close range you get little depth of field, and you’ll need every millimetre.
Your subject may be moving and you’ll be trying to focus and shoot very quickly. Even a small flashgun when it’s inches from the subject will be bright enough for a very small aperture to be used, but test your own to determine the exact exposure.
If you can’t stop down enough, reduce the output by taping tissues over the lens.
Set manual exposure mode, and a shutter speed of at least 1/125sec (but within the max sync speed) to eliminate any motion blur from the ambient light.
How to Take Macro Photos – Taking the Pictures
You might think autofocus would be the quickest option, but for this sort of work manual focus is much faster and eliminates any chance of the AF ‘hunting’.
Set the lens to its mimimum distance, or whatever distance gives you a composition you’re happy with. When you see a bee (or other flying insect) land on a flower, move right in close, looking through the viewfinder until the subject snaps into focus.
You may need to quickly fine tune the focus before shooting, but don’t take too long! You may not get it right first time, but do persevere.
How to Take Macro Photos – Photoshop Enhancements
Once you’ve managed to capture a shot or two, you’ll probably want to tidy them up a bit on the PC.
Depending on how good your technique was at the shooting stage, you may need to crop any unwanted edges out so that, for example, the flower completely fills the frame. You’ll almost certainly need to apply some levels, colour correction and perhaps a small increase in saturation.
As usual with these things, less is more. In fact this image is full frame and needed no cropping at all, but that’s what comes with practice!
How to Take Macro Photos – Apply Sharpening
While no amount of software-based sharpening can compensate for an image not being focused correctly, most images benefit from a degree of sharpening before printing.
The obvious way to do this is to select the Sharpen filter from the Filters menu, but these are crude and offer little control over the effect.
Instead, select Unsharp Mask (from the same menu). Adjust the Amount slider but don’t go mad – somewhere between 50 and 100 is usually enough. If printing, set the Radius to 2.0 and the Threshhold to 1.0 or zero. Use the preview pane to check the result.


