
The light of a full moon is astonishingly bright on clear nights, and with a little exposure wizardry and a good camera for landscape photography, it can illuminate the landscape like daylight. James Abbott shows you how to achieve this stunningly surreal moonlight landscape photography technique.
After the sun has set and you’ve taken your final image during twilight, packing away and beginning the long trek back to your car is the typical order of events for landscape photographers. But once darkness has set in, depending on the moon phase and how clear the sky is, a whole new view of the world can reveal itself; one where nighttime scenes can be captured in such a way that they look as if they were taken in daylight. The main giveaway that something else is afoot is the stars nestled in the bright blue sky.
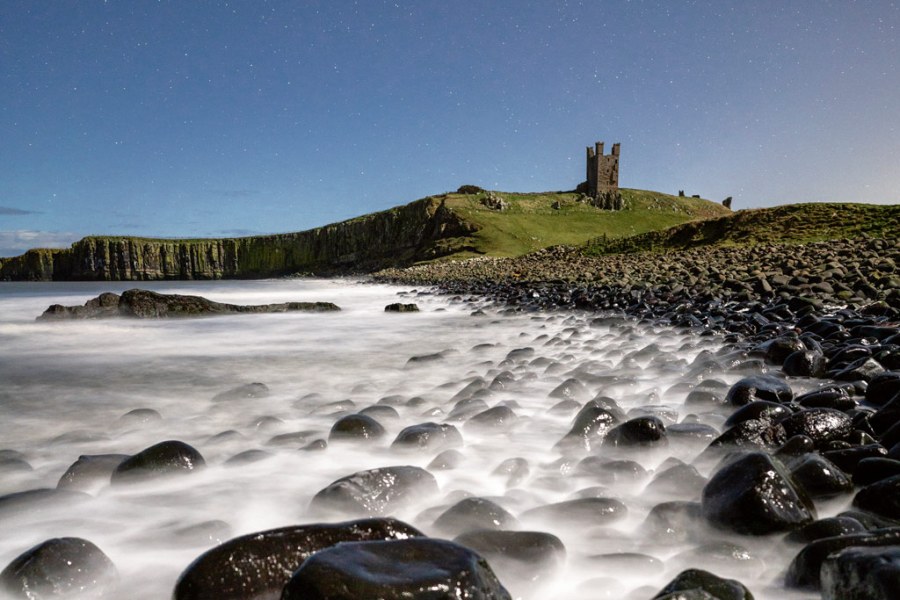
Shot under a full moon, this image is made up of a shorter exposure for the sky and a longer stopped-down exposure for the foreground Sony A7R III, 20mm f/1.8, 6sec at f/1.8, ISO 640 (sky); 5min at f/11, ISO 400 (foreground) Image: James Abbott
For this effect to work, you ideally need to shoot on or within a few days of a full moon. However, you can shoot during first quarter or third quarter moon phases (a half-illuminated moon as seen from Earth). The only downside here is that you have to roughly double the ISO compared to a full moon, but modern cameras, even entry-level models, are excellent performers up to ISO 1600 which is the highest setting you’ll ever need if you’re using the right type of lens. It’s a unique approach to night landscape photography, so let’s take a look at how it’s done…
Capturing images of this type is tricky, it can’t be denied. Not only do you have to shoot using standard astrophotography settings, which involves manually focusing on the stars, but you also need a bright enough moon, a mostly clear sky and a location that doesn’t suffer from too much light pollution. This doesn’t sound like much, but for these variables to fall into line you need a lot of luck alongside a solid shooting plan. And when they do, it’s always well worth the effort because the resulting images are unlike any other style of landscape photography.
Exposure considerations for moonlit landscapes
If you’d like to capture the best quality images, at the lowest ISO setting possible, you’ll need to shoot using a wideangle prime with a fast maximum aperture such as a 20mm, 24mm or 35mm f/1.8. If you have an f/1.4 or an f/1.2, even better. Then, before you begin shooting, you have to decide whether you’d like to shoot a single exposure that captures the stars and foreground subjects 20-30m away from the camera and beyond perfectly, or if you need to shoot a second longer exposure at a lower ISO setting and narrower aperture to make sure any closer foreground interest is sharp and in focus. These two exposures can then be merged in Photoshop for sharpness throughout the entire nighttime scene. This is a fairly simple process in editing terms, and the result is much closer to how the eye saw the scene except for the foreground and sky being captured almost as brightly as daylight.
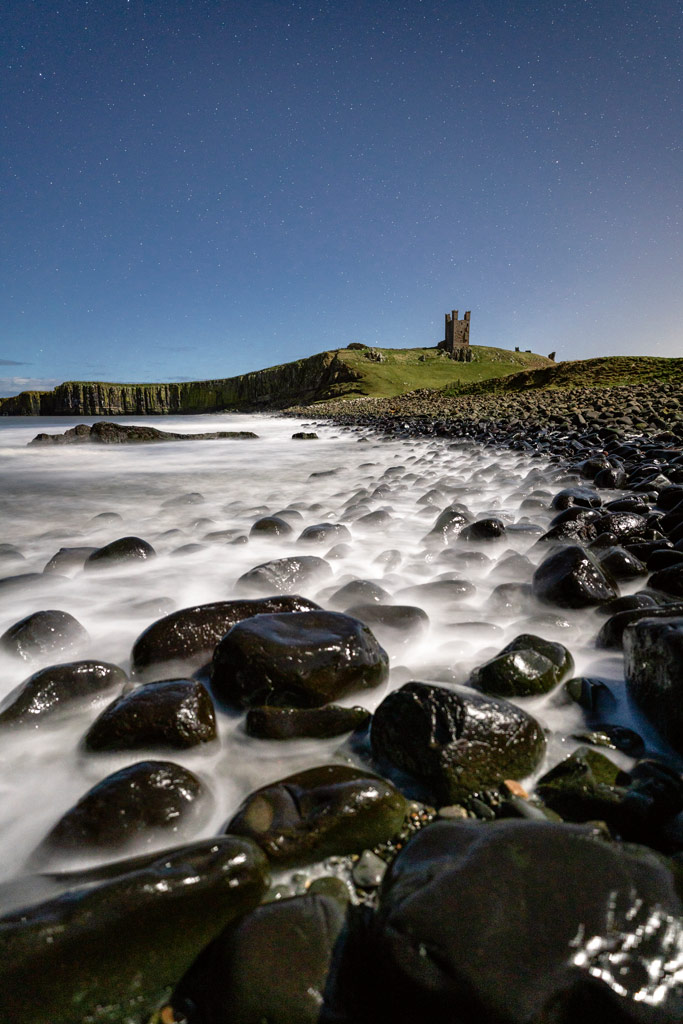
This image of the iconic Dunstanburgh Castle was shot under a waxing gibbous moon with just a single wide aperture exposure because a large depth of field wasn’t required, Sony A7R III, 20mm f/1.8, 10sec at f/1.8, ISO 1600. Image: James Abbott
Apps for planning your moonlight landscape shots
As with standard astrophotography, this is a technique where several variables need to align, so meticulous planning is essential. First and foremost, you need to know the moon phase, when it will rise and fall and where it will travel across the sky relative to your chosen location and shooting direction. Ideally, it needs to be to the side or behind you, but you do have to watch out for your own shadow creeping into the shot. The best app for planning most of this is PhotoPills. You also need a mostly clear sky, and Clear Outside provides detailed information about cloud cover.
Clear Outside App. Image: James Abbott
Moonlight Landscapes – Shooting Steps
1. Focus on the stars
Attach your camera to a tripod and compose the shot. Switch on live view and zoom in to the brightest star you can see in the frame. Set the lens to manual focus and rotate the focus ring until the star is at its smallest and sharpest. And if you’d like an additional focusing aid, switch on the focus peaking set to red to show a ring around the star when it’s in focus.
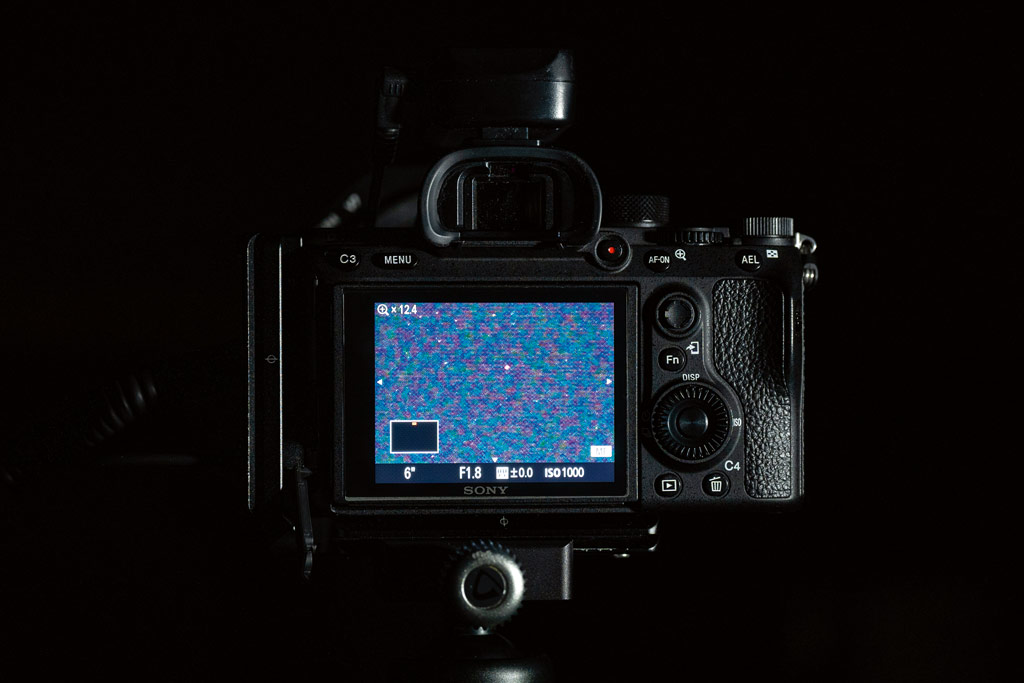
Image: James Abbott
2. Expose for the stars
Exposure requires experimentation because it depends on the brightness of the moon and the maximum aperture of your lens. In manual mode, start at a shutter speed of 10 seconds with ISO set to 1000 and the lens at the maximum aperture – ideally f/1.8 or wider. Then adjust ISO and shutter speed as required, but ideally keep the shutter speed below 10 seconds.

Image: James Abbott
3. Focus and expose for the ground
This step is only necessary if you’re shooting a scene where there’s foreground interest fairly close to the camera. For this, stay in manual mode with ISO at 400-800, aperture at f/11 and use Bulb mode to manually time an exposure of around 10 minutes. You’ll also need to refocus 1/3 of the distance into the scene beyond the foreground.
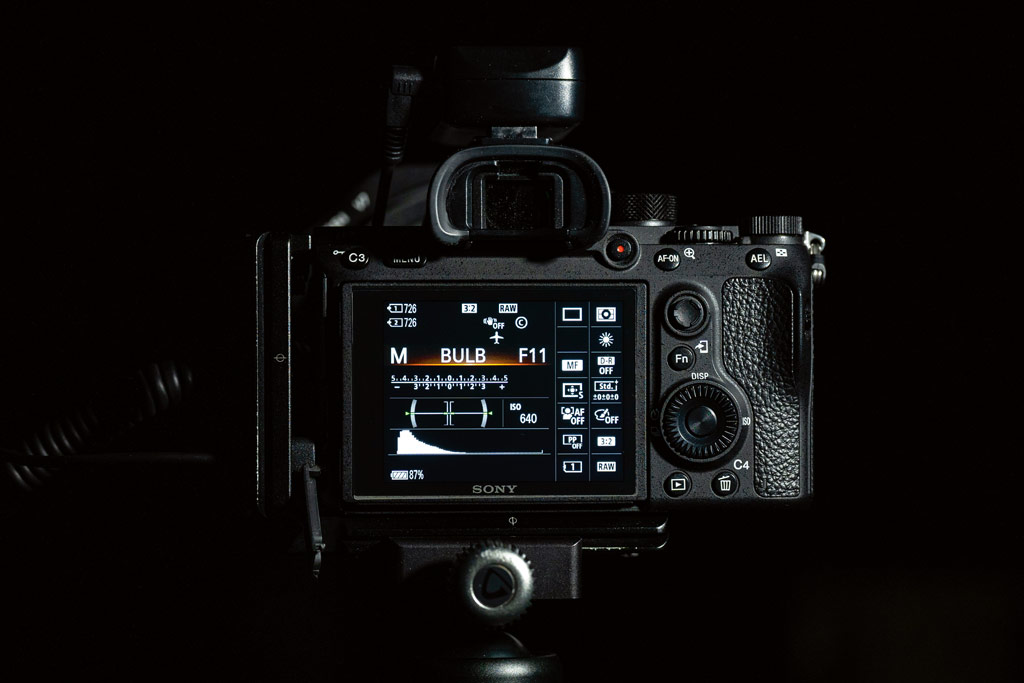
Image: James Abbott
Moonlight Landscapes – Ensuring perfection
Sharpness is just as important for moonlit landscapes as it is any other, and the high ISO settings required can be ‘fixed’ in Lightroom during processing thanks to the amazing Denoise feature within the Enhance controls. So, as long as you’ve focused on the stars correctly and the exposure time is short enough to capture the stars as dots, everything will fall into place. This is important whether you’re shooting a single exposure or a dual exposure for blending, and there’s a simple way to guarantee pinpoint stars.
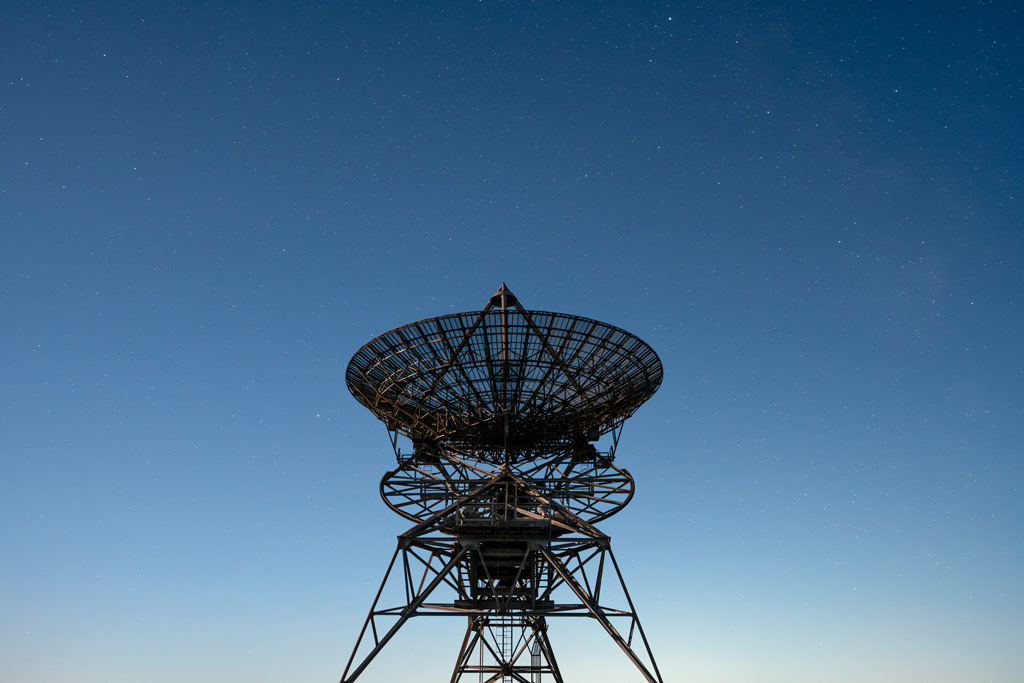
A different approach to this technique is to find a large and tall subject that can be shot against the sky to capture more stars behind the moonlit object. This is, of course, less of a moonlit landscape image and falls more into the realm of astrophotography, but the shooting technique is identical and it provides an alternative compositional approach that can produce interesting images Sony A6300, 20mm f/1.8, 10sec at f/1.8, ISO 500. Image: James Abbott
Without going into the 500 rule, which is a calculation that can be made to determine the longest exposure you can make, depending on the focal length of the lens used, before movement of the stars is captured, simply keep shutter speed below 15 seconds but ideally at 10 seconds or less. This will capture stars as dots rather than teardrops or worse, as trails. Of course, if you shoot a longer exposure for the foreground, this will capture star trails because of the long exposure time, but this isn’t a problem because the shorter, higher ISO/wide aperture exposure for the stars will be used for the sky.
Moonlight Landscapes – Adding light
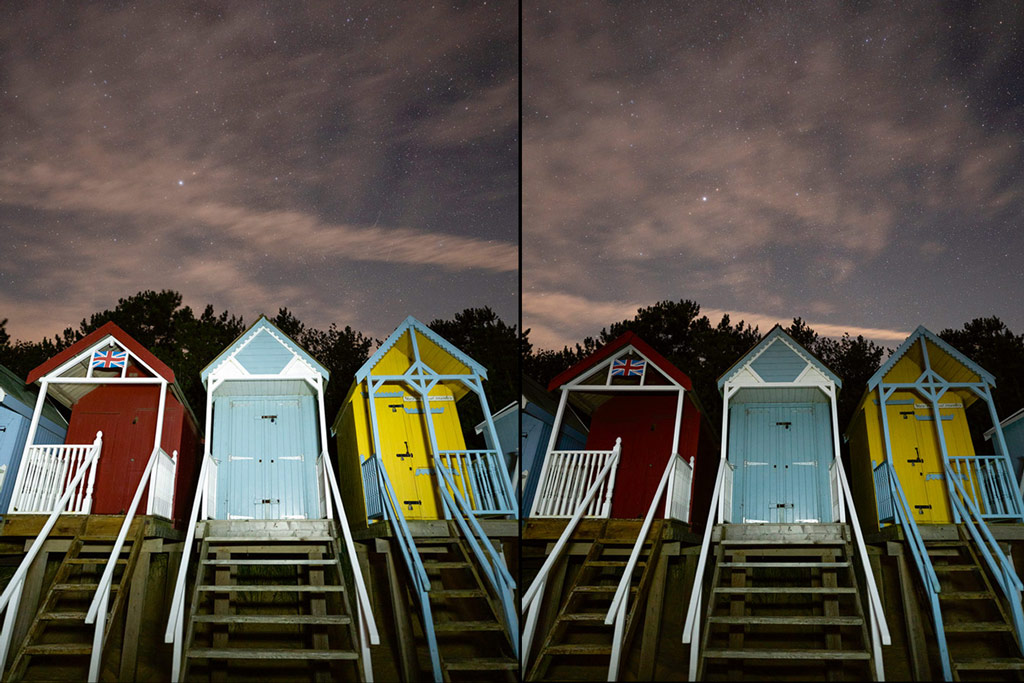
Image: James Abbott
The only time you’d ever need to add artificial light to a moonlit scene is if and when the moon is obscured by a cloud. This can be frustrating when the weather forecast has suggested a clear night, but it does unfortunately happen. In this situation, the best course of action is to shoot a single exposure with standard astro settings to capture the stars and use a torch or headtorch to illuminate the foreground interest. This is exactly what happened with this shot, and although the technique used is different from the one intended, it guarantees an image despite the less-than-ideal conditions.
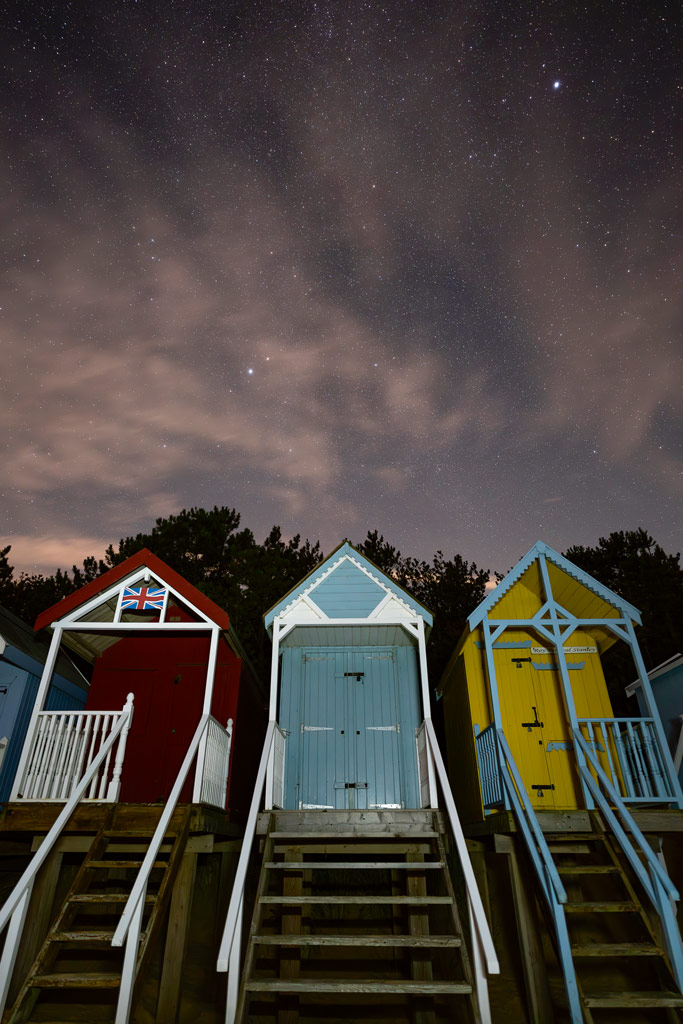
Image: James Abbott
Painting with light is always hit and miss, which means you have to shoot multiple frames where you adjust and refine your lighting technique to achieve the desired lighting effect. The two examples here were taken before the main image, with the left image being too bright in the foreground and the right image being too dark and unevenly lit.
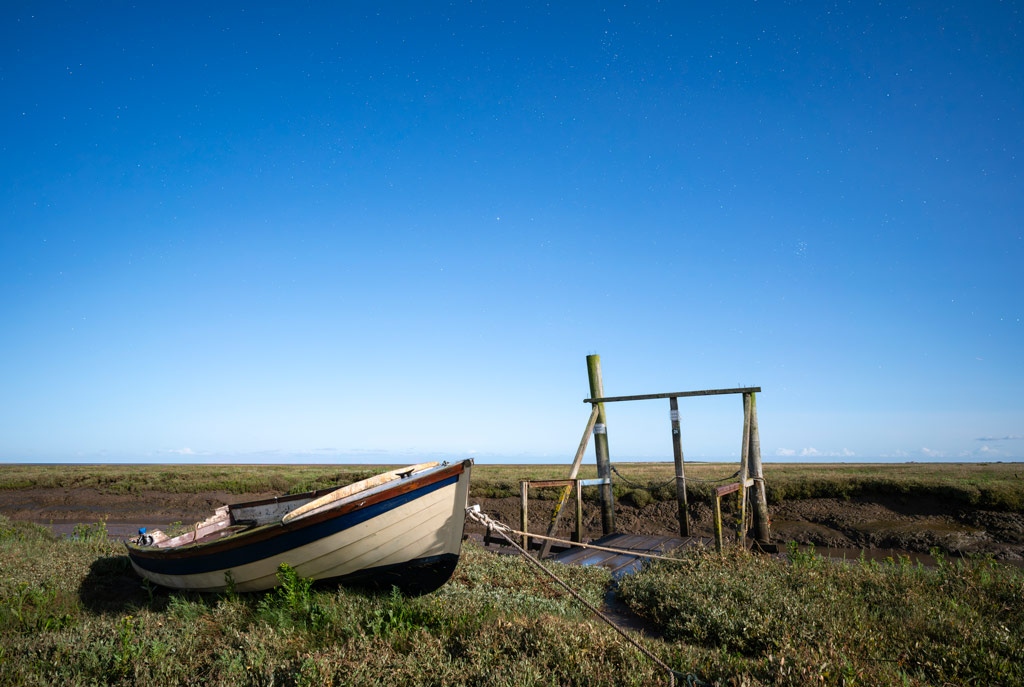
Shot under the blue moon at the end of August 2023, the full moon was extremely bright and it perfectly illuminated this salt marsh scene Sony A7R III, 20mm f/1.8, 10sec at f/1.8, ISO 800 (sky); 10min at f/11, ISO 640 (foreground). Image: James Abbott
Moonlight Landscapes – Editing Steps
1. Apply basic adjustments
Process your f/1.8 exposure, or the first of the two exposures you took, as you would a standard landscape using the controls in the Basic tab, the Tone Curve and Lens Corrections. The latter is especially important for the shot taken at f/1.8 or wider to remove the inevitable vignette.
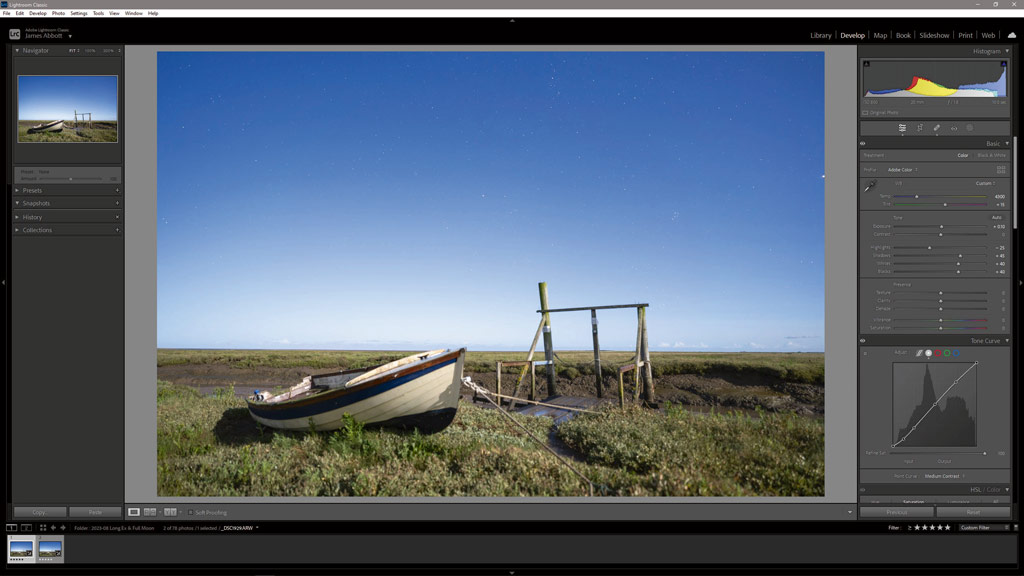
Image: James Abbott
2. Use localised adjustments
Lightroom’s Masking Tools are ideal for localised adjustments. Here, a Radial Gradient was applied and inverted for a subtle vignette. If you’re working with just an f/1.8 exposure, you could omit Lens Corrections in step one to maintain the vignette, but this is the best option for the dual-exposure approach.
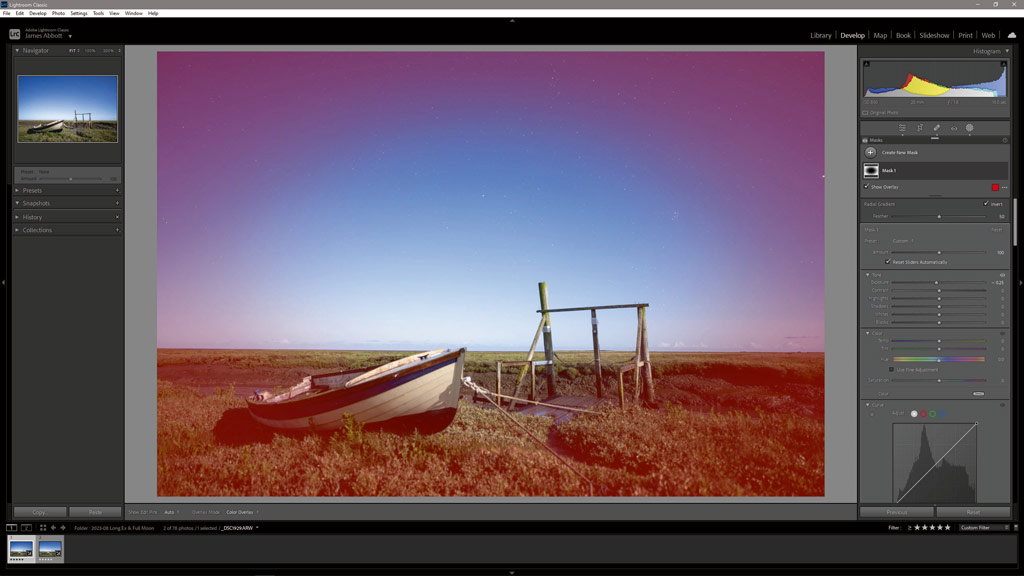
Image: James Abbott
3. Denoise the image
For single f/1.8 exposures, this is the final step. In the Detail tab, click Denoise to open the Enhance dialogue. Select an area of stars and adjust the Amount so that noise is reduced but fainter stars aren’t lost. For this image, 40 worked perfectly. Click OK and then Sync all adjustments to the second exposure.
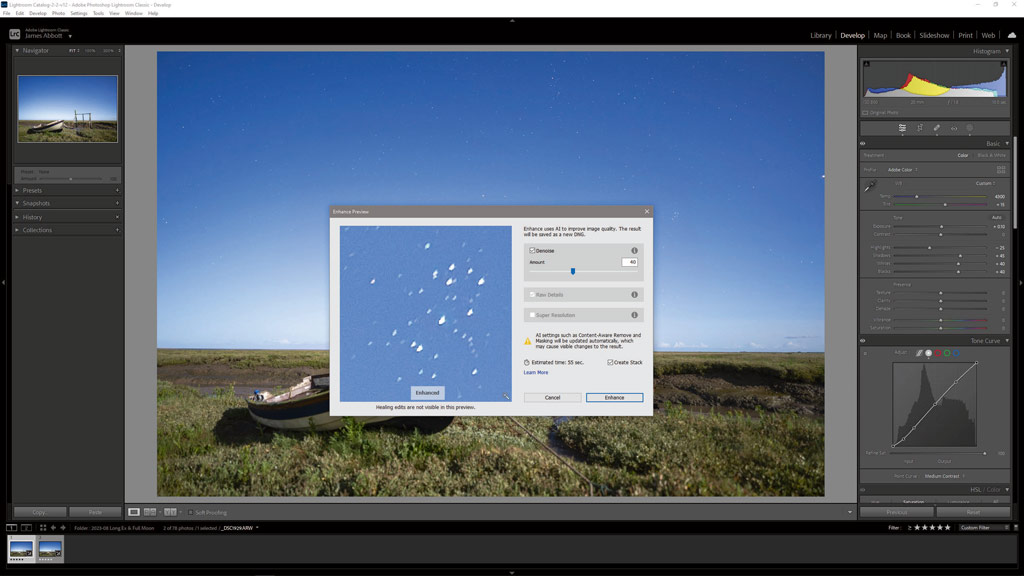
Image: James Abbott
4. Open images as Layers
Manually adjust Exposure in the second shot to match the first and apply the same Denoise settings. Next, with both exposures selected, right-click on the thumbnails and go to Edit In>Open as Layers in Photoshop. Select both layers, go to Edit>Auto Align Layers and then crop out any space at the image edges.
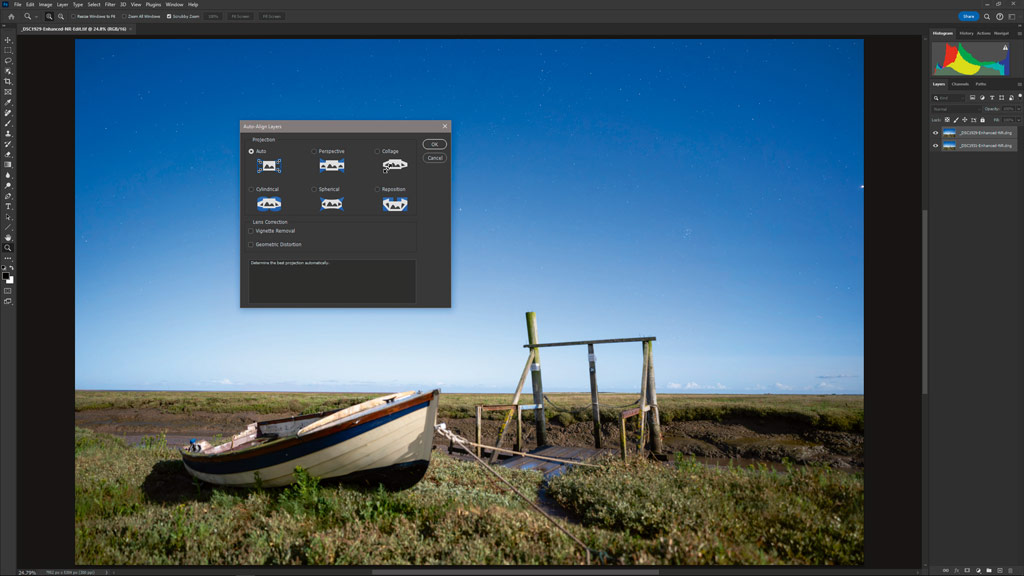
Image: James Abbott
5. Blend the two exposures
Select the top layer and go to Select>Sky. Add a mask and the area of ground in this layer will be hidden. The image layer at the top of the stack needs to be the exposure for the stars. If it’s the ground exposure you’ll need to press Ctrl/Cmd+I to invert the mask that will be active by default.
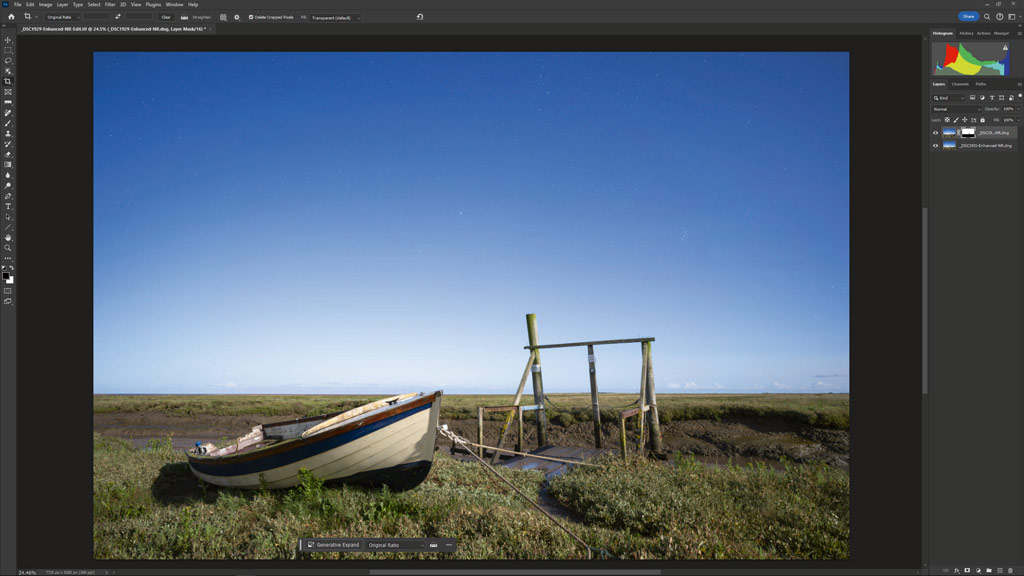
Image: James Abbott
6. Refine edges
The AI-powered sky selection may need some manual mask refinement. Parts of the boat and the jetty posts have ghosted. Carefully paint black over these edges to reveal the sharper bottom layer. Switch to white to paint out any mistakes. If you inverted the mask, use white to reveal and black to hide.
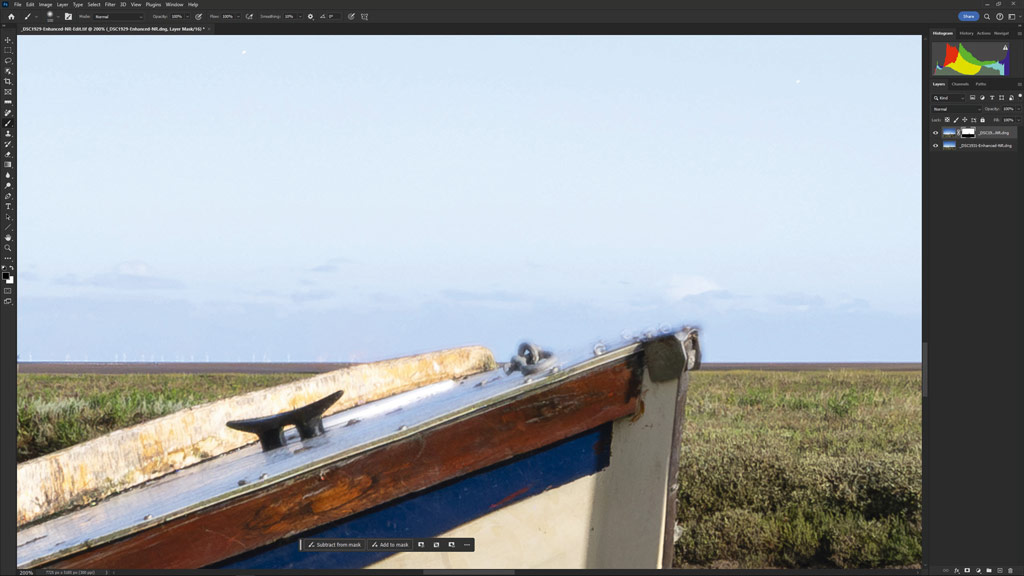
Image: James Abbott
Moonlight Landscapes – Kit List
Tripod
With exposures ranging from 5 seconds to more than 10 minutes, depending on your approach to this type of photography, a sturdy tripod, ideally not a travel model, is an absolute must to keep the camera still during long exposures.
Fast prime lens
Fast, wideangle prime lenses are the perfect option because they often provide better edge sharpness than zoom lenses and their fast maximum aperture of f/1.8, f/1.4 or f/1.2 is essential for astrophotography.
Shutter remote
A shutter remote is much quicker and more convenient for releasing the shutter than the camera’s self-timer. Plus, if you’re shooting one exposure for the sky and another longer exposure for the foreground, you’ll need a shutter remote to shoot in Bulb mode.
PhotoPills app
The PhotoPills app is one of the best smartphone apps available for planning landscape and astrophotography shoots. For this technique it’s particularly useful because it shows you when and where the moon will rise, travel and set.
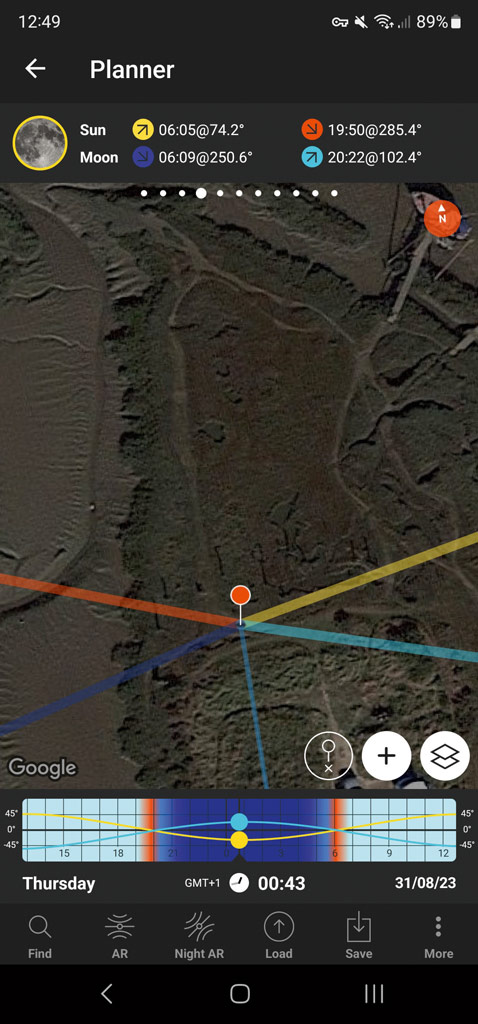
Photo Pills App. Image: James Abbott
Headtorch
Headtorches are essential for landscape photographers because they leave your hands free for navigating to and from locations in the dark, as well as adjusting camera settings etc. Just make sure you switch it off during exposures.
Related reading:
- The best landscape photography books for inspiration
- The night sky: How to photograph stars and the Milky Way
- How to shoot star trails – in 6 easy steps
- Shooting the night sky: tips from Astronomy Photographer of the Year winners
- Best camera for astrophotography
- Best lenses for astrophotography
Follow AP on Facebook, Twitter, Instagram, YouTube and TikTok.


