How to use photography lighting gels:
Apart from a softbox, the most useful accessories that I have for my small lighting kit are different-coloured lighting gels. However, mention lighting gels and many photographers will think of images seen in photography books from the 1970s and ’80s, where portraits were lit with blue- or red-coloured lights – and sometimes even both.
This garish style looks very dated, and has probably deterred quite a few photographers from ever buying a set of lighting gels. Yet these gels are useful for a variety of different purposes, and are one of the cheapest accessories available. There are basically three ways that lighting gels can be used: for colour correction; to create a special effect; or to simply illuminate an area or subject with a particular colour. The key to using lighting gels well is to use them subtly and in moderation. Unless you are using a lighting gel for colour correction, there are few times when the coloured light should be the dominant illumination in an image.
What is a lighting gel in photography?
Lighting gels are coloured transparent sheets used to alter the colour of a light source. They are called gels because for years gelatine was used in their manufacture. However, as the gels have to withstand the extremely high temperatures created by continuous lights used in photographic, theatre and television productions, they are now manufactured from various heat-resistant plastics.
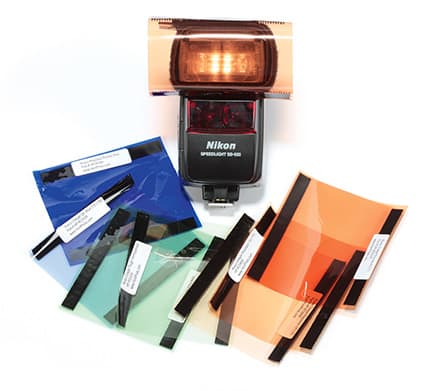
As the size of lighting gel required depends entirely on the type of light with which it will be used, gels usually come in rolls or sheets that are then cut to the correct size. This is especially true in photography, where often only a very small amount of gel is required for use with a hotshoe flashgun. For this reason, many manufacturers offer small kits for photographers with a number of different-coloured gel swatches. Despite being manufactured from materials designed to withstand very high temperatures, lighting gels do wear out over time. The colour can begin to fade and the material can become quite brittle and just flake away.
[Right: Some flash gel kits have Velcro fixings so they can be easily attached to your flashgun]
How do you use a gel filter for photography?
Colour – Correction Gels
Some of the most useful types of lighting gels are those that alter the colour temperature of a light so it replicates another light source. While these are also possibly the least exciting, they can make a crucial difference to images lit with multiple sources of light. For example, using fill-in flash in a tungsten-lit room means there will be two light sources illuminating the scene, each with a different colour temperature. The tungsten light will be an orange colour, while the flash will be very blue in comparison. Setting the camera’s white balance to tungsten will add blue to the image to neutralise the orange colour of the tungsten lights. However, in doing so, the added blue will also exaggerate the blue light from the flash, which can be very unflattering when using fill-in flash for portraits, producing a cold, pale-looking complexion.
However, by using an orange colour-correction filter over the flash, the light it emits will be orange and will match the colour of the tungsten light in the room. Setting the camera’s white balance to tungsten will then neutralise the orange light from both the tungsten lights and the flashgun, creating a perfectly neutral image. Another example might be when taking images outside at night. Streetlights produce a very orange/amber-coloured light. If you are taking a portrait of someone using flash, with the camera’s white balance set to flash, then the subject will look neutral, but the background will be a deep amber colour. Instead, using a deep amber filter and setting the camera’s white balance to tungsten, or an even stronger custom setting, will make both the subject and the background neutral.
Blue colour-correction gels work in a similar manner.
A good example is when people wish to mix continuous tungsten lights and flash in the studio. Instead of putting the orange gel over the flash, blue gels can be used with the tungsten lights to help match their light to the colour of the flash output. Fluorescent lighting is a little trickier to compensate for, as the exact colour of the light can vary as the bulbs or tubes heat up, and depending on which gas is used inside. As a general rule, most fluorescent lights emit a green hue. A green colour gel over a flash will therefore match it to this light, enabling the fluorescent white balance setting to be used on the camera for an even colour temperature across the image.
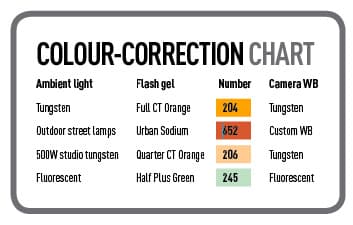
Colour-correction gels are available in different strengths, usually measured in 1/4, 1/2 and full, to match the colour temperature of different strengths of light. To get an exact colour match, it may be necessary to combine different filters. For example, combine 1/4 and 1/2 gels to make a 3/4 gel, for those times when a full gel is just a little too much. Similarly, some lights may just have a slight hint of another colour, such as certain types of street lamp. In these instances, try using a full orange gel combined with another slightly pink gel to recreate the hue of the light. There are hundreds of different colours and strengths of gel available, and manufacturers will often have sample swatches that can be purchased to try out. The table above contains some of the most common types of colour-correction gel and the product numbers from the most popular manufacturers.
Measuring colour temperature
It is usually quite easy to find out the colour temperature of lights that are used for photography. Most manufacturers will list the colour temperature of flashguns, studio flash heads and continuous lights in each product’s specification – after all, it is in their interests to make this information available. When it comes to balancing different types of light, it is therefore quite easy to work out roughly which gels to use, but for absolute precision the exact colour temperatures are necessary.

[Above: Lit using both tungsten light and a fill-in flash, there is a big difference in white balance across the scene. Using a tungsten gel over the flash means it matches the colour of the tungsten lamp, leaving no colour cast when the tungsten white balance is used]
Lee Filters has a handy calculator on its website that allows users to select the colour temperature of the light source to be filtered, and then the colour temperature of the light that is to be matched. It then displays the colour filter gel, or different combinations of gels, that can be used to match the light sources. The gel calculator is free to use and is available at www.leefilters.com/lighting/mired-shift-calculator.html.
With traditional tungsten light bulbs now being replaced by energy-efficient ones, it is a little more difficult to know the colour temperature of the newer kind. Older types of energy-efficient bulbs have the same colour temperature as a standard fluorescent lighting tube, while others are designed to produce a cool daylight colour. However, most current household energy-efficient bulbs try to replicate the colour of a tungsten bulb. When shooting with these bulbs, it is important to allow them to warm up fully to reach their peak operating temperature, as the colour of the light will change as this takes place. The white balance of these bulbs is sometimes featured as a Kelvin value on the box, or included in the instructions. Failing that, the specification is often available from the manufacturer’s website.
It is also possible to find out the exact colour temperature of a light using a digital camera. Using only the light source to be measured, hold a grey card under the light and use the camera’s custom white balance feature to take a colour reading from the light. Usually, the exact Kelvin value of the light source will be set and should be shown when looking at the image information on the camera screen. If the custom white balance value is not apparent, open the raw file in raw-editing software and it can be seen there. Once this value is known, the Lee Filters calculator can be used to calculate the filters needed to match a flash to this light.
How to use coloured lighting gels for effects:
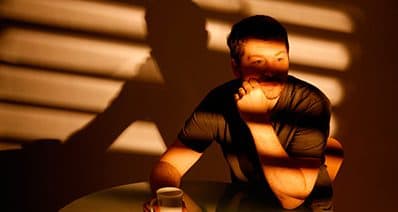
With such a huge number of coloured lighting gels available, many are used for special effects. For example, a Deep Golden Amber 135 gel may be used to replicate a vivid sunset. By placing the flash at a low angle to light the subject in a room, it can look like the light from a sunset pouring in through a window. At night-time, or on an overcast day, the flash can be placed outside a window, with the window frame creating strong shadows across the subject.
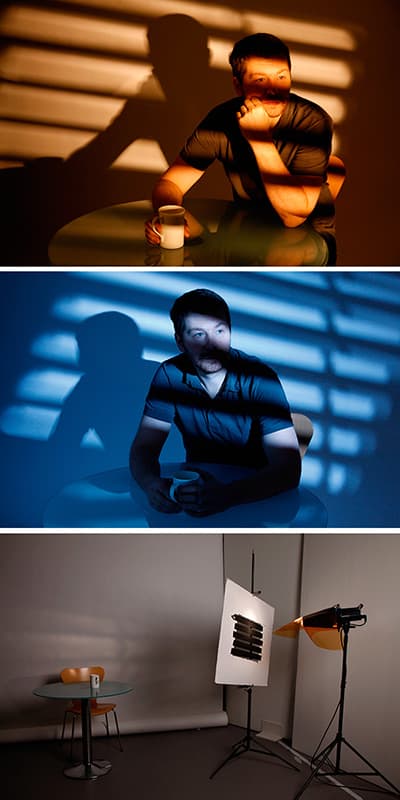
[Above: Gels can be used to create different effects. Here a warm orange gel used over a lamp at a low angle gives the feel of sunrise or sunset, while a cool blue gel used on a light at high angle replicates moonlight]
This effect can even be recreated without actually needing a window. Use a large sheet of black card and cut out a simple frame to give the impression of window light falling onto the subject. Alternatively, try cutting strips out of the card to create a Venetian blind effect. Both techniques will make it appear as though the subject is sitting next to a window at sunset.
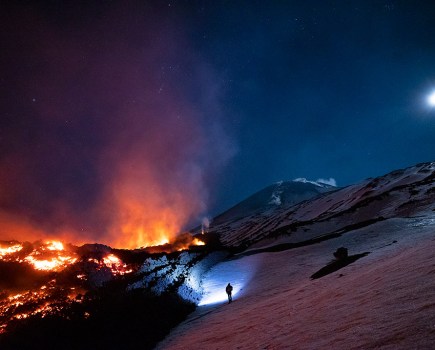
However, it isn’t just sunsets that can be recreated using lighting gels. A Sky Blue 068 gel gives the appearance of moonlight. Use the same technique as for the sunset effect, except place the gelled flash higher and angled down at the subject.
Top tips
- Use the custom white balance to find out the exact colour temperature of a light source
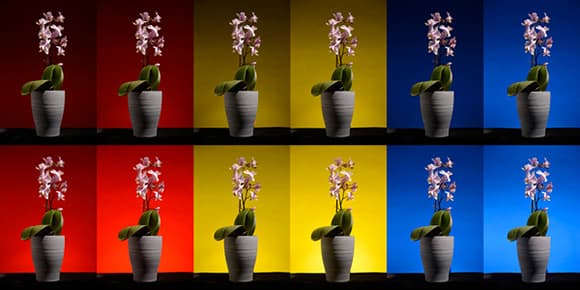
- A grey background can be easily coloured using a filter gel
- Remember to think about how the colours of the gel will work with other colours in the image. Try using complementary colours together.
- Keeping a basic selection of colour-correction gels with your flash is extremely useful
- Gels can reduce the flash output, so make sure that this is factored into the exposure
- Certain coloured gels can be used to replicate certain types of light, such as a sunset or moonlight
Where to get the gels:
Lee Filters
www.leefilters.com.Manufacturer of lighting gels
Lumiquest
www.snapperstuff.com
Manufacturer of a number of kits to enable the use of filters on flashguns. Distributed in the UK by Snapper Stuff
Honl
www.flaghead.co.uk
Honl makes the lighting gel kit pictured on page 54. Distributed in the UK by Flaghead Photographic
Rogue
www.daymen.co.uk
Manufacturer of the Universal Flash Gels Kit. Distributed in the UK by Daymen
Rosco Lighting Gels
www.rosco.com/uk
Manufacturer of lighting gels
Silverprint
www.silverprint.co.uk
Has a good selection of Lee Filters in both rolls and sheets

