Looking for inspiration or a new challenge with your photography? Try one of our photography project ideas to get you started. Each task should be manageable within a weekend, or can be expanded into as large a project as you like.
If you do manage to get any shots you’re proud of, tweet them to us at @ap_magazine with the hashtag #photoprojects or send them into ap_online@timeinc.com and we’ll retweet the best ones.
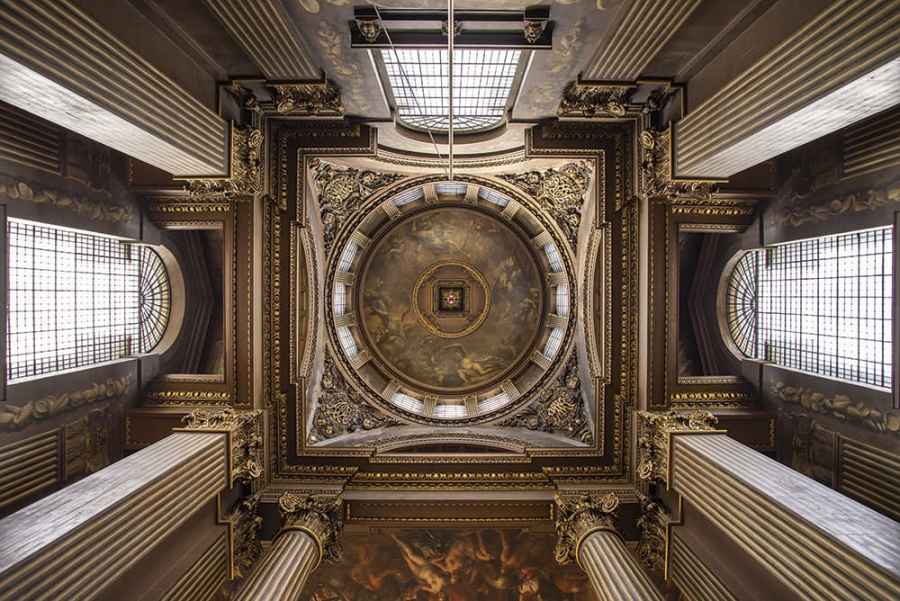
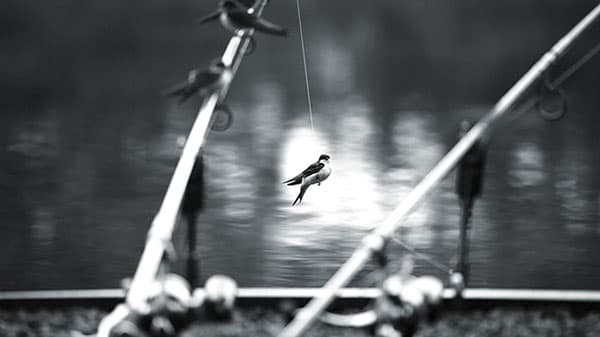
Look up
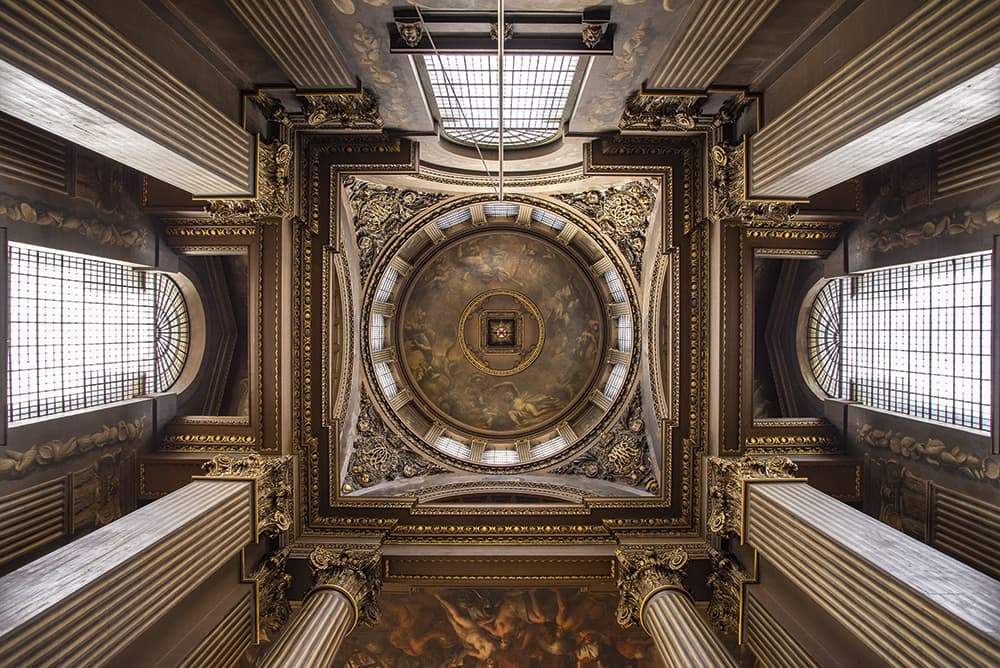
To ensure everything is lined up in the frame, use your camera’s grid overlay. Photo by Phil Hall
When wandering round towns or cities (or even country houses), we invariably fall into the trap of looking at architecture from a fairly flat-on view, often shooting just the exterior of a building without venturing inside. While there’s plenty of scope for general interior views, next time you’re out and photography is permitted inside a building, look up. More often than not you’ll be rewarded with striking patterns that make really interesting and abstract imagery.
Wideangle lenses are invaluable in these situations, as they allow you to cram so much into the frame. When composing your shot, though, aim to have elements of the structure leading in from the edges of the frame to draw the eye into the image.
- It may not be possible to set up a tripod in a public building, so be prepared to handhold your shot and increase your ISO. Don’t be afraid to lie on the floor, as trying to lean backwards and shoot can be uncomfortable.
- Use your camera’s grid overlay to ensure that everything is symmetrical and lined-up straight in the frame, otherwise the effect won’t be as good as it could be. You may need to shuffle on the spot to do this.
- To avoid the loss of too much detail in the highlights, it’s worth underexposing the shot a little. Then play with the Shadow slider when converting the raw file to lift detail in the shadows and balance the exposure.
- You’ll want a nice wideangle lens to really achieve a striking look. When converting the file, use the Lens Correction tool to avoid any distortions that may occur when shooting at a wide focal length.
Get closer
This shot was taken with 50mm f/1.8 lens with a 14mm extension tube and lit from behind. Photo by Callum McInerney-Riley
With the obvious exception of dedicated macro lenses, most optics don’t feature a close focusing distance. However, with the addition of an extension tube it is possible to make the minimum focusing distance a lot closer. There are a variety of different adapters on offer, typically ranging from 8-35mm in length. The longer the extension, the closer the focusing distance becomes. As these extension tubes do not feature any optical elements, they are relatively inexpensive, although those that feature autofocusing can cost significantly more.
So why not use an extension tube with one of your existing lenses to shoot some creative macro images.
- Pairing extension tubes with wide-aperture prime lenses, such as the 50mm f/1.8, will allow a very shallow depth of field when shot wide open. So you can achieve sharp focus on subjects and blur the background extensively.
- If you are shooting subjects with out-of-focus backgrounds, try manipulating the look in-camera using props and different types of light. Candles, LED lights, tin foil and highly textured surfaces all make excellent backgrounds.
- Focusing will often need to be precise, especially when using longer focal-length lenses. Try to keep the camera steady by using a good tripod and, where possible, use manual focusing with preview enlargements.
- With subjects so close, the lens can often obstruct the on-camera flash and the light won’t fall properly on the subject. Try using an off-camera flash, LED panel or macro ring light to illuminate the subject instead.
Stick to One Lens
Try photography with one lens for an entire week. Photo by Tom Calton
Sometimes the best way to inspire creativity is through limitation. It forces you to look at a scene in a new light, presents new challenges and ultimately enhances your ability to overcome these obstacles.
A great example is setting yourself the task of choosing one lens from your kit bag and sticking to it for the entire weekend. Selecting a prime lens for this project would be best, as it will constrain you to a single focal length. We’d recommend using either a 50mm for full-frame users, or 35mm for APS-C DSLRs, as these generally provide a happy medium between wide and tele. Ultimately, though, it’s your choice, so select a lens that will force you to rethink your compositions.
- Being limited to a single focal length doesn’t mean you can’t add variety to your shots. Experiment with the aperture setting to either isolate a subject with a shallow depth of field, or capture the whole scene using a large f-number.
- As a prime lens doesn’t offer the flexibility of being able to zoom in and out of a scene, it’s up to you to physically move yourself closer or further away from a subject in order to gain the correct composition.
- One of the added benefits of shooting with a single prime lens is the reduction in weight. Generally, primes are lighter than zoom lenses, meaning that you’ll most likely find it less of a chore to carry your camera about.
- Prime lenses offer a much wider maximum aperture than most zooms, allowing you to shoot as wide as f/1.8, f/1.4 or even f/1.2. This provides a host of practical advantages, particularly when shooting in low light.
Shoot mono
Graphic shapes and a range of tones set the scene fofr a successful monochrome image. Photo by Phil Hall
If you’ve ever shot black & white film, you’ll know that creating a good mono image requires a set of skills entirely separate to colour. Most modern DSLRs now feature a built-in black & white mode, which enables you to shoot mono images straight out of the camera. Activating this often-overlooked feature is actually a great way to challenge your photography skills, as it takes away any reliance on bright colours to help make a shot interesting. Colours are transformed into tones, which forces you to look at scenes in an entirely different manner. So, this weekend, why not test your photography skills by stripping away the colour from your photos to capture some raw and gritty mono imagery.
- With all colour stripped away, you’re going to have to rely on elements such as texture, tone and shape to draw the viewer’s eye into your shot and make it appear visually interesting. Keep an eye out for unusual shapes and patterns.
- When shooting black & white, the colour noise that’s generated when using higher ISOs ceases to be a problem. Instead, it creates a colourless ‘grain’, which can be used to add a gritty, film-like appearance to your shots.
- Did you know that on some cameras you can adjust the amount of contrast added to your JPEG images via the camera settings menu? This is a great way to add some punch to your images if they’re looking a little flat.
- It’s a good idea to set your camera to shoot in raw + JPEG mode. In that way, the black & white effect will only be applied to the JPEG image, leaving the raw image as a full-colour backup should you dislike the mono version.
Shoot minimalist street photography
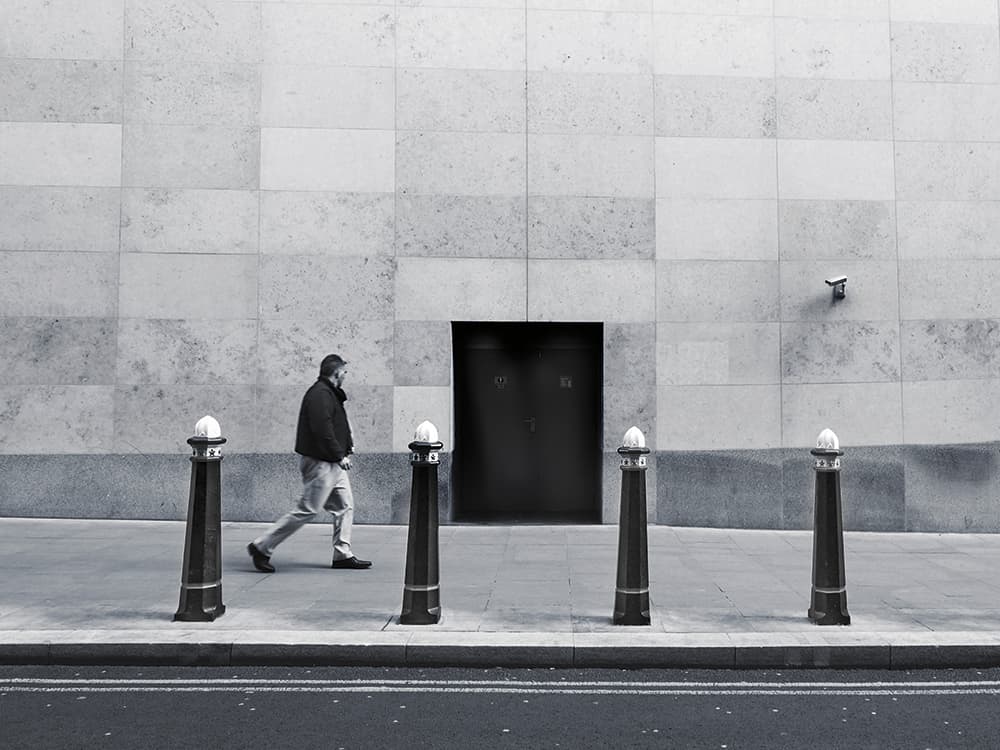
Look for strong architectural shapes and then wait for someone to walk into the frame. Photo by Callum McInerney-Riley
Street photography is more popular than ever before, with many photographers shooting their own specific style of street imagery. Much of the work of many famous street photographers relies upon a certain technique or subject matter to define their style, from capturing a definitive moment in a street scene to a very specific type of lighting.
The idea of this project is to achieve simple but brilliant minimalist street images. The great thing about this type of photography is that it requires very little preparation – all you need is a camera, a few buildings or structures, a couple of people and sharp eyes to find the right place to shoot.
- Look for strong shapes. Buildings, roads, columns, railings and steps are all perfect examples of this. Once you’ve found a good shot, wait until an interesting person walks past before taking your shot.
- If your camera can display grid lines in the viewfinder or on the LCD, make sure you turn them on. This will allow you to compose your shots more precisely and achieve a more balanced composition.
- Street photography does not rely on there being exceptional light, but do look for shadows and directional light that may add to your composition, and conform with the shapes and structures in the frame.
- Don’t be afraid to chop bits out post-capture. Parking meters, traffic cones and manhole covers can be big distractions in a minimalistic scene. Don’t be shy about using software to clone out bits you don’t like.
Try your hand at long-exposure architecture
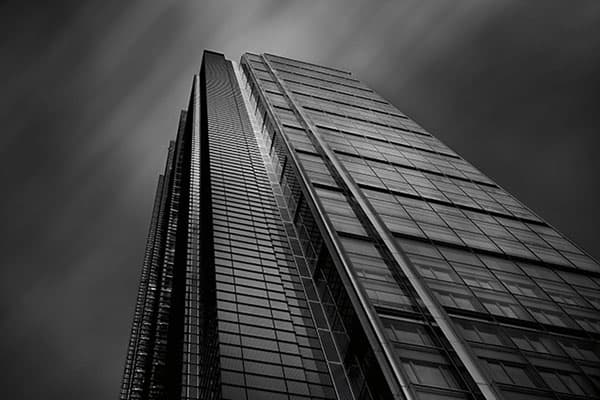
If you live in a big city, then the beauy is that your potential subjects are all around you. Photo by Callum McInerney-Riley
In recent years, fine-art style architectural photography has risen in popularity and many photographers have embraced the use of long exposures to capture the beauty of architecture. They rely on simple composition and dynamic lighting in order to make the images come to life. Shooting with a tripod and using very dark neutral density filters is the way to achieve these images.
There are thousands of fantastic buildings to photograph up and down the country, mostly in the larger cities. If you’re struggling to find the right ones, simply check out www.instantstreetview.com where you can click around your local area to find the perfect location.
- Stacking upward of 10EV of ND filters inside a square filter holder is not uncommon for architectural photographers. This achieves silky smooth skies or blurred clouds. A cheap workaround for this is to use welding glass.
- A shutter speed of between 1/30sec and 15mins is what you should aim for. If the clouds are moving very slowly, then a longer shutter speed is needed. This can be achieved by adding more stops of neutral density.
- Try walking through a built-up area with a camera phone or a little compact camera and taking a couple of snapshots in order to find a subject you know will work. This helps reduce the trial and error of composition.
- Shooting mid-morning or late afternoon will give you the best results as the sun is high enough to add dimension and depth to the subject matter. The movement of the light will be captured in the long exposure.
Book a model

For best results, be clear in what you want to achieve from a shoot with a model. Photo by Phil Hall
Whether you want to experiment with some lighting set-ups, shoot some outdoor portraits or you have a specific image in mind, there will be occasions when you might want to think about booking a model, especially if you’ve exhausted the goodwill of family and friends as subjects.
With community sites like modelmayhem.com putting photographers, models and make-up artists in touch with each other, you’re bound to find a model in your area. You’ll often find models starting out happy to work for free in return for images (though you may have to pay travel), but to guarantee a level of professionalism and punctuality, it is worth booking a professional model from a model agency like missionmodels.co.uk. You’ll have to pay, but if you club together with someone else, you can spread the cost and help each other with lights and diffusion.
- Think about the look you want from the shoot, asking the model to bring a selection of outfits to fit in with the brief. Hair and make-up are just as important – to start with you may want the model to do this but as you progress you may want to hire a professional make-up artist.
- You want to build a rapport with your model – start by telling them what you want and how you want them to pose. It may help to strike the poses yourself and, as the model warms up and relaxes, they will invariably start to create their own poses.
- Maximise your time with your model, especially if you are paying. Iron out any technical issues you may have with a stand-in to avoid wasted time once your model arrives. You can then concentrate on the shoot and get the shots
you want. - If you’re looking to sell your images for commercial use, then ensure the model signs a model release form. Models have legal rights as to how and where the pictures are used, but release the right to influence picture usage by signing.
Photograph your car

Boom arms can produce striking results. Photo by Phil Hall
Whether you have a gorgeous classic, a hot hatch or a family runaround, why not try to shoot your car in a style that wouldn’t look out of place in a glossy car magazine? Take a look at a few car magazines for inspiration and try to deconstruct why they work so well. Think about the angle and framing, focal length used, location and if they’ve captured that feeling of speed. Before you set off with your camera and car, though, make sure it is spotlessly clean – even the best Photoshop retouching can’t clean a grubby car, while you’ll need an insured friend free to do the driving. And think where you’re going to shoot as well: avoid busy roads, opting for quiet country lanes towards the end of the day that are dappled in warm evening light.
- The obvious place to start is with a panning shot. Experiment with shutter speeds and, to help, ask someone to drive the car past you relatively slowly. Also, set yourself as far back from the road as possible.
- For static shots, get down low to add drama and use a telephoto lens to compress perspective. Think about the angle and try to get a pleasing and balanced front three-quarter shot, maybe tilting the camera a little.
- Dedicated boom arms allow you to attach a camera to the car, so you can capture (triggering the camera remotely) close-up shots while the car’s moving. Even 5mph is enough – the arm can be removed in Photoshop.
- Don’t just think about shooting the whole car, either. Look to pick out those little details on the body as well as the interior. A 50mm fast prime lens on a full-frame body is perfect for isolating these elements of the car.
Visit a wildlife centre
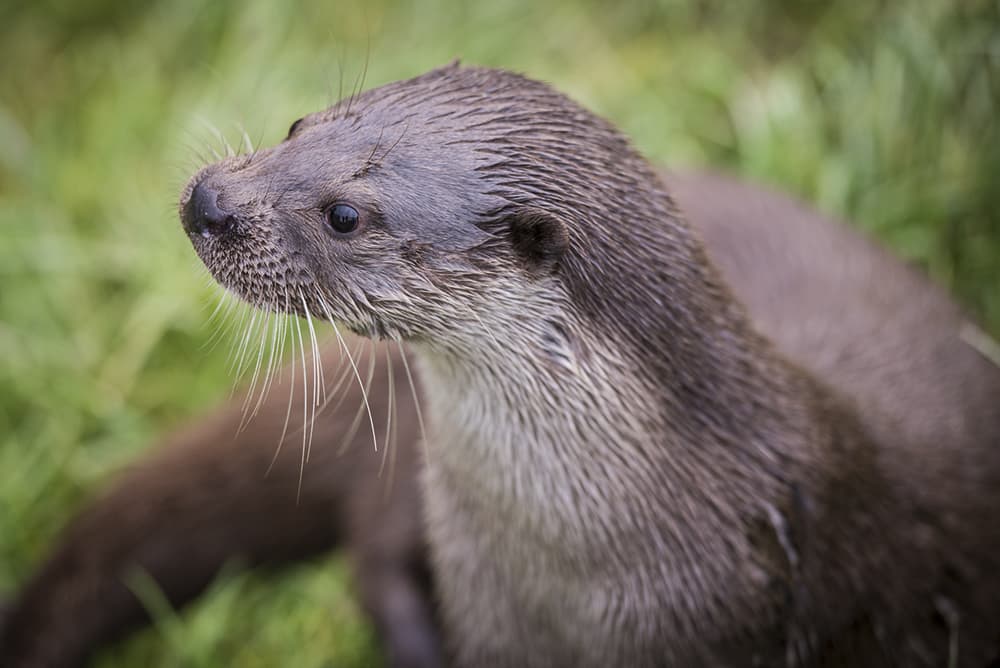
Wildlife centres offer the ideal opportunity to photograph some of Britain’s more elusive wildlife, such as otters. Photo by Phil Hall
If you want to dip your toe in the world of wildlife photography, a visit to a wildlife centre offers a great opportunity to get close to a host of our native species. So, whether you want to see foxes, red squirrels, little owls or otters, you’re likely to find them at venues like the British Wildlife Centre in Surrey.
These centres can offer fabulous photo opportunities that would take great patience and fieldcraft to achieve if you were in the wild. And for those really wanting to get the perfect wildlife shot, you’ll find that some centres will offer specific days for photographers in small groups that are often closed off to the public. This means you’ll have the luxury of better vantage points and, in some cases, access inside enclosures to get even closer.
- Think about the light. Shooting at midday (especially if it’s bright) can cause unwanted shadows and contrast in the shot, so try to get there early or wait until the end of the day. Failing that, an overcast day is good.
- If some animals aren’t that active or are too far away to photograph, there will often be a couple of opportunities to get shots at feeding time or when keepers are giving a talk.
- Think about your positioning. Try to get down to eye-level with the animal for a more pleasing frame, but pay attention to your background to avoid any unwanted and distracting elements ruining your shot.
- As you’ll have pretty good access to the animals, ultra-long telephotos aren’t necessary. A lens such as a 70-200mm f/2.8 or 70-300mm will do the job, allowing you to fill the frame with your subject.
Keep it local
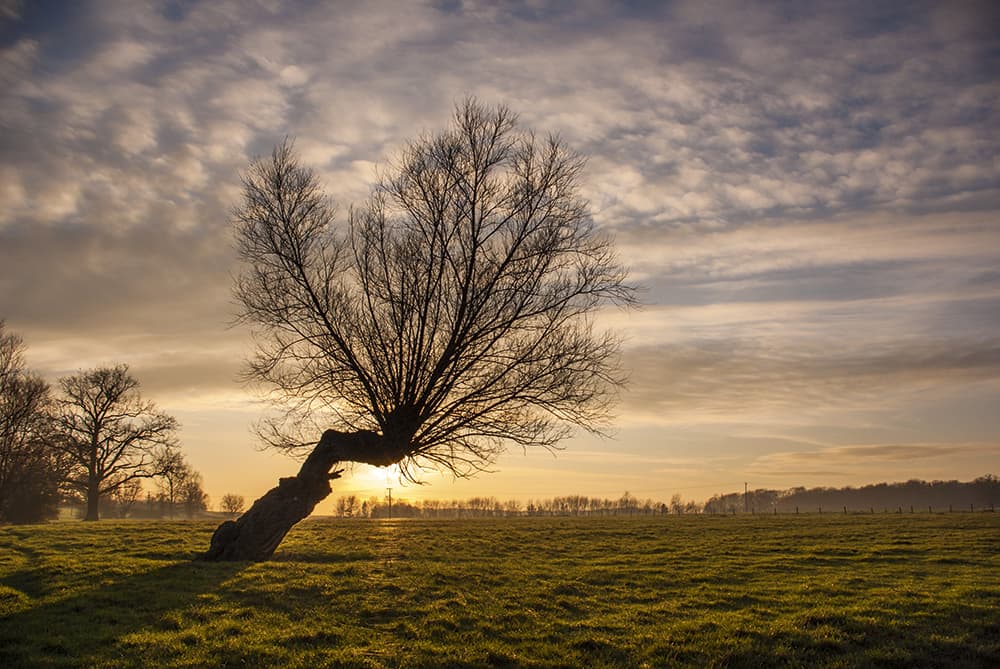
Choose a local location and get up early to make the most of the early morning light. Photo by Phil Hall
There’s no denying that visiting a new location can be incredibly inspirational and it often provides a sometimes much-needed shot of creativity that might otherwise be missing. That said, with demands of family life and other commitments, it’s not always possible to travel around the country to shoot a new spot. Rather than giving up and keeping your camera tucked away in its bag, why not focus on the landscape and locations near you?
With a keen eye and the right conditions, you’ll be surprised by the images you can achieve close to home, while you can be back in time for Saturday Kitchen Live. This is a great way to push your creativity that bit further, and, since you are close to home, if the conditions aren’t quite right, you can easily pop back later.
- The landscape is constantly changing, so always pay attention to it. Some spots will take on a new quality that will then fade away, so make mental notes and pinpoint where you want to shoot at the weekend.
- Get up early in order to make the best of the first light – if it will benefit your shot. With your location being only a short walk or drive away, at least you won’t have a long journey ahead of you.
- Don’t be afraid to experiment, especially with your framing. Try shooting down low to get the vegetation in, or pick out elements in your composition and opt for a shallow depth of field to really draw in the eye.
- Why not set yourself a challenge and return regularly to the same location time and again? Shoot from the same spot or work the scene so that you come away with a completely different shot each time.
Letter Montage

Photo by Tom Carlton
If you fancy a change from shooting the same old landscapes and portraits, why not try this rather unusual, but very creative, photo project. The idea is to take individual images of letters and shapes taken from a variety of everyday street signs, billboards and the like, then merge them together in Photoshop to spell out your name. It is deceptively challenging, as you must scout out and record each of the letters you’ll need from your local area. In turn, it will change the way you view your surroundings. Once you get started, you’ll look at every street sign and advertisement board in an entirely new light, as you start to piece together the letters needed to create your name.
- Although it’s tempting, don’t just stick to shooting letters on street signs. Try to be a little more creative in your approach and look for shapes in your surrounds that could make up the letters – like the bicycle wheel ‘O’ in our shot.
- In order to capture the most detail in your letters and to crop out any other distractions, you may have to shoot close-up, which will require a lens that has a relatively good minimum focusing distance.
- You don’t have to spell your first name using this technique. If you fancy doing something a little different, why not try spelling out the name of your home town, or even your family’s last name instead?
- Once you’ve constructed your final montage, why not see about getting it printed via a professional printing service? The resulting image would make an eye-catching piece of art when placed on the wall in your home.
Take a Still from a Video
Shooting this scene on video at 1080p full HD enabled this still to be extracted. Phot by Callum McInereny-Riley
Last September, we recorded some video footage of a model using the Panasonic Lumix DMC-GH4. We then reviewed the footage of the model moving and extracted a still image of the perfect moment. See how we did this in our online article. This shoot was recorded in 4K resolution, which gave us an 8-million-pixel still image, but even with 1080p full HD (1920 x 1080-pixel) video, it’s possible to save a still image at just over 2 million pixels. Such low resolution makes this image unsuitable for large-scale printing, but for uploading to the web it should be fine.
It’s possible using this method to capture a fraction of a second of action that would not usually be possible with continuous shooting at high frame rates.
- Dragging and dropping a video into Photoshop will bring up the video pallete, which users can scroll through to find their specific frame. Once the shot is located, select File> Save As. Then save as a TIFF to avoid compression.
- Most cameras have colour profiles in the menu that allow users to control sharpening, contrast and saturation. Either configure these first, or shoot with everything set to 0 and change them in post-processing.
- Although TIFF images can be opened in Adobe Camera Raw, it’s often very hard to bring back shadow and highlight detail from video footage. For this reason, try to avoid shooting in very challenging lighting conditions.
- Taking a video of a landscape will have very little benefit over a still image taken of the same scene. Pick a subject matter that’s constantly moving in order to capture the definitive moment in a single frame.
Objects from your shed

Objects from your shed. Photo by Phil Hall
The shed might not be the first place you’d look for photographic inspiration, but if you don’t consider it’s potential you could be missing a trick. Nestled among the lawnmower and bikes, you’ll probably find a few rusty old tools and other paraphernalia that can make the perfect still-life study. Distressed, worn items have a story to tell, which you can help translate into photographic form.
Some objects will make an interesting image on their own, while others can be grouped together as a study in composition. Any camera will be suitable, although you might want to consider using a prime lens. Also, a tripod is vital. While there’s nothing wrong with using flash, soft and diffused window light can produce some lovely effects.
- If you have only new tools hanging up in your shed, see what relatives and friends might have tucked away. Alternatively, visit a reclamation yard or car-boot sale to find some well-used and loved tools.
- Take three tools, and instead of shooting them together, shoot them all identically. Then, in Photoshop, create a new document and position the images side-by-side to create an understated triptych.
- Choose a background that complements your main subject. Look downwards and you might find that your shed floor provides the perfect solution. Pieces of old wood can also make a lovely backdrop.
- If you’ve converted your image to mono, experiment with split-toning. Light tones work well with highlights, with darker tones for shadows. The technique is simple to carry out in Camera Raw or Lightroom.