The large majority of all photos taken are shot from eye level. There’s nothing wrong with eye level but, well, it can get a bit samey after a while. The good news is that if you break the mould and try shooting from low down or high up, you new viewpoints will be more likely to create a visual impact that will stop people in their tracks.
Viewpoints – Shooting Low
There are lots of good reasons to sample new viewpoints and choose a low shooting angle. Here are a few of them:
Architecture
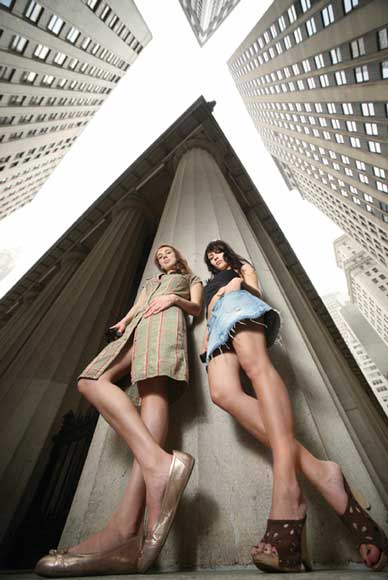
With architecture the usual aim is to keep the camera perpendicular to avoid the edges of the building converging inwards. Some types of building however, especially tall, modern ones, lend themselves to distorting the perspective in this way. The standard method is to select a wideangle lens, and shoot from as close as you can, tilting the camera up as much as you can. The greater the tilt, the more the distortion. Sometimes, if you really can’t keep the edges of a building straight, it’s better to go for extreme distortion than suffer just a little bit, as at least this will look deliberate.
 Landscapes
Scenic shots often benefit from a lower shooting angle. Choosing a low angle emphasises what’s in the foreground, be it a fallen tree, an interesting plant, or the texture of the earth. If you’re on the coast or beside a lake, you can give more prominence to the rocks on the waterline. By shooting under a tree you can place an overhanging branch at the top of the image to frame the view beyond, but you may need to select a low angle to avoid the foliage obscuring the horizon.
Nature
 Plants and flowers invariably look better when you’re shooting at their level rather than looking down at them from higher viewpoints. In many cases this will require placing the camera near ground level, so you may have to lie on the ground to look through the viewfinder. You’ll need a tripod of course, or some other form of support to hold the camera in position, and you should take a mat to lie or kneel on so you don’t get dirty. If your camera has a live view mode you may find this makes viewing and composing easier, especially if it also has a tilt and swivel screen. (If you’re in the market for a new DSLR and you do a lot of this sort of photography, this is a feature worth adding to your wish list.
 Portraits
By looking up at your subject from a lower angle you make your portrait subject look more powerful and important. Combined with the right expression it can also help to make a subject look intimidating. When photographing children it’s a classic rule of thumb to get the camera down to their level, rather than pointing it down from above. In doing so you immediately enter their world and see things from their perspective which lends the image a greater sense of empathy.
Reportage
Trying to shoot candids without being spotted can be tricky. As soon as you put that camera to your eye people clam up, stop doing whatever it is that you wanted to photograph, or in some cases become hostile. One strategy is to shoot from the hip, with the camera hanging off its strap round your neck. From out of shutter-sound range, face the direction of your intended target and discreetly press the button. Set a wideangle focal length to ensure they’re in shot, and a moderate aperture to ensure good depth of field and make sure your subject is sharp. If it helps, set the self-timer, or use a wireless remote release and trigger it from your pocket.
Viewpoints – Shooting High
There are many reasons to choose a high shooting position…
 Landscapes
Landscape and location photographers routinely choose high viewpoints to shoot vistas, whether an expansive mountain view or a city skyline. While a low angle will emphasise an object right in front of the camera, this object is also likely to obscure what’s in the middle distance. A high angle will place the camera above any such obstructions to provide a more accurate sense of relative distance from foreground to background.
Crowds
Raising the camera above your head to get a picture above a crowd is probably the most obvious reason to use a high angle. Whether at a sports event, concert or crowded club it’s the best way to avoid filling the frame with the backs of people’s heads. If your arm isn’t long enough to get you the height you need, try attaching it to a monopod and holding the monopod above your head. Of course, you won’t be able to reach the shutter button so you’ll need to use the self-timer or a remote release. You’ll find a tilt and swivel LCD screen useful to help you compose accurately.
 Portraits
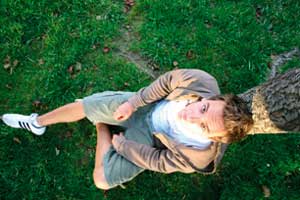
A slightly high viewpoint is common practice when photographing people. Portraits are generally more flattering when taken from slightly above the subject’s eyeline, as it places less emphasis on the nose, nostrils and chin. But this is a subtle height difference. When you go for more extreme angles the subject’s relationship with the viewer changes. They become more subservient to the viewer and, depending on the context, can look vulnerable or lost in their surroundings.
Viewpoints – Useful Gear
 Tilting LCD screen
If you have one on your DSLR, it can help you see to compose accurately when you may not be able to look through the viewfinder.
Remote release
A wireless or tethered remote release saves you having to crouch down or stretch up to take a photo.
Tripod
When shooting at awkward angles camera shake is a greater risk. A tripod that enables the legs to be splayed wide for low level shooting, or perhaps a tabletop tripod, can be invaluable.
 Beanbag
An alternative to a tripod for shooting at ground level.
Monopod
A great way to get a high viewpoint. Attach the camera to the monopod and lift the monopod as high as you can.
Laptop
Some cameras come with software to enable you to connect your camera to a laptop and shoot tethered, even firing the shutter from the laptop itself.


