
So you’ve just bought a DSLR, we tell you how to set it up, so that you’re ready to start shooting.
Before you start taking pictures you should make sure the camera is set up correctly for the way that you want to use it.
 Setting up
The menu of even simple digital compacts offers a wide variety of options to tailor the camera to your requirements. Here are some of the options:
The basics
The first thing you’ll be required to do with any new camera is set the date and time, so that the date and time data added to every picture you take is accurate.
You should also ensure that the video mode is set to PAL for UK TVs (NTSC is for the US) and whether or not you want your pictures to be displayed on the LCD screen after each shot, and for how long. (Bear in mind this increases battery consumption.)
You can also choose whether your portrait format shots are automatically rotated on playback so you don’t have to turn the camera sideways to view them.
Image size
In addition to shooting at the camera’s full resolution and using all the pixels available you’ll also find that you can shoot at smaller image sizes, using as few as two megapixels on some cameras.
Unless you have a very good reason for choosing a smaller size, such as shooting for web use only and having a very low capacity card, it’s always best to shoot at the maximum size, for quality reasons. If you got that once-in-lifetime shot you’d be kicking yourself if you’d taken it at the two-megapixel setting.
JPEG Compression

All digital cameras save your pictures as jpeg files by default, which compresses the data captured by the sensor so you can get more pictures on the card.
There are different levels of compression available, selectable in the menu, but for maximum quality you should set the lowest compression possible (probably called something like ‘Best Quality’ or indicated by the highest number of stars) because the greater the compression, the worse the quality will be.
Raw format
A few compacts and all DSLRs offer the option to shoot in the raw file format. In this mode, no in-camera processing is applied to the image.
Instead, the image you get from the camera will rarely be printable (and you’ll need raw processing software to even open it), but you’ll get the digital equivalent of a negative which, once you’ve processed it manually, will provide better quality, greater tonal depth and more creative control than you can get from jpeg.
You may not want to faff around on the PC processing every shot you take, but luckily you can usually shoot both raw and jpeg simultaneously, so you’ll get an effort-free jpeg plus a raw file of every shot you take.
Colour space
You’ll probably find you have a choice of two colour spaces on your camera: the default sRGB and Adobe RGB. The colour space refers to the range and number of colours that the camera can record.
Adobe RBG offers a wider range (or ‘gamut’) than sRBG but you need to select Adobe RBG throughout your workflow, from capture to screen to print, or you’ll lose those extra colours.
Image settings
When the camera processes your images to make a jpeg file it adjusts the colour, contrast and sharpness to what it thinks your picture should look like before saving it. If you find the camera’s choices not to your tastes you’ll usually have an option to adjust each of these parameters using sliders in the menu.
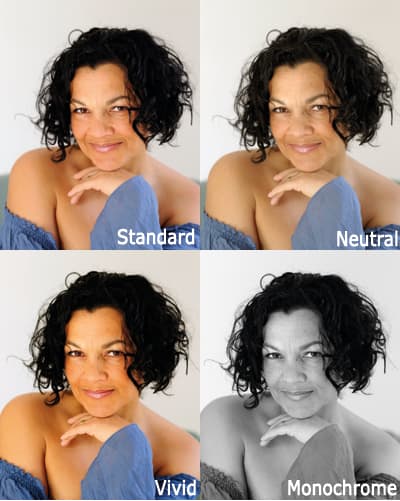
Picture styles
Most cameras offer a range of pre-set ‘looks’ for your picture that are applied in the processing. You’re likely to have natural, vivid and muted options, along with black & white and sepia options, and perhaps even a few more.
These are fine if you want to print directly from your camera and don’t want the fuss of having to use software such as Photoshop to create the effect afterwards, but offer the drawback that you can’t change the picture back afterwards – unless you also shoot a raw version, of course.

Image: Four images taken using different Picture Control settings on the Nikon D700. From top to bottom: Standard, Neutral, Vivid and Monochrome
Screen set-up
Ideally the LCD screen should show you a fairly accurate depiction of the picture you’re going to get, but if it doesn’t, you should be able to adjust the colour and contrast of the screen so that it more closely resembles your actual shots.
Card format
Having a media card corrupt on you after you’ve taken some never-to-be-repeated shots is a galling experience that’s best avoided.
The constant using-deleting- re-using can make a mess of the card’s careful internal filing system so to keep your card in tip-top shape it’s best to re-format it before every re-use. This performs a deep delete and tidy up, and formats the card for use with the camera you’re using.


