No matter how good modern digital imaging sensors are, they are still some way off being able to capture all the tones in a very high-contrast scene.
However, if you are faced with a scene that can’t be captured within the dynamic range of your camera’s sensor, there are a few things you can do to help. Some of these involve altering the light, while others are software tricks.
First up we show you some tricks for how to shoot high contrast landscapes.
High dynamic range images

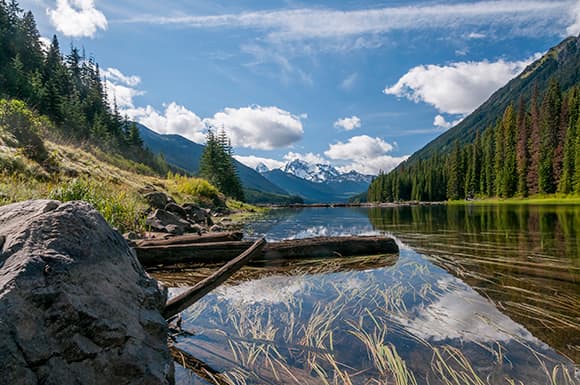
Using an HDR technique is a good option when photographing landscape scenes, but you have to be careful not to make the effect too strong
Uttering the term HDR can often lead to a raised eyebrow or two. Over the past few years HDR has received a bad press, mainly due to the flurry of images with a high local contrast, low overall contrast and high levels of saturation that have been unleashed on the internet.
In fact, HDR has a very practical use that extends the dynamic range of an image beyond what the camera’s sensor is capable of capturing. If done correctly, HDR images can help reveal detail in shadow areas and highlights that may have been witnessed at the scene but could not be captured in a single image.
For those unaware of how HDR images are created, the process is relatively straightforward. A series of images is taken of the same scene, but each has a different exposure. Usually there are at least three images: one that is a standard evaluative metered image; a second image that has been exposed to retain detail in highlight areas; and a third exposed to reveal detail in shadow areas. These exposures are then blended together, either in camera or using image-editing software.
As the camera doesn’t move between each shot, each pixel should now have highlights, midtones and shadow information, which allows for far greater adjustments to be made to the brightness and contrast of the image.
For best results, set the camera on a tripod and take a spot-metered reading from the highlight and shadow areas, and expose images for these. Next, calculate the midpoint between the second, different exposure and take a third image. However, many people simply set the exposure-bracketing mode on their camera to take a shot ±1 to 3EV above and below a standard 0EV evaluative metered exposure. After a while it becomes quite easy to look at a scene and judge the precise point at which you will need to set the exposure bracketing.
Nowadays, some cameras come witha built-in HDR mode, and they will even allow you to shoot without needing to be on a tripod, with the images being aligned and merged in the camera.
Graduated neutral density filters
Graduated neutral density filters, or ND grad filters as they are more commonly known, help even out the difference in brightness between the sky and the foreground in a landscape image. The filters have a neutral grey gradient across them, with the darkest edge of the gradient designed to be placed in front of the lens to darken the sky. ND grad filters come in different strengths, with the strength used based upon the brightness of the sky, and how dark you want it to be compared to the foreground in the final image.
Although they are available individually, it is best to buy a whole set of ND grads, as the exact filter that you will need to use depends entirely on the difference in brightness between the sky and foreground. However, if you can only buy a single filter, we would recommend one with a 1EV strength. A 1EV ND grad filter should just take the edge off any brightness in the sky, helping to retain more highlight detail without looking too over the top. The aim should be to create a natural-looking scene, and not one that looks as though it has been taken from a Sunday night TV car programme.
Reflectors and diffusers

With diffuser

Without diffuser
Quite possibly the simplest way that a photographer can even out the contrast in a scene is to use a reflector. Although there are specialist reflectors available, often the simplest reflector that can be used is a sheet of white card. When taking a portrait that is strongly backlit – for example, when shooting into the sun – use a reflector to bounce some of this light back onto the subject’s face. You can even ask the subject to hold the card themselves.

Diffuser set-up
Reflectors aren’t just for portraits, though. If you are taking pictures of flowers outside on a bright sunny day, then a carefully placed reflector can help brighten shadow areas, which can be a problem if shooting white flowers in the middle of summer.
When photographing indoors, still-life images can also benefit from the use of a reflector to add just a little more light into shadow areas.
Diffusers are another simple way to help reduce the level of contrast if you are shooting a portrait or still-life image. Simply place some diffusion material between the light source and the subject. This can be something as simple as a sheet of tracing paper folded in half, or a specially designed photographic diffuser. The end result will be the same. The hard direct light will be filtered and softened by the diffuser, creating softer shadows. The closer the diffusion material is to the subject from the light source, the softer the highlights and shadows will be, reducing the overall contrast.
Polarisers
Although the aim of a polariser is to reduce reflected light, and in turn make skies bluer and cut down on reflections in glass or water, polarisers also make skies darker. While it is not blue skies that generally create the highlights in a landscape image, a polariser does slightly reduce the brightness of any white fluffy clouds slightly, which will help retain a little more highlight detail.
Fill-in flash

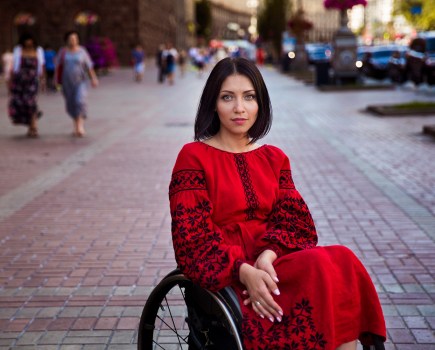
Here the image has been exposed to retain the detail and colour in the sky. However, the subject is too dark, so a touch of fill-in flash is needed to hel even out the subject and the sky
Fill-in flash is a great technique for shooting high-contrast portraits.
Using flash is another way to help even out the brightness of an image, particularly on a bright summer’s day when you may be trying to shoot a portrait. When using flash to help brighten a dark subject, there are two ways of approaching this.
The first method is to be sympathetic to the lighting of the scene, and just add the flash to fill in the face of the subject. Most cameras and flashguns have intelligent TTL flash metering systems that can easily calculate the required exposure to do this, but it is easy enough to set your flash to manual mode and a moderate setting of, say, 1/8th power and just add a touch of light to the subject. This will add enough light so the subject will be visible in a backlit scene.
The other method has a far stronger effect that aims to reduce the brightness ratio between the ambient light and flash light. In effect, what we are doing is underexposing the background and ambient light, and then using the flash to light the subject, which should even out a range of tones in the image.
First, switch the camera to aperture priority mode and set the aperture to f/8. Take an image using the standard evaluative meter reading and make a note of the required shutter speed. This should be below the fast flash sync speed of the camera. If the required shutter speed is faster than the flash sync speed, reduce the ISO sensitivity to as low as it will go on your camera, or use a slightly smaller aperture. The aim should be to reduce the exposure of the image so that the fastest flash sync speed – for example 1/250sec – produces an image that is underexposed by 1-2EV.
Once you have calculated the reduced exposure, switch the camera to manual exposure and use those exposure settings. Now set the flashgun to manual and its most powerful 1/1 setting. You should find that this flash output is bright enough to light the subject with the background being far darker than in the original image.
If the flash is too bright, reduce the power. If the brightness of the background needs altering, use the shutter speed. Increasing the exposure should have little effect on the main subject, as this will be lit by the flash. Reducing the shutter speed will darken the subject, and again, the light from the flash will be unaffected, so the brightness of the subject will remain the same. Just remember not to make the shutter speed faster than the flash sync speed of the camera.
Blending exposures
At first glance, blending exposures is very similar to shooting an HDR sequence. The starting point is to capture different exposures of the same scene – one that acts as a mid-range image, and two others that are correctly exposed to preserve highlight and shadow detail.
By putting each image into a different layer in Adobe Photoshop, you can use layer masks to reveal or obscure different areas of the image. For example, in a landscape image a darker shot can be used to reveal detail in the sky and it can be carefully blended with a shot to show the midtones. Careful masking can then be used to lighten any very dark shadow areas by revealing the lighter layer below.
Using software
Although creating HDR images requires specific software, such as Photomatix, or the specific HDR features found in Adobe Photoshop, there are ways that you can adjust the contrast of a raw image to reveal highlight and shadow detail that may otherwise look lost.
Raw-conversion software has improved greatly over the past few years, so it is worth revisiting older images to see if you can get more out of them than when you originally made the raw conversion.
In Lightroom 3 and 4, and Camera Raw 7 and 8, Adobe has created four specific sliders. These are grouped in pairs – Highlight and Shadows, and Black and White – and when combined, they help make the most of the complete tonal range of raw images. However, to get the most from these sliders, you may need to change your way of editing slightly.
To put it very simply, each of the sliders affects a different part of the image tone curve. The Black and White sliders affect the clipping points of the brightest and darkest parts of the image, effectively working over a very small range of tones to decide which should be black or white.
The highlights and shadows slider affects the tones either side of the midtones in the image. Using these can lighten dark shadows to reveal details, or darken highlights to reveal details in highlight areas. What working with these highlight and shadow sliders means is that rather than simply adjusting the brightness of the image, the exposure slider effectively becomes a midtone brightness control.

Original raw

1. Use the Exposure slider to brighten or darken the midtones. Remember that you are not trying to recover any bright or dark detail here, just concentrate on how the existing midtones look. In this example the exposure has been increased by 1EV to just lighten the midtones slightly.

2. The clouds in this image are on the verge of becoming pure white, so the white point has been darkened slightly to reduce the effect of the very brightest tones. Having done this, the Highlights slider is used to darken the other brighter tones. This has darkened the sky and provided more details in the clouds.

3. With the highlights now looking darker, the shadow areas can be adjusted by increasing the brightness of the Shadows slider quite significantly. Shadow detail can often be lacking in saturation and colour, so the Vibrancy slider has been used to add a bit more colour. This can be also be done as a local adjustment directly to the shadow area.

4. The final step is to adjust the black areas, as you want some black in the image so that it has a good level of contrast. By using the Black slider while holding down the Alt key, you can reduce or increase its strength until some black details are added. In fact, the Alt key can be used with any of these settings to see if highlights or shadows are clipping. Finally, make any refinements needed to tweak the finished image.

Edited raw