
What is infrared photography?
Colour, as we see it, is only a small part of the light spectrum. Ranging from violet to deep red it occupies wavelengths from around 380 nanometres (nm) to 750nm; shorter wavelengths become Ultraviolet, while longer wavelengths are Infrared (IR).
Although these extremities of light cannot be seen with a naked eye, they can be picked up by our camera’s sensor. For conventional photography this can be detrimental, and so manufacturers equip their sensors with UV and infrared filters, to protect against them. However, for creative uses, infrared light especially can produce some stunning effects.
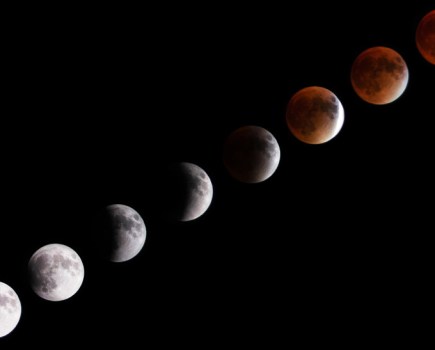
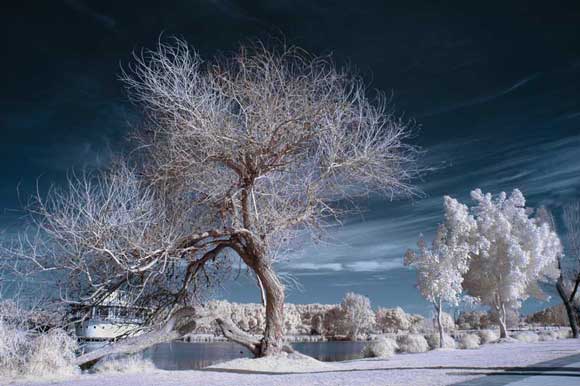
Infrared images are easily recognised by their radiant white trees and jet-black skies, either in black and white, or with strange colour casts. This is because objects respond differently to infrared light than they do to visible wavelengths: plants and trees reflect far more, making them appear to glow, while water and skies reflect very little. Traditionally infrared photography was a tricky business; infrared film was difficult to handle – easily fogged in daylight – and results were highly unpredictable but, thanks to the instant previews of digital cameras, the process is now much easier.
In this feature we show you how to achieve eerie results like these from your camera…
How to Shoot Infrared Photos
 Using an infrared filter vs converting your sensor
Even if you can see infrared light with your camera, without some additional preparation the chances are you won’t get very spectacular results. The common solution is to use an infrared filter on the front of your lens. These are very dark red in colour and block out all but the infrared light to your sensor. This causes one main problem for photographers, in that with the filter on you can’t see anything through the viewfinder. One solution to this is to compose first and add the filter at the last minute. Some specialist companies offer a service to convert your camera for infrared use. The sensor can be filtered to allow just IR or IR and visible light, while leaving you with a regular view through your viewfinder. This is not easily reversible though, so it’s best not to use your brand new model.
Choosing your subject
For the best results from infrared you should aim to include some foliage to give the trademark white glow. You don’t need bright sunlight – in fact a cloudy or overcast day can achieve the best results – but shooting in the summer provides more greenery and ensures there’s plenty of chlorophyll in the leaves. Try to contrast your greenery with something man-made: stonework looks good for mono images; or try some water and sky for darker colours.
Setting the white balance
Infrared light, by definition, has low colour temperature, so gives a very warm image. To counter this you need to make the necessary adjustments to the white balance. For natural results hold up a sheet of white paper (once the filter is on) and take a manual white balance reading. For more extreme results, however, try taking a reading from some green grass or from a blue sky.
Set to Raw with mono preview
Shooting in Raw format will not only allow you the best possible quality, but it will also give you the option to change the white balance during processing to fine-tune or accentuate the effect. If you are looking to achieve a mono infrared effect, select Raw+JPEG shooting and use your camera’s black & white or monochrome function (if it has one). This will allow you to get a better idea of the result on the back of your camera but still allow you to make the conversion during post-processing.
 Use LiveView/LCD
One of the main problems with using infrared filters on the front of your lens is that it renders the viewfinder virtually useless. If your camera has live view, however, this may still allow you to see your composition (though depending on how much light is coming through this may still be very dark) and allow you to fine-tune your shot before pressing the shutter. Alternatively you can just use your monitor to review the shots after you’ve taken them – and if your camera is mounted on a tripod you can then adjust as needed for the next shot.
Focusing
Due to the longer wavelength of infrared light, focusing may need to be adjusted in order to achieve sharp results. Cameras that are professionally converted for infrared will also have their focusing adjusted so you can still use the autofocus as normal. Alternatively, choose a wider aperture for increased depth of field and manually decrease your focus distance slightly.
Shoot in Manual
Depending on the light conditions you may need to adjust your exposure a lot from the camera’s metering, so switch to manual mode.
How to Shoot Infrared Photos – Before You Go
How to Check Your Camera for Infrared Filters
The chances are your camera will have some form of infrared protection on its sensor, but depending on the model it should still let some infrared light through. The easiest way to check is using your standard TV remote control. Almost every remote uses infrared to send signals back to the device, so by pointing it at your camera and pressing the buttons you can check if your camera can see it. If your camera has live view or you’re using a compact, simply watch the screen on the back and look for a red dot on the end of your remote. Otherwise, sit your camera on a tripod and take a picture while pointing and pressing the remote towards the camera.
Try doing this in a darkened room for the best results – you may need to ramp up your ISO or use a slow shutter speed. If you can see a red dot, your camera can see infrared light, and you’re good to go.
 Removing the filter
Sigma’s SD14 has a removable infrared and dust blocking filter mounted right behind the lens mount. Simply remove the lens and push the filter up to release. Most other cameras need professional conversions to remove this filter.
Have your camera converted
If you’re serious about infrared and want to take more than the odd snap, you can always have your camera specially adapted to see more infrared light. ACS is currently the only company in the UK offering a service to convert your camera for infrared use. Starting from just £290, the sensor can be filtered to allow just IR or IR and visible light using a clear Quartz filter. With the infrared filter on your sensor rather than the lens, you can then continue to use your viewfinder as normal, and exposure times remain short enough to handhold. This process means your camera will then only take infrared shots but if you have an old DSLR that you no longer use, sat in your draw at home, this could give it a new lease of life. For more information contact: www.advancedcameraservices.co.uk or phone 01953 889 324.
Dedicated IR cameras
Not all cameras have been designed to resist infrared light. These three models (right) have been specially designed to include the longer wavelengths for specialist use such as astronomy and forensic work, making them ideal for IR fans. They all still allow visible light through, though, so you would still need to use an IR filter for true infrared results.
Test your camera
Can your camera see infrared light? Try the remote control test (see facing page), and for best results consider having an old camera converted or use the Sigma SD14.
Get an IR Filter
To block out all visible light from your sensor, for true infrared results (unless your camera has been converted) you’ll need an IR filter over your lens – see next page.
Set white balance
If you want your plant life to glow white in your image, set a manual white balance value before you start shooting by pointing at some green grass with the filter on.
How to Shoot Infrared Photos – Adjusting and Creating Infrared Images
Adjust Infrared in software
All digital infrared images will need a little bit of a tweak in editing software to give an effective result. Apart from adjustments to the white balance, images will normally need a boost in contrast which is best done using the Levels palette.
To achieve a mono infrared, convert to black & white by desaturating the image and then adding contrast (see steps below), or a dedicated black & white conversion mode, as features in recent versions of Photoshop CS and Elements. If you want to keep your image in colour it can help to add some extra saturation to your colours, and some more contrast for an extra punch. For more surreal colours you can use the Channel Mixer in Photoshop and swap the Red and Blue channels by setting the Blue channel to 100% Red, and the Red channel to 100% Blue.
Achieving colour results that you’re happy with can take time, and lots of experimentation with settings. There’s no right answer, and don’t be afraid to make mistakes – make notes though, as you may stumble on success.
Step One