Medium format film cameras are gaining in popularity again thanks to their improved image quality and a unique look, but there are a few things to know before you consider giving it a try, says Damien Demolder
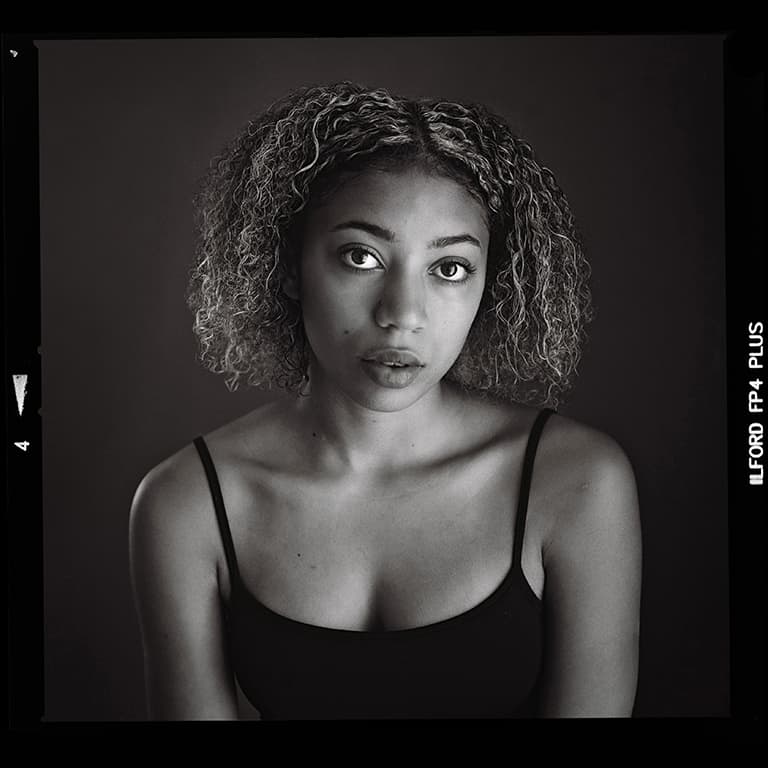
AP Editor Nigel Atherton shot this portrait of model Amelie Hurley (@ameliehurley) using a Hasselblad 500C/M and Ilford FP4 Plus film from Analogue Wonderland. It was lit using natural light with a Lastolite TriFlector. The ’blad was the pro workhorse of choice for decades, and is still probably the most desirable medium format film camera, due to the exceptional build and image quality. Consequently they tend to fetch £1,500 to £2,000 for a good-condition example with a waist-level finder and 80mm lens. Thanks to Derrick Bradfield (DerrickBradfieldPhotography.com) for the loan. Hasselblad 500C/M, 80mm lens, 1/60sec, f/5.6, Ilford FP4 Plus
There’s something magical about shooting with a medium format camera, and it isn’t just the experience of holding and using it. What’s really special is the way the images can look, not only the enhanced detail benefits of the larger recording area, but also the shallower depth-of-field when you want it and the delightful rendering of transitions from in-focus to out-of-focus areas.
Medium format cameras used to be the preserve of ‘serious’ amateurs and professionals, and owning an outfit elevated you above your fellows. These days though medium format film cameras are relatively cheap and getting into a system is much easier than it was, and while all medium format film cameras will now be second-hand there is a massive choice of models and formats to choose from.
Here I hope to offer a little guidance around making your choice and then using the camera. Also, if you want to try medium format digital instead of film, you can check out our guide to the best second-hand digital medium format cameras.
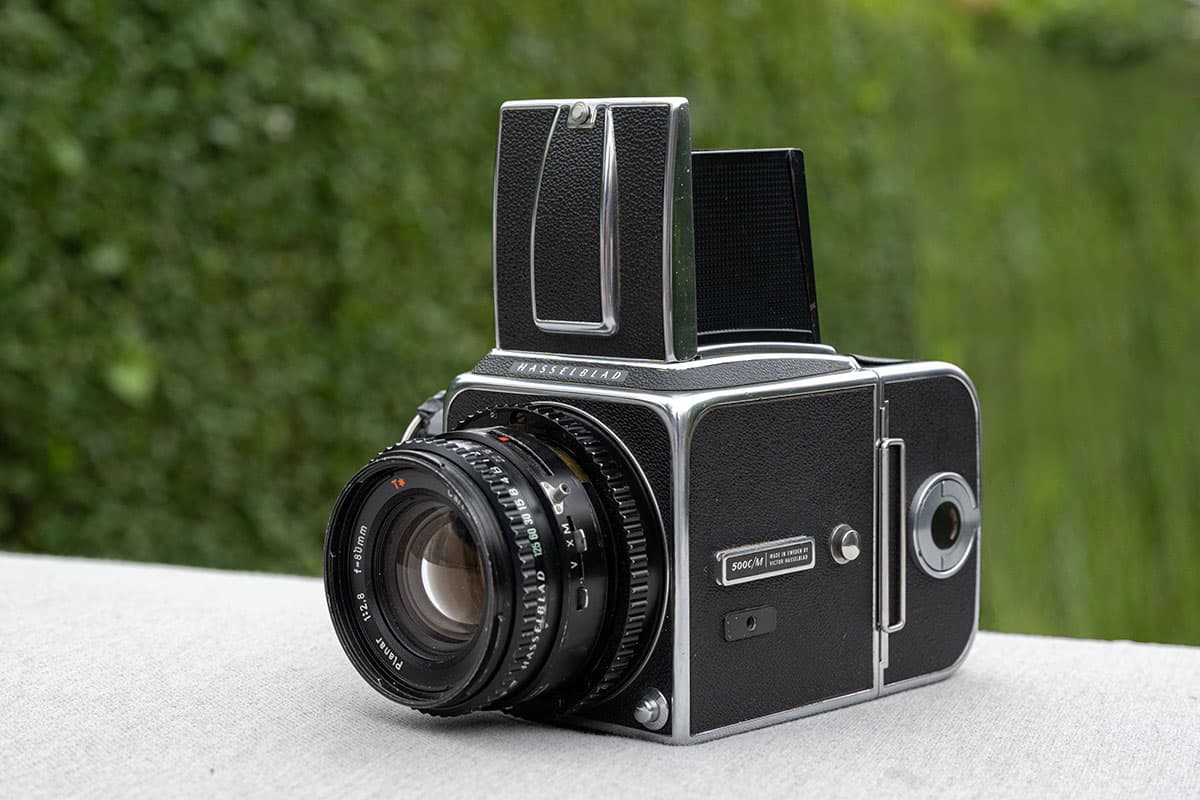
The classic Hasselblad 500C/M medium format camera. See our video guide to using it at here
Aspect ratios
We talk about medium format as though it was just one thing, but while almost all 35mm film pictures are the same shape, those shot on medium format film can be one of many different ‘formats’.
While the only film commonly available these days is 120 there are a number of different shaped frames that can be recorded on it. The smallest in general use is 6×4.5cm. This size allows us to squeeze 15 or 16 pictures on a roll – depending on the camera – while the most famous perhaps is the 6x6cm square recorded by Hasselblad cameras and most Twin Lens Reflex (TLR) models.
When you shoot 6x6cm you get 12 pictures per roll as each frame takes up a little more space than 6×4.5cm frames do, while 6x7cm cameras give us 10 pictures per roll, but a very nice-sized negative. There are also 6x8cm and 6x9cm cameras that each takes a little more emulsion to create even bigger frames.
The cameras mentioned so far mostly produce a regular rectangular format image with aspect ratios of 4:3, 1:1 or 3:2 – shapes that we recognise from 35mm film, full-frame sensors as well as APS-C and Micro Four Thirds models. Beyond this though, we have long, stretched formats that offer panoramic images such as 6×12 and 6×17.
The issues that govern our choices when deciding which format to go for are of economy, the aspect ratio you like and the size of the system you are prepared to work with. Generally the cameras that shoot the largest negatives are bigger themselves, though there are many non-interchangeable lens medium format cameras that aren’t big and yet shoot 6×8/6x9cm images – such as the Ensign Selfix 820.
Interchangeable lens SLR systems tend to be larger but give us more choice when it comes to focal lengths. They also tend to be a little more modern, and offer more functions and features.
A 6x9cm frame from the Ensign Selfix 820. Older lenses often provide a lovely softness that helps to create atmospheric images
Modern-vintage or vintage-vintage?
While it is the Hasselblads and Mamiyas that get all the attention in medium format land there are plenty of other brands to look at, and plenty of fixed-lens older cameras that will give you all you need for your photography. In my recent series of interviews with film photographers for this magazine, I’ve noted that most medium format shooters stick with a standard lens for their camera no matter what they are shooting, so being ‘stuck’ with a camera that has ‘only’ one lens mightn’t be as restrictive as it seems at first.
Old folding 120 cameras are often fitted with the standard lens for their format, and they tend to be cheap, easy to use and pretty cool to look at. Folders of course don’t all allow us to look through the lens, so we have to be careful when framing things close to the camera using a separate viewfinder, and focusing may not be coupled to the finder – so a tape measure or a good guess may be required.
Cameras with coupled viewfinders or direct through-the-lens viewing are easier to use, but you will pay more for them. When you aren’t sure of your focus you can just close the aperture a little to ensure your depth of field covers your inaccuracy, though of course this somewhat restricts certain areas of our creativity.
If you can live with this, you can get an old folder with a very nice lens for well under £100.
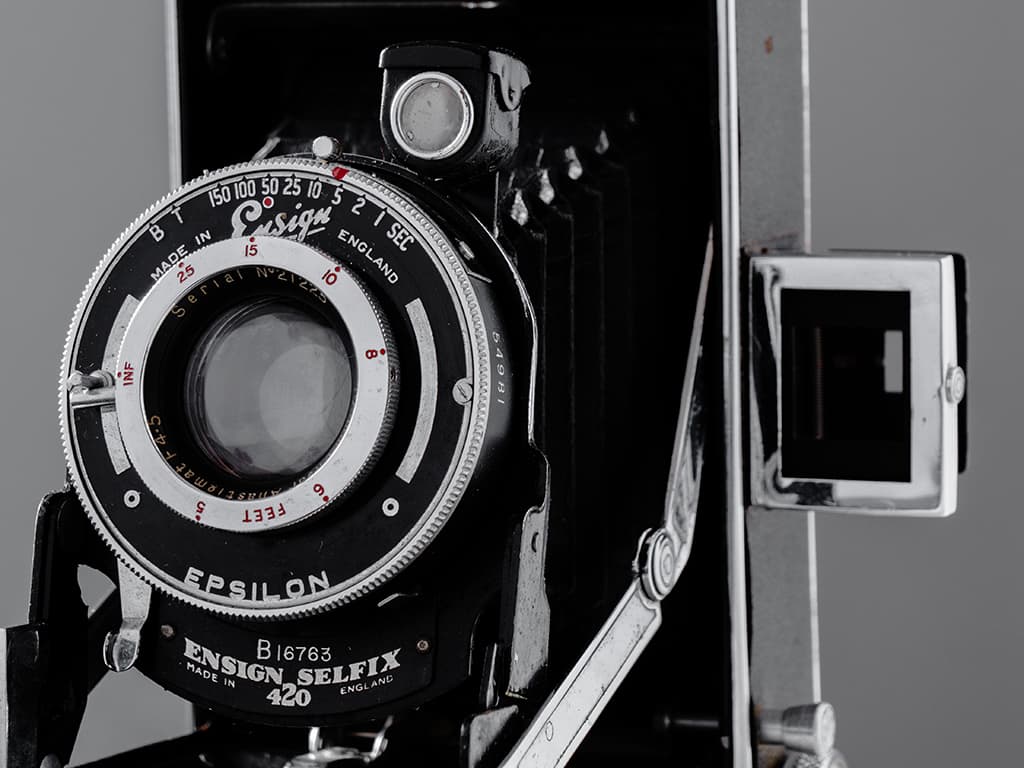
The Ensign Selfix 420 is a pretty basic camera that comes with a 110mm lens for shooting on 6x6cm and 6x9cm negatives. Focusing is done with a tape measure or by guesswork, and composition via a primitive waist-level finder or the ‘Spitfire’ framing sights on top of the body. A decent example will cost around £45
Depth of field
One of the great things about medium format cameras is that it’s really easy to create a shallow depth of field that directs the viewer’s attention straight to the part of the image you want people to see first. Conversely of course this also means it is also much more difficult to get a shot where everything front-to-back is sharp – such as for landscapes or architecture.
The depth-of-field characteristics of your camera system will depend on the size of image it produces – a standard lens on a 6×4.5cm system will produce more depth of field than a 6x9cm using a standard lens and the same aperture. We should also understand that the ‘standard’ lens for these systems will be different as the diagonal of the film frame they create is different.
The standard lens for a 6×4.5cm camera will be a 75/80mm, while that for a 6x6cm camera will be 80mm, and for a 6x7cm camera system it is 90mm. For a 6x8cm system you’ll need a 100mm and for 6x9cm you need 105mm.
As you know, creating extensive depth of field with a longer lens is more difficult and requires a smaller aperture – so be prepared. This is one of the reasons larger formats need a tripod more often than smaller formats – as the smaller apertures required for more depth-of-field also need longer shutter speeds when faster film isn’t available.
You also won’t find image stabilisation systems on medium format film cameras. You should also not be alarmed that lenses for medium format cameras don’t have maximum apertures of f/1.8, as those designed for 35mm cameras often do. In medium format expect f/2.8 at best, and more often f/3.5 or f/4.
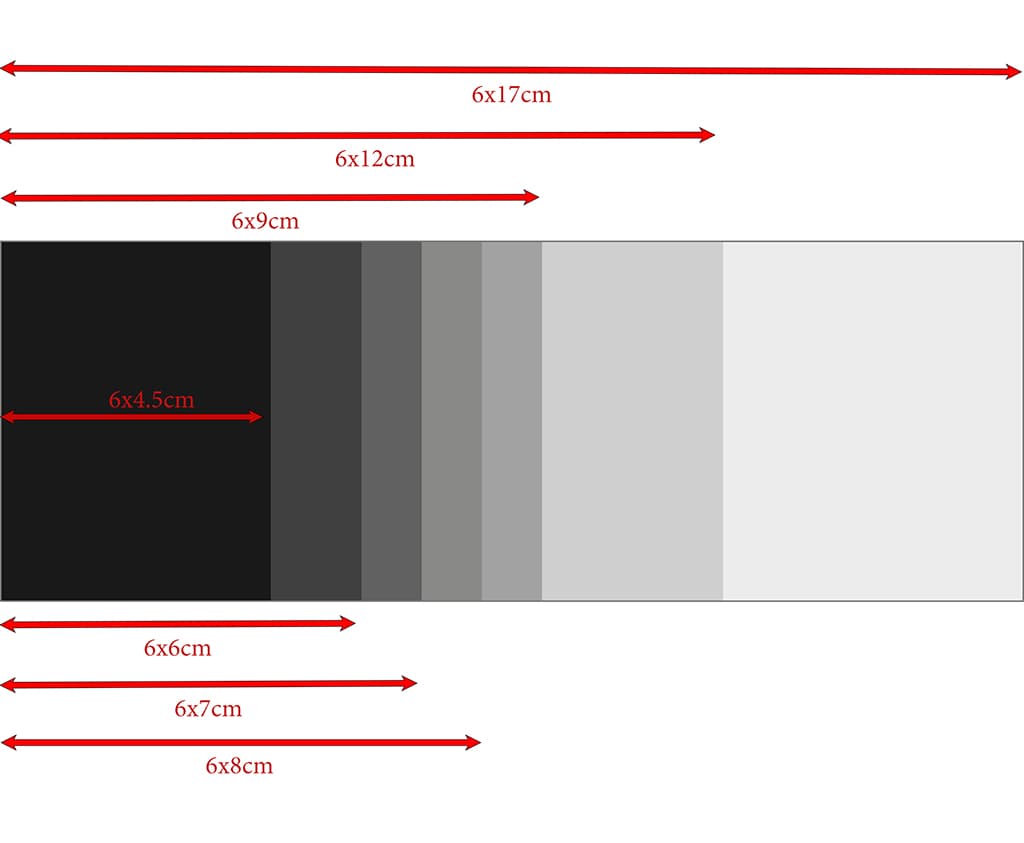
Common image formats on 120 film, and the relative amount of space they occupy on the roll
Manual focus vs slow focus
It’s also worth remembering that most medium-format cameras do not offer autofocus facilities. This may not be a big deal to some photographers, but others may be surprised or slightly put off. Photographers managed to shoot fantastic pictures before the advent of AF so it should be no barrier to success, and with a little practice focusing manually becomes second nature.

This double exposure was intentional, but many older models don’t have double exposure protection
It will make operation somewhat slower than when using a camera with AF, but not always and being forced to pay attention to where the focus will be isn’t such a bad thing. Focusing manually with no rangefinder, coupled viewfinder or direct through-the-lens viewing can be trickier, as we must get used to estimating distance and following the focus scale on the lens, but again time makes this easier – though it’s rarely ideal for moving subjects.

The 6×4.5cm format is an ideal step up from 35mm, offering lots of benefits without the bulk. Mamiya 645J, 80mm f/2.8 Sekor
Some medium format cameras do offer automatic focusing, such as some of the Mamiya 645 range, the Contax 645, the Rollei 6008AF and Hasselblad H series, among a few others. Although these cameras do indeed offer AF, do not expect the same sort of service you get from your 35mm cameras even if they are of the same vintage. Even modern digital medium format cameras don’t offer lightning-fast AF, and some of these are definitely slow.
Viewfinders and waist-level finders
Different medium format camera systems offer different methods for framing up what you are about to shoot, and each provides a unique experience of its own that you may or may not get on with. The most commonly used viewing method for interchangeable lens system cameras is the waist-level finder or ‘WLF’ that provides a top-down view of what the lens sees.
The image passes through the lens and is directed to a ground-glass screen, which we view by looking down a chimney-type structure on the top of the camera. A pop-up magnifying glass may be provided for fine-focusing.
A very simple line-it-up type framing guide, used by many older and cheaper cameras. They can be surprisingly accurate though, and quick to use
Sometimes these can be removed and replaced with a prism finder that allows us to look through the lens while looking in the same direction as the lens – just as we do with regular SLR cameras. Other models offer a plain viewfinder that simply help us frame the image, while others have a viewfinder that contains a coupled rangefinder that helps us to frame as well as focus.
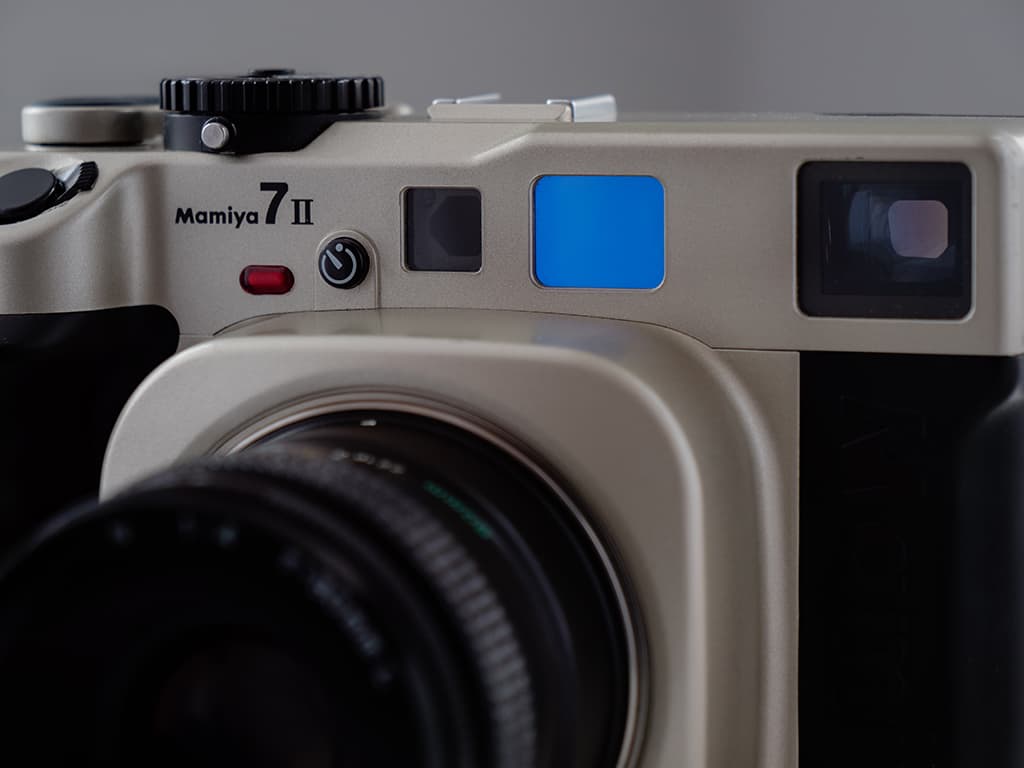
The Mamiya 7 and 7ll cameras offer rangefinder focusing, so we can compose and focus in the same viewfinder. As what we see in the viewfinder isn’t coming directly from the lens, as it does in an SLR system, there is often a slight difference in framing when shooting close-up – though the Mamiya offers a shifting frame to compensate
Pros and cons of viewing methods
Waist-level finder
Pros
See the whole composition in one glance
Easy to shoot from lower angles
Cons View is usually laterally reversed (left appears right)
Magnifier needed to focus Hard to shoot from high angles
Can make upright compositions difficult.
Prism finder
Pros Allows us to see the image clearly Image will be the right way round
Often have metering options
Cons Adds weight to the camera Adds cost to the system
Separate viewfinder
Pros
Tend to be bright
Lightweight
Cons
View can be different to what is captured
Only rangefinder models have focusing information
View can be partially blocked by the lens
Loading film
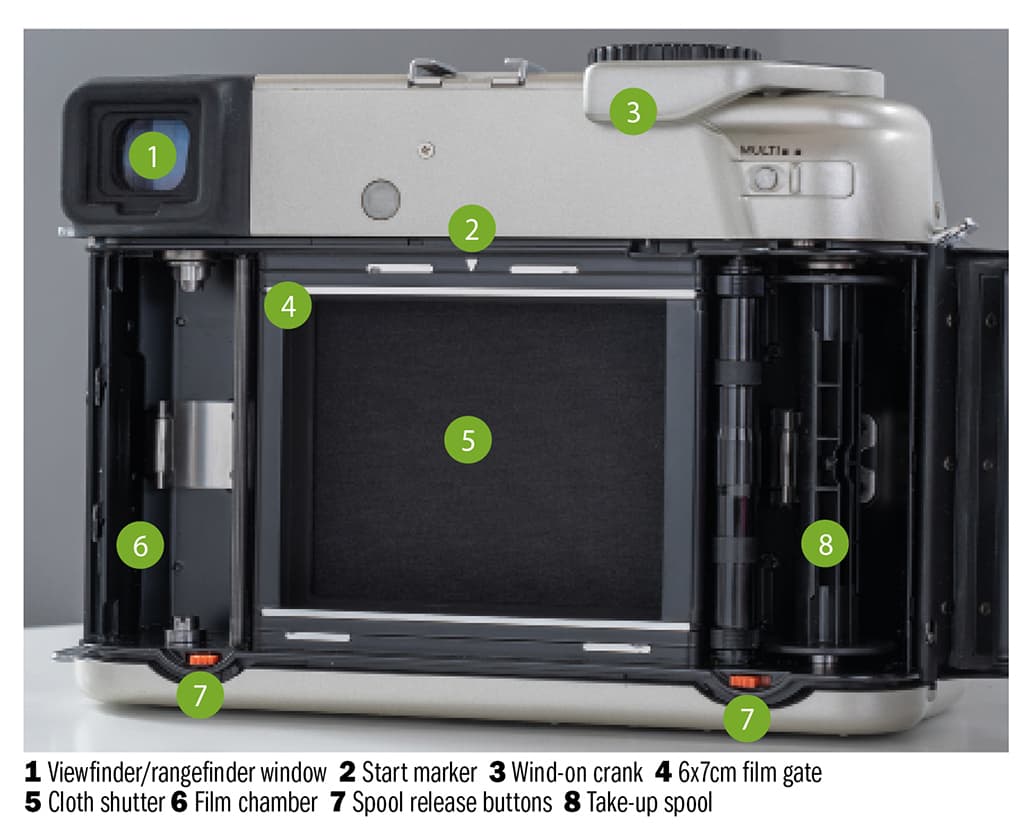
Into the camera
The only film commonly available today is 120, which is fine as it was always the most popular format and offers the greatest choice of cameras. The film got its name as it was the 20th of Kodak’s daylight loading roll films, and comes attached to a 1520mm length of backing paper to protect it from fogging in the light.
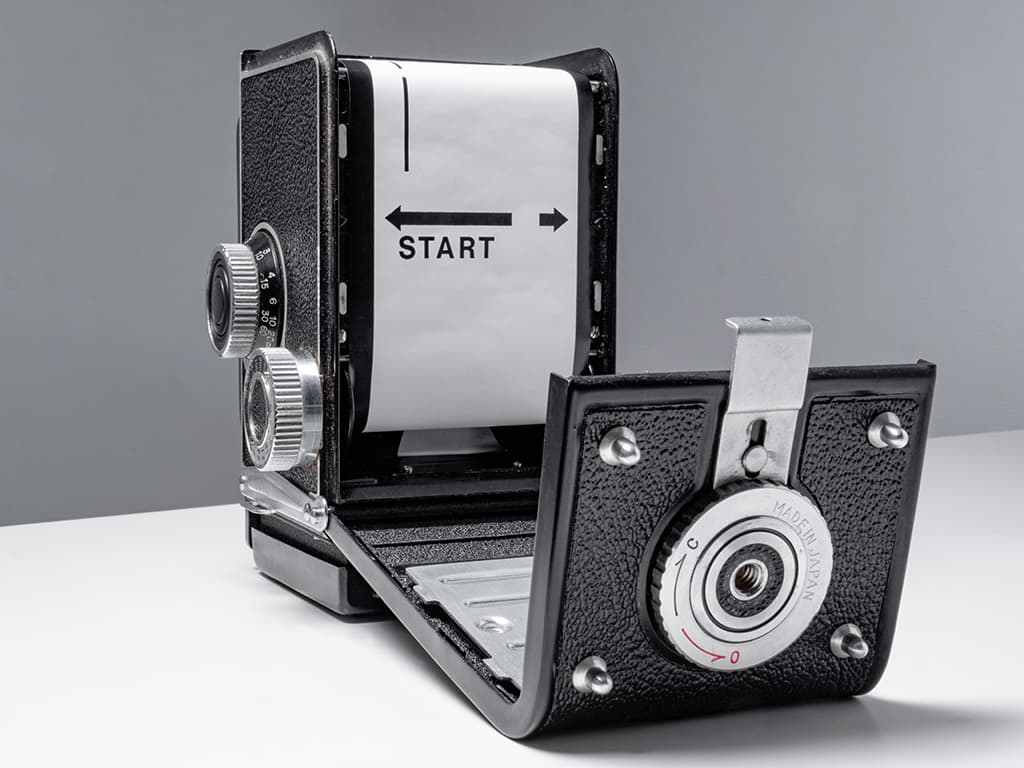
The film’s spool is loaded into one side of the camera and the paper leader is pulled across the film gate and slotted through an empty spool in the other side of the camera. We then wind the paper on for 230mm until an arrow appears on the paper that we line-up with a marker inside the camera. Shut the back of the camera and wind on until the number 1 appears in the red window on the back of the camera.
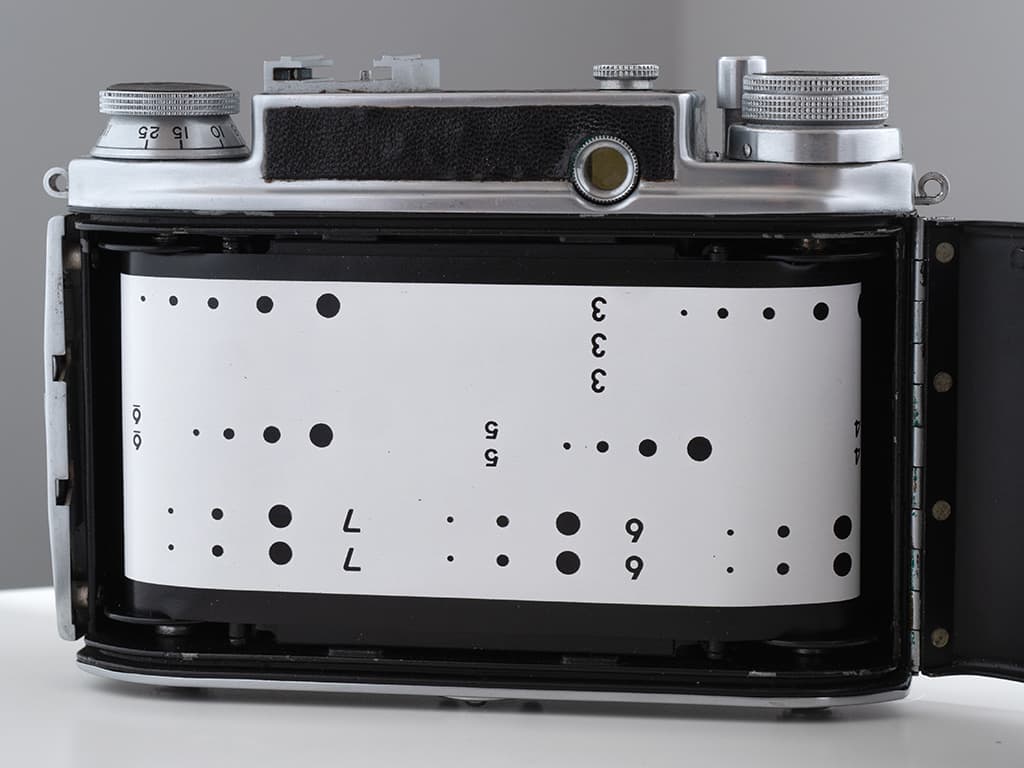
The backing paper of a now-fogged roll of 120 film, show the markings that appear in the windows of different format cameras. The numbers are at differing heights to suit the specified window of each format, so 6×4.5cm users will only see the markings designed for that system. The sequences of growing dots indicates that a number is about to appear in the window to prevent us winding on too far
The backing paper of 120 film has markings in different places to indicate the correct position for all the regular formats. Your camera will have a red window positioned at a specific height to show the markings that relate to the format of your camera.
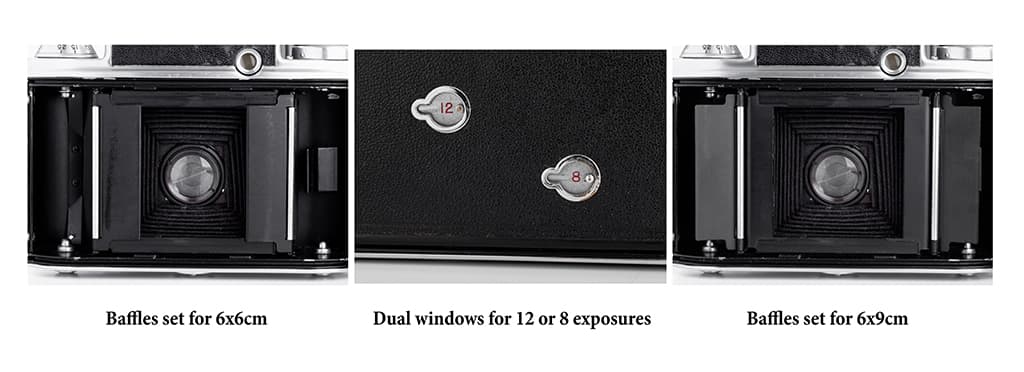
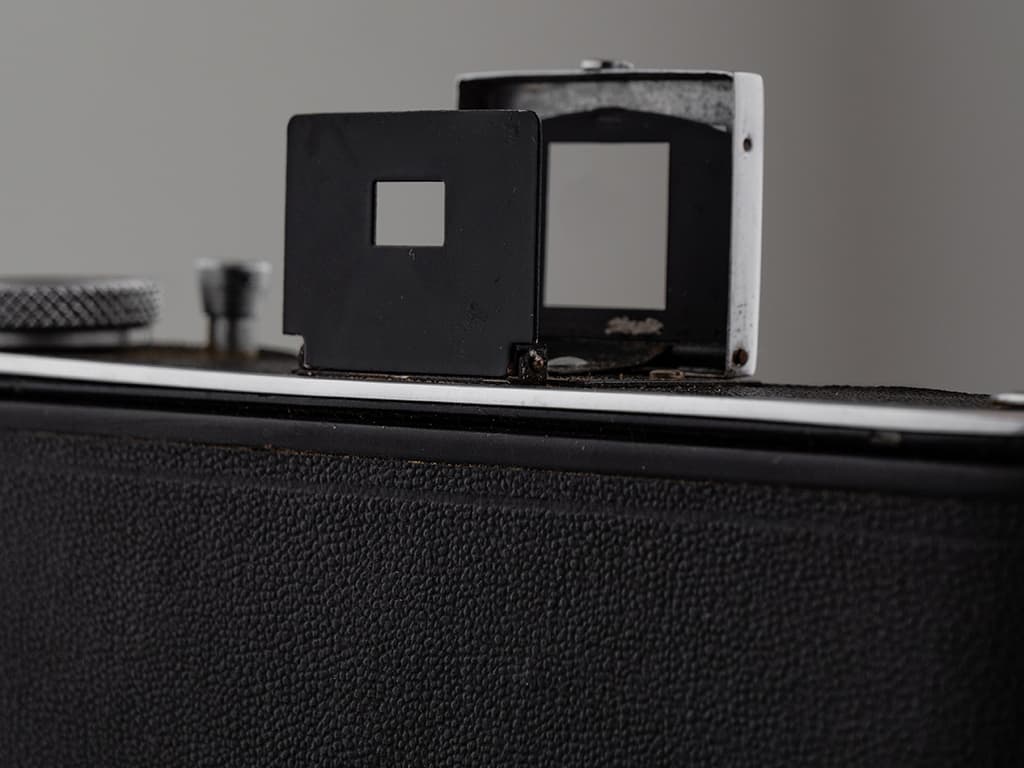
Markings for 6×4.5cm cameras are positioned lower down the paper than those for 6x7cm, for example, so that only the numbers relevant to your camera’s format will be displayed. Cameras that are capable of shooting in more than one format will have red windows in the back for each of the formats offered. The Ensign Commando, for example, has internal baffles that can be adjusted to make it shoot 6x6cm or 6x9cm images, and consequently it has a pair of red windows in its back. See above.
Some twin-lens-reflex cameras have to be flipped upside-down to be loaded, depending on whether the hinge for the back is at the top or the bottom of the body
Into a film insert
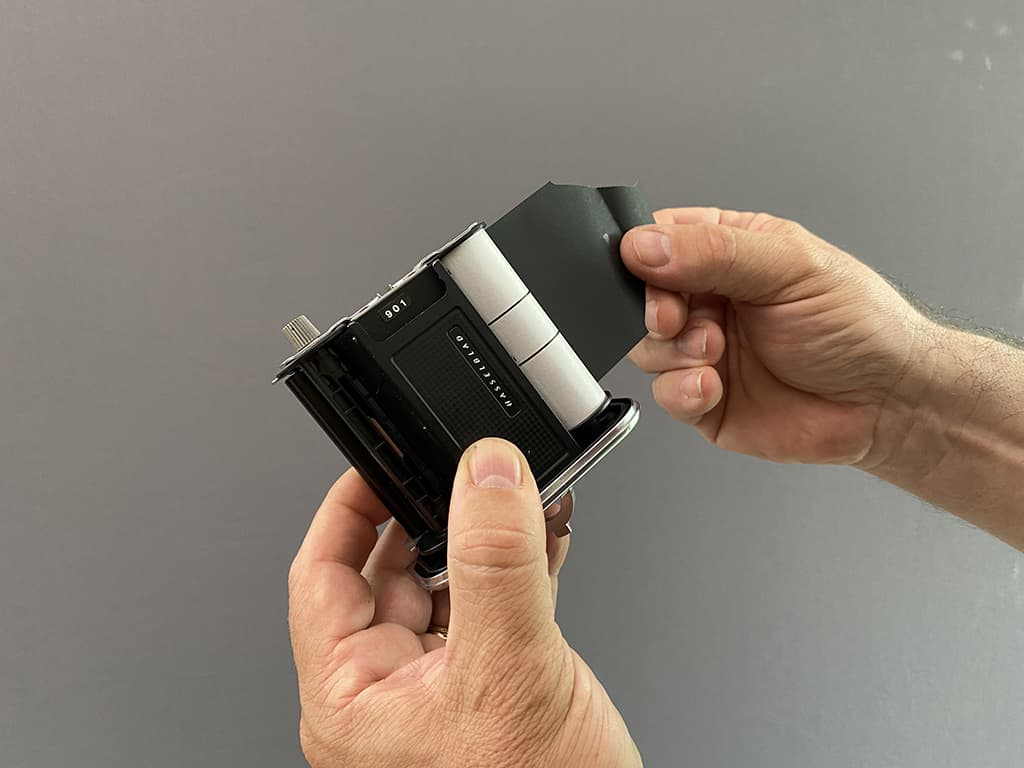
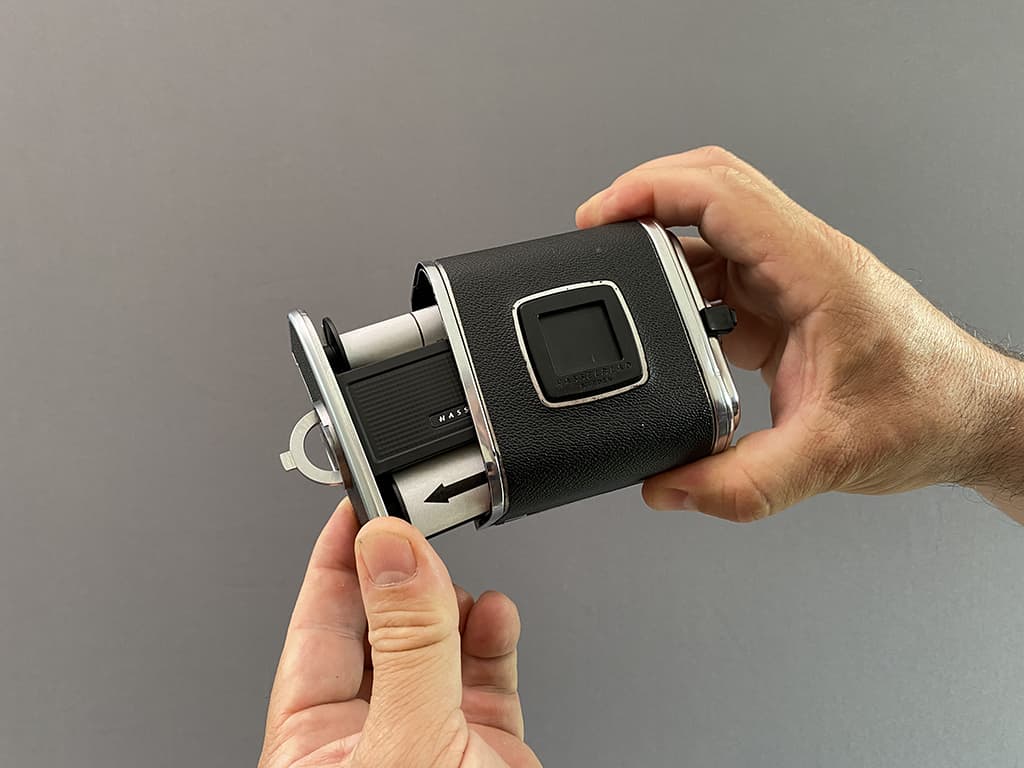
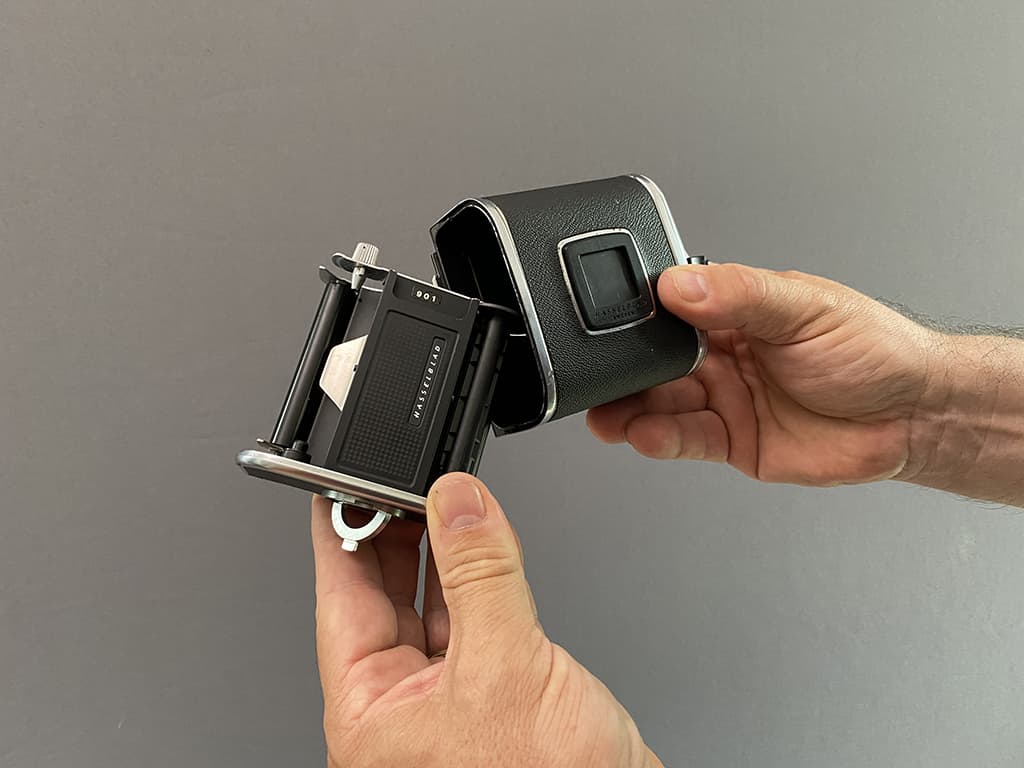
Some cameras, such as Hasselblad V, Mamiya RB/RZ and Bronica SLR models have interchangeable backs that allow users to have spare film loaded ready for when the current roll runs out. Others, such as the Pentax 645 models, have a fixed back but interchangeable inserts, but the principle is the same because the spare backs themselves have inserts that take the film.
Loading an insert is a little different from loading film directly into the camera as the paper has to be wrapped around the insert with the black side showing, but the paper is still rolled until the arrow meets the marker before being slotted into the camera’s back and wound-on to the first frame.
Further reading
Medium format film masterclass